background image

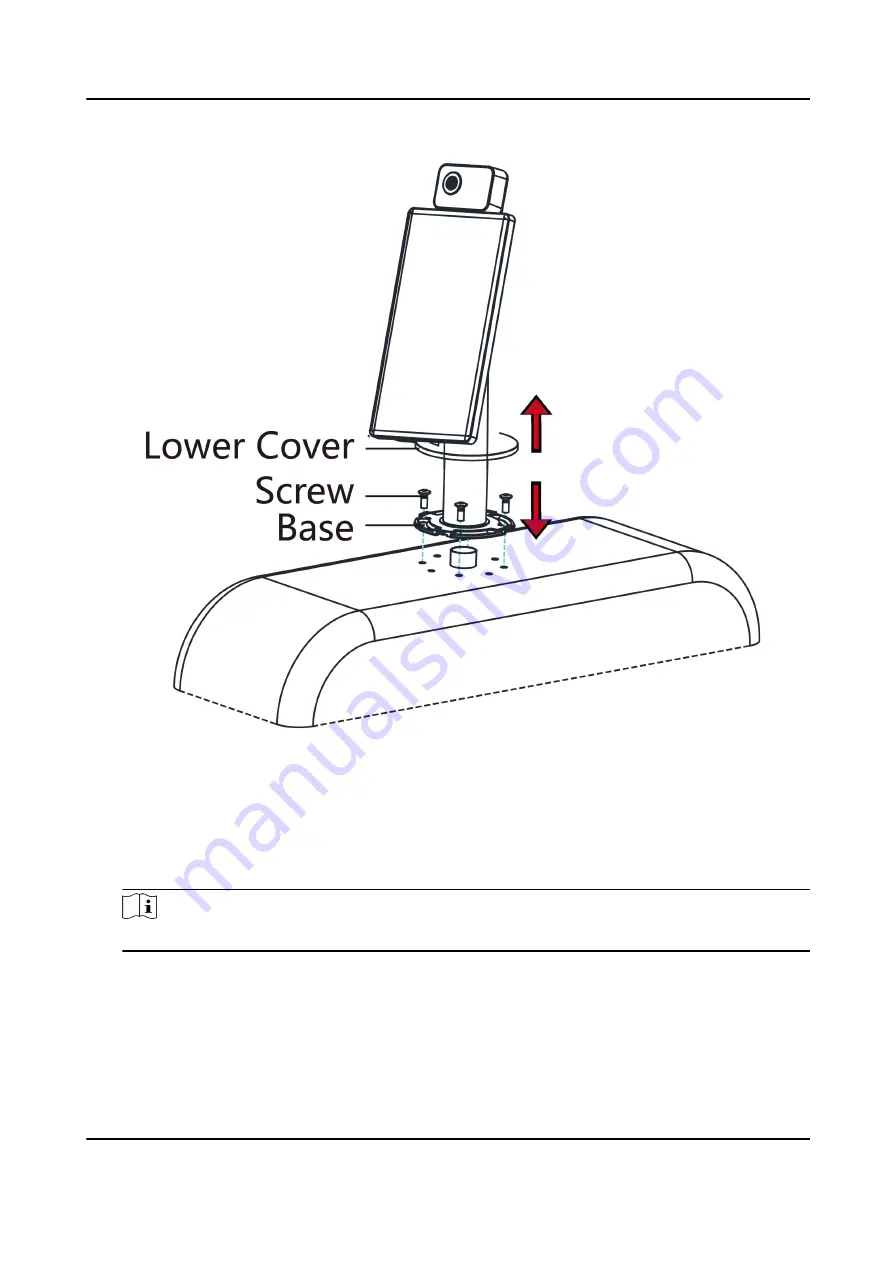
Figure 3-3 Secure Bracket and Turnstile

5. Install the lower cover back on the base and rotate to secure.
6. Adjust the device elevation.

1) Loosen the screws inside.

2) Adjust the device elevation.

3) After adjustment, secure the screws and install the upper cover.

Note

The default elevation angle is 15°. The adjustable elevation angle is from 0° to 15°.

DS-K5671-3XF Series Face Recognition Terminal User Manual

8

Summary of Contents for DS-K5671-3XF Series

Page 1: ...DS K5671 3XF Series Face Recognition Terminal User Manual...

Page 2: ...AT YOUR OWN RISK IN NO EVENT WILL HIKVISION BE LIABLE TO YOU FOR ANY SPECIAL CONSEQUENTIAL INCIDENTAL OR INDIRECT DAMAGES INCLUDING AMONG OTHERS DAMAGES FOR LOSS OF BUSINESS PROFITS BUSINESS INTERRUPT...

Page 3: ...esign principles For example for device with facial recognition features biometrics data is stored in your device with encryption method for fingerprint device only fingerprint template will be saved...

Page 4: ...ill or could result in death or serious injury Caution Indicates a potentially hazardous situation which if not avoided could result in equipment damage data loss performance degradation or unexpected...

Page 5: ...e determined by turning the equipment off and on the user is encouraged to try to correct the interference by one or more of the following measures Reorient or relocate the receiving antenna Increase...

Page 6: ...dard s Operation is subject to the following two conditions 1 this device may not cause interference and 2 this device must accept any interference including interference that may cause undesired oper...

Page 7: ...r heat or fire hazard Please make sure that the power has been disconnected before you wire install or dismantle the device When the product is installed on wall or ceiling the device shall be firmly...

Page 8: ...rface coating of the device cover Please use a soft and dry cloth when clean inside and outside surfaces of the device cover do not use alkaline detergents Please keep all wrappers after unpack them f...

Page 9: ...upplies listed in the user instructions Model Manufacturer Standard C2000IC12 0 24P DE MOSO Power Supply Technology Co Ltd CEE C2000IC12 0 24P GB MOSO Power Supply Technology Co Ltd BS KPL 040F VI Cha...

Page 10: ...0 4 2 Wire Normal Device 13 4 3 Wire Secure Door Control Unit 14 Chapter 5 Activation 15 5 1 Activate via Device 15 5 2 Activate via SADP 17 5 3 Activate Device via Client Software 18 5 4 Activate via...

Page 11: ...42 7 4 Temperature Measurement Settings 43 7 5 Data Management 45 7 5 1 Delete Data 45 7 5 2 Import Data 45 7 5 3 Export Data 46 7 6 Identity Authentication 47 7 6 1 Authenticate via Single Credentia...

Page 12: ...son Management 68 8 4 Search Event 69 8 5 Configuration 69 8 5 1 Set Local Parameters 69 8 5 2 View Device Information 70 8 5 3 Set Time 70 8 5 4 Set DST 71 8 5 5 View Open Source Software License 72...

Page 13: ...105 9 2 Device Management 105 9 2 1 Add Device 106 9 2 2 Reset Device Password 108 9 2 3 Manage Added Devices 109 9 3 Group Management 110 9 3 1 Add Group 110 9 3 2 Import Resources to Group 110 9 4...

Page 14: ...ice Parameters 128 9 8 Door Control 131 9 8 1 Control Door Status 131 9 8 2 Check Real Time Access Records 132 Appendix A Tips When Collecting Comparing Face Picture 135 Appendix B Tips for Installati...

Page 15: ...wear a mask the device will prompt a voice reminder At the same time the authentication or attendance is valid Forced mask wearing alert If the recognizing face does not wear a mask the device will p...

Page 16: ...Supports 6 attendance status including check in check out break in break out overtime in overtime out Audio prompt for authentication result DS K5671 3XF Series Face Recognition Terminal User Manual 2...

Page 17: ...on of the face recognition terminal Figure 2 1 Face Recognition Terminal Diagram Table 2 1 Description of Face Recognition Terminal No Name 1 USB Interface 2 IR Light 3 Thermographic Module 4 White Li...

Page 18: ...No Name 6 Camera 7 Touch Screen DS K5671 3XF Series Face Recognition Terminal User Manual 4...

Page 19: ...sweat will take the heat away which may affect the measurement result Air Conditioner Cool Air If the indoor temperature is low the surface temperature may also lower than the actual temperature which...

Page 20: ...ng Figure 3 1 Drill Holes on Turnstile 3 Solder the other four holes polish the surface and implement wire drawing 4 Solder circular tubes on the turnstile s inner surface to avoid water from entering...

Page 21: ...er 2 Route the cables through the cable hole on the turnstile 3 Align the holes on the base with those on the turnstile and place the device with bracket on the turnstile 4 Use 4 screws to secure the...

Page 22: ...re 6 Adjust the device elevation 1 Loosen the screws inside 2 Adjust the device elevation 3 After adjustment secure the screws and install the upper cover Note The default elevation angle is 15 The ad...

Page 23: ...5 Adjust Elevation 7 After installation for the proper use of the device outdoor use stick the protection film parts of models supplied on the screen DS K5671 3XF Series Face Recognition Terminal User...

Page 24: ...ntroller and the access controller can judge whether to open the door or not Note If cable size is 18 AWG you should use a 12 V power supply And the distance between the power supply and the device sh...

Page 25: ...Figure 4 1 Terminal Diagram The descriptions of the terminals are as follows DS K5671 3XF Series Face Recognition Terminal User Manual 11...

Page 26: ...iring B5 Yellow Brown COM B6 Yellow Red NO Group C C1 RS 485 Yellow 485 RS 485 Wiring C2 Blue 485 C3 Black GND Ground C4 Wiegand Green W0 Wiegand Wiring 0 C5 White W1 Wiegand Wiring 1 C6 Brown WG_OK W...

Page 27: ...on to Input to connect to a Wiegand card reader If connects to an access controller you should set the Wiegand direction to Output to transmit authentication information to the access controller For d...

Page 28: ...s 2 power supply with surge protected function 4 3 Wire Secure Door Control Unit You can connect the terminal with the secure door control unit The wiring diagram is as follows Figure 4 3 Secure Door...

Page 29: ...orted The default values of the device are as follows The default IP address 192 0 0 64 The default port No 8000 The default user name admin 5 1 Activate via Device If the device is not activated you...

Page 30: ...password strength of the device can be automatically checked We highly recommend you change the password of your own choosing using a minimum of 8 characters including at least DS K5671 3XF Series Fa...

Page 31: ...e device parameters you should set administrator For details see Add Administrator 5 2 Activate via SADP SADP is a tool to detect activate and modify the IP address of the device over the LAN Before Y...

Page 32: ...fy to activate your IP address modification 5 3 Activate Device via Client Software For some devices you are required to create the password to activate them before they can be added to the software a...

Page 33: ...he device 5 4 Activate via Web Browser You can activate the device via the web browser Steps 1 Enter the device default IP address 192 0 0 64 in the address bar of the web browser and press Enter Note...

Page 34: ...t a language for the device system By default the system language is English 6 2 Set Application Mode After activating the device you should select an application mode for better device application St...

Page 35: ...Figure 6 1 Welcome Page 2 Tap OK to save DS K5671 3XF Series Face Recognition Terminal User Manual 21...

Page 36: ...xt the system will select Indoor by default If you activate the device via other tools remotely the system will select Indoor as the application mode by default 6 3 Set Network Parameters After activa...

Page 37: ...t Wired Network Note Make sure the device has connected to a network If enable DHCP the system will assign the IP address and other parameters automatically If disable DHCP you should set the IP addre...

Page 38: ...network settings 6 4 Set Administrator After device activation you can add an administrator to manage the device parameters Before You Start Activate the device and select an application mode Steps 1...

Page 39: ...Figure 6 3 Add Administrator Page 3 Select a credential to add Note Up to one credential should be added DS K5671 3XF Series Face Recognition Terminal User Manual 25...

Page 40: ...The device wired network is connected not connected connecting failed The device Wi Fi is enabled and connected not connected enabled but not connected Shortcut Keys Description Note You can configure...

Page 41: ...trator If you have added an administrator for the device only the administrator can login the device for device operation Steps 1 Long tap on the initial page for 3 s and slide to the left right by fo...

Page 42: ...Figure 7 1 Admin Login 2 Authenticate the administrator s face or card to enter the home page DS K5671 3XF Series Face Recognition Terminal User Manual 28...

Page 43: ...ll be locked for 30 minutes after 5 failed attempts 3 Optional Tap and you can enter the device activation password for login 4 Optional Tap and you can exit the admin login page DS K5671 3XF Series F...

Page 44: ...to login Steps 1 Long tap on the initial page for 3 s and slide to the left right by following the gesture to enter password entering page 2 Tap the Password field and enter the device activation pass...

Page 45: ...Communication Settings You can set the network parameters the Wi Fi parameter the RS 485 parameters and the Wiegand parameters on the communication settings page DS K5671 3XF Series Face Recognition...

Page 46: ...Comm Communication Settings on the Home page to enter the Communication Settings page 2 On the Communication Settings page tap Wired Network Figure 7 4 Wired Network Settings 3 Set IP Address Subnet...

Page 47: ...btain DNS set the preferred DNS server and the alternate DNS server 7 2 2 Set Wi Fi Parameters You can enable the Wi Fi function and set the Wi Fi related parameters Steps Note The function should be...

Page 48: ...t Wi Fi is not in the list tap Add Wi Fi Enter the Wi Fi s name and password And tap OK Note Only digits letters and special characters are allowed in the password 5 Set the Wi Fi s parameters By defa...

Page 49: ...terminal can connect external access controller secure door control unit or card reader via the RS 485 terminal Steps 1 Tap Comm Communication Settings on the Home page to enter the Communication Sett...

Page 50: ...e page to enter the Communication Settings page 2 On the Communication Settings page tap Wiegand to enter the Wiegand tab Figure 7 7 Wiegand Settings 3 Enable the Wiegand function 4 Select a transmiss...

Page 51: ...pper case letters lower case letters and special characters are allowed in the user name Up to 32 characters are allowed in the user name 5 Optional Add a face picture or cards for the administrator N...

Page 52: ...ployee ID should be less than 32 characters And it can be a combination of lower letters upper letters and numbers The employee ID should not be duplicated 4 Tap the Name field and input the user name...

Page 53: ...Figure 7 8 Add Face Picture 6 Look at the camera DS K5671 3XF Series Face Recognition Terminal User Manual 39...

Page 54: ...The user can only authenticate or take attendance on the initial page 10 Tap to save the settings 7 3 3 Add Card Add a card for the user and the user can authenticate via the added card Steps 1 Long t...

Page 55: ...iew Password Add a password for the user and the user can authenticate via the password Steps 1 Long tap on the initial page for 3 s and slide to the left right by following the gesture and log in the...

Page 56: ...and slide to the left right by following the gesture and log in the backend 2 Tap User Add User Edit User Authentication Mode 3 Select Device or Custom as the authentication mode Device If you want t...

Page 57: ...Settings You can set the temperature measurement parameters including temperature detection over temperature alarm threshold temperature compensation door not open when temperature is abnormal temper...

Page 58: ...Figure 7 9 Temperature Measurement Parameters The available parameters descriptions are as follows DS K5671 3XF Series Face Recognition Terminal User Manual 44...

Page 59: ...mp When enabling the function the door will not open when the detected temperature is higher or lower than the configured temperature threshold By default the function is enabled Temperature Measureme...

Page 60: ...oll_pic4 under the root directory The employee ID should be less than 32 characters It can be a combination of lower letters upper letters and numbers It should not be duplicated and should not start...

Page 61: ...ce Face forward at the camera and start authentication via face Card Present the card on the card presenting area and start authentication via card Note The card can be normal IC card or encrypted car...

Page 62: ...cate other credentials Note For detailed information about authenticating face see Tips When Collecting Comparing Face Picture If authentication succeeded the prompt Authenticated will pop up 7 7 Basi...

Page 63: ...light community No building No and Unit No Shortcut Key Choose the shortcut key that displayed on the authentication page including the QR code function the call function call type and the password en...

Page 64: ...me of the prompt window on the authentication page You can select Theme as Default Simple If select Simple the live view of the authentication page will be disabled and in the meanwhile the person s n...

Page 65: ...etween two continuous face recognitions when authenticating Note You can input the number from 1 to 10 Wide Dynamic It is suggested to enable the WDR function if installing the device outdoors When th...

Page 66: ...th mask detection the system will recognize the captured face with mask picture You can set face with mask face 1 N level and the strategy Reminder of Wearing If the person do not wear a face mask whe...

Page 67: ...ws Table 7 3 Access Control Parameters Descriptions Parameter Description Terminal Auth Mode Terminal Authentication Mode Select the face recognition terminal s authentication mode You can also custom...

Page 68: ...ed Open Duration Set the door unlocking duration If the door is not opened for the set time the door will be locked Available door locked time range 1 to 255s Authentication Interval Set the device au...

Page 69: ...the platform 7 10 2 Set Manual Attendance via Device Set the attendance mode as manual and you should select a status manually when you take attendance Before You Start Add at least one user and set t...

Page 70: ...an status and change its name if required The name will be displayed on the T A Status page and the authentication result page Result You should select an attendance status manually after authenticati...

Page 71: ...hedule Before You Start Add at least one user and set the user s authentication mode For details see User Management Steps 1 Tap T A Status to enter the T A Status page 2 Set the Attendance Mode as Au...

Page 72: ...ed attendance status according to the configured schedule Example If set the Break Out as Monday 11 00 and Break In as Monday 12 00 the valid user s authentication from Monday 11 00 to 12 00 will be m...

Page 73: ...ame if required The name will be displayed on the T A Status page and the authentication result page 6 Set the status schedule 1 Tap Attendance Schedule 2 Select Monday Tuesday Wednesday Thursday Frid...

Page 74: ...s Monday 11 00 and Break In as Monday 12 00 the valid user s authentication from Monday 11 00 to 12 00 will be marked as break 7 11 System Maintenance You can view the system information and the capac...

Page 75: ...17 Maintenance Page System Information You can view the device model serial No versions address production data QR code and open source code license DS K5671 3XF Series Face Recognition Terminal User...

Page 76: ...The system will reboot to take effect Reboot Reboot the device 7 12 Video Intercom After adding the device to the client software you can call the device from the client software call the main statio...

Page 77: ...device see Add Device 5 Set the main station s IP address and SIP address in the remote configuration page Note For details about the operation see the user manual of the main station 6 Call the cente...

Page 78: ...ils about adding device see Add Device 5 Link a user to an indoor station and set a room No for the indoor station 6 Call the room If you have configured a specified room No in the Basic Settings you...

Page 79: ...1 Tap on the device initial page 2 Tap to call the mobile client DS K5671 3XF Series Face Recognition Terminal User Manual 65...

Page 80: ...er to enter the login page Note Make sure that the IP address starts with Https Enter the device user name and the password Click Login Login via Remote Configuration of Client Software Download and o...

Page 81: ...o way audio you may hear a repeated sounds You can capture image when starting live view Reserved function You can zoom in the live view image Start or stop live view Start or stop video recording Sel...

Page 82: ...e Click User Add to enter the Add Person page Click on the right to upload a face picture from the local PC Note The picture format should be JPG JPEG or PNG The size should be less than 200K Click OK...

Page 83: ...ployee ID the name the card No the start time and the end time and click Search The results will be displayed on the right panel 8 5 Configuration 8 5 1 Set Local Parameters Set the live view paramete...

Page 84: ...rom your local computer and click Save You can also click Open to open the file folder to view details 8 5 2 View Device Information View the device name language model serial No QR code version numbe...

Page 85: ...interval Manual By default the device time should be synchronized manually You can set the device time manually or check Sync with Computer Time to synchronize the device time with the computer s tim...

Page 86: ...Configuration System Maintenance Upgrade Maintenance Figure 8 5 Upgrade and Maintenance Page Click Reboot to start reboot the device Restore Parameters Click Configuration System Maintenance Upgrade M...

Page 87: ...uring the upgrading 8 5 7 Log Query You can search and view the device logs Go to Configuration System Maintenance Log Query Set the major and minor type of the log type Set the start time and end tim...

Page 88: ...els Create and Install Self signed Certificate Steps 1 Go to Configuration System Security Certificate Management 2 In the Certificate Files area select a Certificate Type from the drop down list 3 Cl...

Page 89: ...s 3 Upload a certificate file from the local 4 Click Install 8 5 10 Change Administrator s Password Steps 1 Click Configuration User Management 2 Click 3 Enter the old password and create a new passwo...

Page 90: ...nd arming IP address Go to Configuration Arming Disarming Information You can view the device arming disarming information Click Refresh to refresh the page 8 5 12 Network Settings Set TCP IP port Wi...

Page 91: ...MTU and the device port If you check the function the system will allocate the IPv4 address IPv4 subnet mask and the IPv4 default gateway automatically NIC Type Select a NIC type from the drop down l...

Page 92: ...TSP It refers to the port of real time streaming protocol HTTPS Set the HTTPS for accessing the browser Certificate is required when accessing Server It refers to the port through which the client add...

Page 93: ...Save to save the settings Center Group Select a center group from the drop down list Main Channel The device will communicate with the center via the main channel Note N1 refers to wired network Plat...

Page 94: ...an send alarm information to the destination IP or host via HTTP protocol HTTPS protocol Before You Start The destination IP or host name should support the HTTP protocol HTTPS protocol to receive the...

Page 95: ...ter the configuration Set Audio Parameters Click Configuration Video Audio Audio Set the audio stream type and audio encoding Drag the slider to adjust the device input and output volume You can also...

Page 96: ...the time duration when authentication succeeded 1 Click Add 2 Set the time duration and the language Note If authentication is succeeded in the configured time duration the device will broadcast the c...

Page 97: ...Parameters Set the video standard WDR brightness contrast saturation and sharpness Steps 1 Click Configuration Image Adjustment Figure 8 10 Image Settings Page 2 Configure the parameters to adjust th...

Page 98: ...ar images with details Brightness Contrast Saturation Sharpness Drag the block or enter the value to adjust the live video s brightness contrast saturation and sharpness Start end recording video Capt...

Page 99: ...you can add the person to the shift group and assign a shift schedule a rule for the attendance defining how the schedule repeats the shift type break settings and the card swiping rule to the shift g...

Page 100: ...e mode as manual and you should select a status manually when you take attendance Before You Start Add at least one user and set the user s authentication mode For details see User Management Steps 1...

Page 101: ...ally change the attendance status according to the configured schedule At the same time you can manually change the attendance status after the authentication Before You Start Add at least one user an...

Page 102: ...tercom Device No If set the device type as Door Station Outer Door Station Access Control Device you can set the period No building No unit No floor No door station No and community No Click Save to s...

Page 103: ...r door station as the device type you should enter a number between 1 and 99 Note If you change the No you should reboot the device Community No Set the device installed community No 8 5 19 Configure...

Page 104: ...and description They are read only Enable Card Reader Enable the card reader s function Authentication Select an authentication mode according to your actual needs from the drop down list Recognition...

Page 105: ...rval A second authentication will be failed Alarm of Max Failed Attempts Enable to report alarm when the card reading attempts reach the set value Communication with Controller Every When the access c...

Page 106: ...locked Door Open Timeout Alarm An alarm will be triggered if the door has not been closed within the configured time duration Door Contact You can set the door contact as Remain Open or Remain Closed...

Page 107: ...r code should be different Set Card Security Click Configuration Access Control Card Security to enter the settings page Set the parameters and click Save Enable NFC Card In order to prevent the mobil...

Page 108: ...tomatically RS 485 Address Set the RS 485 Address according to your actual needs Note If you select Access Controller If connect the device to a terminal via the RS 485 interface set the RS 485 addres...

Page 109: ...rameters the device will reboot automatically Set Face Recognition Parameters You can set face recognition parameters for accessing Click Configuration Access Control Face Recognition Parameters You c...

Page 110: ...t Picture Uploading and Storage Upload Captured Picture When Authenticating Upload the pictures captured when authenticating to the platform automatically Save Captured Picture When Authenticating If...

Page 111: ...Go to Configuration Access Control Card Authentication Settings Select a card authentication mode and click Save Full Card No All card No will be read Wiegand 26 3 bytes The device will read card via...

Page 112: ...tion If enabling the function the device can recognize whether the person is a live one or not Note Biometric recognition products are not 100 applicable to anti spoofing environments If you require a...

Page 113: ...ding to your needs 1 1 Matching Threshold Set the matching threshold when authenticating via 1 1 matching mode The larger the value the smaller the false accept rate and the larger the false rejection...

Page 114: ...person do not wear a face mask when authenticating the device prompts a notification and the door will open Prompt and Not Open Door If the person do not wear a face mask when authenticating the devic...

Page 115: ...ion within the configured sleep time After enabling Sleep you need set the start time of display 8 5 23 Temperature Measurement Settings Temperature Measurement Settings You can set the temperature me...

Page 116: ...uation If the detected temperature is higher or lower than the configured parameters an alarm will be triggered By default the value is 37 3 Temperature Compensation If the measured temperature is hig...

Page 117: ...nt area Unit Select a temperature unit according to your preference 4 Click Save Black Body Settings The black body can correct the measuring temperature You should set the black body parameters if th...

Page 118: ...ack body and the temperature unit Note The black body s temperature is fixed 5 Click Calibrate and draw the black body s position on the page When is displayed on the black body on the screen the blac...

Page 119: ...low the flow diagram below to configure on the client software Figure 9 1 Flow Diagram of Configuration on Client Software 9 2 Device Management The client supports managing access control devices and...

Page 120: ...played on the right panel 3 Click Add to open the Add window and then select IP Domain as the adding mode 4 Enter the required information Name Create a descriptive name for the device For example you...

Page 121: ...ient 7 Optional Check Import to Group to create a group by the device name and import all the channels of the device to this group Example For access control device its access points alarm inputs outp...

Page 122: ...ettings is the responsibility of the installer and or end user Import to Group Enter 1 to create a group by the device name All the channels of the device will be imported to the corresponding group b...

Page 123: ...s After adding devices to device list you can manage the added devices including editing device parameters remote configuration viewing device status etc Table 9 1 Manage Added Devices Edit Device Cli...

Page 124: ...ntrol door status and do some other operations of the devices after managing the resources by groups 9 3 1 Add Group You can add group to organize the added device for convenient management Steps 1 En...

Page 125: ...ormation in a batch etc 9 4 1 Add Organization You can add an organization and import person information to the organization for effective management of the persons You can also add a surbodinate orga...

Page 126: ...de 5 Click Download Template for Importing Person to download the template 6 Enter the person information in the downloaded template Note If the person has multiple cards separate the card No with sem...

Page 127: ...mport to start importing The importing progress and result will be displayed Export Person Information You can export the added persons information to local PC as a CSV Excel file Before You Start Mak...

Page 128: ...y the person name will be filled with the issued card No after importing to the client The gender of the persons will be Male by default If the card number or person ID employee ID stored on the devic...

Page 129: ...on will be inactive Steps 1 Enter Person module 2 Select the person you want to report card loss for and click Edit to open the Edit Person window 3 In the Credential Card panel click on the added car...

Page 130: ...include DS K1F100 D8 DS K1F100 M DS K1F100 D8E and DS K1F180 D8E Card Type This field is only available when the model is DS K1F100 D8E or DS K1F180 D8E Select the card type as EM card or IC card acc...

Page 131: ...he holiday list and configure the holiday duration Note Up to 16 holiday periods can be added to one holiday 1 Click Add in the Holiday List field 2 Drag the cursor to draw the time duration which mea...

Page 132: ...ft panel to create a new template 3 Create a name for the template 4 Enter the descriptions or some notification of this template in the Remark box 5 Edit the week schedule to apply it to the template...

Page 133: ...ss groups to the devices again to take effect The access group changes include changes of template access group settings person s access group settings and related person details including card number...

Page 134: ...ed devices and then apply the new access group to the device Apply Changes to Devices This operation will not clear the existed access groups of the selected devices and only apply the changed part of...

Page 135: ...ss control to meet some special requirements in different scene Note For the card related functions the type of access control card only the card s with access group applied will be listed when adding...

Page 136: ...ng parameters are not listed in the Basic Information page click More to edit the parameters RS 485 Comm Redundancy You should enable this function if you wire the RS 485 card reader to the access con...

Page 137: ...nfigure Parameters for Door Elevator After adding the access control device you can configure its access point door or floor parameters Before You Start Add access control device to the client Steps 1...

Page 138: ...ecific person can open the door by inputting the super password Dismiss Code Create a dismiss code which can be used to stop the buzzer of the card reader by entering the dismiss code on the keypad No...

Page 139: ...card swiping of the same card is less than the set value the card swiping is invalid You can set it as 0 to 255 Max Interval When Entering PWD When you inputting the password on the card reader if the...

Page 140: ...l Set the matching security level when authenticating via 1 N matching mode The larger the value the smaller the false accept rate and the larger the false rejection rate when authentication Live Face...

Page 141: ...parameter configuration page 2 In the device list on the left click to expand the door select an alarm input and you can edit the alarm input s parameters on the right 3 Set the alarm output parameter...

Page 142: ...Closing Barrier Speed Set the barrier s opening and closing speed You can select from 1 to 10 The greater the value the faster the speed Note The recommended value is 6 Audible Prompt Duration Set ho...

Page 143: ...he device will upload an alarm to the client If mismatched the person is not in the blocklist the access will be granted Save Authenticating Face Picture If enabled the captured face picture when auth...

Page 144: ...orts Wiegand Steps 1 Enter the Access Control module 2 On the navigation bar on the left enter Advanced Function More Parameters 3 Select an access control device in the device list and click Wiegand...

Page 145: ...rol the door Or the icons used for control will not show For setting the user permission refer to Person Management 9 8 1 Control Door Status You can control the status for the door s including unlock...

Page 146: ...osed or open All the persons can access the doors with no credentials required Remain All Locked All doors in the group will be closed and locked No person can access the doors even if he she has the...

Page 147: ...of the selected group 3 Optional Check the event type and event status The detected events of checked type and status will be displayed in the list below 4 Optional Check Show Latest Event to view th...

Page 148: ...k to view details including person s detailed information and the captured picture Note In the pop up window you can click to view details in full screen DS K5671 3XF Series Face Recognition Terminal...

Page 149: ...the picture below Do not wear hat sunglasses or other accessories that can affect the facial recognition function Do not make your hair cover your eyes ears etc and heavy makeup is not allowed Postur...

Page 150: ...DS K5671 3XF Series Face Recognition Terminal User Manual 136...

Page 151: ...Value Candle 10Lux Bulb 100 850Lux Sunlight More than 1200Lux 2 Install the device at least 2 meters away from the light and at least 3 meters away from the window or door 3 Avoid backlight direct an...

Page 152: ...Appendix C Dimension DS K5671 3XF Series Face Recognition Terminal User Manual 138...

Page 153: ...ion access control and video intercom devices Figure D 1 QR Code of Communication Matrix Device Command Scan the following QR code to get the device common serial port commands Note that the command l...

Page 154: ...UD19360B F...

Reviews: