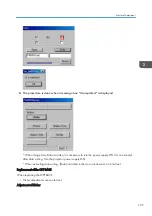
Display Blue raster signal by clicking [Test B] button in the [Test Pattern] box. Adjust B-scroll bar so
that the flicker in the middle of the window becomes smallest.
When flicker adjustment is done, click [SET] button in the [Data] box to write the adjusted value.
* When adjustments have been finished ([SET] is clicked), the Floor characters turn to red.
* To restore the data to the state before the adjustment, click [RESET] button. The data will restore
to the initial setting, and the characters return to black.
* The value displayed by the side of the scroll bar indicates the original value in the left side of the
arrow, the current value in the right side of the arrow.
* The data adjusted with the scroll bar is temporary data. For the projector to store the data, click
[SET] button to write in Flash ROM.
Miscellaneous
If <All Data Copy> cannot be accomplished during the replacement of the PCB Main Ass’y, follow the
following steps:
In regard to the replacement of servicing parts for the PCB Main Ass’y, the procedures after the
completion of replacement (after mounting the PCB Main Ass’y on the product) are described below.
1. Data writing for each model is carried out.
2. PCB Main Ass’y adjustments (Usage Time setup, Flicker adjustments (*1)).
*1 In the case of "Replacement of the OPT BASE", these adjustments are not required.
1. EDID data writing is carried out.
2. Data writing for Serial number and Model number.
Usage Time Setup
• If the present Usage Time for the Lamp / Projector is different from the actual Usage Time, the
following setup is made to recover the correct Usage Time.
• When Usage Time Read / Write is carried out at the time of PCB Main Ass’y replacement, the
correct Usage Time is also copied for the Lamp / Projector. Therefore, no more setting is required.
• However, this function should not be used unless the correct Usage Time is known.
Electrical Adjustment
109
Summary of Contents for Sirius-PJ2
Page 1: ...Model Sirius PJ2 Machine Codes Y076 Y077 Y078 Field Service Manual June 2015 ...
Page 2: ......
Page 12: ...10 ...
Page 20: ...No Name 16 Ethernet Port RJ 45 Part Names of the Remote Controller 1 Product Information 18 ...
Page 24: ...1 Product Information 22 ...
Page 34: ...Filters 1 Remove the Filter cover A 2 Remove the Filters A 3 Replacement and Adjustment 32 ...
Page 36: ...5 Disconnect the cable 1 PCB Key Pad 1 Top cover page 33 3 Replacement and Adjustment 34 ...
Page 54: ...5 Remove the Duct Cover A 3 6 Remove the Duct Base A 3 3 Replacement and Adjustment 52 ...
Page 67: ...3 Remove the bracket A 2 4 Remove the Power supply DC 6 Parts Replacement 65 ...
Page 153: ...MEMO 151 ...
Page 154: ...MEMO 152 EN ...
Page 155: ...Model Sirius PJ2 Machine Codes Y076 Y077 Y078 Appendices June 2015 ...
Page 156: ......
Page 158: ...2 ...
Page 172: ...MEMO 16 EN ...


