background image

51

User Controls

IND100064-55

OSD Menu Functions

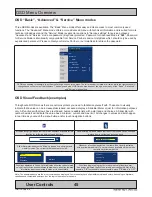
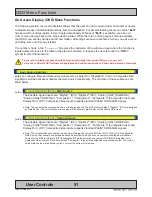
On Screen Display (OSD) Menu Functions

The following section covers all possible settings that the user can (in a certain mode) encounter or needs

to adjust via easy understandable menus, text and navigation. For simpler reading the menu choice 

"Exit"


has been left out of description in this chapter intentionally. Whenever 

"Exit"

 is available, you can exit

current menu and go back to the previous one visited. When there is no more previous menus available, 

the OSD menu overlay will be shut off and hidden. All settings are saved real-time or when you exit a menu 

(including time out of menu visibility).

The number shown in the "|------x------" line gives the indication of the submenu level where the function is 

located (also reference to the table in the previous chapter). It requires the user to touch the "MENU" 

symbol to enter that submenu.


Please note: Available functions described may deviate slightly from actual OSD menu on your unit. 

 This is due to different OSD software configurations and customized solutions. Shown here are factory standards.

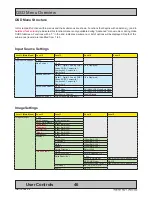
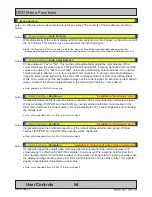
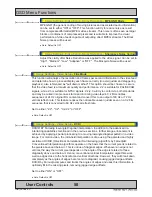
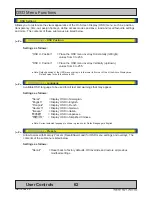
Input Source Settings

Lets you configure Main and Secondary signal source inputs (DVI, DisplayPort, VGA or Composite video 

signals) as well as activate or disable the Auto Source functionality. The contents of these submenus are 

listed below.

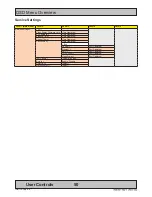
|---2--- 

Input Source Settings

 - Main Source


The possible signal inputs are; "Digital 1" (DVI), "Digital 2" (DVI), "Analog VGA1" (RGB/VGA),


"Analog VGA2" (RGB/VGA), "Composite 1", "Composite 2", "Composite 3" (Composite Video) and


DisplayPort 1 (DP). Composite Video inputs supports standard PAL/NTSC/SECAM signals.


● Note: The current active main source name will be greyed out in the list. By factory default, "Digital 1" (DVI) are assigned


   as Main Source. The current active main source will be shown in green color at the bottom of this menu.

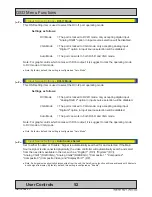
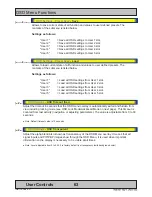
|---2--- 

Input Source Settings

 - Second Source


The possible signal inputs are; "Digital 1" (DVI), "Digital 2" (DVI), "Analog VGA1" (RGB/VGA),


"Analog VGA2" (RGB/VGA), "Composite 1", "Composite 2", "Composite 3" (Composite Video) and


DisplayPort 1 (DP). Composite Video inputs supports standard PAL/NTSC/SECAM signals.


● Note: The current active secondary source name will be greyed out in the list. Also, if DVI, VGA or DP are defined as


   Main Source, they cannot be re-selected as second source as well. The second source is used together with Main


   Source for the Picture-in-Picture (PIP) functionality. PIP works only with one source of DVI/DP/VGA together with


   Composite Video sources. By Factory default "Composite 1 (Video)" are assigned as the second source. The current


   active main source will be shown in green  color at the bottom of this menu.

Summary of Contents for HD 15T22 MMD-xxx-F series

Page 1: ...Fxxx 19 0 inch Maritime Multi Display HD 24T22 MMD xxx Fxxx 24 0 inch Maritime Multi Display HD 26T22 MMD xxx Fxxx 25 54 inch Maritime Multi Display HD 27T22 MMD xxx Fxxx 27 0 inch Maritime Multi Disp...

Page 2: ...yrighted to the respective owners The products may not be copied or duplicated in any way This documentation contains proprietary information that is not to be disclosed to persons outside the user s...

Page 3: ...22 Installation and mounting 22 Installation limitations 23 Ergonomics 25 Cables 26 Cable Entries Connectors Marked area 26 Maximum Cable Length 26 Housing Terminal Block Connector Overview 27 Panel...

Page 4: ...Display OSD Menu Functions 51 Operation Advanced DDC CI 75 Introduction 76 Specifications 79 Specifications HD 15T22 MMD xxx Fxxx 80 Specifications HD 15T22 MMD xxx FHxx 81 High Bright model 81 Speci...

Page 5: ...B SX2 A1 104 Desktop Table Mounting Bracket 15 inch 104 Technical Drawings HD TMB SX2 A1 105 Desktop Table Mounting Bracket 17 inch 105 Technical Drawings HD TMB SX2 A1 106 Desktop Table Mounting Brac...

Page 6: ...eries X to fit 19 inch Series 2 Console Cutout 127 Technical Drawings JH 26TAP STD A1 129 26 inch Series X to fit 26 inch Series 1 Cutout 129 Technical Drawings HD 15COV SX1 A1 130 UV Sun Cover 15 inc...

Page 7: ...141 IP66 Panel Gasket 27 inch 141 Appendixes 143 Pinout Assignments 144 Basic Trouble shooting 147 Declaration of Conformity 148 Return Of Goods Information 149 General Terms and Conditions 150 Pixel...

Page 8: ...erating Systems Test Report HD CMB SX2 A1 Model Dependent 2 pcs of Mounting Brackets for Console Panel Mounting Anodized Aluminium Stainless Steel The bracket kit is suitable for 15 17 and 19 inch uni...

Page 9: ...actory mounted Touch Screen For models 15 27 inch an EPDM sealing gasket for IP66 console mount may be factory pre mounted included with delivery if ordered For High Bright models it is pre mounted by...

Page 10: ...10 This page left intentionally blank...

Page 11: ...11 General...

Page 12: ...p by a strong service network www hatteland display com You will find our website full of useful information to help you make an informed choice as to the right product for your needs You will find de...

Page 13: ...rom There are standard base models available which are listed in the following pages The modules used in Series X are all qualified having undergone and passed our extensive test program which include...

Page 14: ...ame Label B Size 60mm wide x 22mm high rectangle size Note Text content of label will match specifications derived from Data Sheet Silver with glue on back non tearable and made for thermal transfer p...

Page 15: ...restrictions on selected units some labels will be rotated 90 degrees to fit properly The arrangement of labels may be shifted stacked differently as it is based on factory options such as Touch Scree...

Page 16: ...0077 169 Warranty label covers screw Labels placed on rear HD 24T22 MMD xxx Fxxx Warranty label covers screw Labels placed on rear HD 26T22 MMD xxx Fxxx Warranty label covers screw Labels placed on re...

Page 17: ...product and covers a key screw This is to aid service departments to determine if there has been any unauthorized service on a unit still under warranty Quality Control QC Label This label indicates t...

Page 18: ...ong the touch sensor is inside the product better than both surface capacitive and resistive Supports Multitouch Newer Operating System OS required in most cases Excellent readability light transmissi...

Page 19: ...h screen will just operate as a ordinary single point touch screen Additionally to get touch screen working at all in older OS you need to install 3rd party drivers Note that the lack of Multitouch su...

Page 20: ...20 This page left intentionally blank...

Page 21: ...21 Installation...

Page 22: ...ation is a necessary prerequisite for the life of the product The air inlet and outlet openings must definitely be kept clear coverings which restrict ventilation are not permissible 3 Generally do no...

Page 23: ...than 30 degrees i e flat mounting of the unit This is to prevent accidental touches that are similar to a human finger cover area for a x period of seconds as well as make sure the raindrops are movi...

Page 24: ...order to avoid misting of the viewing screen a 25 50 W console heating power depending on the volume is recommended 5 When selecting the site of a display unit the maximum cable lengths have to be con...

Page 25: ...cts are to be operated both from a sitting position and from a standing position a screen inclination of about 30 to 40 from a vertical plane has turned out to be favourable 5 The brightness of displa...

Page 26: ...st largest sizes only Bottom View Displays Back View Displays Bottom View Panel Computers Back View Panel Computers Maximum Cable Length Any cable should generally be kept as short as possible to prov...

Page 27: ...s Illustration Pins Manufacturer Details Connector used for module 5 pin MC 1 5 5 STF 3 81 Screwdriver SZS 0 4X2 5mm VDE slot headed Tightening torque min 0 22 Nm Tightening torque max 0 25 Nm RS 422...

Page 28: ...nfigure the connector s and cable s that are present in your installation environment Below is a sample procedure for a 2 pin DC power connector The procedure is the same for other connectors of this...

Page 29: ...e panel cutout is not too tight for the unit Please disconnect ALL cables before proceeding Please re check the relevant and required panel cutout measurements if unsure 1 Mount one of the flat bracke...

Page 30: ...d fasten the Mounting Nut tight at the end 6 Finally in a even way fasten each of the 4 Thumb Screws to securly fasten the unit to the rear of the Panel Cutout 7 The Console Mounting Kit also allow to...

Page 31: ...ng Please re check the relevant and required panel cutout measurements if unsure 1 Slide the unit into the cutout carefully User Controls and Connector Area should be facing downwards 2 Make sure you...

Page 32: ...el cutout is not too tight for the unit Please disconnect ALL cables before proceeding Please re check the relevant and required panel cutout measurements if unsure 1 Slide the unit into the cutout ca...

Page 33: ...eding Please review User Manual or visit www hatteland display com for Technical Drawings regarding measurements for both main unit and Mounting Brackets 1 Place the unit on a dry flat clean soft surf...

Page 34: ...Top Screws on both brackets adjust unit into new tilting angle and fasten the Set Top Screws again Verifiy that the unit does not tilt by itself and appear fixed in place Alternative Mounting Dependi...

Page 35: ...r both main unit and Mounting Brackets 1 Place the unit on a dry flat clean soft surface i e table with the glass front facing down as illustrated Connector area should be facing downwards from you 2...

Page 36: ...es not appear loose FIG3 Unlock tilt and lock FIG1 FIG2 Top View Use appropriate fasteners 6 pcs x M6 needed FIG3 Re check Lock Pins Alternative Mounting Depending on installation needs you may mount...

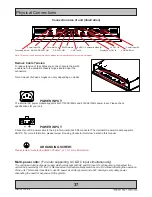
Page 37: ...The internal DC power module supports 24VDC For more information please review Housing Connector Overview earlier in this manual GROUNDING SCREW Please review General Installation Chapter pt 7 for mor...

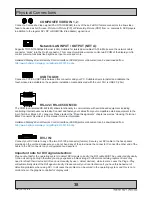
Page 38: ...buzzer externally Connect and fasten your cables from your compatible external equipment to the 5 pin Terminal Block 3 81 connector Please review the Pinout Assignments chapter as well as Housing Term...

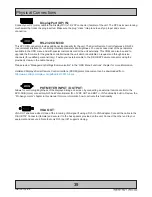
Page 39: ...our external cable to the D SUB 9P Female connector using the provided screws on the cable housing Please review Management Settings Communication in the OSD Menu Functions chapter for more informatio...

Page 40: ...40 This page left intentionally blank...

Page 41: ...41 Operation...

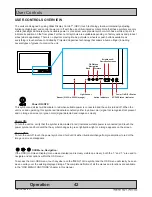
Page 42: ...menu touch anywhere on the MENU circle symbol and the OSD menu will clearly be seen as an overlay over the existing displayed image The complete definition of all the menus and functions are available...

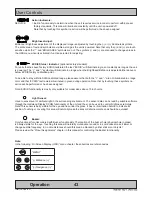
Page 43: ...that both the and are not illuminated in orange color and that ECDIS text remains illuminated in green during operation Note that by touching these symbols no action will be performed or has been assi...

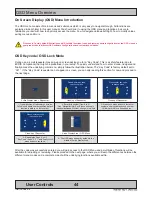
Page 44: ...ter key code to access menu Active Display Area Requester 0 0 0 Please enter key code to access menu Close up of Requester 3 0 0 Please enter key code to access menu Close up of Requester 1 Typical po...

Page 45: ...a value can be increased decreased accessed display a Slide Bar Meter or just for information purposes only All functions with arrows have text based human readable lists with a start and end choices...

Page 46: ...2 Analog RGB1 Analog RGB2 Composite 1 Composite 2 Composite 3 DisplayPort1 Text Displayed Auto Source Select Exit DVI I1 Mode DVI Mode VGA Mode Auto Mode DVI I2 Mode DVI Mode VGA Mode Auto Mode Auto...

Page 47: ...ration DisplayPort Multi PIP Settings Level 1 Main Menu Level 2 Level 3 Level 4 Level 5 Multi PIP Settings Exit PIP Mode PIP Off PIP Child PIP Split PIP Wide PIP Display Exit PIP Child Size Exit PIP S...

Page 48: ...s Factory Defaults Save Exit User 1 to 5 Automatic Action Load Exit User 1 to 5 Automatic Action OSD Timeout Sec Slider Bar 0 30 OSD Transparent Slider Bar 0 255 OSD Mode Exit Basic Select Advanced Se...

Page 49: ...500 Execute Automatic Action Save Timing Save Timing 1 to 8 Automatic Action Clear Timing Clear Timing 1 to 8 Automatic Action GDC Sensitivity Slider Bar 0 255 Filter Enable Disable Communication Exit...

Page 50: ...irmware Ver Text Displayed uC Firmware Text Displayed Elapsed Time Text Displayed Current Temp Text Displayed Fault Status Text Displayed Exit NVRAM Text Displayed Ethernet Text Displayed GDC Text Dis...

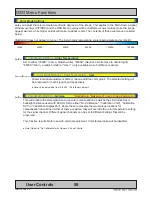
Page 51: ...als as well as activate or disable the Auto Source functionality The contents of these submenus are listed below 2 Input Source Settings Main Source The possible signal inputs are Digital 1 DVI Digita...

Page 52: ...input Analog RGB 2 option in input source selection will be disabled VGA Mode The port is locked to VGA mode only accepting analog input Digital 2 option in input source selection will be disabled Aut...

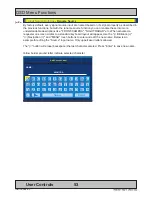
Page 53: ...T RADAR etc When activated a requester on screen similar to a standard keyboard layout will appear Use the Brilliance Navigation and MENU touch buttons to enter and edit the new name Below is an examp...

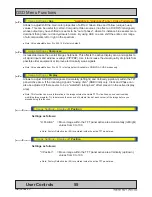
Page 54: ...example is a test pattern image similar to the picture illustrated later in the manual see Service Test Pattern Note Available for RGB VGA mode only 2 Image Settings Brightness Available in Advanced o...

Page 55: ...justable from 0 to 24 12 is factory default Available in RGB VGA CVBS modes only 2 Image Settings Display Allows to adjust DVI DP VGA signals Horizontally left right and Vertically up down within the...

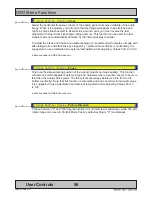
Page 56: ...or horizontally It is suggested to use a dedicated and external test pattern while adjusting Values from 0 to 100 Note Available for RGB VGA mode only 3 Image Settings Display Phase Fine tune the dat...

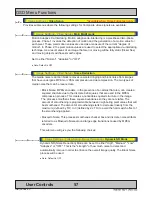
Page 57: ...e two types of media noise that can be reduced are Block Noise MPEG encoders in the presence of an almost flat area can create a squared structure due to the discrete 8x8 squares that are used in the...

Page 58: ...2 film enables sequences of 24 Hz original film content and convert this to an output of 48 Hz or 72 Hz vertical refresh rate This feature reduces the noticeable uneven judder seen on a 3 2 film seque...

Page 59: ...perature User Allows individual adjustment of Red Green and Blue color gains The selected setting will be preserved for each signal input respectively Note Value adjustable from 0 to 255 128 is factor...

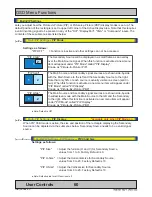
Page 60: ...y visible on screen split in two When this function is activated a new menu item will appear under PIP Mode called PIP Display Known as Picture By Picture PBP PIP Wide 1 2 The Main Source and Secondar...

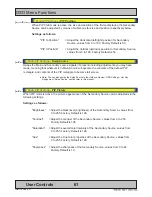
Page 61: ...ctangle and contents of the PIP rectangle to become full screen Note You can also assign the Swap Source to the Hotkeys Review OSD Settings Hot Key Assignment Swap Source section later in this manual...

Page 62: ...in the lower left corner of the of the Active Display area Default value for both functions is 255 2 OSD Settings Language Available OSD language to be used for all text and warnings that may appear...

Page 63: ...gs from User 2 slot User 3 Load all OSD settings from User 3 slot User 4 Load all OSD settings from User 4 slot User 5 Load all OSD settings from User 5 slot 2 OSD Settings OSD Timeout Sec Adjust the...

Page 64: ...e key code the OSD menu will always be in this state during powered on After a power off and on to the unit the OSD Mode will be reverted back to Basic mode 2 OSD Settings OSD Lock Mode To prevent acc...

Page 65: ...gh the available signal sources to PIP PBP Main Source Flip up down through the available signal sources to full screen PIP Child Size Increase Decrease the size of the Picture In Picture overlay Blac...

Page 66: ...picture may appear distorted or stretched Fill to Aspect Ratio Zoom current full screen signal to fill the entire active display area and preserve the aspect ratio This means that you may notice black...

Page 67: ...outwards in one direction Settings as follows Vertical Stretch Zoom stretch current full screen signal in Vertical direction only up and down Values from 0 to 100 Note Values under or over 50 may cau...

Page 68: ...alues manually 3 Management Settings Unknown Timing Search Blind Mode If you know the advanced properties of the incoming signal or want to troubleshoot a possible detected signal that seem to have sm...

Page 69: ...t to 150 Settings as follows GDC Sensitivity Adjust values from 0 to 255 Note Default is model dependent and set by factory Note that the difference between 0 and 100 is minimal as it is not suitable...

Page 70: ...on to RS 485 protocol Half duplex 4 wire RS485 422 Sets the internal communication to RS 485 422 protocol Full duplex Address RS Set the global unique channel port ID for the unit 16 ID s available IP...

Page 71: ...e user to operate elements on screen either with keyboard mouse or just for information purposes only with no user interaction possible via touch screen Settings as follows Always Active Touch is alwa...

Page 72: ...ower button detection enabled Disable Key press from External power button detection disabled Note Factory Default set to Disable 2 Management Settings DDC CI Setting Available in Advanced only This s...

Page 73: ...on of the touch enabled buttons Example FW100002 0A12 Elapsed Time Shows the time elapsed in hours since first time power on Example 180 Current Temp Shows the internal temperature measured by onchip...

Page 74: ...equipment To active this function touch the MENU button Note This function will not inform report any deviations directly you need to have the required technical expertise to interpret the test patte...

Page 75: ...75 Operation Advanced DDC CI...

Page 76: ...ed Hatteland Display Serial Ethernet Communication Control Interface SCOM protocol where specified reference Series X Generation 1 http www hatteland display com pdflink inb100018 4 php Series X Gener...

Page 77: ...14 Command ID Where Write ww xx 05 A9 6500 07 AB 8000 08 A4 9300 Where Read yy zz 05 AB 6500 07 A9 8000 08 A6 9300 Read Write support MCC Color Temperature Select Gamma Calibration 0x14 Set Write Cal...

Page 78: ...78 This page left intentionally blank...

Page 79: ...79 Specifications...

Page 80: ...it EN60945 Tested HD TMB SX2 A1 1 x Table Mount Bracket EN60945 Tested HD VED SX2 A1 1 x VESA Adapter Kit 75 75 100 100 200 100mm Not EN60945 Tested JH 15TAP STD C1 1 x Frame Adapter 15 Series 1 to Se...

Page 81: ...unt Please see user manual datasheet for more information Available Accessories W 356 00 14 02 x H 307 00 12 09 x D 78 50 3 09 mm inch Weight 5 6kg 12 3lbs Delivery includes an EPDM sealing gasket for...

Page 82: ...als Projected Capacitive Touch Screen Multitouch USB Pen Glove supported Optical Bonding Technology Color Calibrated models ECDIS Sunlight Readable High Bright includes Optical Bonding Factory Options...

Page 83: ...sted HD VED SX2 B1 1 x VESA Adapter Kit 75 75 100 100 200 100mm Not EN60945 Tested HD REM SX1 A1 1 x External Remote Control EN60945 Tested HD 17COV SX1 A1 1 x UV Sun Cover P007130 1 1 x IP66 Mount Ga...

Page 84: ...D REM SX1 A1 1 x External Remote Control EN60945 Tested HD 19COV SX1 A1 1 x UV Sun Cover P007131 1 1 x IP66 Mount Gasket EPDM for Flush Console mount Please see user manual datasheet for more informat...

Page 85: ...x Frame Adapter 19 Series X to Series 2 retrofit HD REM SX1 A1 1 x External Remote Control EN60945 Tested HD 19COV SX1 A1 1 x UV Sun Cover P007131 1 1 x IP66 Mount Gasket EPDM for Flush Console mount...

Page 86: ...76 mm inch Weight 8 6kg 18 9lbs Physical Considerations DVI I IN 2 x 29p DVI Female or as VGA IN with adapter DP1 2 IN 1 x 20p DisplayPort female Comp Video IN 2 x BNC Connector female SCOM RS 422 48...

Page 87: ...nector female Ethernet 1 x RJ45 Connector for Remote Control SCOM RS 232 1 x 9p D SUB female non isolated Buzzer Potmeter User 1 x 9p D SUB male Potentiometer IN 5VDC OUT BRT IN AC Power IN 1 x Std IE...

Page 88: ...pported Signals Behind front bezel Glass Display Control GDC IP66 Power On Off On Screen Display Menu Brightness Control Hotkeys left right Mode Status Indicators ECDIS Service Buzzer through glass Li...

Page 89: ...ount Bracket EN60945 Tested HD VED SX2 H1 1 x VESA Adapter 75 75 100 100 200 100mm Not EN60945 Tested HD REM SX1 A1 1 x External Remote Control EN60945 Tested HD 27COV SX1 A1 1 x UV Sun Cover P018743...

Page 90: ...90 This page left intentionally blank...

Page 91: ...91 Technical Drawings...

Page 92: ...way against the interest of Hatteland Display AS Any authorized reproduction in whole or in part must include this legend Hatteland Display Proprietary information Not to be distributed to any third...

Page 93: ...nst the interest of Hatteland Display AS Any authorized reproduction in whole or in part must include this legend Hatteland Display Proprietary information Not to be distributed to any third party wit...

Page 94: ...way against the interest of Hatteland Display AS Any authorized reproduction in whole or in part must include this legend Hatteland Display Proprietary information Not to be distributed to any third...

Page 95: ...nst the interest of Hatteland Display AS Any authorized reproduction in whole or in part must include this legend Hatteland Display Proprietary information Not to be distributed to any third party wit...

Page 96: ...way against the interest of Hatteland Display AS Any authorized reproduction in whole or in part must include this legend Hatteland Display Proprietary information Not to be distributed to any third...

Page 97: ...nst the interest of Hatteland Display AS Any authorized reproduction in whole or in part must include this legend Hatteland Display Proprietary information Not to be distributed to any third party wit...

Page 98: ...way against the interest of Hatteland Display AS Any authorized reproduction in whole or in part must include this legend Hatteland Display Proprietary information Not to be distributed to any third...

Page 99: ...ed in any way against the interest of Hatteland Display AS Any authorized reproduction in whole or in part must include this legend Hatteland Display Proprietary information Not to be distributed to a...

Page 100: ...way against the interest of Hatteland Display AS Any authorized reproduction in whole or in part must include this legend Hatteland Display Proprietary information Not to be distributed to any third...

Page 101: ...way against the interest of Hatteland Display AS Any authorized reproduction in whole or in part must include this legend Hatteland Display Proprietary information Not to be distributed to any third...

Page 102: ...102 This page left intentionally blank...

Page 103: ...103 Technical Drawings Accessories...

Page 104: ...thorized reproduction in whole or in part must include this legend Hatteland Display Proprietary information Not to be distributed to any third party without written permission Dimensions might be sho...

Page 105: ...thorized reproduction in whole or in part must include this legend Hatteland Display Proprietary information Not to be distributed to any third party without written permission Dimensions might be sho...

Page 106: ...thorized reproduction in whole or in part must include this legend Hatteland Display Proprietary information Not to be distributed to any third party without written permission Dimensions might be sho...

Page 107: ...rized reproduction in whole or in part must include this legend Hatteland Display Proprietary information Not to be distributed to any third party without written permission Dimensions might be shown...

Page 108: ...S Any authorized reproduction in whole or in part must include this legend Hatteland Display Proprietary information Not to be distributed to any third party without written permission Dimensions migh...

Page 109: ...Any authorized reproduction in whole or in part must include this legend Hatteland Display Proprietary information Not to be distributed to any third party without written permission Dimensions might...

Page 110: ...Any authorized reproduction in whole or in part must include this legend Hatteland Display Proprietary information Not to be distributed to any third party without written permission Dimensions might...

Page 111: ...Any authorized reproduction in whole or in part must include this legend Hatteland Display Proprietary information Not to be distributed to any third party without written permission Dimensions might...

Page 112: ...Any authorized reproduction in whole or in part must include this legend Hatteland Display Proprietary information Not to be distributed to any third party without written permission Dimensions might...

Page 113: ...st of Hatteland Display AS Any authorized reproduction in whole or in part must include this legend Hatteland Display Proprietary information Not to be distributed to any third party without written p...

Page 114: ...erest of Hatteland Display AS Any authorized reproduction in whole or in part must include this legend Hatteland Display Proprietary information Not to be distributed to any third party without writte...

Page 115: ...horized reproduction in whole or in part must include this legend Hatteland Display Proprietary information Not to be distributed to any third party without written permission Dimensions might be show...

Page 116: ...interest of Hatteland Display AS Any authorized reproduction in whole or in part must include this legend Hatteland Display Proprietary information Not to be distributed to any third party without wr...

Page 117: ...erest of Hatteland Display AS Any authorized reproduction in whole or in part must include this legend Hatteland Display Proprietary information Not to be distributed to any third party without writte...

Page 118: ...Any authorized reproduction in whole or in part must include this legend Hatteland Display Proprietary information Not to be distributed to any third party without written permission Dimensions might...

Page 119: ...st of Hatteland Display AS Any authorized reproduction in whole or in part must include this legend Hatteland Display Proprietary information Not to be distributed to any third party without written p...

Page 120: ...terest of Hatteland Display AS Any authorized reproduction in whole or in part must include this legend Hatteland Display Proprietary information Not to be distributed to any third party without writt...

Page 121: ...AS Any authorized reproduction in whole or in part must include this legend Hatteland Display Proprietary information Not to be distributed to any third party without written permission Dimensions mig...

Page 122: ...AS Any authorized reproduction in whole or in part must include this legend Hatteland Display Proprietary information Not to be distributed to any third party without written permission Dimensions mig...

Page 123: ...AS Any authorized reproduction in whole or in part must include this legend Hatteland Display Proprietary information Not to be distributed to any third party without written permission Dimensions mig...

Page 124: ...Any authorized reproduction in whole or in part must include this legend Hatteland Display Proprietary information Not to be distributed to any third party without written permission Dimensions might...

Page 125: ...ed reproduction in whole or in part must include this legend Hatteland Display Proprietary information Not to be distributed to any third party without written permission Dimensions might be shown wit...

Page 126: ...ed reproduction in whole or in part must include this legend Hatteland Display Proprietary information Not to be distributed to any third party without written permission Dimensions might be shown wit...

Page 127: ...eproduction in whole or in part must include this legend Hatteland Display Proprietary information Not to be distributed to any third party without written permission Dimensions might be shown with or...

Page 128: ...tteland Display AS Any authorized reproduction in whole or in part must include this legend Hatteland Display Proprietary information Not to be distributed to any third party without written permissio...

Page 129: ...ed reproduction in whole or in part must include this legend Hatteland Display Proprietary information Not to be distributed to any third party without written permission Dimensions might be shown wit...

Page 130: ...S Any authorized reproduction in whole or in part must include this legend Hatteland Display Proprietary information Not to be distributed to any third party without written permission Dimensions migh...

Page 131: ...S Any authorized reproduction in whole or in part must include this legend Hatteland Display Proprietary information Not to be distributed to any third party without written permission Dimensions migh...

Page 132: ...S Any authorized reproduction in whole or in part must include this legend Hatteland Display Proprietary information Not to be distributed to any third party without written permission Dimensions migh...

Page 133: ...S Any authorized reproduction in whole or in part must include this legend Hatteland Display Proprietary information Not to be distributed to any third party without written permission Dimensions migh...

Page 134: ...S Any authorized reproduction in whole or in part must include this legend Hatteland Display Proprietary information Not to be distributed to any third party without written permission Dimensions migh...

Page 135: ...S Any authorized reproduction in whole or in part must include this legend Hatteland Display Proprietary information Not to be distributed to any third party without written permission Dimensions migh...

Page 136: ...S Any authorized reproduction in whole or in part must include this legend Hatteland Display Proprietary information Not to be distributed to any third party without written permission Dimensions migh...

Page 137: ...S Any authorized reproduction in whole or in part must include this legend Hatteland Display Proprietary information Not to be distributed to any third party without written permission Dimensions migh...

Page 138: ...S Any authorized reproduction in whole or in part must include this legend Hatteland Display Proprietary information Not to be distributed to any third party without written permission Dimensions migh...

Page 139: ...S Any authorized reproduction in whole or in part must include this legend Hatteland Display Proprietary information Not to be distributed to any third party without written permission Dimensions migh...

Page 140: ...AS Any authorized reproduction in whole or in part must include this legend Hatteland Display Proprietary information Not to be distributed to any third party without written permission Dimensions mig...

Page 141: ...AS Any authorized reproduction in whole or in part must include this legend Hatteland Display Proprietary information Not to be distributed to any third party without written permission Dimensions mig...

Page 142: ...142 This page left intentionally blank...

Page 143: ...143 Appendixes...

Page 144: ...ED link 2 PIN 22 T M D S Clock Shield PIN 23 T M D S Clock Digital clock Links 1 and 2 PIN 24 T M D S Clock Digital clock Links 1 and 2 PIN C1 Analog RED PIN C2 Analog GREEN PIN C3 Analog BLUE PIN C4...

Page 145: ...link inb100018 6 php Potmeter Control 9 pin DSUB Male 5 4 3 2 1 9 8 7 6 PIN 01 5V 5V out PIN 02 PWR Power On Off PIN 03 Res Reserved do not connect PIN 04 Aref For potensiometer PIN 05 12V 12V out PIN...

Page 146: ...ally 2 4 6 8 10 1 3 5 7 9 PIN 01 RxD Receive Data Positive PIN 02 GND Ground PIN 03 RxD Receive Data Negative PIN 04 5V 5V Out PIN 05 TxD Transmit Data Positive PIN 06 BUZ Buzzer Control Negative PIN...

Page 147: ...right graphics driver installed in your system IMAGE APPEARANCE A faulty TFT panel can have black lines pixel errors failed sections flickering or flashing image Incorrect graphic card refresh rate r...

Page 148: ...to comply with the limits for a Class A digital device pursuant to part 15 of the FCC Rules These limits are designed to provide reasonable protection against harmful interference when the equipment i...

Page 149: ...ntrol Please contact our service sales department if additional questions or review the following links at bottom of page for more information online Return Of Goods Information Make sure you surround...

Page 150: ...ithin 7 days 5 DOCUMENTATION For any claims the following documentation is required and must be forwared to the company or their agent invoice way bill and or bill of landing and or statement of arriv...

Page 151: ...sub pixels that are always lit Non extinguishing dot Dark dot defects Spot on the panel appear as pixels or sub pixels that are always dark off Non lightening dot c Inspector observes the LCD from no...

Page 152: ...4 equipment category b protected from the weather Other type approvals applies for the different products Please see the appropriate Specifications page in this manual for more information Use of bri...

Page 153: ...153 Appendix IND100077 24 User Notes...

Page 154: ...17 Added JH 26TAP STD A1 accessory page 137 Revised Contents of Package note Q1 2018 for HD CMB SX2 E1 F1 throughout the manual General update throughout the user manual based on latest specifications...

Page 155: ...155 Revision History Appendix IND100077 170...

Page 156: ...www hatteland display com...

Reviews: