AUXILIARY ANALOG AUDIO INPUTS AND PROGRAMMING
31
ENGLISH
Auxiliary Analog audio Inputs and Programming
Enter Button to select it, and a check mark will
appear to the right. See Figure 11c (Selecting a
Track).
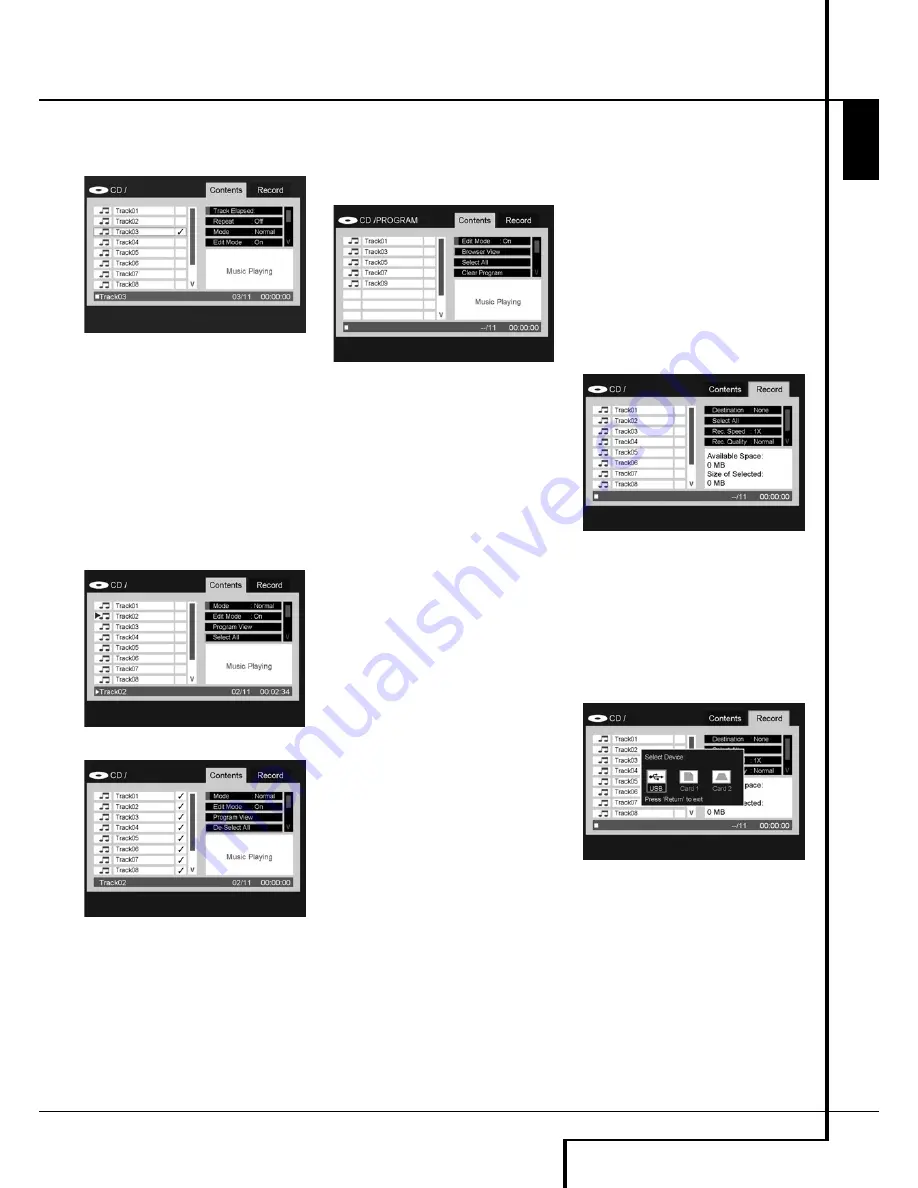
Figure 11c – Selecting a Track
NOTE:
If more than one track is selected, they
will be added to the play list in the disc’s native
order. If you wish to order them differently, select
each track one at a time and add them to the
program individually in the desired order.
Step Four:
You may select all items in the cur-
rent view to add to the play list by moving the
cursor to the Select All line of the Control
Commands and pressing the Enter Button. See
Figures 11d and 11e (Select All Command and
All Tracks Selected). This command is particularly
useful for programming data files, where you
wish to select all files in a folder.
Figure 11d – Select All Command
Figure 11e – All Tracks Selected
Step Five:
When you have selected the desired
tracks, scroll to the Add to Program line of the
Control Commands, and press the Enter Button.
All of the selected items will be copied to the
play list, and the check marks will disappear.
Step Six:
To view the play list, scroll up to the
Program View line and press the Enter Button.
The screen will change to display the contents of
your programmed play list. See Figure 11f
(Programmed Play List).
Figure 11f – Programmed Play List
Step Seven:
Scroll to the Edit Mode line and
change the setting to Off. You may now play the
programmed list as you would the main list.
To remove individual tracks from the play list,
make sure the Program View is on screen. Use
the Navigation Buttons to highlight the track
and press the Enter Button to select it, and a
check mark will appear. Then navigate to the
Clear Program command and press the Enter
Button to remove the selected track from the
program.
To remove all tracks from the programmed play
list, highlight the Select All line of the Control
Commands and press the Enter Button to select
all tracks. Then scroll down to the Clear Program
command and press the Enter Button to clear
the entire program. The program will also be
cleared if you open the disc drawer or remove
the solid-state media, as appropriate.
To return to the main Contents Menu, use the
Navigation Buttons to highlight the Browser
View command and press the Enter Button.
Recording
One of the unique features of the DMC 250 is its
ability to record audio from a CD or the Auxiliary
Analog Audio Inputs, convert the audio to the
MP3 format and store the resulting MP3 files on
a memory card or USB flash drive.
Making recordings is easier than ever using the
DMC 250’s simple Recording Menu. Just follow
these steps:
Step One:
Insert a memory card into one of the
card slots, or insert a USB flash drive into the
USB Port. Make sure the media is blank or con-
tains sufficient space to hold the new record-
ings.
Step Two:
Press the Source Button and use the
M N
Buttons
to select the Disc Player or
Auxiliary Analog Audio Inputs (AUX) as the
media source. Press the Open/Close Button and
insert a CD, or make sure your analog source
device is connected to the DMC 250 and turned
on.
NOTE:
Recordings may not be made from DVDs
or VCDs, or from CDs containing MP3 or WMA
files. Only audio CDs that are compliant with the
so-called “Red Book” standard, such as com-
mercial CDs, may be recorded. It is also not pos-
sible to make a recording using one of the solid-
state media as the source. It is your responsibili-
ty to comply with any copy restrictions imposed
by law.
Step Three:
Stop playback, and press the
Record Button to access the Recording Menu.
You may also access the Recording Menu by
using the Navigation Buttons to highlight the
Record tab at the top of the screen and pressing
the Enter Button. See Figure 12 (Recording
Menu).
Figure 12 – Recording Menu
Step Four:
Use the Navigation Buttons to high-
light the Destination line.
Press the Enter Button to display a dialogue box
allowing you to select Card Slot 1, Card Slot 2 or
the USB Port as the destination for the record-
ings. If no media has been installed, then that
media’s icon will be dimmed and you may not
select it. See Figure 12a (Select a Recording
Destination).
Figure 12a – Select a Recording Destination
Step Five (CDs only):
Select the tracks you
wish to record by using the Navigation Buttons
to highlight each track and pressing the Enter
Button.
A check mark will appear next to each selected
track. See Figure 12b (Selecting a Track For
Recording). To reverse the selection of a track,
highlight it and press the Enter Button, and the
check mark will disappear. To select all of the
tracks on the disc, scroll to the Select All com-
mand and press the Enter Button.


