


10
2.4 RTTY Loop Connections
Since the RTTY output stage of the keyboard is isolated from ground and from the chassis, the keyboard
can be connected at any convenient point in the station loop circuit, provided that the voltage from either
loop connection to ground does not exceed 250 volts. Loop current is switched by a transistor, rated to carry
up to 80 mA DC and to withstand loop voltages up to 250 volts DC. Before making any connections to the
keyboard, measure the loop voltage in the space condition and the current during mark pulses to make
certain that neither exceeds the keyboard ratings.
UNPLUG THE KEYBOARD AND THE STATION LOOP SUPPLY BEFORE TAKING ANY
CONNECTIONS.
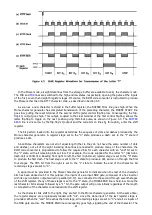
A typical station loop circuit is shown in Figure 2.3. A 6 pin plug is used to connect the loop to the
keyboard. Break the loop circuit at the desired point and connect the positive lead to pin 1 of the plug.
Connect the negative lead to pin 3. The cable shield, if one is used, may be connected to pin 2. A jumper
(or additional RTTY equipment) should be connected between pins 4 and 6. Double check the polarity of the
loop leads, as reverse voltages may damage the switching transistor. Then insert the plug into the RTTY
LOOP jack on the keyboard rear panel.
If the negative loop keying lead is grounded, the connections shown in Figure 2.4 should be used.
Prepare the plug connections as shown in Figure 2.4A.
Summary of Contents for DKB-2010
Page 1: ......
Page 20: ...18...
Page 39: ...37 Table 4 3 ROM Converter Input and Output Codes...
Page 52: ...50 Figure 6 1 Logic Circuit Board Test Points...
Page 53: ...51 Figure 6 2 Keyswitch Circuit Board Test Points...
Page 54: ...52 Figure 6 3 Power Supply Circuit Board Test Points...
Page 57: ...55 Table 6 4 DKB 2010 Wire List...
Page 63: ...61...
Page 64: ...62...
Page 65: ...63...
Page 67: ...65...
Page 69: ...67...
Page 71: ...69...
Page 73: ...71...
Page 75: ...73...
Page 77: ...75...
Page 79: ...77...
Page 81: ...79...
Page 83: ...81...
Page 85: ...83...
Page 87: ...85...
Page 89: ...87...
Page 91: ...89...
Page 92: ...90...
Page 93: ...91...
Page 94: ...92...
Page 95: ...93...
Page 96: ...A1 EXTENDED MEMORY OPTION FOR THE DKB 2010 KEYBOARD INSTRUCTION MANUAL...
Page 100: ...A5...
Page 101: ...A6...