background image

11

English

Summary of Contents for GCA-C0335P

Page 1: ...GCA C0335P 28 1 10 08 2011 Owner s Manual ASP AG Motorized Dome Cameras GCA C0335P Motorized Dome Day Night Camera 12x Zoom WDR ...

Page 2: ......

Page 3: ...es a bright and beautiful image in these conditions The Dome Camera supports one cabling for easy installation and can be combined with various digital surveillance products such as DVRs Control Keyboards and various sorts of accessories for a total surveillance solution The camera is incorporated with multiple protocols Pelco VCL Philips etc to enhance powerful connectivity 2 Important Safety Ins...

Page 4: ...ilation When installing the unit fasten it securely and firmly A falling unit may cause personal injury If you want to relocate the already installed product be sure to turn off the power and then move or reinstall it If the PTZ system looses its power supply during freezing temperatures and the power supply returns afterwards the Swiftdome Camera will first heat up internally to 3 C and then the ...

Page 5: ... other devices of a CCTV system please complete first the Dome Camera s ID and communication switch settings These switches are located on the bottom of the Dome Camera Additionally the 22 Pin Connector for Data Cable connection and the ISP Connector for firmware upgrade kit connection are located on the back plate of the analogue Swiftdome Camera There are various switches and connectors located ...

Page 6: ...terwards 4 4 ID Configuration Please change the analogue Dome Camera s ID if there is more than one Dome Camera in the same network Use this switch to change your Swiftdome Camera s ID by setting the 10 bit dip switch For instance if the camera s ID is 006 set the SW 8 and SW 9 to ON the rest to OFF as shown below For switch configuration details please refer to the Switch Settings Index Table Cha...

Page 7: ...s 4 6 1 Cable Requirements For operation this Dome Camera requires video RS 485 and power cables as described below The video cable sends video signals to a remote viewing site Using a coaxial cable to send video signals is recommended The RS 485 cable carries commands from a control device to the Dome Cameras A CAT 5 24 AWG cable is recommended Power supply DC 24V AC 24V input voltage NOTE Please...

Page 8: ...s inserted into the mid pin of the terminal block 4 6 3 22 Pin Connector Definition With the 22 pin connector installers can simply connect the power video and RS 485 cables to the Dome Camera at once Particularly the alarm pins are serviceable for connecting alarm input and output devices such as alarm sensors sirens or flashing lights with the surveillance system For the definition of each pin p...

Page 9: ...lease refer to the figure and the table below for pin definition and wiring 4 6 5 Cable Wiring and Connection Users may need to conduct cable wiring when 1 Connecting self provided cords to the connector housing shown in the figure below instead of using the equipped data cable or 2 Connecting alarm input and output devices The following pictures will illustrate the way to wire cords into the conn...

Page 10: ...e with a proper tool and pull it out gently Connect the 22 pin connector to its mating port on the back plate of the Dome Camera NOTE The figure is for illustration only Please refer to section 4 2 Switch Connector Definition for correct back plate layout 8 English ...

Page 11: ...5 Operation and Configuration 5 1 OSD Display Format Regarding information about OSD display position and function description please refer to the table below 9 English ...

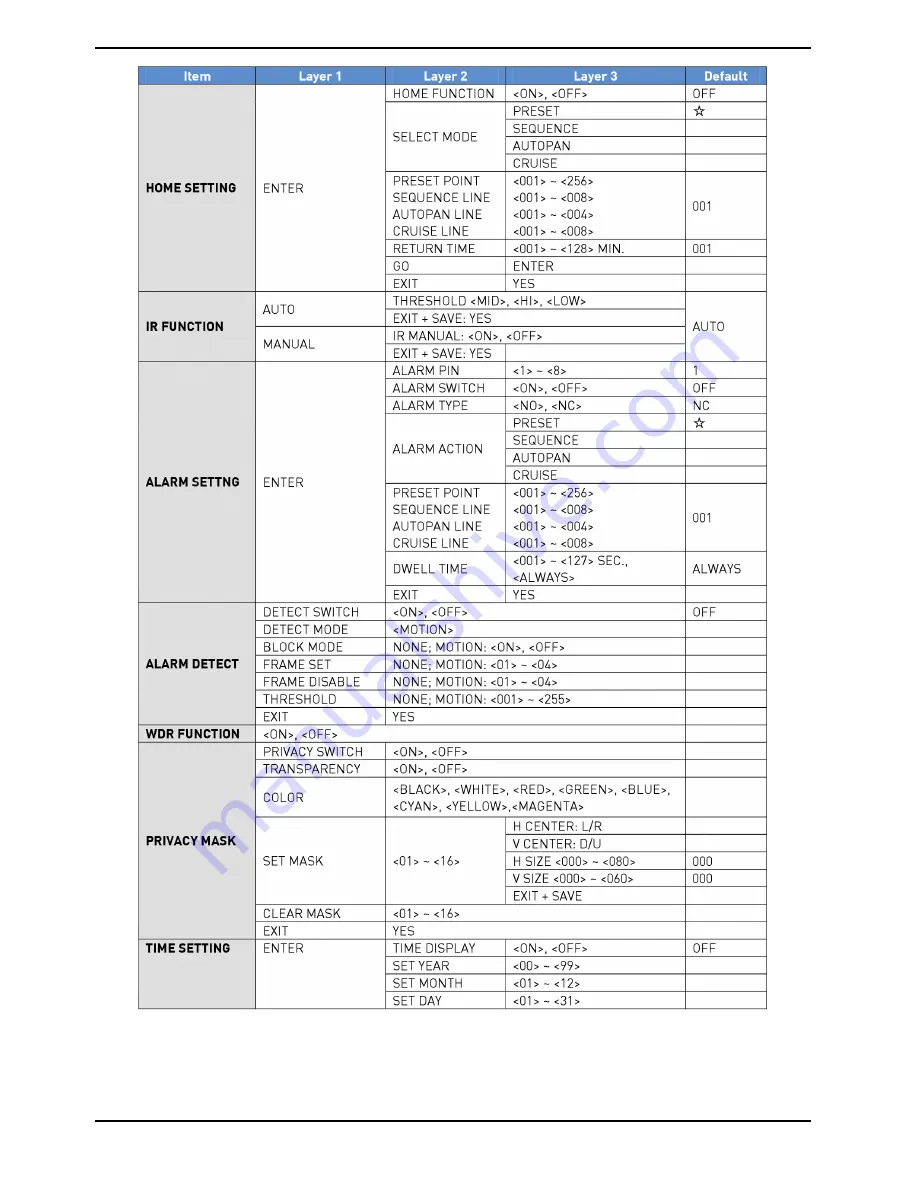
Page 12: ...SD Menu Tree The OSD setup menu structure is listed in the following section The star symbol indicates the factory default For detailed function description please refer to 5 3 Configuration Menu 10 English ...

Page 13: ...11 English ...

Page 14: ...12 English ...

Page 15: ...menu For items with an arrow press the right left direction keys on the control keyboard to select it For items with a press the CAMERA MENU key on the control keyboard to enter the submenu For items with several arrows users can use the right left direction keys to select these functions and then press the CAMERA MENU key on the control keyboard to enter their submenus NOTE In the Camera OSD menu...

Page 16: ...t to the edge of the picture where backlight would most likely be located After completing the setup of backlight go back to Main Page 1 and continue to set the focus values 5 3 4 FOCUS The Dome Camera s focus can be operated in two modes Manual Focus mode and Auto Focus mode AUTO There are three options available for the AF Mode including Normal mode Zoom Trigger Z TRIG mode and PTZ Trigger PTZ T...

Page 17: ...htness Shutter Speed IRIS and AGC Auto Gain Control control circuits work together automatically to get consistent video output level SHUTTER With this option Shutter Speed takes main control of exposure and both IRIS and AGC will function automatically in cooperation with the shutter speed to achieve consistent exposure output The shutter speed ranges from 1 10000 to 1 50 IRIS In this mode the IR...

Page 18: ...Temperature 2 500 to 3 000 K 75 watt Bulb Colour Temperature 2 820 K Candle Flame Colour Temperature 1 200 to 1 500 K AUTO In this mode white balance works within its colour temperature range This mode computes the white balance value output using the colour information from the entire screen It outputs the proper value using the colour temperature radiating from a black subject based on a range o...

Page 19: ...the original image therefore the image quality stays the same In contrast the Digital zoom takes one part of the image and expands that image to the full size of the screen in doing so the image quality will be reduced SLOW SHUTTER The shutter speed determines how long the image sensor is exposed to light The Dome Camera will automatically adjust the shutter speed based on the light condition of t...

Page 20: ...s point A Then the next view would directly change to point B without displaying the moving path APERTURE Users can adjust the enhancement of the edges of objects in the picture There are 16 levels of adjustment the options are from 01 to 16 01 represents no enhancement When shooting a text this function can make the text sharp EXIT Exit the SETUP MENU 1 and go back to the MAIN PAGE 1 to set other...

Page 21: ...ER This item is for adjusting the camera view angle The range of the view angle is between 10 and 100 SPEED BY ZOOM If this item is set to ON the pan tilt speed will be adjusted by internal algorithm when zooming automatically The larger zoom ratio leads to a lower rotation speed AUTO CALI Auto Calibration There is one horizontal and one vertical infrared ray check point in each dome When the dome...

Page 22: ...Please enter the password press ENTER to access the OSD main menu NOTE When you activate the Password Function for the first time please enter first the following Master Password to be allowed to setup the new password The Master Password is 9527 OSD AUTO CLOSE Users can specify the duration during which the OSD menu stays on the screen The time selection ranges from 5 to 30 seconds To let the OSD...

Page 23: ...l be displayed when the dome stays in the view area OFF When the TITLE DISPLAY is set to OFF no title will be displayed on the screen even when titles were set in advance 5 3 11 TITLE SETTING Up to 16 zone titles can be set with max 20 characters for each title Follow the steps below to set a camera title STEP 1 Move the dome to a view area for which you want to set a title STEP 2 Access the OSD m...

Page 24: ...key on the keyboard to select a number 1 represents Preset Point 1 2 represents Preset Point 2 etc STEP 2 Press the CAMERA MENU key ENTER on the keyboard and then rotate the dome camera to a target shooting area point STEP 3 Press the CAMERA MENU key again to save the defined preset point Once the setup of a preset point is completed users can move the cursor to the next item to run the preset poi...

Page 25: ...cific preset position to the selected sequence point with this item SPEED Users can set the speed of the transition from one sequence point to the next one The range of speed is from 1 to 15 Within this range PAN and Tilt speed varies from 5 to 300 degrees sec DWELL TIME The DWELL TIME is the duration during which the Dome Camera stays at a sequence point The range of duration time is from 000 to ...

Page 26: ...ave the position as the start point the cursor will move to END POINT automatically Make sure to set the end point to complete the Auto Pan setting NOTE The tilt and zoom values of the start point will be recorded and fixed for the selected Auto Pan line END POINT Users are able to set the end point after the start point is defined Pan the Dome Camera to another position and press ENTER to save th...

Page 27: ...e lines built in a Dome Camera Please use the LEFT RIGHT direction keys to first select a line and then follow the steps below to start recording the cruise path RECORD START Follow the description below to record a CRUISE path STEP 1 Rotate the Dome Camera to a desired view area for some protocols users may need to do it before entering the OSD menu and press ENTER to perform a cruise path using ...

Page 28: ...on is enabled and the RETURN TIME is up The options include AUTOPAN SEQUENCE CRUISE and PRESET Use the LEFT RIGHT direction keys on the control keyboard to change the setting and the items mentioned below will change in cooperation with your selection PRESET POINT Select a Preset Point to which the Dome Camera should go after the Return Time function which will be explained later is activated The ...

Page 29: ...ll automatically decide to remove the IR cut filter according to the light condition calculated by the internal light algorithm The options include LOW MID and HIGH LOW indicates a higher sensitivity and can improve reliability of the lens so that it is quicker to switch to Day mode and relatively slow to change to Night mode while HIGH indicates that it is quicker to switch to Night mode and slow...

Page 30: ...s triggered there the flash warning notice ALARM will be displayed in the upper right corner of the screen PRESET POINT Select a Preset Point to define where the Dome Camera should go when an alarm is triggered The preset point s should be set in advance either in the PRESET setup menu or through the keyboard SEQUENCE LINE Select a Sequence Line that the Dome Camera should execute when an alarm is...

Page 31: ...nction 5 3 19 ALARM DETECT When the Alarm Detect function is activated the camera will detect movement within a monitoring area and then send an alarm signal automatically The flash warning notice MOTION will be displayed in the upper left corner of the screen DETECT SWITCH This item is used to enable or disable the ALARM DETECT function DETECT MODE The Motion Mode is set in this section MOTION Th...

Page 32: ...he right left keys on the keyboard MODE Assign a trigger action to a specific motion detection frame The options include PRESET SEQUENCE AUTOPAN and CRUISE When motion is detected within a frame the Dome Camera will execute the specific trigger action DWELL TIME The DWELL TIME is duration of executing a trigger action If select the PRESET mode when motion is detected the Dome Camera will go to the...

Page 33: ...sing the joystick and adjust the mask size and area via the direction keys on the control keyboard When setting a mask it is suggested to set it at least twice bigger height and width than the masked object The Dome Camera will assume that the center of the selected view is the starting point and the joystick will be locked as users enter the SET MASK menu this will be explained later Please refer...

Page 34: ...he original vertical centre of a mask zone is the center of a screen It is possible to move a mask zone to another position by adjusting the vertical value with the LEFT RIGHT direction keys on the keyboard The camera will tilt up or down according to the user s control H SIZE 00 80 Users can adjust the horizontal size of a privacy mask through this item Setting the H and V size to 0 can delete th...

Page 35: ... MONTH DAY These items are for setting up the system date SET HOUR MINUTE These items are for setting up the system time EXIT SAVE Exit the TIME SETTING menu and go back to MAIN PAGE 3 to set up a schedule 5 3 23 SCHEDULE FUNCTION The schedule function enables users to program the performance of a preset point or function Sequence Auto Pan Cruise automatically in a specific period of time SWITCH S...

Page 36: ...6 Switch Settings Index Table Please refer to the switch settings below for the Dome Camera s ID and protocol setup 35 English ...

Page 37: ...36 English ...

Page 38: ...37 English ...

Page 39: ...38 English ...

Page 40: ...39 English ...

Page 41: ...40 English ...

Page 42: ...41 English ...

Page 43: ...42 English ...

Page 44: ...asy installation To connect the connector box with other devices Use a RS 485 cable CAT 5 is recommended to complete RS 485 communication wiring with control devices such as DVRs and Control Keyboards Use a 22 pin cable to connect the connector box to the dome For more detailed information please refer to the connector box user s manual A system wired with a connector box is illustrated in the fol...

Page 45: ...0 kilometers away Additionally the SDU can be installed eitherin a star or in a daisy chain configuration with up to 160 cameras see the diagrams below Its versatile installation configuration makes an easy integration into expanding surveillance systems possible For more information please refer to the SDU s user manual Star Configuration Daisy Chain Configuration 44 English ...

Page 46: ...ough a Pelco keyboard with built in D protocol and P protocol Please follow the instruction to operate the Swiftdome Camera through a keyboard with D and P protocols Cable Definition P Protocol Keyboard to PTZ Camera Cable Definition D Protocol Keyboard to PTZ Camera 45 English ...

Page 47: ...e Type Auto iris DC BLC On Off WDR ON OFF White Balance Auto Manual Camera ID 20 character Number of Privacy Zones 16 Pan Speed Manual 1 s 80 s Preset 400 s max Tilt Speed Manual 0 5 s 90 s Preset 400 s max Range Panning 360 endless Range Tilting 10 190 Number of Preset 256 Number of Pattern 8 OSD Yes Regulation CE FCC RoHS Compliant Supply Voltage 12 VDC 24 VAC Operating Temperature 45 C 50 C Hum...

Page 48: ...g relevant provisions EC EMC Directive 2004 108 EC Low Voltage Directive 2006 95 EC Applied harmonised standards and technical specifications EN 55022 2006 EN 55024 1998 A1 2001 A2 2003 EN 61000 3 2 2006 EN 61000 3 3 1995 A1 2001 A2 2005 EN 60950 1 2006 Ludwig Bergschneider CEO Remscheid 16 08 2011 ASP AG Lüttringhauser Str 9 42897 Remscheid Germany 47 English ...
Reviews: