


Model G0833P (Mfd. Since 06/17)
-73-
Miter Gauge
Adjustments
The miter gauge can be adjusted so it is perpen-
dicular to the blade and snug in the T-slot.
Tools Needed
Qty
90° Square ........................................................ 1
45° Square ........................................................ 1
Hex Wrench 2mm .............................................. 1
Hex Wrench 2.5mm ........................................... 1
Hex Wrench 4mm .............................................. 1
Checking/Setting 90° Stops
1. DISCONNECT MACHINE FROM POWER!
2. Slide miter gauge into T-slot on table.
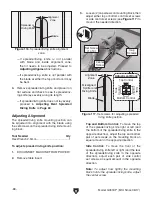
3. Loosen miter gauge lock knob, pull out posi-
tive stop knob, then pivot miter gauge body
to 90° so stop knob springs into position (see
Figure 125).
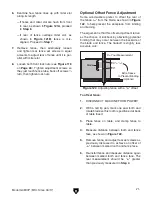
Figure 126. Checking 90° stop on miter gauge.
Square
Miter Gauge
Blade
Figure 125. Set screws for adjusting miter bar in
miter slot.
Set Screws
Lock Knob
Indicator
Screw
Positive Stop
Knob
4. Place square evenly against face of miter
gauge and blade, as shown in
Figure 126.
— If square does not touch miter body and
blade body evenly at same time, then pro-
ceed to
Step 5.
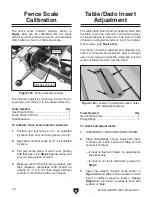
5. Loosen button head cap screws on positive
stop knob block (see
Figure 127), adjust
miter body until it is flush with square, then
tighten screws.
— If square touches miter body and body of
blade (not the teeth) evenly at same time,
then it is square to blade and 90° stop is
set correctly. No further adjustments are
necessary.
6. Loosen indicator screw on top of miter bar,
adjust pointer to 0°, then tighten screw.
Adjusting Miter Bar Tightness
The miter bar can be adjusted so it fits more tightly
in the miter slot. To adjust the miter bar tightness,
adjust the set screws shown in
Figure 125 as
needed. Bar should slide with little resistance.
Figure 127. Screws for adjusting miter body.
Positive Stop
Knob Block
Button Head Cap Screws
Summary of Contents for Polar Bear G0833P
Page 92: ......