


-68-
Model G0833P (Mfd. Since 06/17)
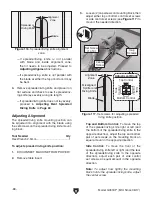
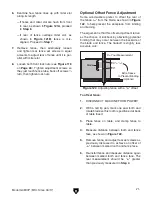
Figure 116. Spreader/riving knife alignment
zone.
Alignment
Zone
Spreader or
Riving Knife
Blade
— If spreader/riving knife is not parallel
with blade and inside alignment zone,
then it needs to be adjusted. Proceed to
Adjusting Alignment instructions.
— If spreader/riving knife is not parallel with
the blade at either the top or bottom, it may
be bent.
4. Remove spreader/riving knife and place it on
flat surface and check to see if spreader/riv-
ing knife lays evenly along its length.
— If spreader/riving knife does not lay evenly,
proceed to
Adjusting Bent Spreader/
Riving Knife on Page 69.
Adjusting Alignment
The spreader/riving knife mounting position can
be adjusted into alignment with the blade using
the set screws on the spreader/riving knife mount-
ing block.
Tool Needed
Qty
Hex Wrench 2.5mm ........................................... 1
To adjust spreader/riving knife position:
1. DISCONNECT MACHINE FROM POWER!
2. Remove table insert.
3. Loosen (2) cap screws on mounting block, then
adjust either top or bottom control set screws
or side control set screws (see
Figure 117) to
move it the needed direction.
Top and Bottom Control: To move the top
of the spreader/riving knife right or left (and
the bottom of the spreader/riving knife in the
opposite direction), adjust the top and bottom
pair of set screws on the mounting block an
equal amount in the opposite direction.
Side Control: To move the front of the
spreader/riving knife left or right (and the rear
of the spreader/riving knife in the opposite
direction), adjust each pair of side control
set screws an equal amount in the opposite
direction.
Note: To adjust how tightly the mounting
block holds the spreader/riving knife, adjust
the center screw.
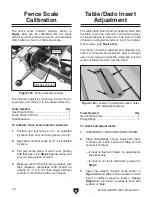
Figure 117. Set screws for adjusting spreader/
riving knife position.
Alignment
Zone
Misaligned
Splitter or
Riving Knife
Blade
Adjustment Block
Top Control
Side
Control
Side
Control
Bottom Control
Cap
Screws
Center
Screw
Cap
Screws
Set Screw
(1 of 4)
Summary of Contents for Polar Bear G0833P
Page 92: ......