


Model G0833P (Mfd. Since 06/17)
-69-
Adjusting Bent Spreader/Riving Knife
1. DISCONNECT MACHINE FROM POWER!
2. Bend spreader or riving knife by hand while
installed, then follow
Steps 1–3 in Checking
Alignment on Page 67 to determine if it is par-
allel with blade and inside "Alignment Zone"
(refer to
Figure 115 Checking Alignment on
Page 67).
— If this doesn't work, remove it to straighten.
— If you cannot straighten it properly,
replace it.
4. Re-install table insert.
5. Follow Checking Alignment, Steps 1–3.
— If spreader/riving knife is in alignment
zone, no additional steps are necessary.
—If spreader/riving knife is still not in align-
ment zone, continue adjusting set screws
on mounting block as necessary to cor-
rectly position spreader/riving knife.
6. Tighten (2) cap screws on mounting block to
secure spreader/riving knife adjustment.
Fence Adjustments
There are four main adjustments for the fence:
height off the table, squareness, parallelism with
the miter slot, and clamping pressure. These
adjustments are interconnected and some repeti-
tion may be needed when adjusting.
Tools Needed
Qty
Hex Wrench 6mm .............................................. 1
Square ............................................................... 1
Felt-Tipped Marker ............................................ 1
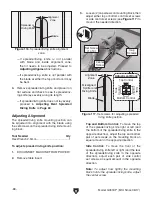
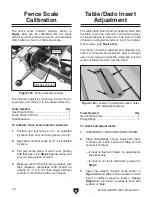
Figure 118. Location of screws used to adjust
fence parallelism and clamping pressure.
Rear Set Screws
Front Lock Nuts
and Adjustment Screws
Height and Square
The fence should be adjusted high enough off the
table so that it does not drag across the surface or
allow wood chips to get caught between the fence
and table. Also, the fence face must be square to
the table in order to produce accurate cuts.
To check/adjust fence height and squareness
to table:
1. DISCONNECT MACHINE FROM POWER!
2. Remove fence from saw and place it on a flat
surface.
3. Unscrew front lock nuts and adjustment
screws shown in
Figure 118 until they are
barely threaded into fence flange.
4. Back out rear set screws until they are just
threaded into fence flange (see
Figure 118).
Summary of Contents for Polar Bear G0833P
Page 92: ......