


Model G0833P (Mfd. Since 06/17)
-63-
Blade Tilt Stops
The table saw features stop collars that stop the
blade exactly at 45° and 90° when tilting it with
the handwheel.
The stops have been set at the
factory and should require no adjustments, unless
you notice that your cuts are not accurate.
Note: The tilt scale reads "0" when the blade is
90° to the table.
Tools Needed
Qty
90
° Square ........................................................ 1
45° Square ........................................................ 1
Hex Wrench 2.5mm ........................................... 1
Hex Wrench 3mm .............................................. 1
Setting 90° Stop Collar
1. DISCONNECT MACHINE FROM POWER!
2. Raise blade as high as it will go, then tilt it
toward 0° until it stops and cannot be tilted
any more.
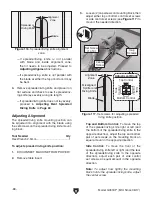
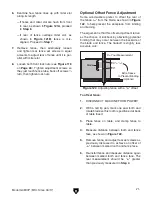
3. Place 90° square against table and blade so
it contacts blade evenly from bottom to top,
as shown in
Figure 105. Make sure blade
tooth does not obstruct placement of square.
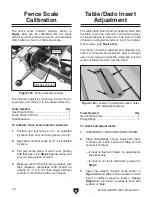
—If blade is 90° to table, then adjustments do
not need to be made. Make sure tilt indica-
tor arrow shown in
Figure 106 points to 0°
mark on scale. Adjust position by loosening
button head screw, moving indicator with
your fingers, then tightening screw.
Figure 105. Checking blade at 90°.
Table
90° Square
Blade
—If blade is not 90° to table, you will need
to adjust 90° stop collar. Proceed to next
step.
4. Tilt blade away from 0° by about 5°, so there
is room for 90° stop collar to move.
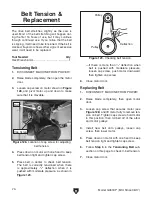
5. Open motor door, loosen set screws shown
in
Figure 107, then thread 90° stop collar
one turn away from trunnion bracket. This will
allow you to square blade in next step.
Figure 106. Tilt indicator arrow.
Indicator
6. Place square against blade, as shown in
Figure 105, then adjust blade until it is per-
fectly square to table.
7. Without turning blade tilt leadscrew, finger-
tighten 90° collar against trunnion bracket,
then tighten two set screws to secure collar
position.
Figure 107. 90° stop collar and set screws.
Set Screws
90° Stop
Collar
Trunnion
Bracket
Summary of Contents for Polar Bear G0833P
Page 92: ......