


-34-
Model G0833P (Mfd. Since 06/17)
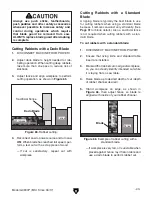
Blade Guard
Assembly
The term "blade guard" refers to the assembly
that consists of the clear polycarbonate shield
and dust enclosure, the spreader, and the anti-
kickback pawls on each side of the spreader
(see
Figure 45). Each of these components have
important safety functions during the operation of
the saw.
Figure 45. Blade guard assembly components.
Clear Shield
Spreader
Dust Enclosure
Anti-Kickback
Pawl
Guard
The clear polycarbonate guard allows the opera-
tor to see the blade cut the workpiece during
operation. This guard is designed to lift as the
workpiece is pushed into the blade and remain in
contact with the workpiece throughout the entire
cut.
The guard reduces injury risk by providing a bar-
rier around the blade that prevents accidental
contact and contains flying wood chips.
To ensure that the guard does its job effectively,
the guard must always be in the downward posi-
tion against the table during idle operation, and
the hinge mechanism must be maintained in good
working condition so the guard can freely pivot
up and down to accommodate the height of the
workpiece and return to the table surface.
Spreader
The spreader is a metal plate that prevents the
newly cut kerf of the workpiece from pinching the
backside of the blade, causing kickback.
The spreader also acts as a barrier behind the
blade to shield hands from being pulled into the
blade if a kickback occurs.
In order to work properly, the spreader
cannot be bent or misaligned with the blade.
If the spreader gets accidentally bent, take
the time to straighten it or just replace it.
Using a bent or misaligned spreader will
increase the risk of kickback! Refer to Page
67 to check or adjust alignment if necessary.
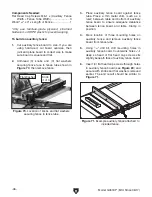
Installing Blade Guard & Spreader
4. Slide blade guard spreader all the way down
into adjustment block, then rotate knurled
knob so it disengages bracket and locking pin
engages hole in center of spreader.
5. Give spreader an upward tug to verify that it
is locked.
Tools Needed
Qty
Hex Wrench 3mm .............................................. 1
Straightedge ...................................................... 1
To install blade guard and spreader:
1. DISCONNECT MACHINE FROM POWER!
2. Install table insert, then raise blade all the
way up.
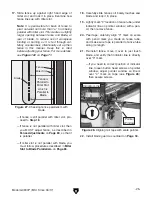
3. Slide knurled knob out (see Figure 46) and
rotate it so it engages upper bracket.
Figure 46. Knurled knob used to secure
spreader.
Locking Pin
Knurled
Knob
Upper
Bracket
Adjustment
Block
Summary of Contents for Polar Bear G0833P
Page 92: ......