


-48-
Model G0817 (Mfd. Since 05/16)
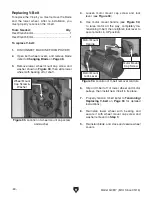
To check/calibrate positive stop:
1. Tilt table to approximately 10° right-tilt.
2. Set positive stop to up position (see
Figure 74).
3. Test positive stop setting by tilting table all the
way left.
— If table stops at 0, no further adjustments
are necessary.
— If table does not stop at 0, proceed to
Step 4.
4. Loosen jam nut, then rotate adjustment bolt
until table contacts bolt when at 0 (see
Figure 75).
Checking/Calibrating Positive Stop
Tools Needed
Qty
Wrench or Socket 13mm ................................... 1
5. Repeat Step 3 to test adjustment. If neces-
sary, repeat
Step 4.
Note: If you wish to set the positive stop to an
angle other than 0, follow
Steps 1–5 for the
desired angle.
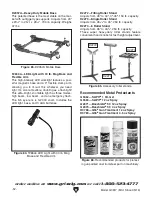
Figure 75. Positive stop in up position.
Adjustment
Bolt
Jam Nut
Ripping
"Ripping" means cutting with the grain of the
wood stock. For plywood and other processed
wood, ripping simply means cutting down the
length of the workpiece. Beveled rip cuts may be
performed by tilting the table.
To make a rip cut:
1. Adjust fence to match width of cut on your
workpiece, then lock fence in place.
2. Adjust blade guide assembly to proper height
above workpiece.
3. After all safety precautions have been met,
turn bandsaw
ON and wait for it to come to
full speed. Slowly feed workpiece into blade
until blade is completely through workpiece.
Figure 76 shows an example of a ripping
operation.
Figure 76. Example of a ripping operation.
NEVER place fingers or hands in the line of
cut. If you slip, your hands or fingers may
go into the blade and may be cut.
ALWAYS use a push stick when ripping
narrow pieces. Failure to follow these
warnings may result in amputation or
laceration injuries!
Summary of Contents for G0817
Page 88: ......