


Model G0817 (Mfd. Since 05/16)
-37-
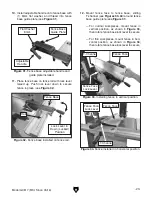
5. Loosen trunnion bolts that secure table (see
Figure 60).
Figure 60. Location of trunnion bolts.
Trunnion Bolts
(3 of 4)
6. Adjust table until distance between straight-
edge and miter slot is the same at front and
back of table.
7. Retighten trunnion bolts, then repeat Step 4
to verify adjustment.
3. Determine which trunnion is on low side of
table, then remove two trunnion bolts (see
Figure 60) from low trunnion.
4. Insert a shim, such as a thin washer, between
table and low trunnion at each mounting
location.
5. Re-install and tighten trunnion bolts, then
repeat
Step 2 to verify adjustment.
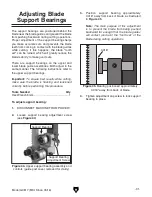
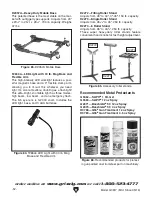
Figure 61. Squaring back of blade and table.
Blade
Square
Table
Adjusting Table Perpendicular to
Blade
1. DISCONNECT MACHINE FROM POWER!
2. Place a square on table and against back
of blade, as illustrated in
Figure 61. Table
should be perpendicular to back of blade.
— If the table is perpendicular to the back
of the blade, no adjustment is necessary;
proceed to
Aligning Fence on This Page.
— If the table is not perpendicular to the back
of the blade, you must shim the table; pro-
ceed to
Step 3.
Aligning Fence
To ensure cutting accuracy, the fence should be
aligned parallel with the blade. This is achieved
by aligning the fence to the miter slot after miter
slot parallelism is properly adjusted, as instructed
on
Page 36.
Note:
Occasionally, even after aligning the fence,
a symptom known as "blade lead" will develop,
requiring the fence to be skewed slightly to
compensate for the blade lead problem. Refer
to
Blade Lead, beginning on Page 61 for more
information on blade lead and skewing the fence.
Tools Needed
Qty
Hex Wrench 5mm .............................................. 1
To align fence:
1. DISCONNECT MACHINE FROM POWER!
2. Make sure table is aligned with blade (see
Adjusting Miter Slot Parallelism on Page
36 for detailed instructions).
Summary of Contents for G0817
Page 88: ......