


Model G0817 (Mfd. Since 05/16)
-33-
Installing
"Euro-Style"
Roller-Disc Guides
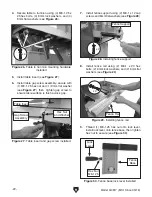
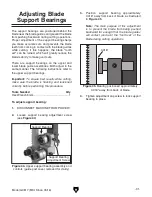
3. Loosen both guide bearing adjustment cap
screws (see
Figure 49), then position guide
bearings so they are close to —but not quite
touching—sides of blade.
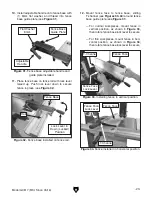
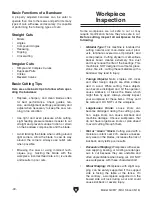
Note: When the blade guide bearings are
properly adjusted, they should only rotate
during cutting operations, or when the blade
is deflected to the left or right (see
Figure 50).
4. Retighten cap screws to secure settings.
Rotate blade by hand to check the setting,
and, if necessary, repeat
Steps 3–4.
Whenever changing blade or adjusting
blade tension or tracking, the support and
guide bearings must be re-adjusted before
resuming operation to ensure proper blade
support.
Figure 50. Blade guide bearings rotating during
cutting operation.
Figure 49. Location of upper guide bearing
adjustment cap screws (guide post cover
removed for clarity).
Guide Bearing
Adjustment
Cap Screws
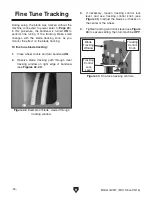
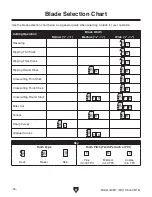
Many woodworkers prefer the type of support pro-
vided by "Euro-Style" roller-disc guides for certain
types of cuts, such as when cutting curves. With
these guides, the blade is supported side to side
by the larger surface area of the disc faces, rather
than the edges of two bearings (see
Figure 51).
These discs also roll with the movement of the
blade when contact does occur, thus minimizing
any friction against the blade.
Grizzly offers accessory "Euro-Style" Roller-Disc
Guides specially designed to fit Model G0817
(see
Accessories on Page 51). Installing these
blade guides is relatively easy, though it requires
first removing the blade and existing blade guide
assemblies.
Tools Needed
Qty
Hex Wrench 5mm .............................................. 1
To install "Euro-Style" Roller-Disc Guides:
1. DISCONNECT MACHINE FROM POWER!
2. Remove blade (refer to Page 46).
Figure 51. "Euro-style" roller-disc guides
installed.
Summary of Contents for G0817
Page 88: ......