


-38-
Model G0817 (Mfd. Since 05/16)
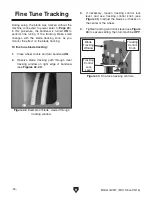
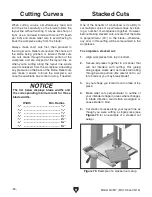
5. Adjust fence face parallel with edge of miter
slot, then retighten the four cap screws, being
careful not to move fence.
6. Re-check fence alignment and, if necessary,
repeat
Steps 4–5.
Figure 62. Fence installed next to miter slot for
alignment adjustment.
Cap Screws
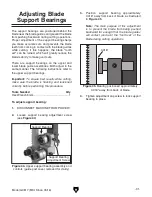
Calibrating Miter
Gauge
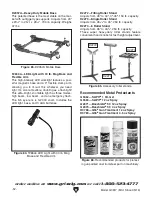
To calibrate miter gauge:
1. DISCONNECT MACHINE FROM POWER!
2. Place one edge of square against face of
miter gauge and other edge of square against
blade side, as shown in
Figure 63.
Note: Make sure square does not go across
a blade tooth when performing this step.
— If square rests flush and evenly against
both miter gauge face and blade side,
then no adjustments are necessary.
— If square does not rest flush and evenly
against both miter gauge face and blade
side, the miter gauge must be calibrated;
proceed to
Step 5.
3. Loosen lock knob on miter gauge and adjust
face flush with edge of square.
4. Tighten lock knob, and verify square rests
flush and evenly against both miter gauge
face and blade side.
Note: Sometimes the tightening procedure
can affect the adjustment.
5. Loosen screw that secures angle pointer,
adjust pointer to 0˚ mark on scale, then
retighten screw to secure setting.
Figure 63. Example of squaring miter gauge to
blade.
3. Install fence next to miter slot (see Figure 62).
4. Loosen four cap screws located to the left of
fence face (see
Figure 62).
The miter gauge needs to be calibrated to the
blade when it is first mounted in the miter slot.
Tools Needed
Qty
Phillips Screwdriver #2 ...................................... 1
Square ............................................................... 1
Summary of Contents for G0817
Page 88: ......