


-34-
Model G0817 (Mfd. Since 05/16)
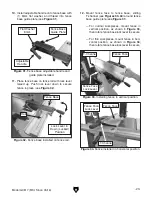
3. Loosen two cap screws on guide post that
secure upper blade guide assembly, remove
upper blade guide assembly, and replace
it with upper "Euro-style" roller-disc guide
assembly (see
Figure 52).
Adjusting
"Euro-Style"
Roller-Disc Guides
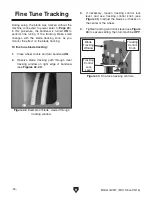
The "Euro-style" roller-discs (see
Figure 54) can
be adjusted left to right, as well as front to back,
relative to the blade. Properly adjusted roller-discs
provide side-to-side support, from just behind
the gullets to the back of the blade, to help keep
the blade straight while cutting. There are roller-
discs on the upper and lower "Euro-style" roller-
disc guide assemblies. Both adjust in the same
manner.
Important: Make sure the blade is tracking and
tensioned correctly before adjusting roller disc
guides (see
Tensioning Blade on Page 28).
The "Euro-style" roller-disc guide support bear-
ing (see
Figure 54) functions in the same way as
the support bearing that came with your saw. It is
positioned behind the blade near the roller-discs
and prevents the blade from pushing backward
during cutting operations. To adjust the support
bearings, refer to
Page 31 for more detailed
instructions.
Important: Always adjust roller-discs before
adjusting roller-disc guide support bearing.
Figure 52. "Euro-style" roller-disc guide
assembly installed.
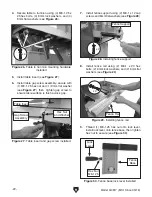
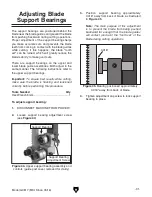
4. Loosen cap screw shown in Figure 53,
remove lower blade guide assembly, and
replace it with lower "Euro-style" roller-disc
guide assembly.
5. Re-install blade (refer to Page 46).
6. Proceed to Adjusting "Euro-Style" Roller-
Disc Guides in next section.
Figure 53. Installing lower "Euro-style" roller-disc
guide assembly.
Cap
Screw
Install Guide
Assembly Here
Figure 54. Upper "Euro-style" roller-disc guide
assembly.
Support
Bearing
Roller-Discs
Cap Screws
Summary of Contents for G0817
Page 88: ......