highlighted.
5. Move the appropriate control stick (lever, switch,
etc.) to the right or left of center to the direction of
travel you want to adjust. An arrow to the left of the
travel adjust value will reflect the current position to
be adjusted.
6. After the control stick or switch is placed in the
direction of travel to be adjusted, press the (+) or
(-) key until the proper amount of servo travel is
shown on the LCD. Press the (+) key to increase the
amount of servo travel. Press the (-) key to decrease
the amount of servo travel.
7. Follow the same procedure for the remaining chan-
nels.
8. Access the
SUB TRIM
function by pressing the
Down
key.
9. Access the
ELE
F MX
function by pressing the
Up
key.
10. Exit the
TRAVEL ADJ
function by pressing the
Down
and
Select
keys simultaneously.
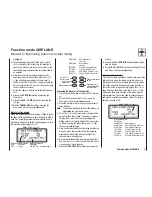
Elevator to flap mixing
When this system is active and a value of flaps is input,
the flaps will be deflected each time the elevator stick is
used. The actual flap movement is adjustable for both
up and down elevator. A switch can be assigned to turn
the elevator to flap mixing on or off.
MIXING VALUE (+/- 125%)
Elevator Operating Direction
E-DN:
Down side
E-UP:
Up side
Mixing SW Selection
SW Display
ALWAYS ON: Always Mixing In
RIGHT FWD:
Gear SW Forward
side
On
RIGHT REA:
Gear SW Rear
side
On
LEFT FWD:
FLAP SW Forward side
On
LEFT REA:
FLAP SW Rear side
On
AILE D/R:
AILE D/R SW Position 1
On
ELEV D/R:
ELEV D/R SW Position 1
On
Go to Ail
Rud Mix menu
Go to Travel
Adjust menu
Change selection
Change value/Select
switch
Reset selection to
Default (adjust to 0%
or ALWAYS ON)
Accessing the Elevator to Flap Function
1. Place the transmitter power switch on the ON positi-
on.
2. Access the Function mode. To do so, press the
Down
and
Select
keys simultaneously.
3. Move the elevator stick in the direction you want to
mix with flaps.
Note:
The position indicator will reflect this change by
highlighting the up or down arrow.
4. Press the (+) or (-) key to increase or decrease the
amount of flaps to be mixed. If you want to reverse
the flap travel, press the Clear key, bringing the
mixing value to the factory default (0%), and increa-
se the value using the opposite key (+) or (-) from
the key originally selected.
5. Once you have adjusted the first mixing position (up
or down), place the elevator stick in the opposite
direction and follow Step 5 above to adjust the
second elevator mixing value.
6. Access the switch position by pressing the
Select
key. Use the (+) or (-) keys to select from the one of
six switches, or from always on.
7. Access the
TRAVEL ADJ
function by pressing the
Up
key.
8. Access the
AIL
RUD MIX
Mixing function by pres-
sing the Up key.
9. Exit the
ELE
F MX
function by pressing the
Down
and
Channel
keys simultaneously.
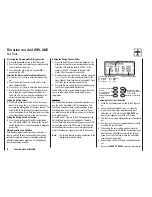
Aileron to rudder mixing
This form of mixing is designed so that when input to the
aileron stick is given, the rudder servo will also move,
eliminating the need to coordinate these controls manu-
ally. When adjusting, if an opposite mixing direction of
the rudder servo is required, simply press the (+) or (-)
keys to change the mixing value from a (+) or (-). This
will reverse the mixing direction of the rudder from its
original direction. The switch used to activate this mix
can also be selected as explained below. The factory
default is a value of 0%
Function mode AIRPLANE
Elevator to flap mixing; Aileron to rudder mixing
MIXING VALUE (+/- 125%)
Mixing SW Selection
SW Display
ALWAYS ON: Always Mixing In
RIGHT FWD:
Gear SW Forward side
On
RIGHT REA:
Gear SW Rear side
On
LEFT FWD:
FLAP SW Rear side
On
LEFT REA:
FLAP SW Rear side
On
AILE D/R:
AILE D/R SW Position 1
On
ELEV D/R:
ELEV D/R SW Position 1
On
Function mode AIRPLANE
21


