


GE M
EDICAL
S
YSTEMS
- K
RETZTECHNIK
RAFT
V
OLUSON
® 730P
RO
/ 730P
RO
V (BT´04)
D
IRECTION
KTI105947, R
EVISION
2
S
ERVICE
M
ANUAL
4-40
Section 4-5 - Backup and Restore Database, Preset Configurations and Images
4-5-6
Archiving Images
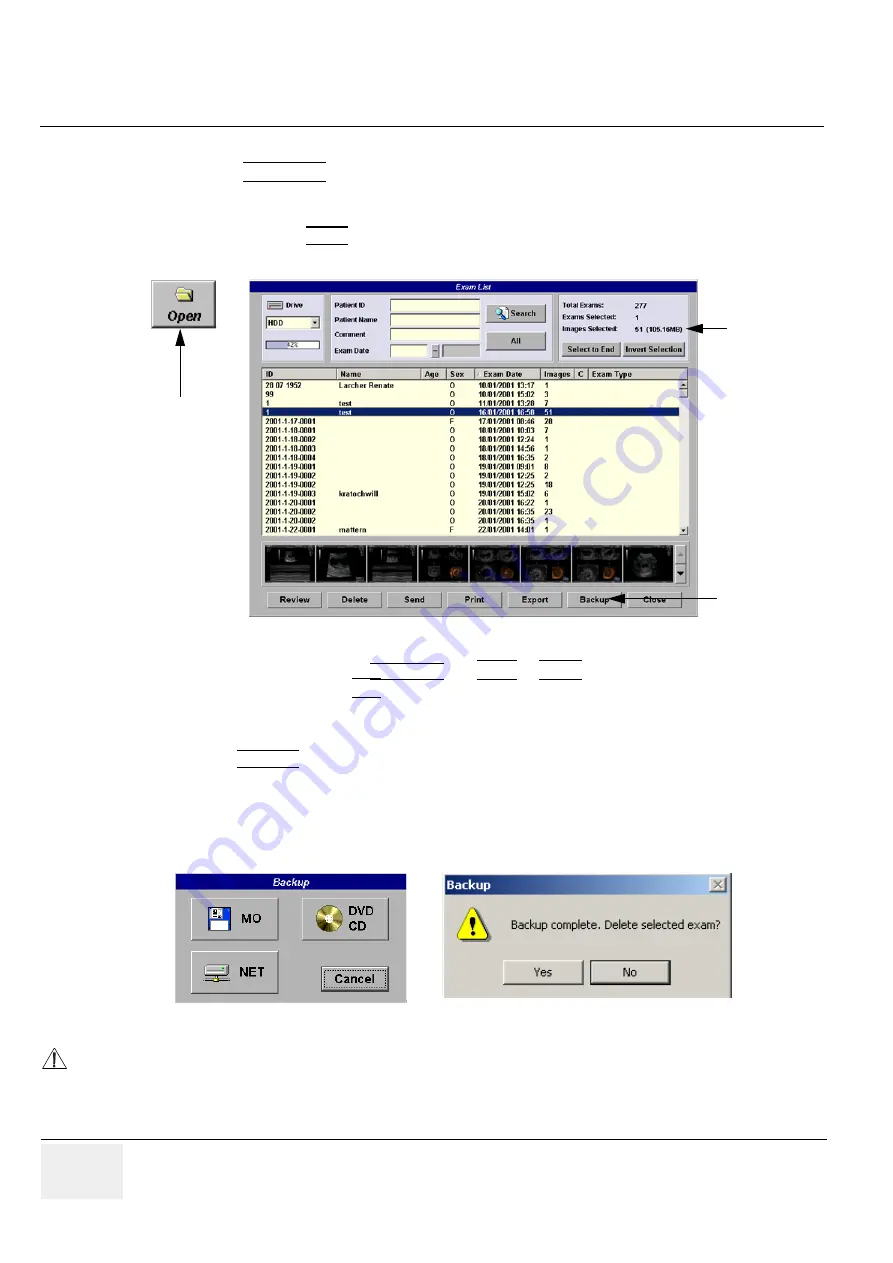
1.) Press the
SONOVIEW
key on the control panel.
2.) Insert the DVD/CD+(R)W or MOD into drive.
If required, format/erase the media, see
Section 4-4-11-1 "Formatting Media" on page 4-29
.
3.) When you click the OPEN button on the upper left side of the screen, a list of all the exams is
displayed see
Figure 4-35
.
4.) Select the exam(s) using the
TRACKBALL
, the
CTRL
or
SHIFT
key on the alphanumeric keyboard
and the right trackball key
SET
.
The number of all exams, the number of currently selected exams, the number of images and the
capacity of selected images are displayed automatically at the right and upper corner of the exams list.
5.) Click the BACKUP button.
6.) Select the destination for the backup.
NOTE:
For destination NET perform
Section 3-12-1 "Map Network Drive" on page 3-51
first.
7.) After finishing the backup, select whether the selected exam(s) is to be deleted or not.
For further information refer to Chapter 15 in the Basic User Manual of Voluson® 730Pro / 730ProV.
Figure 4-35 Sonoview Screen
Figure 4-36 Backup windows
NOTICE
If you select to delete the exam after finishing the backup, it will be absolutely deleted from the hard
disk of the ultrasound scanner Voluson® 730Pro / 730ProV!
Open button
Backup
capacity
of selected
exams
button


