background image

7

Software

Overview

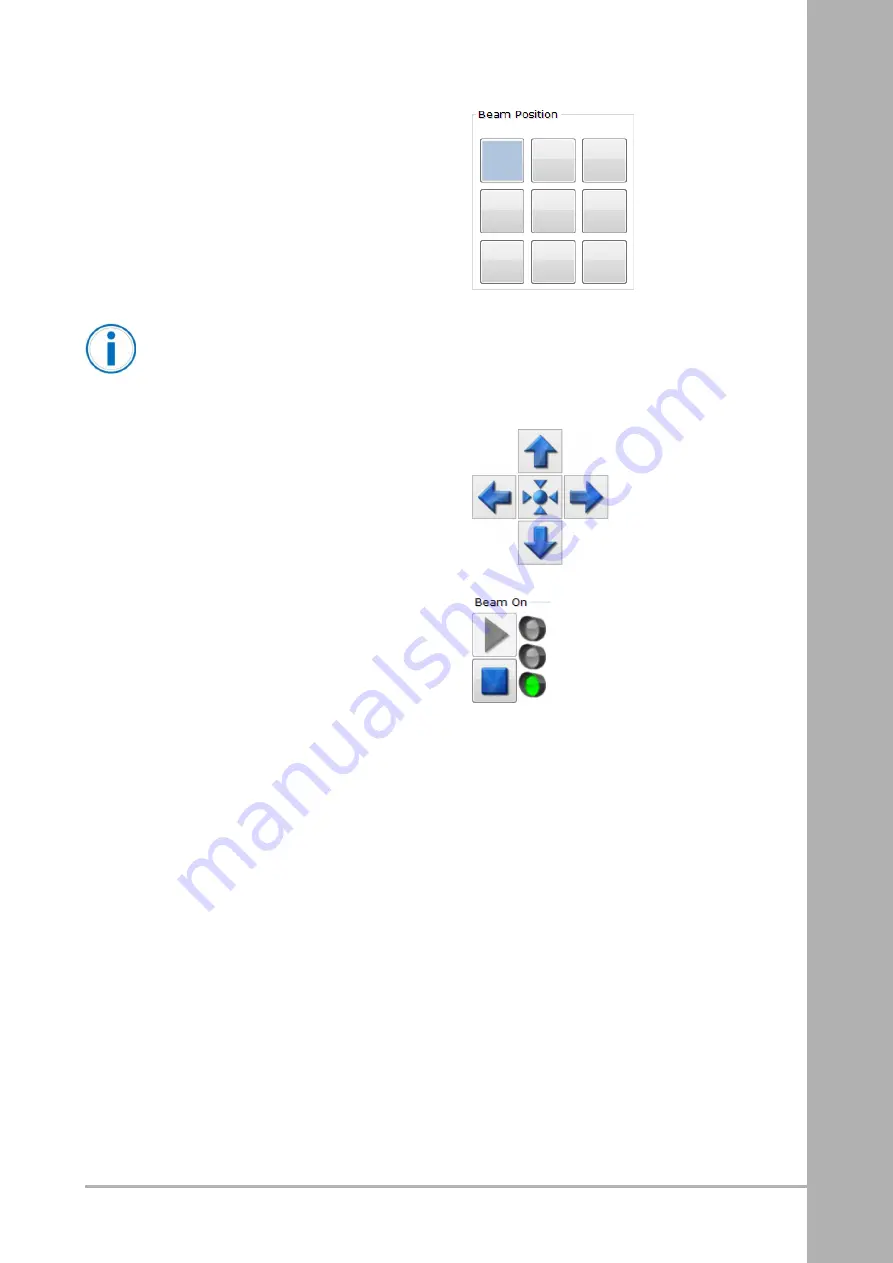
7. Press a square to choose a beam position.

N

No

otte

e

All nine beam positions have to be aligned individually.

8. Observe the beam for flickering through the view-

port. A flickering might be seen as two spots alter-
nating close to each other.

9. Press the arrows (Up-Down / Left-Right) until the

flickering stops and the two spots coincide as one.

10. Perform this procedure for all the nine beam

positions.

11. Press S

Stto

op

p to deactivate the beam.

12. Press S

Sa

avve

e to save the alignment.

02

OM-710430

en-GB

129

Summary of Contents for ArcamEBM Spectra H

Page 1: ...Original language 02 OM 710430 en GB O OM M Operation Manual Spectra H...

Page 2: ...This page is intentionally left blank...

Page 3: ...ision Notes 3 3 Change Log 5 4 About This Manual 7 5 Safety 13 6 Hardware Overview 35 7 Software Overview 67 8 Build Preparation Checklist 171 9 Build Preparation 179 10 PM U Electron Beam Unit Checkl...

Page 4: ...Table of contents ii 02 OM 710430 en GB This page is intentionally left blank...

Page 5: ...d by a CAD model The electron beam is managed by electromagnetic coils providing beam control that allows several melt pools to be maintained simultaneously The vacuum system provides a base pressure...

Page 6: ...Table of contents ii 02 OM 710430 en GB This page is intentionally left blank...

Page 7: ...instructions changes due to SOP Start of Production releases A Ad dd de ed d R Re em mo ov ve ed d I In nf fo or rm ma at tiio on n D De es sc cr riip pt tiio on n Build Preparation Content has been...

Page 8: ...This page is intentionally left blank 2 Revision Notes 4 02 OM 710430 en GB...

Page 9: ...documenta tion updated Please write SOP revision Start of Production or other useful information about why the chapter was replaced N No ot te e Only complete chapters should be replaced D Da at te e...

Page 10: ...3 Change Log D Da at te e C Ch ha ap pt te er r D De es sc cr riip pt tiio on n C Co om mp pa an ny y N Na am me e S Siig gn na at tu ur re e 6 02 OM 710430 en GB...

Page 11: ...4 About This Manual 4 4 A Ab bo ou ut t T Th hiis s M Ma an nu ua all 4 1 General 8 4 2 Validity 8 4 3 Document Updates 8 4 4 Proper Use 9 4 5 Improper Use 9 4 6 Acronyms 10 02 OM 710430 en GB 7...

Page 12: ...in this manual refers to the current develop ment state and manufacturing release of the product at the time of issue This manual is produced by A Ar rc ca am m E EB BM M Kroksl tts Fabriker 27A SE 43...

Page 13: ...omes invalid if the end user makes unauthorised modifications or changes to the product 4 4 5 5 I Im mp pr ro op pe er r U Us se e D DA AN NG GE ER R Improper usage can result in severe body injury an...

Page 14: ...ATmosph res EXplosibles an EU directive to protect employees from explosion risk B BC CU U Beam Control Unit C CA AD D Computer Aided Design C CL LF F Compressed Layer File A 2D slice format with comp...

Page 15: ...ol Unit H HM MI I Human Machine Interface H HV V High Voltage 60 kV H HV VU U High Voltage Unit H HW W Hardware I IM M Installation Manual I IO OQ Q Installation and Operational Qualification I IQ Q I...

Page 16: ...PR RS S Powder Recovery Station P PR RS S2 20 0 PRS for Arcam EBM Q20 Q20plus P PS SD D Powder Size Distribution P PS SI I Pound force per Square Inch R RC CC CB B Residual Current Circuit Breaker R...

Page 17: ...2 5 6 1 Heavy Lifting 22 5 6 1 1 Indicated Maximum Weights 23 5 6 2 High Voltage 24 5 6 3 X radiation composed of X rays Emission 25 5 6 4 Hot Surfaces 26 5 6 5 Crush and Pinch Hazards 26 5 6 6 Arcam...

Page 18: ...d more about this in the Operation Manual 5 5 2 2 P Pe er rs so on na all P Pr ro ot te ec ct tiiv ve e E Eq qu uiip pm me en nt t P PP PE E S St ta ag ge e E Ea ar r P Pr ro ot te ec ct tiio on n P P...

Page 19: ...ra at to or ry y P Pr ro ot te ec ct tiio on n M Ma as sk k Always use a respiratory protection mask with a fine dust filter whenever handling metal powder Full face mask covering both eyes and nose...

Page 20: ...n actions that m miig gh ht t cause lesser body injuries and or lesser equipment damage This caution can be levelled up to I Im mp po or rt ta an nt t and then W Wa ar rn niin ng g de pending on the s...

Page 21: ...lifting assistance There is a serious risk of injury if these items are handled incorrectly C Ch he ec ck klliis st t This symbol is used to inform about a checklist related to this instruction E Ex x...

Page 22: ...aiir r s su up pp plly y Build table bayonet Door closing actuator Camera shutters Build tank actuator 5 5 4 4 2 2 L Liig gh ht t C Cu ur rt ta aiin n C Ca au ut tiio on n Do not place your hands unde...

Page 23: ...ersons with appropriate knowledge i e people approved by Arcam through training in advanced troubleshooting only Violation can result in safety risks since the safety switch controls on off for interl...

Page 24: ...5 Safety 412532 Jokab Safety Eden Eva 105261 Light curtain 20 02 OM 710430 en GB...

Page 25: ...breathing as needed Rinse the nose mouth and throat with water Seek medical attention I In ng ge es st tiio on n Call poison control centre Never give anything by mouth to someone who is uncon scious...

Page 26: ...C Ca au ut tiio on n To eliminate the risk of dropping the build tank or hoppers when using the trolley make sure that the trolley forks are fully inserted in the fork channels before lifting the bui...

Page 27: ...e the powder barrel transporter to transport powder barrel 104853 or similar Place the barrel according to the left figure Lock with the wheel locks when filling the powder barrel For indoor use only...

Page 28: ...ansformed to 60 kV The high voltage parts are located in both cabinets Supply parts in the Control Cabinet and the Electron Beam Unit in the Chamber Cabinet The door interlock system prevents the high...

Page 29: ...on levels below limits indicated in EC Directive 96 29 EurAtom 1 Sv hour To ensure satisfactory X radiation protection all machine parts internal and external must remain in position Removing or repla...

Page 30: ...ne powder and build However some parts of the chamber or equipment con tained within the chamber might still have an elevated temperature Use tools or insulating gloves to handle hot components The bl...

Page 31: ...grades 45 microns in a barrel Handle the metal dust with care If the barrel is overfilled do not pour the metal dust but use a scoop and gently put into a new barrel Seal the barrels with a lid Dispo...

Page 32: ...t in accordance with your local disposal regulations Contact your local disposal authority for advice Arcam EBM machines are optimised to be used with Arcam powders Arcam does not recommend and will n...

Page 33: ...and to handle these risks according to the local working environment laws and regulations N No ot te e Wash hands thoroughly after powder handling before meals before breaks and at the end of the wor...

Page 34: ...pment Consult local fire brigade for further recommendations and advice D Do o N NO OT T e ex xt tiin ng gu uiis sh h m me et ta all f fiir re es s w wiit th h Foam Carbon dioxide Water N No ot te e A...

Page 35: ...he build table drive belt is to be removed first ensure that the powder table is in its highest position to reduce the risk of pinching Do not exceed the maximum weight limit for the trolley A hopper...

Page 36: ...e the cham ber or with chamber parts and keep the vacuum chamber parts free from metallisation D DO O N NO OT T Reuse dirty heat shields cones foils or glass Don t reuse any dirty or metallised consum...

Page 37: ...ible cleanliness Do N NO OT T touch parts with bare hands Use a separate set of tools for the column All surfaces where parts and tools are placed have to be wiped with alcohol prior to work Access th...

Page 38: ...f cleaning column and vacuum chamber and of cleaning the tools after each use C Ch he em miic ca all c co on nt te en nt t r re eq qu uiir re em me en nt ts s Pharma or analytical grade alcohol with a...

Page 39: ...Fan 47 6 4 Vacuum Chamber 48 6 4 1 Chamber Door 48 6 4 2 Rake System 49 6 4 2 1 Rake Positions 50 6 4 3 Z actuator 51 6 4 4 Build Unit Removable Parts 52 6 4 5 Build Unit Fixed Parts 53 6 4 6 Door Clo...

Page 40: ...attached to the back of the control cabinet below the main switch between the two cabinets The plate in cludes the following data Manufacturer details Model type Serial number Power supply Short circ...

Page 41: ...viewport 6 offers a direct observation of the build process W We eiig gh ht t 2810 kg 6195 lbs N No oiis se e lle ev ve ells s Standby mode 75 dB A Start vacuum mode 77 dB A Turbo pump vacuum mode 76...

Page 42: ...r the hatch needs to be pushed fully open to get the gas spring to hold the hatch in an open position Make sure that the hatch is in the fully open top position before commencing any work within the E...

Page 43: ...power supplies and safety override switch C Ch ha am mb be er r c ca ab biin ne et t b ba ac ck k d do oo or r Access to the vacuum subsystem C Co on nt tr ro oll c ca ab biin ne et t b ba ac ck k d d...

Page 44: ...ss s p pa an ne ell Panel secured with screws Access to internal cooling system Hidden behind D Cooling system access panel C Ch ha am mb be er r c ca ab biin ne et t llo ow we er r a ac cc ce es ss...

Page 45: ...la as sh hiin ng g Maintenance mode enabled S St te ea ad dy y Error or fatal alarm acknowledged Y Ye ellllo ow w F Flla as sh hiin ng g Operator handling error S St te ea ad dy y Operator assistance...

Page 46: ...6 Hardware Overview 6 6 3 3 2 2 P Pn ne eu um ma at tiic c S Su up pp plly y S Sy ys st te em m Internal distribution of compressed air with a safety shut off functionality 42 02 OM 710430 en GB...

Page 47: ...and or the light curtain Possible to lock with padlock when shut off B B V Va ac cu uu um m c clle ea an ne er r f fe ee ed d v va allv ve e ON OFF valve for air supply to vacuum cleaner The vacuum c...

Page 48: ...6 Hardware Overview 1 Vacuum cleaner 2 Door actuators 3 Camera shutters 4 Lift plates 5 Build table bayonet 44 02 OM 710430 en GB...

Page 49: ...external and one internal circuit connected via a liquid to liquid heat exchanger The closed internal circuit automatically regulates the temperature keeping media at 2 25 5 C C External cooling media...

Page 50: ...ontrol valves for individual circuits 7 7 C Ciir rc cu ulla at tiio on n p pu um mp p Circulation pump for the internal media circuit 6 6 3 3 3 3 3 3 C Co on nn ne ec ct tiio on n M Ma an niif fo olld...

Page 51: ...irects the media flow through the heat ex changer whenever cooling is required 1 10 00 0 value in EBM Control means 1 10 00 0 flow in bypass line 2 2 H He ea at t e ex xc ch ha an ng ge er r Stainless...

Page 52: ...correct temperature inside the chamber throughout the build The thickness of the door the machine shell plate and the lead glass in the viewport protects operators from X radiation The viewport 1 allo...

Page 53: ...om the hoppers and spreads it over the build area start plate A drive motor is mounted externally at the rear of the vacuum chamber Movement is transferred via a gear box and a shaft feedthrough to th...

Page 54: ...echanical stop 2 2 F Fe et tc ch h P Po os siit tiio on n Fetch is the position at which the rake will move to fetch powder Fetching is alternated between the left and right side 3 3 R Re es st t P Po...

Page 55: ...uild platform is connected to the Z actuator via a bayonet coupling 1 Bayonet 2 Feedthrough assembly 3 Rail 1 pcs 4 Ball screw 5 Shaft 6 Shuttle 7 Thermocouple feedthrough 8 Z actuator drive belt 9 Or...

Page 56: ...lld d The heat shield helps to maintain the temperature of the build and protects internal parts from metalli sation The heat shield is also used as part of the X radiation protection H He ea at t s s...

Page 57: ...nk lift plate assembly Parts of the build table which are not required to be removed when reloading the machine 6 6 4 4 6 6 D Do oo or r C Cllo os siin ng g A Ac ct tu ua at to or rs s The door closin...

Page 58: ...The pump is fitted with an ex haust silencer filter The pump is located near the cooling system from where it blows cool air up to the Electron Beam Unit A shut off valve enables a secure sealing of...

Page 59: ...r 3 Line pressure 0 to 2 5 bar 4 He vent valve 5 Safety shut off valve 6 Test port 7 Helium feed 5 to 10 bar The Arcam EBM machine uses inert gas to keep a steady level of vacuum during the build proc...

Page 60: ...able The high voltage supply is interlocked by door switches and also by the vacuum level in the chamber The opening of back doors of the ma chine or failure to maintain the vacuum level shuts down th...

Page 61: ...ed through a pair of contactor pins to the cathode heats up the cathode to the correct operating temperature The cathode is mounted in a grid cup which acts as a throttle for the electron beam The gri...

Page 62: ...s shapes and controls the beam Astigmatism 1 2 Focus Deflection X Y The column is cooled by air to keep critical parts at normal temperature during operation 1 Ground fingers 3 pcs 2 Column protection...

Page 63: ...ide of the lower column The term smoke is used when the powder bed becomes charged and creates a dust cloud in the chamber The smoke sensor will detect this state shut off the beam for a short while a...

Page 64: ...6 Hardware Overview 6 6 7 7 C Co on nt tr ro oll S Sy ys st te em m 6 6 7 7 1 1 C Co om mp pu ut te er r An SSD for OS and control software C and a separate drive for log files D 60 02 OM 710430 en GB...

Page 65: ...d logic to control different systems of the EBM machine For example the control of the vacuum pumping sequence rake movement and table movement The safety PLC and relay controls the machine in terlock...

Page 66: ...ct tr ro on niic c R Ra ac ck ks s Rack 1 and 2 hold amplifiers R Ra ac ck k 1 1 R Ra ac ck k 2 2 The third row of the electronic rack holds xQam Main and CV Controlled Vacuum modules T Th he e t th...

Page 67: ...6 Hardware Overview 6 6 7 7 4 4 P Pr ro of fiiB Bu us s S Sy ys st te em m The EBM machine utilises Profibus as communica tion protocol between various machine components 02 OM 710430 en GB 63...

Page 68: ...er and the surge protector are located on the back side of the cabinet at the top They protect the machine from disturbances and harmful power spikes C Ca au ut tiio on n Do not use the main power swi...

Page 69: ...image from front 1 xQam 2 LayerQam camera 3 Lens 4 Shutter blade actuator 6 6 8 8 1 1 L La ay ye er rQ Qa am m The LayerQam camera takes picture of each layer throughout the build This provides a vali...

Page 70: ...lades are operated by pneumatic ac tuators They are closed throughout the build proc ess except when a picture is taken 6 6 8 8 3 3 x xQ Qa am m xQam is a sensor system used for automatic cali bration...

Page 71: ...ction Mode 92 7 1 2 9 5 Reset Maintenance Timers In Production Mode 93 7 1 2 10 Hardware Status 94 7 1 3 Engineering Mode 95 7 1 3 1 Left Panel 96 7 1 3 1 1 Engineering Mode Alarm Types 98 7 1 3 1 2 P...

Page 72: ...Build Project ABP 147 7 4 Magics Build Processor 148 7 4 1 Configure Arcam Build Processor 149 7 4 1 1 Add Printer 149 7 4 1 2 Configure Printer Profile 151 7 4 2 Export Build Projects 155 7 4 2 1 Gra...

Page 73: ...s the GUI looks different The production mode is only available for Spectra and the Q series There are four levels of user access see 7 2 1 User Access P Pr ro od du uc ct tiio on n M Mo od de e Produ...

Page 74: ...s mode Its layout will guide the operator throughout the proce dure of preparing the machine for a build The production mode interface is divided into two sections A fixed panel at the top An overview...

Page 75: ...person that has a master key that overrides all safety equipment and has full access to the system If a master key is inserted a yellow master key symbol is visible on the user symbol 1 Press the use...

Page 76: ...om the operator to be able to run the machine The number on top of the alarm symbol shows how many alarms that are active In this case four alarms are active This alarm symbol has two categories E Er...

Page 77: ...7 Software Overview 7 7 1 1 2 2 4 4 C Ch ha am mb be er r L Liig gh ht t This button turns the chamber light ON OFF O ON N O OF FF F 02 OM 710430 en GB 73...

Page 78: ...w 7 7 1 1 2 2 5 5 M Ma an nu ua all C Co on nt tr ro olls s This page is a control panel for the table and rake movement These buttons can be turned ON OFF due to safety reasons during maintenance 74...

Page 79: ...ure is successful the indicator beside the button turns green If not it turns red L Lo oa ad d U Un nllo oa ad d These buttons move the heat shield to its upper or lower position D Do ow wn n U Up p 7...

Page 80: ...ecify the number of times the rake will move and fetch powder to the start plate N Nu um me er riic c k ke ey y b bu ut tt to on n S St ta ar rt t f fe et tc ch hiin ng g S St to op p f fe et tc ch hi...

Page 81: ...es the rake to the fetch position and back to rest position R Re es st t p po os siit tiio on ns s Moves the rake quickly to the rest position C Ce en nt tr re e Moves the rake quickly to the centre o...

Page 82: ...on up down with the S St te ep p U Up p or S St te ep p D Do ow wn n buttons On upwards movements the table will go up one additional millimeter and then back down to compensate for backlash in the mo...

Page 83: ...p Up or Step Down buttons The step size can be changed by pressing the numeric key button T Ta ab blle e P Po os siit tiio on n Shows the current position of the table z axis movement relative to the...

Page 84: ...ep p S Siiz ze e I In n P Pr ro od du uc ct tiio on n M Mo od de e 1 Press M Ma an nu ua all C Co on nt tr ro olls s 2 Press N Nu um me er riic c k ke ey y b bu ut tt to on ns s 3 Enter a new step si...

Page 85: ...build can be started If a Build Project is loaded from an external system for example Materialise Streamics the L Lo oa ad d Build Project function can be disabled in the Production Mode Settings Mac...

Page 86: ...h number turns up next to the nu meric key buttons 5 Press L Lo oa ad d B Bu uiilld d P Pr ro ojje ec ct t 6 Press L Lo oa ad d to activate a build project Selected build project appears on the Build...

Page 87: ...etup in Engineering Mode it is possible to select if an auto matic beam alignment should be included or not in the Automated Build Process If the control parameter is set to false and there is a need...

Page 88: ...EB BM MC Co on nt tr ro oll5 5 B Bu uiilld dP Pr ro ojje ec ct ts s 1 Press B Bu uiilld d P Pr re ep pa ar ra at tiio on n 2 Press L Lo oa ad d B Bu uiilld d P Pr ro ojje ec ct t 3 Press I Im mp po o...

Page 89: ...2 2 7 7 B Bu uiilld diin ng g Once a build has started the progress can easily be monitored on the screen where a progress bar is shown together with the estimated time left before the chamber can be...

Page 90: ...la at tiio on n C Co on nt tr ro olls s To be able to open the chamber door after a build it is necessary to ventilate the chamber If the bottom temperature is below 80 C it is possible to ventilate w...

Page 91: ...C Ch ha am mb be er r I In n P Pr ro od du uc ct tiio on n M Mo od de e 1 Press V Ve en nt tiilla at tiio on n C Co on nt tr ro olls s 2 Press S St ta ar rt t to ventilate with air or helium 3 Press O...

Page 92: ...are Overview 7 7 1 1 2 2 9 9 U Us se er r M Ma aiin nt te en na an nc ce e This page includes normal operator maintenance The access is user dependent Please refer to 7 2 1 User Access 88 02 OM 710430...

Page 93: ...ro od du uc ct tiio on n M Mo od de e To protect the powder between builds this function is activated 1 Press U Us se er r M Ma aiin nt te en na an nc ce e 2 Press P Po ow wd de er r P Pr ro ot te ec...

Page 94: ...intenance section 1 Press U Us se er r M Ma aiin nt te en na an nc ce e 2 Press A Au ut to o B Be ea am m C Ca alliib br ra at tiio on n 3 Insert the Calibration Plate into the chamber 4 Press D Do on...

Page 95: ...ot te e When replacing the cathode in Production Mode a beam alignment must be performed in Engi neering Mode 1 Press U Us se er r M Ma aiin nt te en na an nc ce e 2 Press C Ca at th ho od de e 3 Pres...

Page 96: ...be er r C Co on nt tr ro olls s Chamber Controls has two functions A Ac ct tiiv ve e C Co oo olliin ng g M Mo ov ve e Press M Mo ov ve e to force build table to a position where the table is in conta...

Page 97: ...s s I In n P Pr ro od du uc ct tiio on n M Mo od de e To be reset every time User Preventive Maintenance has been performed 1 Press U Us se er r M Ma aiin nt te en na an nc ce e 2 Press M Ma aiin nt t...

Page 98: ...7 Software Overview 7 7 1 1 2 2 1 10 0 H Ha ar rd dw wa ar re e S St ta at tu us s This page shows the machine status A red indicator requires attention 94 02 OM 710430 en GB...

Page 99: ...the Administrator or Engineer The initial view is the Overview It is divided into three sections a fixed panel to the left a main window to the right that changes appearance depending on which of the...

Page 100: ...arms page The rake is moving A simulation is running The beam has not been calibrated The manual control is running S St to op p Immediate stop an ongoing melting process An ongoing table or rake move...

Page 101: ...ance depending on the most severe alarm present When the Alarm button is pressed a list of unacknowledged alarms appears in the top section of the screen and a history of acknowledged alarms appears i...

Page 102: ...d by EBM Control I In nf fo or rm ma at tiio on n This alarm can be ticked off without an action N No o a alla ar rm ms s p pr re es se en nt t A Ac ck kn no ow wlle ed dg ge ed d a alla ar rm m For s...

Page 103: ...lick inside the parameter window 2 Click the box next to the parameter s name and it will appear in the left side panel 3 To change the order of which the parameters ap pear click on the up down arrow...

Page 104: ...Displays the total height of the build C Cu ur rr re en nt t Z Z Displays the current height of the build M Ma ax x L La ay ye er r T Tiim me e Displays the longest layer time in seconds so far in th...

Page 105: ...me elapsed since the process was stopped either by press ing Stop or when the build finished or failed T Tiim me e G Gr ra ap ph h D Diis sp plla ay y The time graph display shows a graph of the proce...

Page 106: ...ime Must be clicked every time the user wants the graph to be updated 1 Press O Ov ve er rv viie ew w 2 Press G Gr ra ap ph h 3 Click the checkbox in front of each parameter to be shown in the time gr...

Page 107: ...click inside the time graph display 9 Select S Sh ho ow w P Po oiin nt t V Va allu ue es s 10 Right click inside the time graph display 11 Select S Se et t s sc ca alle e 12 Position the mouse pointe...

Page 108: ...tion of clf files and themes in a build All the information required to start a build The B Bu uiilld d F Fiille e button loads a zipped collection of clf files which requires you to go to the Process...

Page 109: ...cters to be used is 244 including the path and file suffix other wise the build may fail Applies to both Windows XP and Windows 7 installations 5 Press O OK K 6 The file is stored in C Programfiles Ar...

Page 110: ...s S Se elle ec ct t B Bu uiilld d 4 Press I Im mp po or rt t b bu uiilld d f fr ro om m r re em mo ov va ab blle e u un niit ts s 5 Select file 6 Press R Re ef fr re es sh h f fiille e lliis st t and...

Page 111: ...stem outgassing The system outgassing steps are defined in the start plate theme N No ot te e The start plate and cathode used during a system outgassing will be destroyed It is therefore recommended...

Page 112: ...in the upper right panel for all tabs must be green to be able to start the machine 14 Press S St ta ar rt t to enable the build The start process dialogue appears Start plate heating is preselected...

Page 113: ...tart and stop height to be able to melt a selected part of the build S St ta ar rt t Z Z lle ev ve ell The start height will automatically be set to the thickness of the first layer S St to op p Z Z l...

Page 114: ...elf are correct 7 7 1 1 3 3 4 4 1 1 F Fu un nc ct tiio on ns s S Se elle ec ct t M Ma at te er riia all This selection will define which Process Themes being available The last selected material will...

Page 115: ...the green tick must be pressed This will not store the changes in the theme file Changes that are made to the theme settings will be marked all the way from out side the theme and down to the paramet...

Page 116: ...s s T Th he em me es s 1 Press M Me en nu u 2 Press P Pr ro oc ce es ss s 3 Select the material to be used by pressing S Se elle ec ct t T Th he em me e 4 Select a machine 5 Select the step checkbox a...

Page 117: ...ps panel 5 Press S Se elle ec ct t T Th he em me e to access a list of themes to choose from such as preheat melt net and wafer N No ot te e The order the process steps gets in the Step area is the sa...

Page 118: ...Ca at th ho od de e To change cathode theme if other than default S Se elle ec ct t t th he em me e To select the filament cathode theme E Ed diit t t th he em me e To be able to edit the filament the...

Page 119: ...to do before the device can be switched on If both buttons are enabled blue some but not all devices controlled by the switch are on All devices can then be switched on or off A Ad dv va an nc ce ed d...

Page 120: ...he e c ch ha am mb be er r It is possible to ventilate with air or Helium Ventilate with air if the temperature is at a safe level material dependent A Ab bo or rt t v ve en nt tiilla at tiio on n Sto...

Page 121: ...ssembly is replaced with a new one 1 Press the burn time reset button to zero the burn time N No ot te e The cathode burn time shall be adjusted when an old grid cup assembly is required to be install...

Page 122: ...hed ON OFF and be reset if necessary From the A Ad dv va an nc ce ed d a an nd d m ma an nu ua all c co on nt tr ro olls s panel the operator finds the controls and settings for the build table and ra...

Page 123: ...r Enables compressed air in machine when the chamber door is open The compressed air will cease to function when the light curtain is interrupted When all doors in the machine are closed the compress...

Page 124: ...the tank L Le ef ft t R Re es st t P Po os siit tiio on n Moves the rake quickly to the left side rest position R Riig gh ht t R Re es st t P Po os siit tiio on n Moves the rake quickly to the right...

Page 125: ...leakage from the backing system when the pump is off and starts the rough pump and the two turbo pumps The S St to op p button turns off the pumps and closes the backing valve P Pr ro og gr re es ss s...

Page 126: ...equals 1 1x x1 10 0 5 5 m mb ba ar r 1 Make sure the doors and hatches are closed 2 Press S St ta ar rt t to enable the vacuum pump sequence 3 If not done prior to enabling vacuum pumps a pop up dial...

Page 127: ...nction should be used when leaving a machine containing powder for longer times 1 Close the chamber door 2 Press M Me en nu u 3 Press H Ha ar rd dw wa ar re e 4 Press A Ad dv va an nc ce ed d a an nd...

Page 128: ...thout running a build or powder protection There will be no vacuum inside the chamber 1 Close the chamber door 2 Press M Me en nu u 3 Press H Ha ar rd dw wa ar re e 4 Press S St ta ar rt t to activate...

Page 129: ...en nt tiilla at te e 4 Press H He elliiu um m if the temperature is above 80 degrees 5 Press U Un nllo oc ck k 6 To be able to see the actual pressure inside the chamber press A Ad dv va an nc ce ed...

Page 130: ...d one for the filament From the A Ad dv va an nc ce ed d a an nd d m ma an nu ua all c co on nt tr ro olls s panel the operator can man ually control the HV contactor the cathode the high voltage and...

Page 131: ...n is 1 10 00 0 m m N No ot te e Do not perform a beam alignment manually during the build preparation If the indicator lamp for B Be ea am m A Alliig gn ne ed d is not green perform an A Au ut to om m...

Page 132: ...the beam 1 Press A Alliig gn n B Be ea am m 2 Press the F Fo oc cu us s A Alliig gn nm me en nt t tab 3 Verify the focus and the step size values Default values are S St te ep p s siiz ze e 0 02 F Fo...

Page 133: ...through the view port A flickering might be seen as two spots alter nating close to each other 9 Press the arrows Up Down Left Right until the flickering stops and the two spots coincide as one 10 Pe...

Page 134: ...ovement will proceed until they are done M Me ellt t S Sa am me e L La ay ye er r Melts the current layer M Me ellt t N Ne ex xt t L La ay ye er r Increases the Z height with one layer and melts the n...

Page 135: ...layer and per form all the calculation that will be done during the actual build The simulation allows you to verify that the job will be successfully ana lysed during the build T Tiim me e A Ap pp pr...

Page 136: ...ware 1 Prepare the STL files in Magics and EBM Build Assembler 2 Start E EB BM M C Co on nt tr ro oll and transfer the build 3 Load the build 4 Select process steps and models Make sure that all of th...

Page 137: ...Qam beam calibration plate R Ra ak ke e C Ca alliib br ra at tiio on n Used for calibration of the different rake positions Please refer to the Instal lation Manual and Maintenance Instructions for de...

Page 138: ...perations of the machine hardware These settings are normally not changed Some parameters are locked for editing To display a description of a certain parameter press the question mark but ton corresp...

Page 139: ...xceeded a warning will be activated to notify the operator that it s time for maintenance The warning will be displayed every time the pressure in the machine rises to nor mal air pressure until the m...

Page 140: ...O Of ff f releases the LayerQam T Ta ak ke e iim ma ag ge es s takes an image with LayerQam View the theme versions Opens a page that lists all themes and their version number Machine times Machine ti...

Page 141: ...a at tiio on n Default log file location is D D L Lo og gs s It requires a master key to change the log file destination 1 Press M Me en nu u 2 Press S Se er rv viic ce e P Pa ag ge e 3 Press L Lo og...

Page 142: ...W Wiin nd do ow ws s e ev ve en nt t llo og g f fiille es s a an nd d s sy ys st te em m llo og g f fiille es s evt or evtx If the computer might be causing the problems 3 Send an email to support arc...

Reviews: