66
Halftone [DEFAULT SETTING: Dithering]
This option controls the way a raster-engraved image is processed.
The “digital image to engraved
output” process can be processed via two methods: Dithering or Error Diffusion. Each offer additional
output options yielding different output effects, style, and quality.
•
Dithering:
Interprets and outputs the raster engraving via the dithering method. This mode
will allow you to select the Pattern Type and Dithering Matrix, and Enhanced Dithering.
•
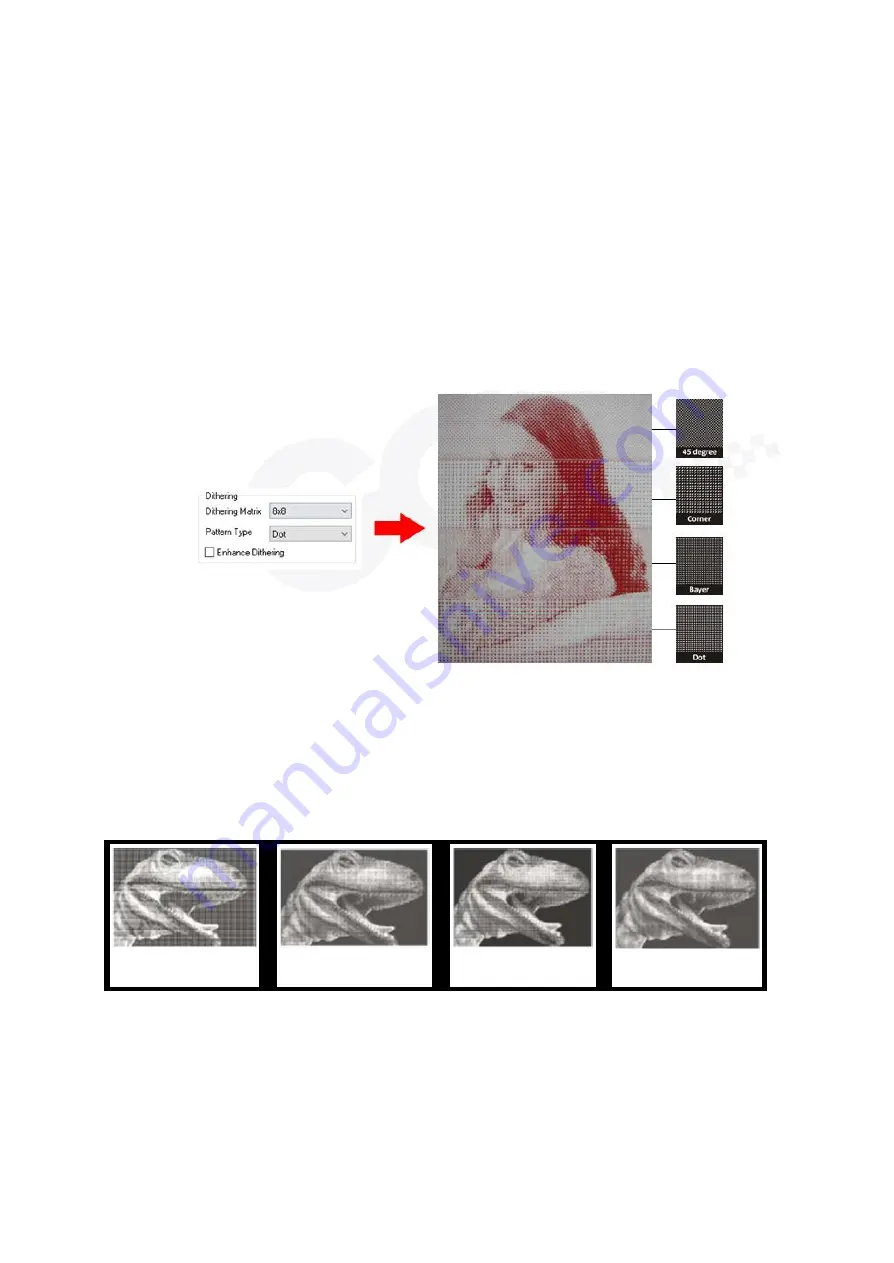
Pattern Type: Dot, Bayer, Corner, 45 Degree
[DEFAULT SETTING: Dot]
Each pattern type uses a different shape and arrangement of dots to compose the shading
effect of a raster image.
The following diagram is an example of the raster effects when using the different
pattern types.
•
Dithering Matrix: Variable depending on the Pattern Type selected
.
[DEFAULT SETTING: 8 x 8]
This controls the resolution (dot size) and the number of dots the image is broken
down into for the dithering process. As an example, selecting 2 x 2 will shade with
a 5-grade halftone, where as an 8 x 8 Dithering Matrix will dither with a 65-grade halftone.
The following diagram is an example of the raster effects when using the different dithering
matrices.
2 x 2 Dithering 8 x 8 Dithering 2 x 2 Enhance
8 x 8 Enhance
Dithering
Dithering
Enhance Dithering [DEFAULT SETTING: Unselected]
Selecting this will produce a finer dithering output.
• Error Diffusion (Raster Page): Interprets and outputs the raster engraving via the error diffusion
method. This mode will allow you to select from three diffusion types: Floyd, Stucki, and Jarvis.
• Diffusion Type: Floyd, Stucki, Jarvis [DEFAULT SETTING: Floyd]
Each diffusion type presents the shade of image as different spread halftones instead of dots to
compose a raster image.
Summary of Contents for LaserPro E200 Series
Page 13: ...12 Chapter 2 Unpacking Unloading Unpacking...
Page 19: ...18 3 3 Right Profile View 3 4 Left Profile View...
Page 20: ...19 3 5 Rear View...
Page 21: ...20 3 6 Water Chiller Front View...
Page 22: ...21 3 7 Water Chiller Right View 3 8 Water Chiller Left View 3 9 Water Chiller Rear View...
Page 23: ...22 Chapter 4 Machine Setup Water Chiller Setup E200 Desktop Laser Engraver Setup...
Page 31: ...30 2 Click Next 3 Clip Launch SmartJOB and clip Finish...
Page 36: ...35 5 Choose the WiFi connection 6 WiFi Setting is complete...
Page 70: ...69 7 4 E200 Touch Panel Operation 7 4 1 Navigation Chart of E200 Touch Panel...
Page 81: ...80 Chapter 8 Optional Items Fume Extraction System Air Compressor Rotary Attachment...
Page 99: ...Chapter 10 Appendix GCC LaserPro E200 Specification Sheet...


