NOTE:
Other Wi
‑
Fi settings appear only when Wi
‑
Fi is
enabled.
Auto Upload
: Allows you to upload activities automatically over
a known wireless network.
Add Network
: Connects your device to a wireless network.
Wireless Sensors
Your device can be used with wireless ANT+ or Bluetooth
sensors. For more information about compatibility and
purchasing optional sensors, go to
.
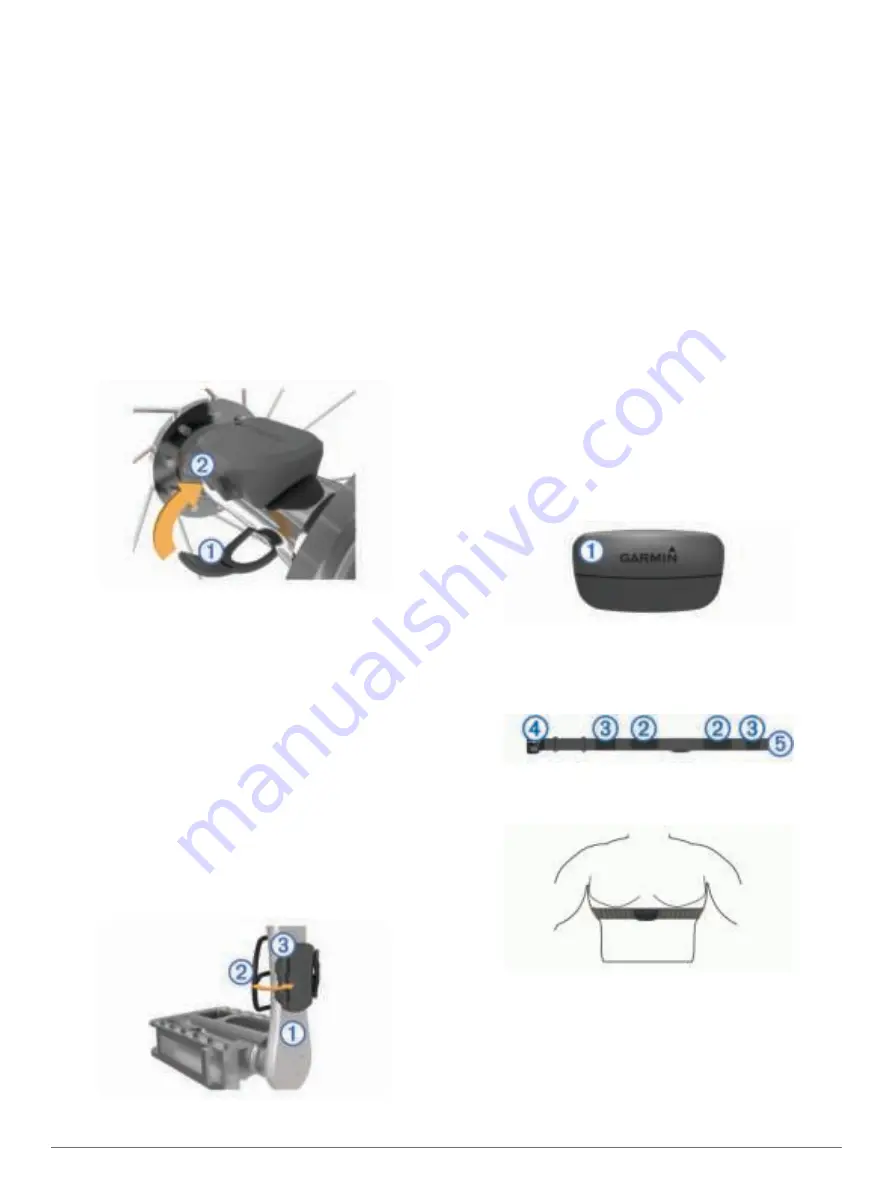
Installing the Speed Sensor
NOTE:
If you do not have this sensor, you can skip this task.
TIP:
Garmin recommends you secure your bike on a stand while
installing the sensor.
1
Place and hold the speed sensor on top of the wheel hub.
2
Pull the strap
À
around the wheel hub, and attach it to the
hook
Á
on the sensor.
The sensor may be tilted when installed on an asymmetrical
hub. This does not affect operation.
3
Rotate the wheel to check for clearance.
The sensor should not contact other parts of your bike.
NOTE:
The LED flashes green for five seconds to indicate
activity after two revolutions.
Installing the Cadence Sensor
NOTE:
If you do not have this sensor, you can skip this task.
TIP:
Garmin recommends you secure your bike on a stand while
installing the sensor.
1
Select the band size that fits your crank arm
À
securely.
The band you select should be the smallest one that
stretches across the crank arm.
2
On the non-drive side, place and hold the flat side of the
cadence sensor on the inside of the crank arm.
3
Pull the bands
Á
around the crank arm, and attach them to
the hooks
Â
on the sensor.
4
Rotate the crank arm to check for clearance.
The sensor and bands should not contact any part of your
bike or shoe.
NOTE:
The LED flashes green for five seconds to indicate
activity after two revolutions.
5
Take a 15 minute test ride and inspect the sensor and bands
to ensure there is no evidence of damage.
About the Speed and Cadence Sensors
Cadence data from the cadence sensor is always recorded. If no
speed and cadence sensors are paired with the device, GPS
data is used to calculate the speed and distance.
Cadence is your rate of pedaling or “spinning” measured by the
number of revolutions of the crank arm per minute (rpm).
Data Averaging for Cadence or Power
The non-zero data-averaging setting is available if you are
training with an optional cadence sensor or power meter. The
default setting excludes zero values that occur when you are not
pedaling.
You can change the value of this setting (
).
Putting On the Heart Rate Monitor
NOTE:
If you do not have a heart rate monitor, you can skip this
task.
You should wear the heart rate monitor directly on your skin, just
below your sternum. It should be snug enough to stay in place
during your activity.
1
Snap the heart rate monitor module
À
onto the strap.
The Garmin logos on the module and the strap should be
right-side up.
2
Wet the electrodes
Á
and the contact patches
Â
on the back
of the strap to create a strong connection between your chest
and the transmitter.
3
Wrap the strap around your chest, and connect the strap
hook
Ã
to the loop
Ä
.
NOTE:
The care tag should not fold over.
The Garmin logos should be right-side up.
4
Bring the device within 3 m (10 ft.) of the heart rate monitor.
After you put on the heart rate monitor, it is active and sending
data.
TIP:
If the heart rate data is erratic or does not appear, see the
troubleshooting tips (
Tips for Erratic Heart Rate Data
).
Wireless Sensors
13
Summary of Contents for EDGE 1030
Page 1: ...EDGE 1030 Owner sManual...
Page 31: ......
Page 32: ...support garmin com August 2017 190 02220 00_0A...


