background image


User Guide: MEGA V2 SA25, Release 1.5


ii 


Gamatronic Electronic Industries Ltd. 
Har Hotzvim Industrial Park  
17 Hartom St.,  PO Box 45029,  Jerusalem 91450  Israel 
Tel: +972-2-588-8222     Fax: +972-2-582-8875 
Email: The equipment described in this document is not intended to be used in connection with any 
application requiring fail-safe performance, unless the application design includes appropriate 
redundancy. This exclusion includes, but is not limited to, the direct operation of any life support 
system or any other system whose failure could lead to serious injury, death, environmental damage or 
mass destruction. 

 Copyright 2014 by Gamatronic Electronic Industries Ltd.   All rights reserved worldwide. 

Any representations in this document concerning the performance of Gamatronic's product(s) are for informational purposes only and are 
not warranties of future performance, either express or implied. 

Gamatronic's standard limited Warranty, which accompanies its sales 

contract or order confirmation form, is the only warranty offered by Gamatronic Electronic Industries Ltd. in relation thereto.


Gamatronic Electronic Industries Ltd. ("Gamatronic") warrants the products it manufactures to be free from defect for a period of one 
calendar year from the date of invoice, including the date of invoice. Gamatronic's liability is limited to repairing or replacing any defective 
parts in the equipment under warranty. Gamatronic reserves the right to determine whether the repair work shall be performed at 
Gamatronic's factory, at the customer's premises, or at an alternate site. The customer must obtain authorization from Gamatronic before 
returning any parts or equipment to Gamatronic for repair or replacement. Any items returned to Gamatronic must be sent freight prepaid.  

Gamatronic’s liability and warranty to the product are according and subject to the fulfillment and implementation by the customer of all the 
terms and instructions in connection with “preventive maintenance” and “service and repair” as further detailed in the user guide which is 
attached to the product and forms an integral part of it.” 

Gamatronic is not responsible for any damage to the product due to unauthorized repair work, misuse or abuse of the product, or force 
majeure. If the product is delivered without batteries, Gamatronic is not responsible for any damage or malfunction due to incorrect wiring 
of the batteries.


Gamatronic is not liable for and the Purchaser waives any right of action it has or may have against Gamatronic for any consequential or 
special damages arising out of any breach of warranty, and for any damages that the Purchaser may claim for damage to any property or 
injury or death to any person arising out of its purchase or the use, operation or maintenance of the subject product. 

This warranty includes parts and labor; however, Gamatronic shall not be responsible for any labor subcontracted or performed by the 
Purchaser to prepare the warranted item for return to Gamatronic or Gamatronic's agent. 

The information contained in this document is proprietary and is subject to all relevant copyright, patent and other laws protecting 
intellectual property, as well as any specific agreement protecting Gamatronic's rights in the aforesaid information. Neither this document 
nor the information contained herein may be published, reproduced or disclosed to third parties, in whole or in part, without the express, 
prior, written permission of Gamatronic. In addition, any use of this document or the information contained herein for any purposes other 
than those for which it was disclosed is strictly forbidden. 

Gamatronic reserves the right, without prior notice or liability, to make changes in equipment design or specifications. 

Information supplied by Gamatronic is believed to be accurate and reliable. However, no responsibility is assumed by Gamatronic for the 
use thereof nor for the rights of third parties which may be affected in any way by the use thereof. 

This document may contain flaws, omissions or typesetting errors; no warranty is granted nor liability assumed in relation thereto unless 
specifically undertaken in Gamatronic Electronic Industries Ltd. standard limited Warranty. Information contained herein is periodically 
updated and changes will be incorporated into subsequent editions. If you have encountered an error, please notify Gamatronic Electronic 
Industries Ltd. All specifications are subject to change without prior notice. 


Summary of Contents for MEGA V2 SA25

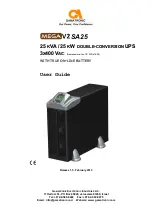
Page 1: ...ic co il Website www gamatronic com SA25 2 25 5 K KV VA A 2 25 5 K KW W D DO OU UB BL LE E C CO ON NV VE ER RS SI IO ON N U UP PS S 3 3X X4 40 00 0 V VA AC C G Ga am ma at tr ro on ni ic c c ca at t n no o 1 10 01 1S SL LD D6 61 1 4 40 05 5 W WI IT TH H T TR RU UE E O ON N L LI IN NE E B BA AT TT TE ER RY Y User Guide Release 1 5 February 2014 ...

Page 2: ...amatronic is not responsible for any damage to the product due to unauthorized repair work misuse or abuse of the product or force majeure If the product is delivered without batteries Gamatronic is not responsible for any damage or malfunction due to incorrect wiring of the batteries Gamatronic is not liable for and the Purchaser waives any right of action it has or may have against Gamatronic fo...

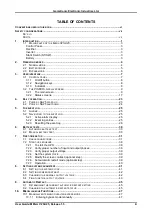
Page 3: ...e alarm display 25 5 2 2 Event log entries 25 5 2 3 Resetting the event log 26 6 BATTERY TESTS 30 6 1 AUTOMATIC BATTERY TEST 30 6 2 MANUAL BATTERY TEST 30 7 FIRST TIME SETUP 31 7 1 CABLE CONNECTIONS 31 7 2 START UP SEQUENCE 38 7 2 1 To start the UPS 38 7 2 2 Verify proper number of input and output phases 38 7 2 3 Verify proper output voltage 39 7 2 4 Set the system clock 39 7 2 5 Modify the scree...

Page 4: ...CREEN NORMAL MODE WITH OVERLOAD INDICATION 11 FIGURE 11 MAIN SCREEN BYPASS MODE WITH OVERLOAD INDICATION 11 FIGURE 12 THE MAIN SCREEN IN BATTERY MODE 12 FIGURE 13 MAIN SCREEN BATTERY LOW 13 FIGURE 14 MAIN SCREEN UPS OFF AT END OF BACKUP 13 FIGURE 15 MAIN SCREEN UPS ON AT END OF BACKUP 14 FIGURE 16 BYPASS MODE MANUAL 15 FIGURE 17 UPS OFF NO OUTPUT 16 FIGURE 18 UPS ON END OF BACKUP 16 FIGURE 19 MEGA...

Page 5: ...RE 37 VERIFY PROPER LINE CONFIGURATION 38 FIGURE 38 VERIFY PROPER OUTPUT VOLTAGE 39 FIGURE 39 RS232 CONNECTOR 55 FIGURE 40 FLOWCHART OF THE MEGA V2 SA25 OPERATION SCREENS 61 LIST OF TABLES TABLE 1 BATTERY LIFETIME VS ENVIRONMENTAL TEMPERATURE 3 TABLE 2 MAIN MENU OPTIONS 22 TABLE 3 OUTSTANDING ALARM MESSAGES 27 TABLE 4 LOG MESSAGES 29 TABLE 5 RECOMMENDED CABLE DIAMETERS 31 ...

Page 6: ...of the UPS and of its LCD display screen Unless otherwise indicated these images are representational only and are not intended to match the exact appearance of a particular unit nor the readings on the screen of a specific unit in a particular environment Abbreviations and notational conventions are in most instances as per the IEEE Standards Style Manual ...

Page 7: ...ttered and free from excess moisture Allow only qualified technicians to service the UPS There are no user serviceable components Do not try to repair it yourself Use the UPS only for its intended purpose The battery drawer contains a series of 12 Volt batteries that provide high voltage and energy in the UPS body even when the UPS is not connected to the ac input Appropriate precautions should be...

Page 8: ... WARNING RISK OF SEVERE DAMAGE TO THE UPS FAILURE TO USE A NEUTRAL CONDUCTOR MAY CAUSE PERMANENT DAMAGE TO THE SYSTEM THIS SYSTEM USES THE NEUTRAL LINE FOR OPERATION THEREFORE IT IS STRICTLY FORBIDDEN TO CONNECT THIS SYSTEM TO THE AC POWER SOURCE WITHOUT A NEUTRAL NULL CONDUCTOR ...

Page 9: ...even during normal use when the input power is constant and continuous Mega V2 SA25 is a true on line battery design according to IEC 62040 31 is a green environmentally friendly power solution thanks to THD of 5 at the input and provides clean power to your loads has an overall efficiency of up to 96 and backup efficiency of 98 provides high power density Mega V2 SA25 requires little attention or...

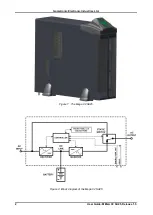
Page 10: ...Gamatronic Electronic Industries Ltd User Guide MEGA V2 SA25 Release 1 5 2 Figure 1 The Mega V2 SA25 Figure 2 Block diagram of the Mega V2 SA25 ...

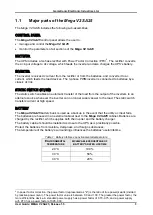
Page 11: ...onger supply power to the load The static switch transfers current at high speed BATTERY The Mega V2 SA25 battery bank is used as a backup in the event that the utility ac input fails The batteries are housed in an external cabinet next to the Mega V2 SA25 cabinet Batteries are charged by the rectifier which supplies both the inverter and the battery charger The battery cabinet should be installed...

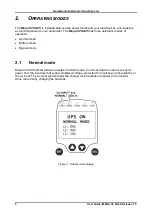
Page 12: ...as three automatic modes of operation Normal mode Battery mode Bypass mode 2 1 Normal mode Mega V2 SA25 almost always operates in normal mode In normal mode the load receives its power from the inverters that supply stabilized voltage protected from spikes and irregularities in the ac input The ac input system feeds the charger which supplies dc power to the inverter while concurrently charging th...

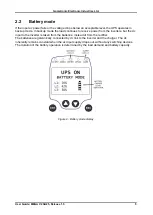
Page 13: ... to receive power from the inverters but the dc input to the inverter is taken from the batteries instead of from the rectifier The batteries are galvanically connected by dc link to the inverter and the charger The dc inherently remains constant when the ac input supply drops out without any switching devices The duration of the battery operation is determined by the load demand and battery capac...

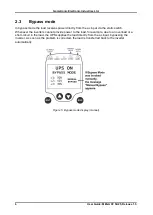
Page 14: ...input via the static switch Whenever the inverters cannot provide power to the load for example due to an overload or a short circuit in the load the UPS supplies the load directly from the ac input bypassing the inverter As soon as the problem is corrected the load is transferred back to the inverter automatically Figure 5 Bypass mode display manual ...

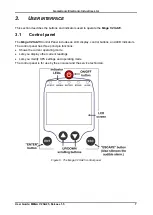
Page 15: ...ntrol panel The Mega V2 SA25 Control Panel includes an LCD display control buttons and LED indicators The control panel has three principle functions Shows the current operating mode Lets you display other current readings Lets you modify UPS settings and operating mode The control panel is for use by the end user and the service technician Figure 6 The Mega V2 SA25 control panel ...

Page 16: ...e alarm condition pressing the Esc button from the main screen silences the audible alarm 3 1 3 51BIndicators The top of the control panel contains four LCD indicators The status indicators show what is running and how the UPS is providing power to the load The table shows the color and meaning of the LCD status indicators when lit AC INPUT Green ac input is present and within normal range NORMAL ...

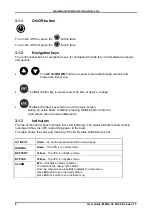
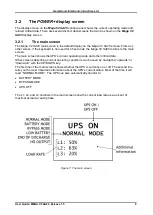
Page 17: ...ds the Mega V2 SA25 returns to the main screen The main screen shows the UPS s current operating mode and other critical data Other screens describing current operating conditions can be seen by navigating upwards or downward with the UP DOWN key The first line of the main screen shows whether the UPS is currently on or off The second line tells you the most important information about the UPS s c...

Page 18: ...he AC INPUT and NORMAL LEDs are lit The following picture shows the main screen as you will see it most of the time in Normal Mode Figure 8 Main screen normal mode In the event of a battery test failure an icon indicating this appears in the lower right quadrant of the screen the alarm LED lights and the audible alarm sounds Figure 9 Main screen with alarm indication ...

Page 19: ...ars in the lower right quadrant of the main screen the alarm LED ligits and the audible alarm sounds Figure 10 Main screen normal mode with overload indication If the overload is severe or continues for more than a few seconds the UPS will transfer the load to the bypass power source Figure 11 Main screen bypass mode with overload indication ...

Page 20: ... Release 1 5 12 3 2 1 2 Battery mode When the UPS is operating in battery mode the main screen first displays the message UPS ON BATTERY MODE Figure 12 The main screen in battery mode As the battery discharges the number of stripes on the battery icon decreases ...

Page 21: ...orderly shutdown of any computers connected to the UPS if you have not already done so Figure 13 Main screen battery low When the UPS battery is exhausted the UPS does one of two things depending on the setting of auto restart mode When auto restart is DISABLED the UPS shuts off and remains off even when ac power is restored When ac power is restored you must press the OFF ON button twice to turn ...

Page 22: ...dustries Ltd User Guide MEGA V2 SA25 Release 1 5 14 When auto restart is ENABLED the main screen shows the UPS ON message When ac power is restored the UPS starts up automatically Figure 15 Main screen UPS ON at end of backup ...

Page 23: ...Bypass mode can also be invoked manually BYPASS and ALARM LEDs are lit After 60 seconds in bypass mode the audible alarm sounds If the UPS was put in bypass mode manually the message manual bypass appears on the screen Figure 16 Bypass mode manual When an overload condition occurs the UPS moves to bypass mode until the overload is resolved If the UPS went to bypass mode due to a failure of the ac ...

Page 24: ... is invoked by pressing the On Off button twice when the UPS is operating The OFF screen displays the message UPS OFF NO OUTPUT Figure 17 UPS OFF no output Off mode can also be invoked automatically in the event of an extended ac power outage if auto restart is disabled Figure 18 UPS ON end of backup ...

Page 25: ...clock HH MM SS See section 8 1 for instructions on setting the system clock Nominal output voltage Nominal output frequency Auto restart status ON or OFF See chapters 9 and 11 for information about the Auto Restart feature To see the second UPS Profile screen press again The second UPS Profile screen shows The software version on card PC705 The software version on card PC701 Current contrast setti...

Page 26: ...output screen To see the current status of the UPS s ac output from the main screen press twice The checkmark indicates that the ac voltage of each output phase is within acceptable range otherwise an X is displayed instead of the checkmark The voltage and current for the three output phases is also displayed ...

Page 27: ...se an X is displayed instead of the checkmark The voltage and current for the three input phases is displayed 3 2 2 4 Bypass screen To see the current status of the bypass voltage from the main screen press four times The checkmark indicates that the voltage of all three phases at the bypass switch is within an acceptable range If the voltage of any of the phases is out of range an X is displayed ...

Page 28: ...K The inverter output is phase synchronized with the bypass input SYNC ORD The phase sequence of the bypass input is incorrect SYNC FLT The bypass input and the inverter output are not in sync A checkmark indicates that the voltage of all three phases of the inverter output is within an acceptable range If the voltage of any of the phases is out of range an X is displayed instead of the checkmark ...

Page 29: ... 6 Battery screen To see the current battery status and voltages from the main screen press six times The battery status can be BATTERY OK BATTERY LOW or BATTERY FLT means the battery failed the latest battery test The battery s positive negative and total voltage is also displayed ...

Page 30: ...n menu from the main screen press Ent Figure 19 Mega V2 SA25 main menu Table 2 Main menu options Event Log The event log displays current alarm conditions and lists a history of significant events See chapter 5 Set Clock Sets the date and time used by the UPS See section 8 Select Language This feature not applicable for this model Battery Test Shows you when the next automatic battery test is sche...

Page 31: ...nning the process from the UPS OFF NO OUTPUT screen Figure 20 UPS OFF no output 1 Press the ON OFF button twice The BYPASS and ALARM LEDs light up for about 40 seconds 2 After a short time the screen reads UPS ON NORMAL MODE The ac INPUT and NORMAL LEDs are lit Figure 21 UPS ON normal mode 3 You can now turn on the computers or other equipment connected to the UPS POWER SA start up is now complete...

Page 32: ...eriod of time during which the load devices will not be operating Begin the process from the UPS ON NORMAL MODE screen Figure 22 UPS ON normal mode 1 It is advisable to turn of all equipment connected to the POWER SA 2 Press the ON OFF button twice The ALARM LED lights up for a few seconds then the screen reads UPS OFF NO OUTPUT Figure 23 UPS OFF no output The POWER SA shutdown is now complete ...

Page 33: ...n to display the main menu 2 On the main menu press Ent again 5 2 1 Active alarm display The first thing you see upon entering the event log is the active alarm display If there are any active alarms a 1 line message is displayed for each alarm to indicate the nature of the alarm For example in the following illustration there are three active alarms END OF BACKUP i e the battery has been exhauste...

Page 34: ...s The illustration shows a typical log entry Figure 26 Typical log entry The first line gives the number of the log entry This is the 23rd log entry The second line gives the log text in this case INVERTER OFF The log entry shows that the inverter was turned off The third line show the time of the log entry HH MM SS The fourth lines shows the date of the log entry DD MM YY The last line prompts yo...

Page 35: ...udible alarm sounds The symbol appears on the main screen Action Shut down your computer or other equipment connected to the UPS BATTERY TEST FAIL Meaning The most recent battery test has failed Additional indications The alarm LED lights up and the audible alarm sounds The symbol appears on the main screen Action It is possible that the most recent battery test occurred after a power outage and b...

Page 36: ...If the UPS was set to bypass mode manually manual bypass appears on the main screen you can manually return it to inverter mode to end the alarm condition If the UPS moved to bypass mode automatically an overload condition may have been the cause OVERLOAD appears on the main screen In this case try reducing the load on the UPS ONE PHASE FAULT Meaning One or more of the ac phases into the rectifier...

Page 37: ...uccessful following a failed battery test END OF BACKUP Battery has been completely discharged RECHARGING Mains power has returned and battery is recharging INVERTER OFF The inverter has been turned off INVERTER ON The inverter has been turned on OVERLOAD An overload condition exists LOAD IN RANGE The load has returned to normal range LOAD ON BYPASS The load is bypassing the inverter LOAD ON INVER...

Page 38: ...nu 2 On the main menu select Battery Test and press Ent 3 The resulting screen tells you the time until the next scheduled automatic battery test To perform a manual test press Ent again Figure 27 Next automatic battery test 4 The battery test lasts for 60 seconds The screen shows a countdown of the time remaining in the test To end the test immediately press Ent again Figure 28 Battery test in pr...

Page 39: ... the lines coming into the UPS are equipped with circuit breakers of the following capacity UPS output 3x40 A Class C Ac input 3x40 A Class C The following table gives the recommended cable sizes that must be used when connecting the UPS The table states the cable s cross sectional area in mm2 If local codes are stricter they have priority Table 5 Recommended cable diameters Ac output Gnd N L1 L2 ...

Page 40: ...Gamatronic Electronic Industries Ltd User Guide MEGA V2 SA25 Release 1 5 32 Figure 29 Connection diagram no input isolation transformer ...

Page 41: ...Gamatronic Electronic Industries Ltd User Guide MEGA V2 SA25 Release 1 5 33 Figure 30 Connection diagram with input isolation transformer ...

Page 42: ...ser Guide MEGA V2 SA25 Release 1 5 34 Figure 31 Recommended switch or CB ratings for the Mega SA 25 kVA 2 Remove the four feet of the UPS They can be removed manually by grasping them and pulling them upwards Figure 32 Remove the UPS s feet ...

Page 43: ...ews lift the cover off the UPS Figure 33 Remove the 4 screws on right side 2 screws on left side 4 Removing the UPS cover reveals the terminals on the rear right side of the UPS Thread the ac input ac output and battery cables through the three holes on the rear panel of the UPS and connect them to the terminals as labeled See Figure 34 Figure 35 and Figure 36 The UPS manufacturer recommends using...

Page 44: ...Two pins Normally Open Max 230 Vac 5 A 6 RS232 interface D9 See chapter 14 for details 7 Cable openings for ac input ac output and battery cables WARNING High voltages are still present in the system when circuit breakers 1 and 2 are in the OFF position To shut down the system completely the circuit breaker on the ac mains line feeding the system must be switched OFF and the battery circuit breake...

Page 45: ...Gamatronic Electronic Industries Ltd User Guide MEGA V2 SA25 Release 1 5 37 Figure 35 The UPS terminal connections Figure 36 The UPS terminal connections close up ...

Page 46: ...s input and the battery The UPS performs a self test this takes about a minute Afterwards you should see the following screen 7 2 2 Verify proper number of input and output phases Before turning the UPS on for the first time verify that the UPS s setting for number of input and output phases is correct for your requirements The phase setting can be seen on the second page of the Profile screen sho...

Page 47: ...lay the Profile screen In the unlikely event that you need to change the UPS s output voltage see Changing the nominal output voltage on page 42 7 2 4 Set the system clock Now set the system clock to the correct date and time See Setting the system clock on page 41 7 2 5 Modify the screen contrast optional step You can modify the screen contrast if necessary See Setting screen contrast on page 42 ...

Page 48: ... 5 40 7 2 7 Operation To turn the UPS on press the ON OFF button twice and wait a few seconds The following screen is displayed The AC Input and Normal LEDs should be lit Turn on the AC output circuit breaker You can now operate the equipment attached to the Mega V2 SA25 ...

Page 49: ... CLOCK screen which shows the current time and date according to the Mega V2 SA25 clock The information is displayed in the format HH MM SS DD MM YYYY 3 To change the time and date press Ent At any time in the following process you can press Esc to exit to the main screen The changes you made before pressing Esc are saved 4 The SET MINUTES screen is displayed Use the UP DOWN button to change the m...

Page 50: ...the screen greener Press the DOWN button repeatedly to make the screen darker blacker 8 3 Changing the nominal output voltage Do not change the output voltage unless you are sure that this is required by your load devices and you are sure that the new output voltage will not damage the load devices To change the nominal output voltage 1 If the POWER SA is not already in off mode press the ON OFF b...

Page 51: ...have the ability to fine tune the UPS output voltage You can adjust each phase of the output voltage up and down by one or more volts if needed To change the nominal output voltage 1 From the main screen press the Ent button to display the main menu 2 On the main menu choose ADVANCED OPTIONS and press Ent 3 In the ADVANCED MENU select TECHNICIAN MENU 4 In the TECHNICIAN MENU select CHANGE VOLTAGE ...

Page 52: ...Guide MEGA V2 SA25 Release 1 5 44 8 Use the UP and DOWN buttons to specify the voltage adjustment value The voltage can be adjusted up or down by up to 7 volts 9 You can continue to adjust another phase or press Esc to return to the main screen ...

Page 53: ...ic restart procedure when the AC power returns the recharging process begins automatically but no power is supplied to the load 9 1 Determining the current automatic restart setting To determine if the automatic restart mode is on or off go to the PROFILE screen To see the UPS Profile screen from the main screen press the Down button once The Profile screen shows the current Automatic Restart stat...

Page 54: ...onic Electronic Industries Ltd User Guide MEGA V2 SA25 Release 1 5 46 4 Press Ent to change the automatic restart status 5 The new automatic restart status is displayed Press Esc to return to the main screen ...

Page 55: ...e input ac power bypasses the inverter entirely and goes directly to the load with no regulation This is called bypass mode The UPS can also be put in bypass mode manually through the system console Usually only a technician will need to manually put the UPS in bypass mode 10 1 1 Entering bypass mode manually 1 From the main screen press the Ent button to display the main menu 2 On the MAIN MENU s...

Page 56: ...Gamatronic Electronic Industries Ltd User Guide MEGA V2 SA25 Release 1 5 48 On the main screen the message manual bypass appears in the lower right quadrant The audible alarm sounds after 60 seconds ...

Page 57: ...TAGE If a power outage occurs The Alarm LED lights up and the audible alarm sounds The UPS continues operating drawing its power from the batteries The POWER SA console looks like this The Alarm and Battery LEDs are lit As the battery discharges the number of stripes in the battery icon on the screen decreases ...

Page 58: ...is the time to shut down any computers connected to the UPS if you have not already done so When the UPS battery is exhausted the UPS does one of two things depending on the setting of Auto restart mode If Auto restart is DISABLED the UPS shuts off and remains off even when ac power is restored When ac power is restored you must press the OFF ON button twice to turn on the UPS ...

Page 59: ...Gamatronic Electronic Industries Ltd User Guide MEGA V2 SA25 Release 1 5 51 If Auto restart is ENABLED the main screen shows the UPS ON message When AC power is restored the UPS starts up automatically ...

Page 60: ...xternal circuit breaker for the AC line The circuit breaker may be off 12 3 Battery Test failed It may be that an automatically scheduled battery test was executed shortly after the end of a power outage when the battery was still charging Wait until about two hours after the return of the AC power and perform a manual battery test This should clear the alarm 12 4 The UPS remains in bypass mode Th...

Page 61: ...the POWER SA UPS system The dry contact circuits make use of opto couplers No more than 30V and 100mA should be applied to a dry contact The Alarm Dry Contacts can report any of three conditions as described in the following table Alarm Condition State of Dry Contacts No input voltage to the rectifier There is a voltage between pin 3 and pin 4 This circuit is normally open Battery voltage is low T...

Page 62: ...ic Electronic Industries Ltd User Guide MEGA V2 SA25 Release 1 5 54 The following figure is a schematic of the Dry Alarm Contacts The triangles represent pins the numerals in the triangles represent pin numbers ...

Page 63: ...s well There are two types of UPS connections Directly to a host computer with dedicated software Remote control through a SNMP Web management programs for communication with a computer network optional In order to use the RS232 connection to a computer monitoring software must be installed on the user s PC Monitoring software can be ordered from Gamatronic The PIN assignment for this 9 pin connec...

Page 64: ...ocol SNMP The SNMP agent communicates with the RS232 interface of the UPS which Supports standard UPS RFC1628 MIB Supports the SNMP commands Trap Set and Get Transfers UPS indicators such as voltage frequency and current via the Internet browser or any management system NMS Use of an SNMP agent disables the RS232 interface of the UPS PSM AC SNMP AGENT EXTERNAL ADAPTOR POWER PSM AC lets you monitor...

Page 65: ...e Gamatronic WING The WING enables real time detection of power system faults and immediately notifies selected recipients control center technician etc detailing the faults The WING includes the following elements WING board SIM board antenna D9 D9 cable for RS232 connection between the Mega V2 SA25 and the WING ac dc power adapter For more information request a copy of the Wing user guide ...

Page 66: ...lude a visual inspection of the UPS and its batteries and the tightening of any screws and bolts that have over time become loosened The owner of the UPS is responsible for ensuring that the preventive maintenance inspections take place This is done by contacting Gamatronic s service department and arranging a mutually convenient time for a technician to perform the inspection It is important that...

Page 67: ...ustomer and Gamatronic In regards to service oral agreements have no standing Service shall be provided gratis during the warrantee period on the condition that the UPS has been properly maintained and a written record has been kept of any maintenance performed on the system The initial warrantee period can be extended by a written service agreement between Gamatronic and the customer Without a wr...

Page 68: ...aximum power dissipation Po 25 kW 1041 W 3552 BTU h Ambient temperature 10 to 40 C operating 20 to 60 C storage Relative humidity 95 max non condensing Altitude 1500 m without derating Enclosure IP20 Cooling system Multi fan with speed control Acoustic noise full load at 1 5 m distance 47 dBA MTBF 250 000 hrs Dimensions mm 610 H x 205 W x 685 D Weight 63 kg LCD display Input Voltage current Output...

Page 69: ...Gamatronic Electronic Industries Ltd User Guide MEGA V2 SA25 Release 1 5 61 Figure 40 Flowchart of the MEGA V2 SA25 operation screens ...

Page 70: ...ters Frequency Converters Battery Chargers Power Management Solutions Headquarters and Factory 17 Hartom Street Science Based Industries Park POB 45029 Jerusalem 91450 Israel Gamatronic Singapore Sales Office email singapore gamatronic co il Gamatronic UK Ltd Gamatronic House Stephenson Court Priory Business Park Bedford MK44 3US United Kingdom Tel 44 0 1234 831111 Fax 44 0 1234 831114 email info ...

Reviews: