


62
Upgrade and Maintenance Manual
TX140
S2
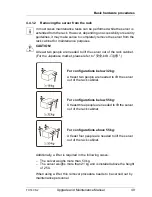
Basic hardware procedures
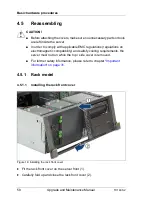
4.5.1.4
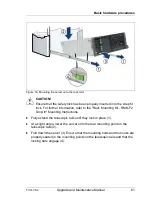
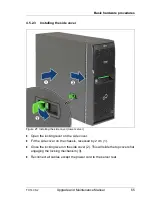
Sliding the server into the rack
Figure 17: Sliding the server into the rack
Ê
Pull up on the locking latch on both telescopic rails (1).
Ê
Slide the server inside the rack as far as it will go (2) until the quick release
levers lock into place.
Ê
Reconnect all cables except the power cord to the server rear.
I
If you are not using a cable mounting arm (CMA kit), ensure that the
rear cables are long enough not to be strained or damaged when
extending the server out of the rack.
Use cable ties to prevent loose cables from blocking the air flow.
Summary of Contents for PRIMERGY TX140 S2
Page 30: ...30 Upgrade and Maintenance Manual TX140 S2 Before you start ...
Page 98: ...98 Upgrade and Maintenance Manual TX140 S2 Basic software procedures ...
Page 120: ...120 Upgrade and Maintenance Manual TX140 S2 Power supply ...
Page 148: ...148 Upgrade and Maintenance Manual TX140 S2 Hard disk drives solid state drives ...
Page 158: ...158 Upgrade and Maintenance Manual TX140 S2 System fan and air duct ...
Page 208: ...208 Upgrade and Maintenance Manual TX140 S2 Expansion cards and backup units ...
Page 216: ...216 Upgrade and Maintenance Manual TX140 S2 Main memory ...
Page 314: ...314 Upgrade and Maintenance Manual TX140 S2 Cabling ...
Page 332: ...332 Upgrade and Maintenance Manual TX140 S2 Appendix ...