


TX140 S2
Upgrade and Maintenance Manual
127
Hard disk drives / solid state drives
In order to permanently remove an operational HDD module that is part of a
RAID array from the server, you first need to delete the array using
ServerView RAID Manager.
V
CAUTION!
All data on all HDDs / SSDs in the array will be lost! Be sure to back
up your data before deleting a RAID array.
For further information, please refer to the "ServerView Suite RAID
Management" user guide.
Ê
If applicable,
"Removing the HDD bay cover" on page 55
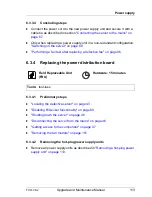
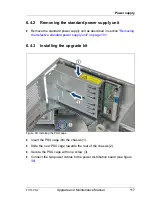
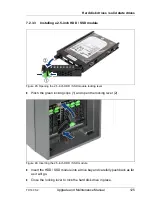
7.2.4.2
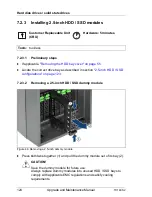
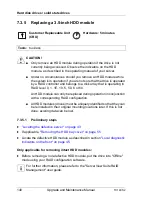
Removing a 2.5-inch HDD / SSD module
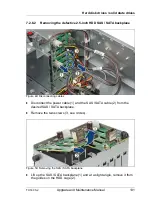
Figure 47: Removing a 2.5-inch HDD / SSD module
Ê
Pinch the green locking clips and fully open the locking lever (see figure
45
).
I
Thereby, the HDD / SSD module is pushed out of its drive bay by
about 1 cm and disconnected from the SAS / SATA backplane.
Ê
Wait about 30 seconds to allow the hard disk drive to spin down.
I
This is not necessary when removing a solid state drive.
Ê
Pull the HDD / SSD module completely out of its bay.
Summary of Contents for PRIMERGY TX140 S2
Page 30: ...30 Upgrade and Maintenance Manual TX140 S2 Before you start ...
Page 98: ...98 Upgrade and Maintenance Manual TX140 S2 Basic software procedures ...
Page 120: ...120 Upgrade and Maintenance Manual TX140 S2 Power supply ...
Page 148: ...148 Upgrade and Maintenance Manual TX140 S2 Hard disk drives solid state drives ...
Page 158: ...158 Upgrade and Maintenance Manual TX140 S2 System fan and air duct ...
Page 208: ...208 Upgrade and Maintenance Manual TX140 S2 Expansion cards and backup units ...
Page 216: ...216 Upgrade and Maintenance Manual TX140 S2 Main memory ...
Page 314: ...314 Upgrade and Maintenance Manual TX140 S2 Cabling ...
Page 332: ...332 Upgrade and Maintenance Manual TX140 S2 Appendix ...