background image

Using the Tablet PC

A26391-K129-Z121-1-7619

English - 29


As noted in the procedure above, the system will not begin charging the battery pack if the
battery pack charge level is 90% or higher when the system is initially connected to external
power source. This prevents the battery from being overcharged.


The Tablet PC battery uses Lithium ion battery cells which have no "memory effect." You do
not need to discharge the battery before you begin charging.

Removing and installing the battery

The battery can be removed from the Tablet PC and swapped with a charged battery. The
discharged battery can then be charged in an external charger if one is available.

Ê


Select one of the following options for prepare for removing the battery:


If a charged battery is available, you can suspend system operation. A built-in buffer
battery will maintain the system in Suspend-to-RAM mode for about 5 minutes while the
battery is removed. This allows time for replacement with a charged battery.


If a charged battery is not available, save your work and close all running programs, then
shut down the system or initiate Hibernate mode.


Plug in an external DC power source.

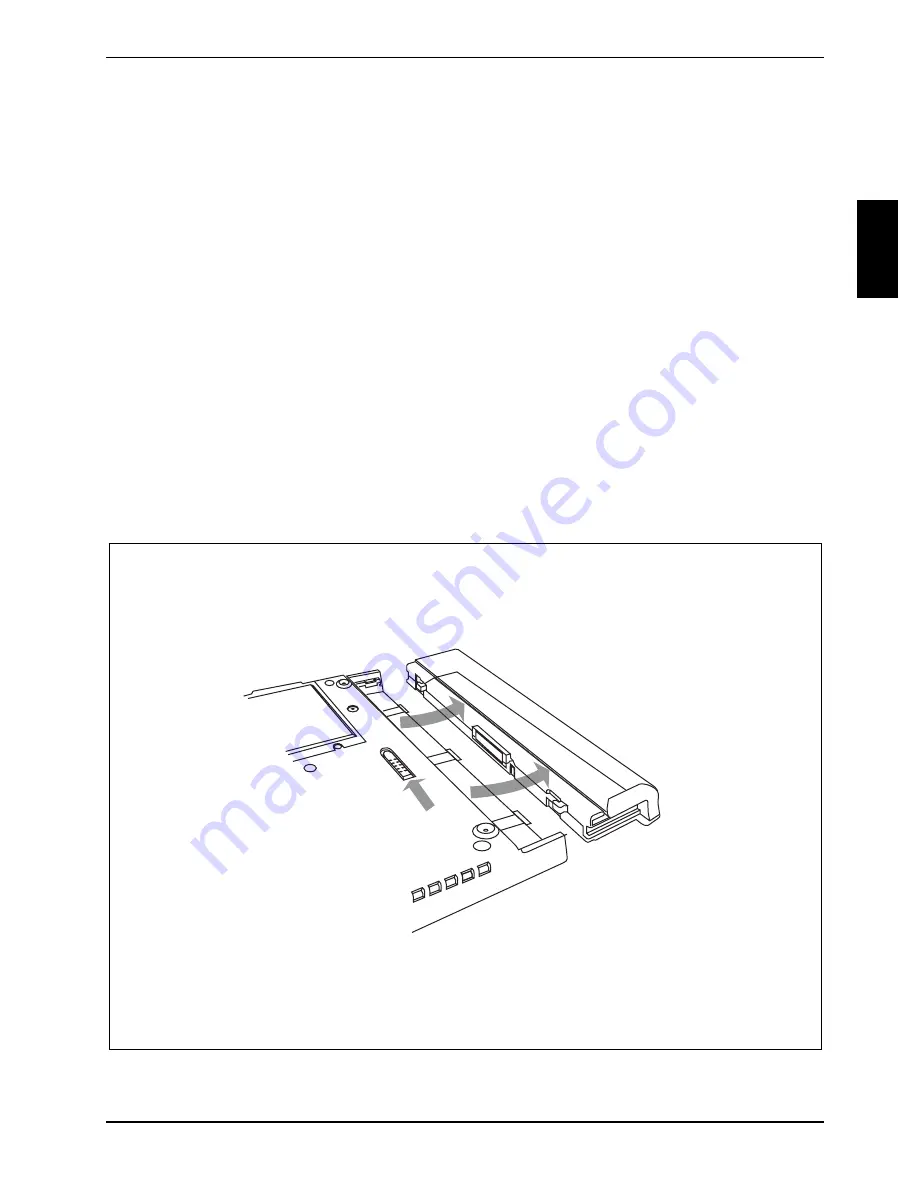
Removing battery

Ê


Slide the battery release latch in the direction indicated.

Summary of Contents for STYLISTIC ST41 Series

Page 1: ...User Guide STYLISTIC ST41XX English answers2 ...

Page 2: ...larified Please contact your sales partner your sales outlet Further information can be found in the Safety and Ergonomics and Warranty manuals The latest information on our products tips updates etc can be found on the Internet under http www fujitsu siemens com ...

Page 3: ...STYLISTIC ST41XX User guide Getting started Using the Tablet PC Wireless LAN optional Care and maintenance Technical data Regulatory information Index April 2003 edition ...

Page 4: ... is a registered trademark of Intel Corporation USA All other trademarks referenced are trademarks or registered trademarks of their respective owners whose protected rights are acknowledged Copyright Fujitsu Siemens Computers GmbH 2002 2003 All rights including rights of translation reproduction by printing copying or similar methods in part or in whole are reserved Offenders will be liable for d...

Page 5: ... 22 Resuming operation 24 Adjusting the display brightness 25 Using the pen 25 Calibrating the pen 27 Installing a pen tether 27 Replacing the pen tip 28 Charging the battery 28 Removing and installing the battery 29 Removing battery 29 Inserting battery 30 Tips for conserving battery power 30 Buffer battery 30 Modem port 31 PC card slot 31 Installing a PC card 31 Removing a PC card 32 Removing an...

Page 6: ...shooting 48 System will not resume operation 48 Display screen is blank or difficult to read 49 Cursor is not tracking pen 49 Infrared data transfer is not working 49 Device is not responding to the pen 49 Speaker headphone volume is too low 50 Configuring peripheral interfaces 50 Technical data 51 Tablet PC 51 Wireless LAN optional 53 Regulatory information 55 CE marking 55 Declaration of Conform...

Page 7: ...e Tablet PC and its features and controls Tablet PC features and controls Features and controls that you use to operate the Tablet PC are outlined below and illustrated in the figures Details on using these features and controls are following Top side view 1 2 3 4 5 6 7 1 Built in microphone 2 On Resume Suspend button 3 Application buttons 4 Speaker 5 Infrared receiver for keyboard mouse 6 Navigat...

Page 8: ...e speaker allows you to listen to mono audio files 5 Infrared receiver for keyboard mouse This interface wraps around the front and bottom of the Tablet PC and is used for communicating with a proprietary infrared keyboard or mouse 6 Navigation buttons The Navigation buttons allow you to move Page Up Page Down Tab Right Tab Left Cursor Up Cursor Down and Cursor Right Cursor Left 7 Status display T...

Page 9: ...d modem module or an optional wireless LAN modem combo module 1 Thermal suede Several areas of the system back are covered with thermal suede This protection should not be removed The thermal suede reduces the temperature on the outside of the Tablet PC This is important when you hold the Tablet PC in your hand for longer periods during operation 2 Wireless LAN On Off switch For a Tablet PC with a...

Page 10: ...ery release latch 8 Tablet Dock latch point Allows you to attach the device to an optional Tablet Dock 9 Memory module cover Removable cover over the memory modules 10 Tablet Dock latch point Allows you to attach the device to an optional Tablet Dock 11 System interface connector Allows you to connect the optional Tablet Dock 12 Tablet Dock latch point Allows you to attach the device to an optiona...

Page 11: ... processor Do not obstruct the ventilation slots 3 Infrared interface IrDA version 1 1 FIR 4 Mbps Allows you to transfer data between the Tablet PC and other infrared devices 4 Microphone jack Connect an external microphone 5 IEEE 1394 jack Allows you to connect between your Tablet PC and peripherals such as a digital video camera 6 Headphone jack Allows you to connect a set of stereo headphones 7...

Page 12: ...N modem combo module 1 Ventilation slots The ventilation slots provide secondary cooling for processor Do not obstruct the ventilation slots 2 Modem jack Allows you to connect a standard RJ 11 connector to the Tablet PC s internal 56 Kbps modem 3 External monitor port Connect an external CRT monitor VGA XGA or SVGA to your system This connection is protected with a plastic cover 4 Power adapter po...

Page 13: ...his interface wraps around the front and bottom of the Tablet PC and is used for communicating with a proprietary infrared keyboard or mouse 2 Pen pen garage The pen is the main pointing device that you use to execute programs and enter data A pen garage is built into the Tablet PC to store the pen when not in use 3 Tablet Dock latch point Allows you to attach the device to an optional Tablet Dock...

Page 14: ... indicator lights up once per second The specification blinking slowly means that the corresponding indicator lights up for one second and then remains dark for five seconds each time If an icon is not displayed it indicates that the related system function is off or inactive Icon Mode Indicator state Remarks ON mode Idle mode Green The system is powered on and ready for use Suspend to RAM mode Gr...

Page 15: ...ble Green Battery charge is between 50 100 Amber Battery charge is between 13 49 Red Battery charge is between 0 12 ON mode Idle mode Red blinking There is a battery error Green blinking slow Battery charge is between 50 100 Amber blinking slow Battery charge is between 13 49 Suspend to RAM mode without power adapter Suspend to RAM mode with power adapter Red blinking slow Battery charge is betwee...

Page 16: ...onal functions that can be used while the system is booting up For more information refer to the Additional functions of Application and Navigation buttons section in this chapter i The Alt button is the only Application button that can be used while the system is logging on or when the system is locked i e when you have the corresponding Windows window showing on your desktop The Alt button has t...

Page 17: ...cal to landscape horizontal or from landscape to portrait When you would like to use the Tablet PC as an eBook for example you would use the portrait orientation When accessing spreadsheets you would more typically use a landscape orientation When you press the Fn and Orientation buttons at the same time the advanced settings menu of the screen controller is launched From that menu you can choose ...

Page 18: ... within the sticky time causes the Fujitsu Menu to appear on your screen The Fujitsu Menu is used to change certain system settings i The Fn button has a handy sticky feature that allows you to press the two buttons in immediate succession rather than at exactly the same time After pressing the Fn button you have a short time 2 to 3 seconds to press the second button Navigation buttons When you ho...

Page 19: ...eature that allows you to press the two buttons in immediate succession rather than at exactly the same time After pressing the Fn button you have a short time 2 to 3 seconds to press the second button Additional functions of Application and Navigation buttons While you are booting up your system you can invoke the Windows Advanced Options Menu where you can set different modes such as Safe Mode T...

Page 20: ...IOS Setup is open acts to escape from the BIOS Setup The ESC button has the same function as the Esc key on a keyboard ENT button Pressing the ENT button while the BIOS Setup is open acts the same as the Enter key on a keyboard Fn button Pressing the Fn button while the system is displaying the operating system boot menu opens the Windows Advanced Options Menu This menu allows you to set different...

Page 21: ...ces on the Tablet PC allow connection of a variety of devices The following table provides a description of each peripheral port on the Tablet PC Each of the illustrated icons is either moulded into or printed on the Tablet PC casing Port Peripheral Tablet PC icon Purpose Power adapter port Connect an external power source such as the power adapter or auto aircraft adapter USB port Connect Univers...

Page 22: ...municate with the Fujitsu Siemens Computers wireless infrared keyboard or mouse which are available as accessories The keyboard infrared port works optimally between 10 to 30 cm approximately 4 in to 12 in from the keyboard infrared port located on the bottom edge of the Tablet PC Ensure that there is a clear line of sight path between the infrared receiver on the Tablet PC and the infrared transm...

Page 23: ...l Fast Ethernet 10 100 Base T Tx to a Local Area Network LAN in your office or home You also can connect broadband devices such as DSL internet Battery release latch The battery release latch allows you to remove the battery from your system Wireless LAN On Off switch The wireless LAN switch allows you to turn power to the optional wireless LAN module on and off ...

Page 24: ......

Page 25: ...you begin or end a session System behaviour for each system mode is described briefly in the following Each system mode is listed in decreasing order of power draw Your system may be configured to enter some of these modes automatically after a period of inactivity to conserve battery power ON mode The system is running The display screen is on Idle mode Some system functions are regulated or turn...

Page 26: ... on the hard disk drive The system does not respond to the pen or other input Refer to the Resuming operation section in this chapter for information on returning the system to the ON mode OFF mode All system functions are turned off to conserve power The system does not respond to the pen or other input The system boots at the next system power on i The system consumes the same amount of power wh...

Page 27: ...our system Is not displayed dark OFF mode or Hibernate mode To enter the ON mode start your system or resume system operation by pressing the On Resume Suspend button Powering up the Tablet PC Follow the procedure below to start the Tablet PC Before you begin confirm that the system is in the OFF mode To do so observe the Status display If the power indicator icon is not visible the system is in O...

Page 28: ... power options go to Start Control Panel Power Options To suspend system operation Ê Press the On Resume Suspend button or carry out the Standby command from your operating system or power management program If your system is configured to suspend operation using Hibernate mode a message is displayed while data is saved to your hard disk If you are replacing the battery wait until system operation...

Page 29: ...ry is depleted Your system may be configured to suspend operation automatically after a period of inactivity Your system may be configured to enter Hibernate mode automatically after a period of time in Suspend to RAM mode The system uses a small amount of battery power when in Suspend to RAM mode Eventually the battery will become fully discharged i If you will not be using the system for an exte...

Page 30: ... mode press the On Resume Suspend button From Suspend to RAM mode Status indicators indicate that the system mode is changing It may take approximately one minute before the system returns to the ON mode and system operation resumes Note that the display turns on shortly before the pen becomes active due to the power up sequences observed by the system From Hibernate mode Active data is read from ...

Page 31: ...er to change the brightness Or Ê Click Start Control Panel Tablet and Pen Settings Ê Select the Display tab and move the screen brightness slider to change the brightness i The STYLISTIC ST41X1 is equipped with a reflective display that reflects incident light enabling you to work even in direct sunlight That means you can also use this device outdoors In addition with favourable lighting conditio...

Page 32: ...od of time especially in higher temperatures causing the tip to act as if it is always depressed To avoid damage the pen should be stored in the pen garage when not in use The screen reacts when the pen tip is approximately 1 8 inch 3 5mm from the screen With the pen you can run all functions for which you otherwise use a mouse In addition you can very conveniently delete hand written pen entries ...

Page 33: ...osing your pen you should attach it to your system using the pen tether that is available as an accessory 1 2 3 1 Pen tether attachment point 2 Larger loop 3 Smaller loop To attach the pen to your Tablet PC perform the following steps Ê Attach the end of the pen tether with the smaller loop to your pen To do so push the end of the tether through the hole in the pen then thread the opposite end of ...

Page 34: ... it is installed in the Tablet PC To do so Ê Connect a power source such as the power adapter on the Tablet PC The DC Input icon appears in the Status display If the battery charge is below 90 the battery begins charging The Charging icon appears in the Status display If the battery charge is 90 or higher when you connect DC power the battery will not charge This prevents the battery from being ov...

Page 35: ... from the Tablet PC and swapped with a charged battery The discharged battery can then be charged in an external charger if one is available Ê Select one of the following options for prepare for removing the battery If a charged battery is available you can suspend system operation A built in buffer battery will maintain the system in Suspend to RAM mode for about 5 minutes while the battery is re...

Page 36: ... t be using the system for an extended period of time Use energy options of the operating system to help you conserve power If you do not use the Tablet PC for a short time you can minimise or switch off the screen lighting on Model ST41X1 to save energy During work as well you do not need to use the screen lighting under favourable lighting conditions in rooms and in the open Buffer battery When ...

Page 37: ... is designed to accept a standard RJ 11 telephone plug Connect the telephone plug to the modem port located on the left hand side of the Tablet PC see the Left side view section in the Getting started chapter The telephone plug can be installed whether or not the Tablet PC has power applied Contact your local help desk or reseller if you need assistance using modem or LAN connection PC card slot T...

Page 38: ... pen tip could be damaged in the process Removing and installing memory modules There is one DIMM slot in your Tablet PC and 256 MB on the mainboard 256 MB and 512 MB modules are available so you can install a combination of up to 768 MB in the system A DIMM replacement should only be carried out at a suitable workplace You must statically discharge yourself e g by touching a grounded object The e...

Page 39: ...the Shut Down command in the Start menu Do not attempt to remove or install a memory module when the system is in Suspend mode or running Ê Remove the screws from the cover on the bottom edge of the device and take off the cover Ê Insert the memory module in the socket at an angle and as shown and push it down until it locks into place ...

Page 40: ...blet PC You can now use the system Removing a memory module Ê Ensure that the Tablet PC is off To do so carry out the Shut Down command in the Start menu Do not attempt to install or remove a DIMM module when the system is in Suspend mode or running Ê Remove the screws from the cover on the bottom edge of the device and take off the cover Ê Carefully push the two mounting clips outwards The memory...

Page 41: ... closed cell Adhoc wireless networks result when a workgroup comes together with its systems and would like to interconnect these for data exchange Any number of systems can be added to this type of network and can leave it again So that several adhoc wireless networks do not interfere with each other in radio traffic there is a unique network name the SSID Service Set Identifier The SSID is used ...

Page 42: ...rating room or near a medical electronics system The transmitted radio waves can impair the operation of the medical devices Keep the Tablet PC at least 20 cm from a pacemaker as otherwise the proper functioning of the pacemaker can be interfered with by the radio waves The transmitted radio waves can cause an unpleasant humming in hearing aids Switch off the radio component Wireless LAN on the Ta...

Page 43: ... mutually independent channels e g 3 8 and 13 are available In the following tables you will find the channels permitted in your country Channel No MHz Europe R TTE France R TTE 1 2412 X 2 2417 X 3 2422 X 4 2427 X 5 2432 X 6 2437 X 7 2442 X 8 2447 X 9 2452 X 10 2457 X X 11 2462 X X 12 2467 X X 13 2472 X X 14 2477 Using module If you purchased the wireless LAN option the integrated wireless LAN mod...

Page 44: ...tivated You can display the connection status by positioning the mouse pointer on the icon Settings via wireless LAN radio icon Ê Click on the symbol A menu similar to the following illustration appears Meaning of the menu items Wireless radio on The radio connection for wireless LAN is activated Wireless radio off The radio connection for wireless LAN is deactivated Remove Status Icon Removes the...

Page 45: ...ed in the operating system only the tabs Status and About of the configuration utility are available under Windows XP All other settings for a wireless LAN are made directly in the operating system If you deactivate the network functions in Windows XP you can configure your wireless LAN with the configuration utility The tabs Configuration and Encryption are then also active under Windows XP Ê For...

Page 46: ...nt Channel Shows the channel of the radio connection Throughput Shows the actual data throughput rate bandwidth Tx Transmit Rx Receive Link Quality Shows the quality of the connection Signal Strength Shows the signal strength of the connection Disable Radio Click on this button to deactivate the wireless LAN in your system Enable Radio Click on this button to activate the wireless LAN in your syst...

Page 47: ...t in the vicinity check whether the SSID is entered correctly If you use the entry ANY then your system connects to any AccessPoint The AccessPoint must then be configured so that it permits any subscriber no access restrictions Network Type The network card can operate either in the adhoc mode 802 11 Adhoc or in the infrastructure mode Infrastructure Click on the arrow next to the Network Type fi...

Page 48: ...n used you must enter the exact number of characters in accordance with the table 40 bit encryption 104 bit encryption Alphanumeric 5 characters 13 characters Hexadecimal 10 characters 26 characters As soon as you have saved the keys they are shown hidden Alphanumeric Alphanumeric characters are permitted for the keys Hexadecimal Hexadecimal characters are permitted for the keys Use WEP Key Specif...

Page 49: ...19 English 43 Create Keys with Passphrase This function is currently not available About tab The About tab provides general information such as the version of the network driver and the MAC address of the PRISM Wireless LAN network card ...

Page 50: ......

Page 51: ...tor is installed before using your Tablet PC The warranty does not cover a scratched screen To install a new screen protector on your Tablet PC Ê If a screen protector is already installed on the display screen remove it before installing the new screen protector The screen protector is held onto the display screen surface by a thin strip of adhesive around the edges There is a angled corner in on...

Page 52: ...y it on the screen surface with the adhesive side downward see illustration Ê Apply pressure to the screen protector with your finger When doing so carry out wiping movements outward toward the edges to prevent air bubbles and then firmly press on the edges To ensure a good seal between the screen protector and the display do not lift the screen protector from the display once it has been applied ...

Page 53: ...e illustration The screen protector is now transparent Ê Wipe the screen protector with a soft dry cloth to remove any low tack adhesive This will help prevent the pen tip from squeaking The screen protector is now installed i The adhesive sets completely within 48 hours Cleaning the display screen Clean the display by wiping the screen surface gently using a soft cotton cloth dampened with isopro...

Page 54: ... Tablet PC do not obstruct the ventilation slots of the device Troubleshooting In the following sections possible solutions to problems that may occur are described If you are experiencing a problem with your Tablet PC that you cannot solve by taking the actions described contact your sales partner or hotline help desk for further assistance System will not resume operation If the system will not ...

Page 55: ...frared receiver of the device note the following Can the infrared receiver on the Tablet PC see the infrared interface on the other device A direct line of sight path must exist between the infrared receiver on the Tablet PC and the infrared interface on the other device The distance between the two devices must not be more than approximately 3 feet The viewing angle from the infrared receiver on ...

Page 56: ...check the Mute box if it is checked Press the Fn button twice to open the Fujitsu Menu This menu contains the tab for adjusting the volume Ensure that the mute box in the system volume control accessible from the system tray is not set Ensure that any volume control in your audio software is set to an audible level Configuring peripheral interfaces Certain peripheral devices can be disabled during...

Page 57: ...d 800 MHz ST4110 or 933 MHz ST4120 ST4121 Memory Main RAM 256 MB SDRAM on board PC133 144 pin SO memory modules 256 MB and 512 MB module configurations available with a system maximum of 768 MB L1 Cache CPU 32 KB on Die L2 Cache 512 KB on Die BIOS ROM 1 MB FWH Hard disk drive 2 5 Hard disk as from 20 GB IDE HDD depending on configuration ordered Ultra DMA 100 Shock mounted Display screen Display s...

Page 58: ... Mbps Keyboard Mouse support Keyboard Mouse IR Port Audio SigmaTel STAC9767 codec Internal mono microphone and speaker Mono microphone and stereo headphone connectors User controls Application buttons with additional functions On Resume Suspend button Two Navigation buttons Status indicators Power indicator Power source indicator Battery charge level indicator Indicator for hard disk drive access ...

Page 59: ...l specifications Emissions EN55022 CISPR22 Class B ETSI EN 300 328 for models with WLAN only ICES 003 Canada RSS 210 Immunity EN55024 1998 ETSI EN 301 489 17 V 1 1 1 2000 9 for models with WLAN only Safety EN60950 Additional Specifications Operating systems Microsoft Windows XP Tablet PC Edition Wireless LAN optional Network type IEEE 802 11b Transfer rate 11 5 5 2 1Mbps auto change Frequency rang...

Page 60: ......

Page 61: ...ain Ireland Italy Luxembourg the Netherlands Austria Portugal Sweden Switzerland Spain Iceland Liechtenstein and Norway Contact the corresponding government office of the respective country for current information on possible operating restrictions If your country is not included in the list then please contact the corresponding supervisory authority as to whether the use of this product is permit...

Page 62: ...ible Party Fujitsu Siemens Computers Inc 598 Gibraltar Dr Milpitas CA 95035 6315 U S A Contact Person Bernd Schroettle Henning Phone No 408 571 6051 Fax No 408 571 6191 We Fujitsu Siemens Computers Inc hereby declare that the equipment bearing the respective trade name and model number specified above was tested conforming to the applicable FCC rules under the most accurate measurement standards p...

Page 63: ...omputer is connected 2 The Ringer Equivalence Number REN for this equipment 3 The equipment requires a standard modular jack type USOC RJ 11C which is FCC Part 68 compliant 4 The FCC Registration Number This equipment is designed to be connected to the telephone network or premises wiring using a standard modular jack type USOC RJ 11C which is FCC Part 68 compliant and a line cord between the mode...

Page 64: ... provided to hearing impaired customers on request DOC INDUSTRY CANADA NOTICES Notice to Users of Radios and Television This Class B digital apparatus meets all requirements of Canadian Interference Causing Equipment Regulations CET appareil numérique de la class B respecte toutes les exigence du Réglement sur le matérial brouilleur du Canada Notice to Users of the Canadian Telephone Network NOTIC...

Page 65: ...er cet équipement aux installations de télécommunications locales L utilisateur est averti que même la conformité aux normes de certification ne peut dans certains cas empêcher la dégradation du service Les réparations de l équipement de télécommunications doivent être eVectuées par un service de maintenance agréé au Canada Toute réparation ou modification qui n est pas expressément approuvée par ...

Page 66: ...AN device Regulatory Notes and Statements Wireless LAN Health and Authorization for use Radio frequency electromagnetic energy is emitted from Wireless LAN devices The energy levels of these emissions however are far much less than the electromagnetic energy emissions from wireless devices such as mobile phones Wireless LAN devices are safe for use by consumers because they operate within the guid...

Page 67: ...ble protection against harmful interference in a residential installation This equipment generates uses and can radiate radio frequency energy If not installed and used in accordance with the instructions it may cause harmful interference to radio communications However there is no guarantee that interference will not occur in a particular installation If this equipment does cause harmful interfer...

Page 68: ... export license This device complies with Part 15 of FCC Rules as well as ICES 003 B NMB 003 B Operation is subject to the following two conditions 1 this device may not cause harmful interference and 2 this device must accept any interference received including interference that may cause undesirable operation Modifications not expressly authorized by Fujitsu Siemens Computers may invalidate the ...

Page 69: ...vice is not responding to the pen 49 Dimensions 51 DIMM memory module installing 33 removing 34 Display 51 Display Mode button 11 Display screen blank or difficult to read 49 protecting 45 E E Mail button 11 Energy saving battery 30 Environmental conditions 53 F Features 1 bottom side 3 left hand side 6 rear side 5 right hand side 7 top side 1 Fn button 12 13 H Hard disk drive cover 4 Hard disk in...

Page 70: ...6 Pen tip removing tool 28 Peripheral devices ports 15 Peripheral interfaces configuring 50 Ports 15 Power adapter port 6 15 Power draw system modes 19 Power On Resume Suspend button 2 16 Power source indicator 9 Power on indicator 8 PRISM Wireless LAN 35 Processor 51 R Regulatory information 55 Resuming operation 24 S Save to Disk see Hibernate mode Screen brightness setting 25 Screen protector 4...

Page 71: ... 50 W Warm casing 19 Weight 51 Windows Advanced Options Menu 13 Wireless LAN 35 antenna 4 configuration utility 38 39 cover 3 handling 37 important notes 36 ON OFF switch 3 17 operating system requirements 36 radio frequencies and security standards 37 radio icon 38 safety notes 36 safety standards 37 Wireless network 35 ...

Reviews: