background image

EXPLODED VIEWS AND PARTLISTS

Page 73

Service Manual TDR8 P Gas   form 9124023   rev.  01/2022

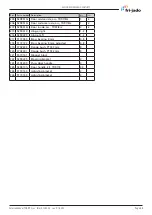
Pos.

Part number Description

Qty.

Prio

96

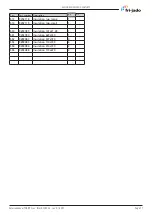
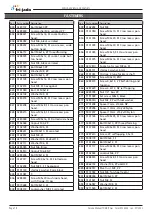
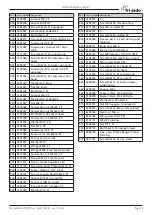
9292107

Insulation exhaust pipe

1

2

97

9291018

Spring for insulation exhaust pipe

2

104

9292120

Coupler tube + coupling 1/2" OD

1-3

107

9290551

Gas tube 1/2” with suspension

1

108

9171053

Elbow 1/2"

1

109

9173072

Tube 1/2" NPT  130mm 

1

125

9292232

Exhaust elbow

1-2

126

9291106

Pipe clamp  52-55mm

1-2

400

9294514

Side panel left, stacked.

1

401

9294515

Air guide

1

402

9294655

Top panel

1

403

9294512

side panel upper right

1

404

9294513

Side panel lower right.

1

405

9294656

Top panel lower unit

1

406

9294041

Grease leak guard

1

407

9294511

Upper cover, exhaust

1

408

9294510

Lower cover, exhaust

1

409

9174485

Drop in guard, exhaust

2

410

9290561

Upper exhaust pipe

1

411

9292229

Gasket

2

412

9290498

Lower exhaust pipe

1

413

9290499

Coupler pipe with suspension

1

415

3721059

Socket 1/2"

1

418

9290505

Lower gas pipe with branch

1

421

3500031

Fan

1

422

9294062

Suspension bracket

1

423

9294529

Transport cover, exhaust

1

424

9171116

Membrane tulle DG 36

1

425

9294531

Mounting bracket, stacked

1

426

9172065

Castor

2

427

9172066

Castor with brake

2

430

9290194s Exhaust kit

Summary of Contents for TDR 8 p gas

Page 1: ...e all encompassing If you have not at tended training for this product you should read in its entirety the repair procedure you wish to perform to determine if you have the necessary tools instruments and skills required to perform the procedure Procedures for which you do not have the necessary tools instruments and skills should be performed by a trained technician Reproduction or other use of t...

Page 2: ...Page 2 Service Manual TDR8 P Gas form 9124023 rev 01 2022 EMPTY PAGE ...

Page 3: ... 10 2013 First release 01 2014 01 01 2014 Added reset and small textual changes Exploded views and electric diagrams changed 03 2014 01 03 2014 Working of rotisserie changed Error 55 explanation Small other changes 11 2014 01 11 2014 New errors various updates 01 2022 21 01 2022 Extension of exploded views and new electric diagrams ...

Page 4: ...mp holder service side 32 Blower motor 33 PT 1000 sensor 33 Gas mixture blower 34 Gas burner safety control 34 Gas control block 35 Ignition Ionization set 35 Ring core transformer 35 Drive motor 36 Door adjustment left side 36 Door glass inside 37 Door outside 37 Working of the gas fired rotisserie 38 Gas technical data 39 Timing diagram gas burner safety control 39 Sticker on gas burner safety c...

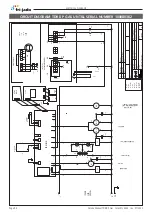
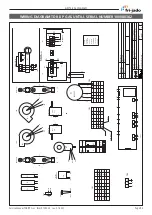
Page 5: ...anation 61 Exploded views partlists 62 TDR 7 P Gas electrical parts from serial number 100097688 62 TDR 7 P Gas electrical parts until serial number 100097687 64 TDR 7 P Gas gas parts 66 TDR 7 P Gas doors 68 TDR 7 P Gas Rotor 70 TDR 7 P Gas stacking parts 72 TDR 7 P Gas sheet metal 74 TDR 7 P Gas Insulation 76 Fasteners 78 Electrical diagrams 80 Circuit diagram TDR 8 P Gas from serial number 10009...

Page 6: ...0 mm 32 830 mm 32 Height 1085 mm 42 2095 mm 82 Weight Gross 236 kg 537 lbs 482 kg 1080 lbs Net 198 kg 459 lbs 412 kg 926 lbs Capacity 48 kg 106 lbs 96 kg 212 lbs Maximum ambient tempe rature 95 F Sound pressure 70 dB A Electrical installation Voltage 1 230 V Frequency 50 60 Hz Required power 345 W 690 W Max nom current 3 A 6 A Plug EU plug with earthing Breaker 1x 15 A 1x 15 A Power cable approx 2...

Page 7: ...3 rev 01 2022 Tools Standard set of tools Metric wrenches sockets and hex socket key wrenches Multi meter AC current clamp tester Temperature tester Insulation value tester Megger Toxicity meter Gas pressure meter Gas consumption flow meter Field Service Grounding Kit ...

Page 8: ... P GAS OPERATING PANEL CHICKEN 85 1 2 3 7 Display On Off Rotor OK Forward List Undo Back Key Function On Off Switching the unit On Off Undo Go back to previous menu List Recipe programming modus Forward One step ahead in setting Rotor Switching the rotor on OK Acknowledge a function or change Back One step back in setting ...

Page 9: ...9 1 2 3 180 C Preheat 5 OPERATION Buttons are lit when functional 5 1 Operation of the rotisserie 1 Press Start 2 Display shows Fri Jado logo 3 Display shows software version 4 Display shows latest cooking program 5 Use the arrow buttons for program selection 6 Display shows selected program 7 Confirm the selected program 8 Display shows pre heat only when pre heat is defined ...

Page 10: ... signal Display shows the next step of the program Note Screen 9 and 11 alternate each 5 seconds 10 When loading press the rotor button to turn the rotor 11 After loading close the door A reminder to empty the fat tray appears 12 Press OK to confirm 13 Display show programmed temperature and time hour min 14 Optional Press OK button for the actual temperature and time shows about 2 seconds 15 Duri...

Page 11: ...seconds 19 Optional visible for 5 min request for additional time minutes after opening the door Note Add time is only available when activated in the service menu 20 Optional press right arrow for one minute increase press left arrow for one minute decrease When activated program continues at step 13 21 Program ready open door 22 Press the rotor button to rotate the rotor 23 Close the door if req...

Page 12: ...ions 5 2 1 To end a running program 1 Press and hold start for 3 seconds 2 Make a choice with the arrow buttons Note Select NO to abort ending the program 3 Confirm the selection Within 5 seconds 4 Display shows the last operated program 5 2 2 Check the actual temperature 1 For example Check the current temperature in program 1 Chicken step 1 2 Press the OK button 3 The display shows during 3 seco...

Page 13: ...tep 1 first digit blinks 3 Time left at step 2 second digit blinks 5 2 4 Show all actual program information 1 Display shows actual program step one is active 2 Press List button 3 Display shows the programmed temperature and time 4 Press List button again for additional information P 180 0 07 3 230 0 05 0 05 1 180 0 20 0 20 H 085 0 10 0 10 2 210 0 10 0 10 C 00 00 00 5 Display shows the programmed...

Page 14: ...tional only available when activated in the service menu In the ECO mode the accumulated heat in the cavity will be used to cook the product Depending on the settings the product and program an energy saving of 5 can be achieved 5 2 6 Cook correction Optional only available when activated in the service menu Cook correction Depending on the load of products the cooking time will be automatically a...

Page 15: ...utton 3 Display shows after 3 seconds cooking step temperature time Note the current cooking step is underlined 4 Use arrow button for next screen 5 Cooking step 1 is finished sound signal is returned Display shows next cooking step temperature time 6 Cooking step 2 is finished sound signal is returned Display shows next cooking step temperature time 7 Display shows the actual temperature Note the...

Page 16: ...re Heat Preheat temperature Holding Holding temperature Cook correction Eco function Language Big digits Sound preheat Sound step Sound done Change pin Clock Transfer Version USB Reading recipes Store recipes Only visible when selected in the service menu 6 2 Programming the rotisserie Possible programming steps Preheat Step 1 Step 2 Step 3 Holding 1 Start the unit 2 Logo appears 3 Unit informatio...

Page 17: ...the User PIN code 7 Use the arrow button to enter the PIN code 8 Press the arrow right button to change the first digit 9 Press the OK button to confirm 10 The next digit is activated Change as required using the arrow button Confirm with the OK button Repeat for the other digits 11 Manager menu is activated Use the arrow buttons to toggle between the sub menu s 12 Select Programming and Press the...

Page 18: ...n to change the character Note ABC can be changed with the use of the list button into lower higher case or special characters 18 Press the OK button to confirm 19 The new recipe name is shown Note To change the name of the recipe use the back arrow button and press the OK button 20 Press the OK button to confirm 21 Set the preheat function and temperature default set on 210 C 425 F Press the left...

Page 19: ...the step 1 temperature Starting with the first digit 24 Use the arrow buttons to increase decrease the value of the selected digit 25 Press the OK button to confirm 26 Set the second digit 27 Press the OK button to confirm 28 Set the third digit 29 Press the OK button to confirm 30 Set the step 1 time Starting with the first digit Note Enter the time in minutes 31 Use the arrow buttons to increase...

Page 20: ...6 Press the OK button to confirm 37 The Step is now completed Select the right arrow and press the OK button to go to the next step Select the left arrow button and press the OK button to go back to the last setting Select the and press the OK button to finish programming 38 Program the next step when required See step 1 for the procedure 39 After step 3 or when entering no time at step 2 or 3 the...

Page 21: ...a Drumstick 5 6 7 8 9 40 When ready programming press the OK button to confirm 41 Save the finished programs Note if the program is not saved all changes are lost 42 Press the OK button to confirm 43 The screen returns to the RECIPES menu 44 Press back to enter the manager menu 45 Manager menu appears 46 Press back to enter the user menu 47 The last program used is shown ...

Page 22: ...XT PAR 1Prev Language Dutch Change Next 6 3 Programming parameters 1 Press the list button 2 Enter your user PIN code 3 Press the OK button to confirm 4 Press the arrow buttons to select Parameters 5 Press the OK button to confirm 6 Press the arrow buttons to select Change or Previous Press the OK button to select the next parameter 7 To change the language select Change 8 Press the OK button to c...

Page 23: ...et at 1 Sound Done Sound T1 T3 Default set at T3 Volume 1 4 Default set at 3 Preheat YES NO Default set at NO Preheat Temperature 50 250 C 122 482 F Default set at 210 C 410 F Holding YES NO Default set at YES Holding Temperature 50 250 C 122 482 F Default set at 85 C 185 F Cook correction YES NO Default set at YES Eco function YES NO Default set at YES Press back to enter the manager menu Press a...

Page 24: ... 8 01 AM SET TIME 112 Insert stick and press enter Interface P Eco TDR Version x x x 6 4 Change pin code 1 Manager menu 2 Select Change Pin 3 Press the OK button 4 Enter the new pin code 5 Press the OK button 6 5 Clock 1 Manager menu 2 Select Clock 3 Press the OK button 4 Set the correct date and time 5 Press the OK button 6 6 Transfer 1 Manager menu 2 Select Transfer 3 Press the OK button 4 Inser...

Page 25: ... Read Sto A_ _ _ _ _ _ _ _ Save File Name A Save File Name 6 8 USB 1 Manager menu 2 Use the arrow buttons to select the USB function 3 Screen shows the USB function Place the USB stick into the USB slot 4 Press the OK button to confirm 5 Use the arrow buttons to select Read to exchange an existing program or STORE to save a program Option STORE 6 Enter the file name by using the arrow buttons and ...

Page 26: ...er gas quality Somebody opened the door Time will be deducted in case of A smaller load A warmer load defrosted Higher gas quality Note 1 In case the time or temperature will be changed in the cooking program the heat number will be adapted with this amount Note 2 Only if you delete a program or change the name the learning process starts again from the beginning The automatic cook correction faci...

Page 27: ...prior procedure 2 Remove the screws securing both large and small top covers 3 Remove the top cover Lift at right side and remove to the left 4 Reverse the procedure to install 1 Remove the right side panel according prior procedures 2 Remove the bolt nut and ring on the top side on the backside of the operating panel 3 Pull the panel away from the top side 4 Remove the flatcables and earth cable ...

Page 28: ...3 Remove the USB connection the reset switch and the red indicaton light 4 Remove the 4 nuts and rings on the CPU board and remove the board 5 Reverse the procedure to install Note 1 For connection flatcable of the key pads see CPU board on page 28 Note 2 For older units with earth wire in right hand bottom corner Take care that the ring terminal doesn t make contact with with the solder point see...

Page 29: ... and parameters from the USB stick to the CPU board Note 1 Flatcable keypad must be connected to connector Touchpanel 1 on CPU board Note 2 Touchpanel 2 is flatcable connection for the rotor switch keypad on customer side Note 3 For older units with earth wire in right hand bottom corner Take care that the ring terminal doesn t make contact with with the solder point see arrow Otherwise the il lum...

Page 30: ...procedure to install Note 1 For connection flatcable of the key pads see CPU board on page 28 Note 2 When the keypad is on the panel on customer side you need a long extended flatcable for connection to the CPU board KEYPAD REPLACING OF BROKEN BUZZER 1 Remove the right side panel according prior procedure 2 Remove the operating panel according prior procedure 3 Stick connector of new buzzer in plu...

Page 31: ...ave a thermostat with auto matic reset 1 Remove the rotor and the right side panel according prior procedure 2 Remove the bolts that secure the air guide plate and remove this plate Lower the plate in vertical position and lift it out of the hinge pins 3 Remove the thermostat probe from the clip in the oven and guide it outside through the opening in the side wall 4 Disconnect the wiring on the th...

Page 32: ... cap nuts that secure the air suction plate and remove this plate 4 Remove the glass and lamp from the lamp holder Turning direction of glass in coun ter clockwise 5 Remove the holder You have to deform the holder to take it out 6 Insert a new holder and click this in 7 Reverse the procedure to install HALOGEN LAMP HOLDER CUSTOMER SIDE 1 Remove the top cover according prior procedure 2 Remove the ...

Page 33: ...ve the screws that secure the motor and remove the motor 5 Reverse the procedure to install Note The blowers are equipped with a capa citor of 1 5uF Check the direction of rotation of the motor clockwise see arrows and change the wiring if necessary BLOWER MOTOR 1 Remove the right side panel according prior procedure 2 Disconnect the wiring of the sensor 3 Remove the screw that secures the sensor ...

Page 34: ...as inlet B and remove the gas mixture blo wer 5 Remove the screws that secure the venturi to the blower and remove the blower 6 Reverse the procedure to install GAS MIXTURE BLOWER 1 Remove the right side panel according prior procedure 2 Remove the screw that secures the burner control on the gas block and remove the burner control by sliding it to the left 3 Remove the screw that secures the plas...

Page 35: ...according prior procedures 2 Remove the insulation around the ex haust pipe 3 Remove the wiring from the set on the gas burner safety control C and A and from the earthing B 4 Remove the nuts that secure the set and remove the set Replace the gasket 5 Reverse the procedure to install 6 Connect A to A B to B and C to C The faston for A is 4 8 mm The faston for C is 2 8 mm GAS CONTROL BLOCK IGNITION...

Page 36: ... a position vertical downwards This can be done electrically by pushing the rotor key or manually by turning the fan blade by hand 5 Note down how far the drive arm sticks out from the inner wall see white arrow 6 Mark the position of the motor on the sup port and the support on the side wall with a marker 7 Remove the bolts that secure the motor and the nuts that secure the motor support and remo...

Page 37: ...inner door out of the hinges and lay this aside 2 Remove the left side panel according prior procedure 3 Remove the 2 nuts behind the upper hinge and loosen the locknut according prior procedure The door must be closed 4 Hold the door on both sides and move this towards yourself before lifting it out of the hinge on the bottom side See to it that the washers stay on the hinge Also remove the top h...

Page 38: ...d indication light on the reset switch will light up In this case the blower has to be replaced The PT 1000 temperature sensor now takes care of the temperature regulation of the oven by switching the burner control on and off If there is no ignition burning of the gas air mixture after 5 seconds of ignition there will be a pause of 5 seconds and after this the ignition sequence will start up for ...

Page 39: ...052 G30 37 15 0 54 25 10 0 36 55 22 0 80 1 2 0 25 2 6 0 44 2 701 0 168 G31 37 15 0 54 25 10 0 36 55 22 0 36 1 0 0 29 2 2 0 49 2 011 0 128 LPG 37 15 0 54 25 10 0 36 55 22 0 36 0 70 0 27 1 5 0 46 1 560 0 098 TIMING DIAGRAM GAS BURNER SAFETY CONTROL Tpp prepurge time TS safety time PP post purge Gas type Orifice mm inch Air inlet mm inch Power KW BTU G20 4 2 1 6 18 1 17 24 14 7 50 000 G25 4 5 11 64 1...

Page 40: ...ower Burn on nr 4 Not connected L nr 5 Orange wire for live connec tion 230V Nr 7 to 10 Black blue red yellow wires for neutral 230V circuit 24V DC circuit 24V circuit Tacho nr 1 White wire to speed regula tion gas mixture blower Reset nr 2 Brown wire to reset knob on side wall High limit nr 3 Yellow wire to high limit thermostat APS nr 4 Not connected PWM nr 5 Black wire to speed regula tion gas ...

Page 41: ... the wiring from the sensor 2 Connect a temperature sensor to the probe for comparison 3 Test the probe with an Ohmmeter PT1000 SENSOR TEST DRIVE MOTOR BLOWER AND TRANSFORMER TEST Type Description Voltage Resistance Ω TDR 8 Drive motor 230 Between white A and white wire 234 Between white A and brown wire 117 Between white and brown wire 117 TDR 8 Blower rotisserie 230 Between blue and brown wire 3...

Page 42: ...e shut down of the rotisserie but is stored in the fault messages in the service menu Error 88 If the expected heat number is more than 20 higher than the stored heat number in the cooking program This error does not result in a complete shut down of the rotisserie but is stored in the fault messages in the service menu App Error Parameter file cannot be openend when switching the TDR on Failure d...

Page 43: ...for gas pressure after reduction valve In order to measure loosen the screw on inside of tube Outlet or burner pressure Measuring tube of gas going into gas mixture blower In order to measure loosen the screw on inside of tube Measuring notes 1 Inlet pressure During operation you measure the pressure of the setting of the reduction valve 2 Outlet pressure During operation you measure a pressure of...

Page 44: ...tment of this set see drawing below Here you can find the distance between the spark plug and the distance bet ween the ignition pins and the burner bed and the distance between the ionisation pin and the burner bed Important dimensions 6 and 8 mm distance between ignition pins and burner bed 10 mm distance between ionisation pin and burner bed 4 5 mm distance between the two ignition pins ...

Page 45: ...do a check up on the reset switch 1 Remove the 2 grey and brown wires from the reset switch 2 Connect these 2 jacks together with a separate wire 3 Start a program and disconnect the 2 jacks RESETTING OF GAS BURNER SAFETY CONTROL 1 Remove right hand panel according prior procedure 2 Press the reset knob 3 Start a program reset knob Red alarm light For testing of the system when reset switch could ...

Page 46: ... 21 01297080 100035026 G 20 06 03 2014 11 42 13 Fuel Natural gas O2 ref 3 0 CO2 max 9 1 5 2 Oxigen 9 0 CO2 1 33 Lambda 5 ppm CO 0 01 GI 26 7 qR 73 efficiency 54 C dew point 130 F 378 C Exhaust gas temp 713 F 23 C Ambient temp 74 F The 2 most important values are the CO2 percentage and the exhaust gas temperature CO2 G 20 25 between 8 7 8 9 CO2 G 30 between 10 4 10 6 CO2 G 31 between 11 2 11 5 CO m...

Page 47: ...ecked by a skilled technician ac cording local state or national regulations First remove the right side panel according procedure in removal and replacement of parts Check for gas leaks and or bad connections of the gas supply inside and outside Check the gas burner and the ignition ionisation set Check the adjustment of the ignition ionistation set Check all gaskets Check the inlet pressure and ...

Page 48: ...eral information such as software version number model name and Fri Jado company logo Please make sure you read the paragraph titled adapting parameters before changing parameters It contains some important information concerning the programming of the parameters To reach the Manager parameter menu press the list key and enter with the standard password 1111 if not protected by a specific Manager ...

Page 49: ...r section can be protect ed by a seperate password The standard number is 1111 This password can be changed inside the manager menu OPTIONS MANAGER MENU Manager Menu USB READ REED STICK STORE FILE NAME SAVE FILE PROGRAMMING NEW EDIT DELETE COPY PARAMETERS CHANGE OTHER CHANGE PIN CLOCK SET TIME 12 24H TRANSFER READ STICK NEXT PREV SAVE ...

Page 50: ...rvice Manual TDR8 P Gas form 9124023 rev 01 2022 OPTIONS SERVICE MENU To enter the service menu press and hold the UNDO key for 5 seconds The service section is by default protected with a default password of 4878 SAVE READ ...

Page 51: ... allows the enabeling of preheating before a recipe If yes is selected every program can have a preheat step included you have a choice in this If no is selected preheating is not possible even if there is a program with a preheat step Holding allowed This parameter allows the enabeling of a warm hold step at the end of the grilling step s If yes is selected every program can have a holding step i...

Page 52: ...s used by the unit Note that some texts may not yet have an updated translation Big digits This parameter allows to choose for big digits on the display during preheat cooking and hold cycle Preheat allowed This parameter allows the enabeling of preheating before a recipe If yes is selected every program can have a preheat step included you have a choice in this If no is selected preheating is not...

Page 53: ...ion of the cook correction is not visible in the display Key sens This parameter allows the adjustment of the sensitivity of the keys Sensitivity is highest on value 1 and lowest on 9 Temp grad This parameter allows the setting of the minimal temperature rise in C or F minute of the PT sensor during the preheat cooking and hold steps until maximal 150 C 302 F Measuring only starts after 5 minutes ...

Page 54: ...stem soft ware below This folder has to be placed direct on the memory stick and cannot be placed in another folder otherwise it will not work That means only one folder 42 P CPU can be placed direct on the memory stick How to read the software version see also operation on page 8 To load new software from a memory stick to the CPU board is as follows 1 Pull the plug out of the socket or switch of...

Page 55: ... and confirm with OK 2 Go to read and confirm with OK 3 Go to read stick and confirm with OK 4 Choose file name with other file and confirm with OK 5 Now go to read file and confirm with OK Now the new program will be loaded inside the CPU board To store programs from the CPU board to the memory stick is done as follows 1 Place the memory stick and go to the manager menu choose USB and confirm wit...

Page 56: ...E MENU Recipies can be read and stored from both the Manager menu and the Service menu Recipies can only be read to or stored from the CPU board by means of a memory stick The transfer is always done out of a folder called Programs This folder has to be placed direct on the memory stick and cannot be placed in another folder otherwise it will not work The folder can contain several files with prog...

Page 57: ...extension csv Parameters can only be read to or stored from the CPU board by means of a memory stick The transfer is always done out of a folder called PARAMS This folder has to be placed direct on the memory stick and cannot be placed in another folder otherwise it will not work The folder can contain several parameter files The name of a file may exist of maxi mum 8 characters and can t have a s...

Page 58: ...o yes no Holding temp 85 50 250 Cook corr Option yes yes no Cook corr factor 3 1 6 Ecocook option yes yes no Ecocook var 6 1 9 Language English English Nederlands Deutsch Francais Espanol Russian Big Digits yes yes no Sound preheat T1 T1 T2 T3 Sound step T2 T1 T2 T3 Sound done T3 T1 T2 T3 Temp unit C C F Boost allowed no yes no User pin in use no yes no Lights out yes yes no Key beep no yes no Tem...

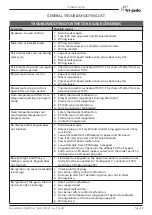
Page 59: ...n 5 Dirty fan guard or fan blade s Oven temperature does not reach desired temperature in program mode 1 Safety thermostat malfunction 2 PT 1000 sensor malfunction 3 Electronic control inoperative 4 Contactor inoperative No display and or keypad does not function 1 Main breaker open 2 Remove plug out of socket and connect plug again reset of key sensitivity 3 Loose flat cable from CPU display to p...

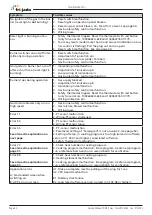
Page 60: ...fety control malfunction 5 Safety thermostat tripped Reset the thermostat with red button only for serial nrs 100064637 638 and 100064776 till 779 6 Wiring ionization pin Gas mixture blower only runs in high speed 1 Gas burner safety control malfunction 2 Gas mixture blower malfunction 3 Wiring loose Error 11 1 PT sensor malfunction 2 Wiring PT sensor shortened Error 33 1 PT sensor malfunction 2 W...

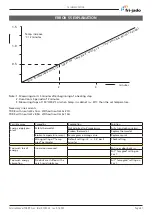
Page 61: ... currents TDR8 with neutral 3x 16A Without neutral 3x 27A TDR5 with neutral 3x 8 5A Without neutral 3x 14A Possible cause Caused by Explanation Solution Energy supply pro blem Safety thermostat Not adjusted to it s maximum Fully turn clock wise cw Broken thermostat Replace thermostat Broken temperature sensor Sensor gives a wrong value Replace sensor Wrong setting of temp grad parameter Default se...

Page 62: ...52 61 53 60 30 1 5 4 6 2 3 4 6 92 12 93 10 1 5 4 6 1 2 3 4 5 6 9 28 11 47 90 91 1x 2x 1 5 8 10 14 17 12 14 4 26 2 3 25 6 3 6 3 6 853 872 7 3 15 14 14 J6 J2 J8 J6 J2 J8 J13 J13 27 28 29 Page 62 Service Manual TDR8 P Gas form 9124023 rev 01 2022 EXPLODED VIEWS PARTLISTS TDR 7 P GAS ELECTRICAL PARTS FROM SERIAL NUMBER 100097688 ...

Page 63: ...repair set TDRp gas J2 1 1 29 9290863s Wire repair set TDRp gas J6 1 1 30 9091383 Connecting cable with plug 1 31 9141934 Fan blade 2 32 9073150 Wing nut left hand threa ded 2 34 9172310 Temperature sensor PT 1000 1 1 35 9044140 Sensor cable 1 36 9171135s Lamp holder incl glass 6 37 3701052 Lamp 20W 12V 300 C 6 1 38 9171049 Ring core transformer secundair 2x12V 1 2 Pos Part number Description Qty ...

Page 64: ...5 56 57 55 56 57 55 56 57 21 52 61 53 60 73 26 66 64 9 72 71 68 67 15 14 63 14 69 70 5 62 2 3 25 6 3 6 3 6 853 872 7 3 14 14 15 EXPLODED VIEWS AND PARTLISTS Page 64 Service Manual TDR8 P Gas form 9124023 rev 01 2022 TDR 7 P GAS ELECTRICAL PARTS UNTIL SERIAL NUMBER 100097687 ...

Page 65: ... 9171135s Lamp holder incl glass 6 37 3701052 Lamp 20W 12V 300 C 6 1 38 9171049 Ring core transformer secundair 2x12V 1 2 40 9151010 Connecting block 6 pole 2 41 9171136 Glass lamp holder 6 2 Pos Part number Description Qty Prio 43 9140027 Blower fanblade wingnut 2 1 45 9293002s Gear motor complete with drive head 1 1 46 2000072 Fanblade Ø 150 mm gear motor 1 49 3701233s Door switch model on avail...

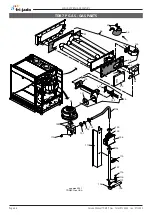
Page 66: ... 122 99 120 121 104 109 95 95 93 94 107 110 103 111 103 106 103 102 101 98 100 112 108 115 116 117 105 updated 2021 125 126 EXPLODED VIEWS AND PARTLISTS Page 66 Service Manual TDR8 P Gas form 9124023 rev 01 2022 TDR 7 P GAS GAS PARTS ...

Page 67: ...mm G31 1 103 9171092 Flange gasket 3 104 9292120 Coupler tube coupling 1 2 OD 1 3 105 9291023s Gas control block 230V Propane gas 1 2 106 9293042s Gas burner safety control 230V Natural gas G20 G25 Natural gas G20 G25 1 1 106 9293043s Gas burner safety control 230V Propane gas Propane gas 1 1 107 9290551 Gas tube 1 2 with clamp plate 1 108 9171053 Elbow 1 2 1 109 9173072 Tube 1 2 NPT 130mm 1 110 9...

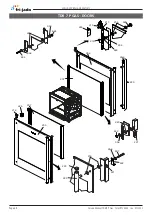
Page 68: ...223 225 221 222 217 218 834 822 219 829 215 206 223 225 220 822 824 956 956 220 221 822 956 207 207 216 226 226 EXPLODED VIEWS AND PARTLISTS Page 68 Service Manual TDR8 P Gas form 9124023 rev 01 2022 TDR 7 P GAS DOORS ...

Page 69: ...8512s Door inside ass TDR7 8m 2 2 215 9290410 Hinge right 1 2 216 9290409 Hinge left 1 2 217 9172054 Brass bearing 8 mm 4 8 218 9172122 Brass bearing 8 mm adjusted 4 8 219 3702342 Flange bush PTFE 3 mm 8 220 3702341 Flange bush PTFE 2 mm 8 221 9070141 Magnet block 222 9294229 Blocking bracket 2 223 2103209 Plug door handle 4 225 9298101s Door handle kit TDR7 8 44 226 9174154 Adjusting bracket 2 22...

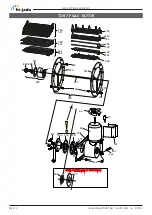
Page 70: ...Untill serial number 100075953 848 838 9292295 307 306 832 931 341 308 800 956 804 46 45 15 350 356 354 355 357 360 359 358 361 364 362 363 365 366 EXPLODED VIEWS AND PARTLISTS Page 70 Service Manual TDR8 P Gas form 9124023 rev 01 2022 TDR 7 P GAS ROTOR ...

Page 71: ...2169 Support pin 1 336 9172063s Bearing ass rotor TDR7 8 1 2 337 9292245 Seal 1 341 9174161 Air guide 1 344 9294649 Pressure ring 6 holes 1 345 9292244 Shaft seal 6 holes 1 346 9294650 Reinforcement ring 6 holes 1 350 9172136 4 Chicken rack 354 9172134 Meat basket SS 355 9172213 Meat basket SS coated 356 9172138 Meat basket SS set of 7 357 9172214 Meat basket SS coated set of 7 358 9172153 Meat fo...

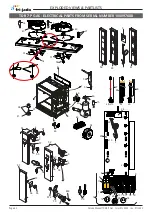
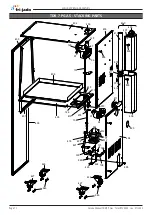
Page 72: ...08 403 404 405 406 407 109 422 421 108 418 104 417 415 423 963 424 425 427 409 411 805 864 812 832 812 426 427 963 426 978 970 970 978 805 805 805 829 411 430 EXPLODED VIEWS AND PARTLISTS Page 72 Service Manual TDR8 P Gas form 9124023 rev 01 2022 TDR 7 P GAS STACKING PARTS ...

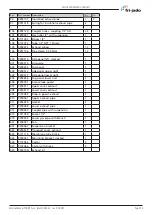
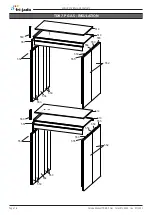
Page 73: ...5 Top panel 1 403 9294512 side panel upper right 1 404 9294513 Side panel lower right 1 405 9294656 Top panel lower unit 1 406 9294041 Grease leak guard 1 407 9294511 Upper cover exhaust 1 408 9294510 Lower cover exhaust 1 409 9174485 Drop in guard exhaust 2 410 9290561 Upper exhaust pipe 1 411 9292229 Gasket 2 412 9290498 Lower exhaust pipe 1 413 9290499 Coupler pipe with suspension 1 415 3721059...

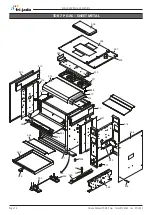
Page 74: ... 409 509 515 503 516 512 511 510 515 514 513 522 523 524 525 526 501 502 529 528 805 517 518 504 420 533 533 226 936 EXPLODED VIEWS AND PARTLISTS Page 74 Service Manual TDR8 P Gas form 9124023 rev 01 2022 TDR 7 P GAS SHEET METAL ...

Page 75: ... Cover top 1 513 9292118 Insulation top large 1 514 9292119 Insulation top small 1 515 9294404 Reinforcement top plate 2 516 9294405 Reinforcement side plate left 1 517 9294406 Reinforcement side plate right 1 518 9294415 Cover plate machine components 1 519 9172053 Nut M5 8 520 9170444 Support gear motor 1 521 9294479 Air guide plate 1 522 9174417 Plate air guide 1 523 9174427 Plate air guide 1 5...

Page 76: ...4 513 554 555 552 553 550 551 552 553 553 555 554 554 553 553 553 555 552 550 551 552 553 555 554 553 EXPLODED VIEWS AND PARTLISTS Page 76 Service Manual TDR8 P Gas form 9124023 rev 01 2022 TDR 7 P GAS INSULATION ...

Page 77: ... number Description Qty Prio 513 9292118 Insulation top large 1 514 9292119 Insulation top small 1 550 9293089 Insulation 141x21 28 1 551 9293090 Insulation 623x180 1 552 9293087 Insulation 327x730 4 553 9293085 Insulation 110x735 6 554 9293086 Insulation 210x730 2 555 9293088 Insulation 110x670 2 ...

Page 78: ...1 0 846 4288323 Screw M5x20 mushroom head with flange 10 pcs 847 9070688 Bolt M8x12 SS 848 9008518 Lockwasher M8 SS serrated FASTENERS Pos Part number Description 849 0142292 Nut M3 853 0141050 Screw M3x10 SS Cross recess pan head 854 0141076 Screw M3x20 SS Cross recess pan head 855 0141078 Screw M3x30 SS Cross recess pan head 856 0141035 Screw M3x5 SS Cross recess pan head 858 0141075 Screw M3x16...

Page 79: ...n nut M5x15 ZP 940 4280540 Screw M5x6 SS countersunk 941 4311215 Screw socket head M6 x 30 942 0141123 Screw pan head Philips M5x10 SS 943 149299 Spacer Ø8xø4 2 H15 black 944 0139142 Screw hexagon head M6x40 SS 945 4285410 Capnut M12 SS low profile 946 4286728 Set screw M8x40 socket 947 4280239 Screw M12x20 hexagon ZP 948 0197380 Washer M12 SS Pos Part number Description 949 0142975 0 950 4285120 ...

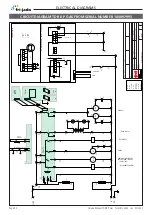
Page 80: ...N WH X1 X3 M4 1 M4 2 M4 4 M4 PWR 115V HIGH LIMIT RESET IonisationPin Ignition F1 F2 10 Amp 10 Amp L1 BN 4 3 24 25 L2 PE 2 33 L1 30 27 ERROR H1 S1 X2 YE OPTION DISPLAY CB5 OPTION OPTION HMI HMI DISPLAY GY GREY BU BLUE BK BLACK YE YELLOW BN BROWN WH WHITE OR ORANGE RD RED GAS BURNER CONTROL S4965 2166 3166 CONTROL 1 24DC 2 TACHO 4 PWM 5 GND GAS BLOWER RG128 F1 1AT 250V U1 J6 6 32 15 16 DOOR SWITCHES...

Page 81: ...6 8 H L reset GAS CONTROLLER S4965V 2166 6 9 1 3 4 1 10 5 6 1 error red ionisation GY BK OR BU WH BN YE BK BU RD YE GY BN WH OR BK BU RD YE M4 M4 M4 M4 YE CB314 M4 PWR K1 GY GREY BU BLUE BK BLACK YE YELLOW BN BROWN WH WHITE OR ORANGE RD RED RESET LAMP RESET 2A 1A TB1 GN TB1 BN TB2 YE TB2 BN THERMOSTAAT 320 C HIGHLIMIT TB1 OR TB1 YE 115V 1 2 5 4 30 BUWH BK GY M4 CONTROL BLOWER RG128 30 TB2 GY 230V ...

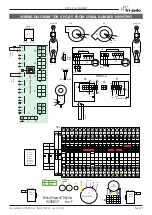
Page 82: ... WH RD GY 4 3 9 10 11 14 YE BU 19 18 17 12 24 25 28 29 7 6 1 Phase 230V N PE 2 33 L1 30 27 ERROR H1 PE OVEN TEMP R1 PT1000 DOOR SWITCHES 16 32 15 47 48 S1 X2 YE OPTION DISPLAY CB5 OPTION OPTION HMI HMI DISPLAY x6 x7 x8 x9 x10 x11 x12 x13 x15 x14 x36 x31 x30 x29 x28 x27 x26 x25 x24 FR MFMB x23 x22 x21 x20 125mA FUSE L N x35 RD WH M5 GY GREY BU BLUE BK BLACK YE YELLOW BN BROWN WH WHITE OR ORANGE RD ...

Page 83: ...itch DOOR BK BN BU M2 FAN BK BN 22 BU M3 FAN 19 23 Operator Side Operator Side Customer Side Customer Side CB4 X1 X3 CB3 14 M4 PWR 115V K1 21 TH TH GY S1 CB3 12 H1 H1 X2 8 13 House valve 13 115V 205V 225V WHITE BLACK RED GREY YELLOW T2 M1 MOTOR BN WH WH A 2 5 uF C3 1 5 uF C2 1 5 uF C1 M4 5 GY 2A X3 2 BN 1A S1 RESET H1 RESET LAMP X1 2 BN X1 7 YE TH HIGH LIMIT 320 GR THERMOSTAAT X3 10 OR X3 3 YE YE ...

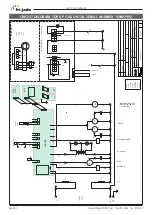
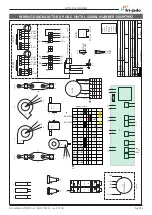
Page 84: ...BU RD YE WH BN GY OR OR 3 4 6 7 9 10 11 12 16 32 15 14 17 18 19 BU WH GY BK K2 28 29 PE 1 PHASE Ignition OR CB1 CB2 CONTROL CONTROL M4 M4 M4 M4 M4 8 3 9 8 10 10 9 9 10 10 9 1 2 2 CB4 CB4 15 CB4 4 2 CB3 13 12 14 M4 PWR 1 3 6 CB4 CB4 11 CB3 CB3 CB3 CB3 CB3 CB3 CB3 CB3 CB3 CB3 CB3 CB3 CB3 CB3 CB3 CB3 CB3 230V CB3 50 60 Hz x4 x5 x3 x6 x7 x8 x9 x10 x11 x12 x13 x15 x14 x36 x31 x30 x29 x28 x27 x26 x25 x2...

Page 85: ... PWR K1 Koolen 31 05 2013 9290871 In Progress 3180 Wiring Diagram TDR Gas 230V 9290871 A3 100 1 mm 13 11 2013 22 04 2014 4 3 CB5 update connections D A 15 x28 4 3 28 10 x15 L N x14 FUSE x12 x13 x36 x35 x11 x10 x30 x31 x29 32 11 12 x9 x8 x7 x25 x27 x26 x24 x6 x20 x21 x23 x22 red white 9 PT1000 A2 22 A1 12 230V AC 21 24 11 14 A2 22 A1 12 230V AC 21 24 11 14 N L1 N L1 30 TB2 GR GY GREY BU BLUE BK BLA...

Page 86: ...Page 86 Service Manual TDR8 P Gas form 9124023 rev 01 2022 EMPTY PAGE ...

Page 87: ...Page 87 Service Manual TDR8 P Gas form 9124023 rev 01 2022 ...

Page 88: ...Page 88 Service Manual TDR8 P Gas form 9124023 rev 01 2022 Fri Jado B V P O Box 560 4870 AN Etten Leur The Netherlands tel 31 76 50 85 400 fax 31 76 50 85 444 info frijado com www frijado com ...

Reviews: