background image

9

4) Clean the oil holes and bar
groove.

5) If the bar is burred, remove the
burs with a flat file.

6) If the rail top is uneven, use a flat
file to make the sides and edges
square again.

Replace the guide bar when the 
groove is worn, the bar is bent or 
cracked, or when excessive heating 
or burring occurs. If the bar needs 
replacing, only use the guide bar 
specified in the parts list or on the 
chain saw.

Oil passages

The oil passages should be cleaned 
to allow proper lubrication of the bar 
and chain.

The condition of the passages can 
be checked. If they are clear, the 
chain will automatically send off a 
spray of oil within seconds of starting 
the saw because it is equipped with 
an automatic oiler system.

Automatic chain lubrication

The chain is equipped with an 
automatic oil system with a toothed 
wheel drive. It will automatically 
supply the bar and chain with the 
right amount of oil. When the engine 
is accelerated, the oil will flow 
through the bar more quickly. 

The lubrication system has been set 
at the factory. The screw for 
adjusting the lubrication is located on 
the underside of the chainsaw. By 
turning the screw counterclockwise, 
it will increase the lubrication and 
turning it clockwise will decrease the 
lubrication.

To check the lubrication, hold the 
chain saw over a piece of paper and 
run it at full speed for a few seconds. 
The amount of oil on the paper will 
determine if the lubrication needs to 
be increased or not.

Chain Maintenance

Sharpening

Chain sharpening requires special 
tools to ensure that the cutters are 
sharpened to the proper angle and 
depth. We recommend you allow a 
professional chain sharpener to 
sharpen your chain.

Breaking in a new chain

A new chain and bar will need 
adjusting after as few as 5 cuts. This 
is normal during the break-in period 
and the interval between future 
adjustments will begin to lengthen.

Chain lubrication

Make sure the oil tank is filled with 
the appropriate oil to lubricate the 
chain. Running the saw with low or 
no oil will cause damage to the 
chain and the saw, causing 
overheating and excessive wear.

STORAGE

If a chainsaw is going to be in 
storage for longer than 30 days, 
follow these instructions.

Storing a chainsaw

1) Remove the fuel tank slowly in
order to release any pressure in the
tank. Carefully drain the fuel from
the tank.

2) To remove all of the fuel from the
carburetor, start the engine and let it
run until the saw stops.

3) Allow the engine to cool
completely.

4) Remove the spark plug.

5) Pour 1 teaspoon of 2-cycle oil into
the combustion chamber. Slowly pull
the starter rope a few times in order
to coat the internal parts. Replace
spark plug.

Note:

Store the unit away from 

water, sources of flame and sparks 
and in a cool, dry location. 

Preparation to use saw again

1) Remove the spark plug.

2) Pull the starter rope briefly to
clear excess oil from the
combustion chamber.

3) Clean the spark plug and check
the electrode gap.

4) Replace the spark plug.

5) Fill the fuel tank with the proper
fuel mixture.

6) Check oil levels.

Summary of Contents for 20120

Page 1: ...ec de le faire peut entra ner des blessures graves CONSERVER CE MANUEL Read this material before using this product Failure to do so can result in serious injury SAVE THIS MANUAL AVERTISSEMENT SCIE A...

Page 2: ...w when it is running starting or being operated 6 You must be mentally alert and in good physical condition when operating a chainsaw because the work is strenuous 7 Carefully plan your sawing project...

Page 3: ...sioned and sharp along with properly maintaining the chainsaw Failure to do so can increase the chance of kickback occurring Begin and continue the cut with the engine running at full speed Use cautio...

Page 4: ...Make sure the bar knobs are loosened 1 1 2 2 turns 2 Using a screwdriver adjust the tension of the chain The adjusting pin is located right below the two bar knobs 4 3 Turn the screw to the right to i...

Page 5: ...6 Allow the engine to run for approximately 30 seconds before squeezing and releasing the throttle trigger which will allow the engine to return to idle speed Starting a Warm Engine 1 Place the ON OFF...

Page 6: ...Cut through 1 3 of the diameter of the tree Complete the notch by cutting the bottom of the notch Remove the notch of wood from the tree once the notch is cut 2 After removing the wood make the fellin...

Page 7: ...ar away branches from the work area in order to avoid tripping over them Limbing Limbing should only be done when a tree is already cut down Leave any large limbs under the tree for support as you wor...

Page 8: ...ean the spark plug with a copper wire brush The electrode gap should be 0 6mm 7 Reconnect the ignition cable 8 Replace the air filter 9 Replace the top cover make sure the cover is securely fitted and...

Page 9: ...ication needs to be increased or not Chain Maintenance Sharpening Chain sharpening requires special tools to ensure that the cutters are sharpened to the proper angle and depth We recommend you allow...

Page 10: ...l not accelerate lacks power or dies under a load Contact an authorized service dealer Crankshaft seal is worn Contact an authorized service dealer Carburetor requires adjustment Engine will not idle...

Page 11: ...equipment as a whole Installation Use and Maintenance Exclusion This warranty will not apply to parts and or labor if the chain saw has been misused neglected involved in an accident abused loaded be...

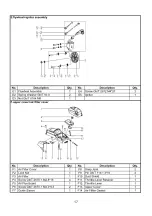
Page 12: ...Of Rear Handle P Trigger Control Arm E Right Side Plate Q Choke Valve Pulling Rod F Tensioning Device R Air Filter Locking Nut G Locking Nut Of Right Side Plate S Small Cap Of Air Filter H Guide Plat...

Page 13: ...13 Parts List...

Page 14: ...14...

Page 15: ...15...

Page 16: ...16...

Page 17: ...17...

Page 18: ...18...

Page 19: ...19...

Page 20: ...20 Service Warranty Contact XVWRPHU 6HUYLFH 1HHG KHOS SOHDVH FRQWDFW XV DV EHORZ 3KRQH RU 7ROO UHH PDLO VXSSRUW IRW XVD FRP...

Page 21: ...defective or a defect in the materials or workmanship of the engine causes the failure of such an emission related part the part will be repaired or replaced by FOT OWNER S WARRANTY RESPONSIBILITIES...

Page 22: ...Induction System including a Intake Pipe Manifold b Air Cleaner 3 Ignition System including a Spark Plug b Ignition Module Coil 4 Catalytic Muffler Assembly if so equipped a Muffler Gasket b Exhaust...

Page 23: ...r s de la scie quand il est en marche au commencement ou tant op r e 6 Vous devez tre mentalement alerte et en bonne condition physique lors de l utilisation d une scie cha ne parce que le travail est...

Page 24: ...rte avec du bon entretien de la scie cha ne L chec de faire peut augmenter le risque de rebond Commencez et continuez la coupe avec le moteur en marche pleine vitesse Utilisez l attention lors de r en...

Page 25: ...2 Avec un tournevis r glez la tension de la cha ne La broche de r glage est situ e juste en dessous des deux boutons de la barre 25 3 Tournez la vis vers la droite pour augmenter la tension et tourne...

Page 26: ...presser et rel cher la g chette d acc l rateur ce qui permettra au moteur de tourner au ralenti D marrage d un Moteur Chaud 1 Placez l interrupteur ALLUME ETEINT dans la position ALLUMEE 2 Poussez le...

Page 27: ...l encoche en coupant le fond de l encoche Retirez l encoche du bois de l arbre une fois que l encoche est coup 2 Apr s avoir enlev le bois faites la coupe d abattage sur le c t oppos de l encoche Fai...

Page 28: ...il afin d viter de tr bucher sur eux Ebranchage L branchage ne devrait tre fait quand un arbre est d j coup Donner des grosses branches sous l arbre pour le soutien que vous travaillez Commencez la ba...

Page 29: ...es doit tre de 0 6 mm 7 Rebranchez le c ble d allumage 8 Remplacez le filtre air 9 Remplacez le couvercle sup rieur assurez vous que le couvercle est bien fix et puis vissez la fixation Carburateur Le...

Page 30: ...tretien de la Cha ne Aff tage L aff tage de la cha ne n cessite des outils sp ciaux pour veiller ce que les couteaux sont aiguis s l angle et la bonne profondeur Nous vous recommandons de permettre un...

Page 31: ...la charge Le joint de vilebrequin est us Contactez un distributeur de service autoris Contactez un distributeur de service autoris Le carburateur exige un r glage Le moteur ne ralenti pas correctement...

Page 32: ...de l quipement dans son ensemble Installation Utilisation et Exclusion d Entretien Cette garantie ne sera pas applicable aux pi ces et ou au travail si la scie cha ne a t mal utilis n glig impliqu da...

Page 33: ...de la Poign e arri re Plaque Droite Dispositif de Tension Ecrou de blocage de la Plaque Droite Plaque de guidage Cha ne Couvercle du r servoir d essence Couvercle du r servoir d huile Poign e de D mar...

Page 34: ...34 Liste Des Parts 20120 Liste des parts...

Page 35: ...9 1 6 30 Assemblage d quilibreur Base d quilibreur Tube de carburant Tube de retour 2 Base de tube de carburant Blocage de poids Filtre de carburant Ressort de base R servoir de carburant Bouchon du r...

Page 36: ...raction principale Epingle G b T 119 1 3 9 Epingle G b T 119 3 14 Vis M5X37 5 Tube de garde front Garde front Ressort de torsion de frein Rondelle plate Gb T 96 1 5 23 1 2 Boulon Gb T 889 1 M5 Adducti...

Page 37: ...de bobine facile 2 Roue de d marrage facile Rondelle plate Gb T 96 1 05 Vis Gb T 2670 1 St4 8 13 Masque de refroidissement d air Tube d huile Buse de carburant Pompe huile Vis Gb T 2672 M4 14 Couvercl...

Page 38: ...u Gb T 6184 M8 Couvercle de filtre d air crou de blocage filtre air Vis Gb T 2670 1 St4 8 16 Plaque de conduction d air Vis Gb T 2670 1 St4 2 9 5 Manchon de guidage Connecteur encliquetage pingle Gb T...

Page 39: ...in Cl de forage 2 9 10 anneau de roulement aiguilles Circlip tige de piston Piston Anneau de piston Tige de piston Roulement aiguilles Joint de carburateur Carburateur Vis Gb T 2670 1 St4 8 16 Admissi...

Page 40: ...Couvercle de protection Vis M4 10 Couvercle de barre Cha ne Barre Scellage l huile 12 32 10 Anneau Gb T 893 132 Vis Gb T 2672 4 8 16 Vis M5 30 tui de vilebrequin DROITE Plaque de poussi re anti vibrat...

Page 41: ...41 Service la Client le ou Probl mes de Garantie 6HUYLFH OLHQWqOH HVRLQ G DLGH YHXLOOH QRXV FRQWDFWHU FRPPH FL GHVVRXV 7pOpSKRQH RX VDQV IUDLV RXUULHO VXSSRUW IRW XVD FRP...

Page 42: ...st d fectueuse ou un d faut dans les mat riaux ou la fabrication du moteur provoquant l chec d une telle partie li e l mission la part sera r par e ou remplac e par FOT RESPONSABILIT S DE LA GARANTIE...

Page 43: ...ission Collecteur b Purificateur d air 3 Syst me d allumage y compris a Bougie b Module d allumage Bobine 4 Assembl e du silencieux cat alytique le cas ch ant a Joint d tanch it du silencieux b Collec...

Reviews: