INSTRUCTIONS FOR USE
Before each use, clean hands thoroughly and clean the device as described
in the section on “CLEANING SANITISATION DISINFECTION”. During use, it is
advisable to protect yourself from any dripping. It is recommended that each
person use their own nebulizer cup and accessories to prevent risk of infection
due to contamination.
This device is suitable for the administration of medical substances and not, for
which the administration via aerosol is foreseen; these substances are to be in
any case prescribed by the Doctor. In case of too thick substances, the dilution
with a suitable physiological solution could be needed, according to the medi-
cal prescription.
1. Plug the power cord (A7) into a power socket corresponding to the voltage
of the unit. This must be positioned so that it is not difficult to make the
disconnection from the mains.
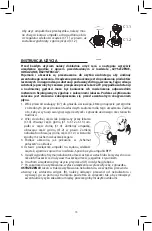
2. Pour the medication prescribed by the physician into the lower part (C1.4).
Insert the upper part(C1.1+C1.2+C1.3) of the bowl
into the lower part (C1.4), then close the bowl by
turning the upper part (C1.2) clockwise. Close
the nebuliser by turning the upper part (C1.2)
clockwise.
3.
Connect accessories as indicated in the
“Connection diagram” on the cover.
4. Set the bowl selector to the desired particle size as
described under “How to use the RF9 bowl”
4 Sit comfortably holding the nebuliser in your
hand, place the mouthpiece onto your mouth or alternatively use the nose piece
or mask. Should you opt for the mask accessory, place it on your face as shown in
the picture (with or without using the elasticated strap).
5. Start the unit by means of switch (A1) and Inhale gently and deeply; after
inspiration we recommend to hold your breath for a moment in order to allow
inhaled aerosol droplets to deposit. Then, exhale slowly.
6. When the treatment is finished, turn off and unplug the unit.
WARNING: If after the therapy session moisture accumulates in the tube (B), remove
the tube from the nebulizer and dry it using the compressor air flow; this operation
will prevent mold from forming inside the tube.
C1.1
C1.2
To use the bowl without selector, firmly grasp the
bowl body and use your other hand to rotate the
particle size regulator (C1.1) clockwise until it is
ejected from the upper part (C1.2)
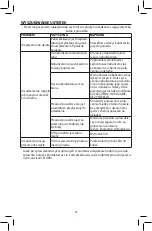
RESPIRATORY
SYSTEM
UPPER
AIRWAYS
LOWER AIRWAYS
Oropharyn-
geal
tract
Tracheobron-
chial
tract
Pulmonary
tract
Peripheral
tract
CONFIGURA-
TION
BOWL
Without
Selector
Selector in
position 1
Selector in
position 2
Selector in
position 3
MMAD
(μm)
7.71
(3)
5.12
(1)
3.67
(1)
2.49
(1)
Output rate
(ml/min’)
0.53
(2)
0.36
(2)
0.30
(2)
0.23
(2)
Breathable
fraction
< 5 μm (FPF)
26.7%
(3)
48.8%
(1)
63.4%
(1)
83.1%
(1)
(1) In vitro testing performed by TÜV Rheinland Italia S.r.l. in collaboration with the University of Parma and in
compliance with the EN 13544-1: 2007 + A1 European Standard for aerosol therapy devices Standard. More
details are available on request.
(2) Data measured according to Flaem I29-P07.5 internal procedure Dispensing speed values may vary accord-
ing to the patient’s respiratory capacity. More details are available on request.
(3) Data calculated on the basis of the values obtained with Malvern Spraytec, and compared with the values
of the tests performed at the University of Parma.
C1.1c
C1.1c
4
5
Summary of Contents for 4Neb
Page 2: ......
Page 44: ...FLAEM FLAEM 400 a b 93 42 E 2 42...
Page 47: ...C1 1 C1 2 1 A7 A8 2 C1 4 C1 1 C1 2 C1 3 C1 4 C1 2 C1 2 3 4 RF9 5 6 1 7 3 1 2 1 C1 1 C1 2 45...
Page 50: ...E FLAEM 48...
Page 65: ...400 CE 42 93 63...
Page 66: ...A6 1 2 C1 1 C1 2 C1 3 C1 4 C1 4 C1 2 C1 2 3 4 RF9 5 A1 6 7 B C1 1 C1 2 C1 1 C1 2 64...
Page 70: ...68...
Page 74: ...FLAEM FLAEM 400 a b 93 42 CE 2 72...
Page 77: ...C1 1 C1 2 C1 1 C1 2 1 A7 2 C1 4 C1 1 C1 2 C1 3 C1 4 C1 2 3 4 RF9 5 6 A1 7 B 3 1 ma 75...
Page 79: ...C C1 1 C1 1a C1 1b C1 1c C1 2 C1 3 C1 4 C2 C3 C4 6 A3 FLAEM...
Page 82: ...MEMO 80...
Page 83: ...81...

