


www.evolutionfury.com
28
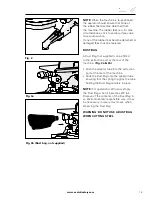
FENCE ADJUSTMENT (Fig. 33a & 33b)
The Fence is fastened to the machines
base by two (2) socket head screws, one
on either side. These Screws are located in
elongated holes, which enable the Fence to
be repositioned as required.
The Fence should be set at exactly 90
0
to a
correctly installed blade.
An accurate Engineers Square (not supplied)
will be required to precisely position the Fence.
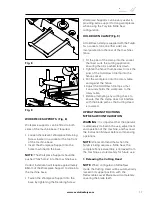
To reposition the Fence:
• Set the Rotary Table to 0
0
Mitre Angle.
• Set the Cutting Head to 0
0
Bevel Angle.
• Slightly loosen the two (2) Fence socket
head screws.
• Lower the Cutting Head to its lowest
position.
• Check the alignment of the Fence with
the Blade using the Engineers Square.
• Align the Fence as necessary and then
tighten the socket head screws.
FUSE AND PLUG REPLACEMENT
Should the fuse in the main plug of your
machine need replacing it should always be
replaced with one of identical rating.
Check the voltage given on your machine
matches the supply voltage.
This machine is supplied with a fitted
moulded plug. If you should need to fit a
new plug follows the protocol below.
IMPORTANT
The wire in the mains lead are coloured in
accordance with the following code:
Blue --- Neutral
Brown --- Live
The wire that is coloured
blue
must be
connected to the terminal that is marked
with the letter
N.
The wire that is coloured
brown
must be connected to the terminal
that is marked with the letter
L.
A 13AMP (BS1363 or BS1363/A) plug must
be used and a 13 AMP fuse must be fitted.
ENVIRONMENTAL PROTECTION
Waste electrical products should not be
disposed of with household waste. Please
recycle where facilities exist. Check with your
Local Authority or retailer for recycling advice.
Fig. 33a
Fig. 33b
Summary of Contents for Fury 6
Page 2: ...www evolutionfury com 2 03 GB...
Page 29: ...www evolutionfury com 29...
Page 30: ...www evolutionfury com 30...
Page 31: ...www evolutionfury com 31...