


www.evolutionfury.com
23
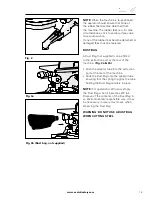
• Tighten the Angle Clamping Screw.
• Adjust the Angle Gauge Pointer if
necessary to point exactly to the 90
0
index mark.
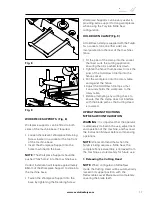
• Use a #2 Phillips Head screwdriver to
loosen the Angle Pointer fixing screw.
(Fig. 22)
Adjust the pointer to suit and
then retighten the fixing screw.
• Loosen the Angle Clamp Locking Screw
to allow the Assembly to slide along the
Rip Fence channel.
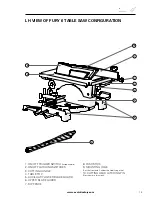
Basic Table Saw Operations
WARNING:
Do not cut metal or metallic
materials when the machine is configured
as a Table Saw.
WARNING:
Never attempt freehand cuts
on this machine. Always use a correctly
adjusted Rip Fence to minimise the
possibility of the blade binding and kickback.
1. Adjusting the Table Height
(Fig. 23a &23b)
The height of the Table above the machines
motor can be adjusted. This enables your
Fury6 to mimic the rise and fall facility found
on many conventional table saws. The
cutting depth of the blade can thereby be
adjusted from 0mm to 32mm.
WARNING:
Only adjust the height of the
table with the machine disconnected from
the mains power supply.
To adjust:
• Loosen the Height Adjustment Screw and
adjust the table height so that the saw
blade protrudes through the table by the
required amount. Retighten the screw.
We recommend that the saw blade
protrudes through the material to be
cut by approximately 3mm.
WARNING:
This machine is not suitable for
cutting rebates or stopped grooves.
Fig. 23b
Fig. 23a
Fig. 22
Summary of Contents for Fury 6
Page 2: ...www evolutionfury com 2 03 GB...
Page 29: ...www evolutionfury com 29...
Page 30: ...www evolutionfury com 30...
Page 31: ...www evolutionfury com 31...