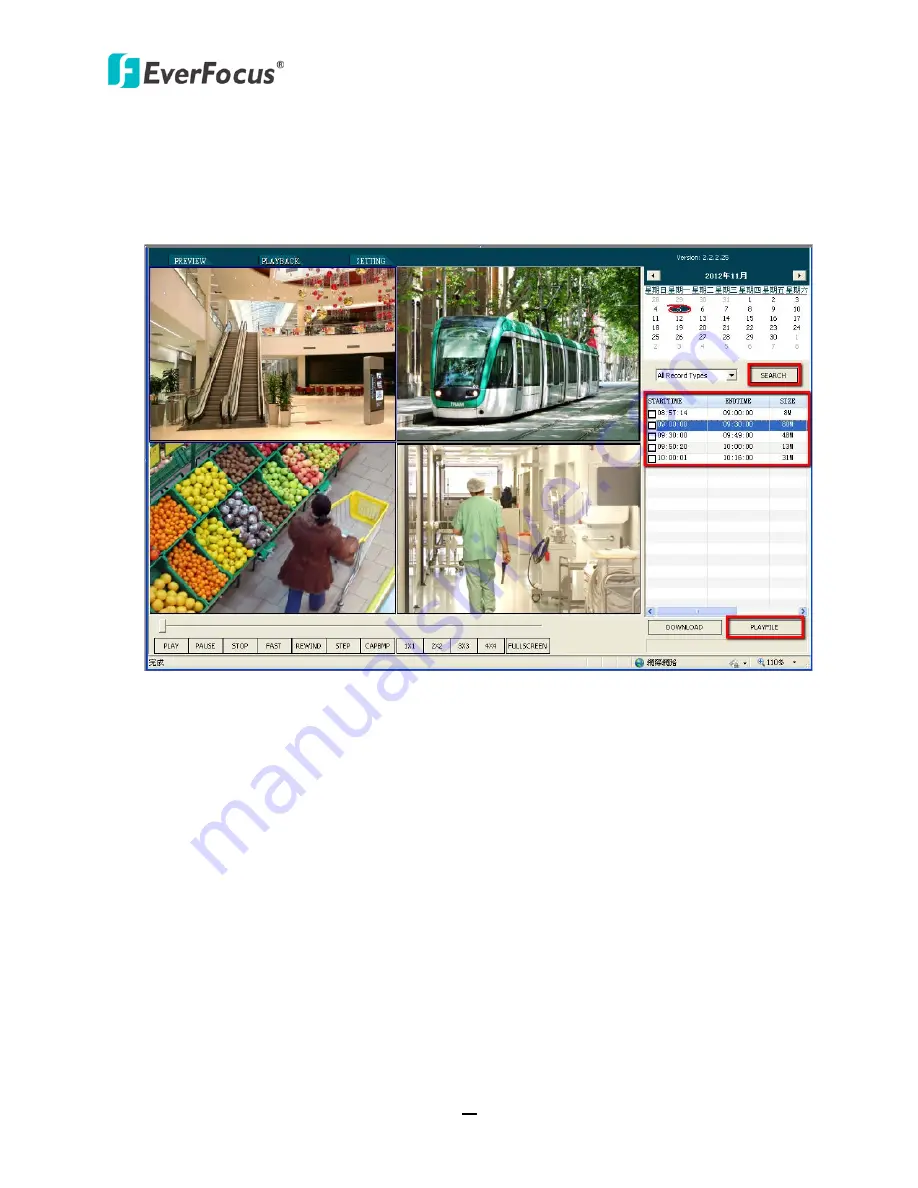
EverFocus TUTIS-16F3 User Manual Download Page 61


TUTIS Series DVR


56 

7.3.1


Remote Playback   


   To play back the recordings from the DVR, select a date and recording type, and then click the 

Search

 button. The searched recordings will be displayed in the list. Highlight the desired 

recording and then click the

 PlayFile

 button to start playing back.       


Summary of Contents for TUTIS-16F3

Page 1: ...TUTIS Series DVR H 264 4CH 8CH 16CH User s Manual TUTIS 16F3 TUTIS 4F3 TUTIS 8F3 Copyright EverFocus Electronics Corp Release Date November 2012...

Page 2: ...12 EverFocus Electronics Corp www everfocus com All rights reserved No part of the contents of this manual may be reproduced or transmitted in any form or by any means without written permission of th...

Page 3: ...ould be guaranteed during operation 10 The DVR shall be installed to ensure proper connection with other devices Please buy HDD from official channel to meet DVR s long time and large data reading and...

Page 4: ...re Upgrade 13 4 OSD Menu Operation 14 4 1 Main Menu 15 4 1 1 Record 15 4 1 2 Alarm 18 4 1 3 Channel 23 4 1 4 Network 25 4 1 5 User 29 4 1 6 System 30 4 1 7 Display 32 4 1 8 Log 33 4 1 9 Record Search...

Page 5: ...veX Controls 52 7 2 2 Enabling ActiveX Controls 53 7 3 Remote Live View 55 7 3 1 Remote Playback 56 7 3 2 Remote Archive 567 7 3 3 Playing Back Recordings from the Computer 588 7 3 4 DVR Configuration...

Page 6: ...2 USB ports RS 485 and alarm I O Wide variety of functions such as live view record playback backup network transmission and mobile surveillance are also provided by the TUTIS Series DVRs You can als...

Page 7: ...ort SATA HDD TUTIS 4F3 8F3 1 HDD up to 2TB TUTIS 16F3 2 HDDs up to 4TB Support video outputs TUTIS 4F3 8F3 BNC x 1 VGA x 1 TUTIS 16F3 BNC x 1 Spot monitor BNC x 1 VGA x 1 HDMI x 1 Support Multi langua...

Page 8: ...nly for 16CH model Terminal block x 2 only for 16CH model Power cord x 1 Product certificate QA certified by EverFocus x 1 User manual x 1 CD x 1 Note Contact the shipper if any items appear to have b...

Page 9: ...recordings 2 Step Back Press to step back the recordings 3 Search Stop Press to search or stop playing back the recordings 4 Step Forward Press to step forward the recordings 5 Play Forward Press to p...

Page 10: ...nu 12 System Info Press to see the system information 13 Mute Press to mute the volume 14 Indicators PWR Indicates the power is on REC Indicates it is recording LINK Indicates the DVR is linked to the...

Page 11: ...TUTIS Series DVR 6 2 2 Rear Panel 1 2 4 3 8 9 10 11 5 6 7 1 2 3 4 5 8 9 10 11 4CH 8CH 12 12 6 7 1 8 9 4 3 13 2 6 5 7 14 12 16CH 11 10...

Page 12: ...tor using a VGA cable 6 Alarm Output Connects to the alarm output device 7 Alarm Input Connects up to the alarm inputs 8 USB Interface Connects to USB storage device to copy archive video or for firmw...

Page 13: ...TUTIS Series DVR 8 2 3 Terminal Block 4CH Alarm out Power out Sensor in RS 485 8CH Alarm out Power out Sensor in RS 485 16CH Power out Sensor in Alarm out RS 485 RS 485...

Page 14: ...ied by the monitor manufacturer Only the 16CH model provides HDMI port 5 To listen to audio of video source connect speakers to the Audio Out port Note that speakers with amplifier are required 6 Opti...

Page 15: ...ng screws on both sides and the back panel and then remove the housing a For 4CH and 8CH models Unscrew the 7 housing screws on both sides and back panel b For 16CH model Unscrew the 8 housing screws...

Page 16: ...ides of the HDDs on the brackets and then fix them on the DVR 4 Use the supplied SATA cable connect one end to the SATA port on the small PCB inside the DVR and the other end to the SATA port on the H...

Page 17: ...TUTIS Series DVR 12 5 Connect the internal power cable to the HDD 6 Screw back the housing to the DVR 7 Format the hard disk drive after the installation is completed...

Page 18: ...e Full screen and multi screen switch can be realized by double clicking and right clicking on the main interface If the user authentication has been enabled on the DVR the login window would pop up T...

Page 19: ...creen Switch to the next screen divisions only for 8CH 16CH models Start Stop Record Start stop recording manually Note The START RECORD manually record function is only functional when the DVR is not...

Page 20: ...iguration menu with 9 setup options appears 4 1 1 Record The Record Menu includes 3 tabs Basic Advanced and Recording Schedule Please refer to sections below for configurations 4 1 1 1 Basic Video Cha...

Page 21: ...o be applied with the above settings Tip Press the Display button on the front panel IR Remote Control can change the tab menus 4 1 1 2 Advanced Overwrite Select Auto No to automatically enable disabl...

Page 22: ...lack Select to disable the recording function Schedule Blue Select to record continuously Alarm Red Select to record when an alarm is triggered Schedule Alarm Green Select to record both continuous an...

Page 23: ...gered Email operation requires valid email setup in the Network Advanced menu Action PTZ If PTZ cameras have been connected to the DVR Click this button to configure the preset positions of the PTZ ca...

Page 24: ...ection function Simply move and drag the mouse cursor on the desired grids Right click the mouse can confirm and then exit from the Partial Region menu Actions Record Select the desired channels for r...

Page 25: ...y to apply the settings to the DVR or click OK to save the settings and exit from the current menu 4 1 2 3 HDD You can configure the alarm settings for the DVR when HDD fails HDD Actions Alarm Out Sel...

Page 26: ...gnal Buzzer Check the box to enable the buzzer when an alarm is triggered E Mail Check the box to send email notification when an alarm is triggered Email operation requires valid email setup in the N...

Page 27: ...l operation requires valid email setup in the Network Advanced menu Event Duration Set up a delay time after an alarm is triggered Video Cover Actions Alarm Out Select an alarm output channel for outp...

Page 28: ...f the PTZ cameras have been connected to the DVR the following settings have to be configured to enable the PTZ Control function through the DVR PTZ Protocol Select a protocol for the DVR to communica...

Page 29: ...ock on the camera view by checking the Area 1 4 boxes 3 Click the Setup button the selected number of masks displayed on the camera view 4 Click on a mask drag and drop it on the desired position 5 Ri...

Page 30: ...guration for the network connection If Static IP is selected you will need to manually input the IP Address Subnet Mask and Gateway You can find all the configurations on your computer s network prope...

Page 31: ...ct On to enable the Sub Stream Channel Select the desired channels to apply for the Sub Stream function Resolution Select CIF resolution for the Sub Stream Quality Select a transmission quality Frame...

Page 32: ...Interval Set up the interval for DVR to send the e mail notifications DDNS You can set up the DDNS service for remote access to the DVR Before enabling the function user should have applied for a host...

Page 33: ...eature DNS2 Setup Click to bring up the on screen keyboard and then set up the secondary DNS server for your network Mobile This port is used for mobile phone connection The default Mobile Port is 660...

Page 34: ...he LAN WAN IP Displays the IP address through the 3G network This IP address can be displayed if you enabled CDMA or WCDMA in the PPPoE field 4 1 5 User You can create multiple user accounts with diff...

Page 35: ...al and Network tabs for the user and then click the Apply button to save the settings or OK to save the settings and exit this menu 4 1 6 System You can configure basic settings for the DVR including...

Page 36: ...xxx seconds To unlock click Main Menu in the OSD Root Menu the Login menu appears Enter the User Name Password and click OK to log in The default user name is admin lower case and password is 0000000...

Page 37: ...et To Factory menu select the desired items and click the Apply button 4 1 7 Display You can configure the display settings including setting up the Sequence Mode for Main Spot monitor and resolution...

Page 38: ...etup menu for adjusting the gaps between the monitor border and image border Click Apply to apply the settings to the DVR or click OK to save the settings and exit from the current menu 4 1 8 Log You...

Page 39: ...s DVD burner 4 1 9 1 Playing Back There are two ways to search for the recordings for playing back By Type and By Time To Play Back the Recordings by Type 1 Select a recording type from the By Type dr...

Page 40: ...n the playback bar please refer to 4 1 9 2 Playback Bar To Play Back the Recordings by Time 1 Click on the Date and Time fields to bring up the on screen keyboard for setting up the date and time 2 Cl...

Page 41: ...p playing back 5 Next Frame Click to move forward to the next frame 6 Play Click to play back the recordings You can also change the playback speed by clicking on the Play button 7 4 Screen Click to p...

Page 42: ...1 Select a recording type from the By Type drop down list 2 Click the Search button The following menu appears 3 Check the recording boxes and then click the FilesBackup button the following menu appe...

Page 43: ...mber the camera will turn to the selected position Preset Click to set up the Preset Positions To set up the Preset Position use the Direction Buttons to move the camera to the desired position click...

Page 44: ...ect the desired Preset Positions and then set up the stay time in second for each Preset Position You can drag the slide bar on the right to display other positions 2 Click the S Path button to save t...

Page 45: ...dow of the camera view appears in the bottom right corner You can navigate the camera view by dragging the Navigation Box and drop it on a certain position Navigation Box Inset Window 3 To exit the Zo...

Page 46: ...l installation double click desktop icon and run the software You need to create a new user when you run the software at first time Note If the earlier version of this software has already been instal...

Page 47: ...TIS Remote you can access the TUTIS DVRs from your Android devices to remotely watch live view take snapshots start stop monitoring and control the connected PTZ cameras Download TUTIS Remote from And...

Page 48: ...This page appears 3 Tap to add a DVR This page appears 4 Enter the Title IP Address ID Password and the channel number of the DVR Enter Port number 6600 which is the default Mobile Port setup on the D...

Page 49: ...TUTIS Series DVR 44 5 Tap the OK button the DVR is added to the Device List 6 Tap on the DVR the channel numbers displayed in the list...

Page 50: ...10 To take a snapshot tap 11 To see the information of TUTIS Remote tap 12 To go back to the Device List tap 13 To display the 4 screen camera view in full screen simply hold the device horizontally...

Page 51: ...the TUTIS DVRs from your Apple devices such as iPhone or iPod Touch to remotely watch live view take snapshots start stop monitoring and control the connected PTZ cameras Download TUTIS Remote from A...

Page 52: ...TUTIS Series DVR 47 Follow the steps below to connect the TUTIS DVRs 1 Tap the icon on the desktop This page appears 2 To add a DVR tap the Setting button This page appears...

Page 53: ...ress ID and Password of the DVR Select the channel number of the DVR Enter Port number 6600 which is the default Mobile Port setup on the DVR For details please refer to Mobile in 4 1 4 2 Advanced 5 T...

Page 54: ...nel the following page with 4 screen camera view appears Channel Field 8 To turn to the next previous channel pages tap 9 To Stop Start monitoring a channel tap a channel which will be highlighted wit...

Page 55: ...Single view simply double tap on a channel 15 To control the PTZ cameras swipe the Channels field see image in Step 7 to the left the PTZ control buttons appears see image below Tap a channel in the 4...

Page 56: ...s from the DVR s Network Menu IP port used e g http 192 138 1 163 2648 Internet connection http IP address given by your Internet Service Provider IP port used e g http 57 182 67 204 2648 2 The Login...

Page 57: ...R s IP address If you do not see a yellow bar as shown in image below your security settings may be too high If so go to 7 2 2 Enabling ActiveX Controls 1 Right click on the yellow bar and click Run A...

Page 58: ...ry if you DO NOT see the yellow ActiveX bar at the top of your browser screen when you first connect to the DVR 1 At the top of the Internet Explorer Window click the Tools button and click Internet O...

Page 59: ...tomatic prompting for ActiveX controls Binary and script behaviors Display video and animation on a webpage that does not use external media player IE7 only Run ActiveX controls and plug ins Script Ac...

Page 60: ...please refer to 7 3 2 Playing Back Recordings from the computer Display Mode 1x1 2x2 3x3 4x4 Full Screen Snapshot Audio Record PTZ Control Buttons PTZ Preset Cruise Setup Alarm Information Display th...

Page 61: ...lay back the recordings from the DVR select a date and recording type and then click the Search button The searched recordings will be displayed in the list Highlight the desired recording and then cl...

Page 62: ...gle file and then play back the recording using the DVR Player see 7 3 3 or select EXE to archive multiple recordings with the DVR Player in a single file and then play back the recording by double cl...

Page 63: ...the Computer You can use the provided DVR Player in the CD to play back the recordings stored in the computer Double click the player exe in the CD to bring up the DVD Player To start playing back cli...

Page 64: ...tion To remotely configure the DVR settings on the Remote Live View window click the Setting button and then click DVRSetting The following setup window appears For details on DVR configurations pleas...

Page 65: ...CIF at100fps D1 at 50fps HD1 at 100fps CIF at 200fps D1 at 100fps HD1 at 200fps CIF at 400fps Network Transmission 4CH real time network transmission with QCIF resolution 8CH real time network transmi...

Page 66: ...Apple Android Browser IE6 0 9 0 Firefox Chrome Opera Apple Safari Apple Safari is only supported on Windows 7 Mouse interface Backup interface USB2 0 Remote Controller Support Working Temperature 0 C...

Page 67: ...www everfocus co jp info everfocus co jp EverFocus Europe UK Unit 12 Spitfire Business Park Hawker Road Croydon Surrey CR0 4WD UK TEL 44 20 8649 9757 44 845 430 9999 FAX 44 20 8649 9907 www everfocus...

Reviews: