4
1. Important notes – Please read this first
Thank you for purchasing the LokProgrammer set 53450/
Thank you for purchasing the LokProgrammer set 53450/
Thank you for purchasing the LokProgrammer set 53450/
Thank you for purchasing the LokProgrammer set 53450/
Thank you for purchasing the LokProgrammer set 53450/
53451.
53451.
53451.
53451.
53451. With the LokProgrammer you can program ESU LokPilot-
and LokSound decoders.
The LokProgrammer 53450 consists of two elements: An
interface module that serves as the physical connection
between the PC and the locomotive, and the software that
can be run on any PC using MS Windows. The set 53451 has
an additional USB adapter but is otherwise the same as 53450.
Never was it easier to program a digital decoder than with
LokProgrammer. Thanks to the graphic interface of MS
Windows you can achieve the optimal adaptation of LokSound
decoders even if you have very little or no experience in
programming digital decoders. This combination allows you to
easily manipulate and adjust the many features and properties
of LokSound decoders with your PC.
LokProgrammer also allows you to modify all sound fragments
and sound effects stored on the decoder as often as you desire.
ESU provides over 100 different sound files on the ESU web
site at www.esu.eu. You will certainly find the right sound for
your locomotive.
Please also take note of the license agreement regarding
downloading and using the sound files contained in the appendix.
This manual describes in detail how to modify sounds and which
methods to use to achieve the desired results.
We wish you lots of fun in the world of LokSound.
ESU electronic solutions ulm GmbH & Co KG, March 2009
2. Installation and start-up of the LokProgrammer
Please note the remarks regarding installation to assure that
your LokProgrammer software keeps working to your full
satisfaction!
2.1.
2.1.
2.1.
2.1.
2.1. System requirements
System requirements
System requirements
System requirements
System requirements
In order to use this software you need a commercially available
PC with the following requirements:
• Operating system: Microsoft Windows 98, 2000 or XP, alsoVista
as from version 2.6.3; but not Windows NT
• CD-ROM drive
• One serial port or an USB interface on your PC
• Audio card
• 10MB minimum available memory on your hard disc
For the utilization of the sound files with this software an Audio
Card must be installed. All cards with a Windows driver are
suitable.
Installation and start of the LokProgrammer
2.2. Connecting the LokProgrammer
2.2. Connecting the LokProgrammer
2.2. Connecting the LokProgrammer
2.2. Connecting the LokProgrammer
2.2. Connecting the LokProgrammer
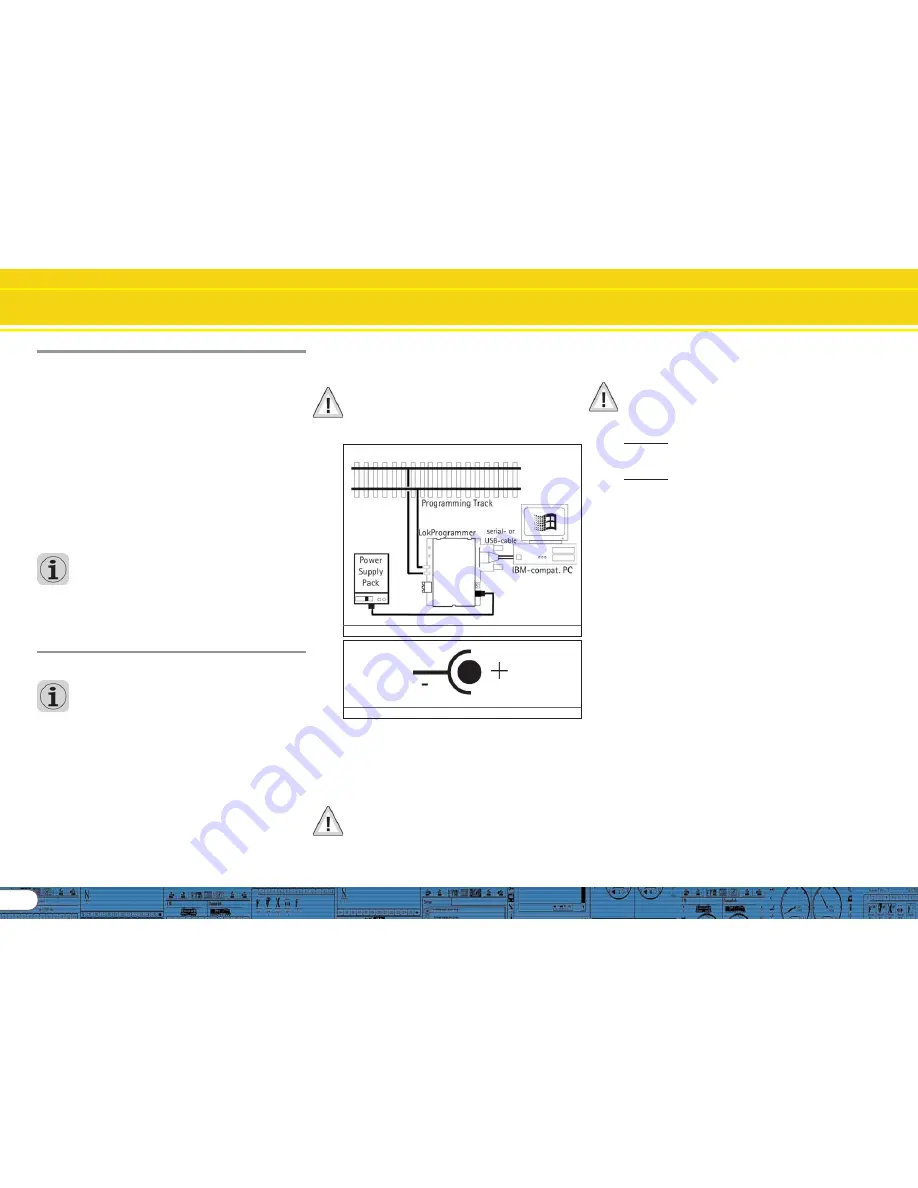
The LokProgrammer has to be connected as shown in Figure 1:
Use the serial cable respectively the USB-adapter cable provided
to connect the LokProgrammer to any available COM port (or
USB-port) of your PC. Which port you select is immaterial.
Please make sure that the programming track is completely
isolated from the rest of the layout to avoid possible damage of
your LokProgrammer hardware!
Also make sure that there are no electrical connections
between the individual wires.
Fig.2.: Polarity of Power Supply Connector
There are two options for the power supply:
• Use the power pack with mains plug provided with the
LokProgrammer. Connect the output of the power pack to
the power supply terminals of the LokProgrammer as per Figure
2.
• Use the AC power output of a model train transformer and
wire it to the screw terminals. We recommend this option for
programming gauge 1 locomotives
Never connect both terminals at the same time. This could
destroy the LokProgrammer!
After connecting the power supply the green LED on the
LokProgrammer should light up.
The terminals „Track Out“ on the LokProgrammer are to be
wired to the programming track. Polarity is irrelevant.
Make sure that the programming track is fully isolated from
the layout!
The two LEDs on the LokProgrammer indicate the following:
Green LED:
• Is lit continuously when supply voltage is available.
• Blinks when the LokProgrammer receives data from the PC.
Yellow LED:
• Blinks quickly when voltage is applied to the programming
track and data is transferred.
• Blinks slowly if the LokProgrammer detects a high current and
is disconnecting the programming track.
2.3. Installing the software
2.3. Installing the software
2.3. Installing the software
2.3. Installing the software
2.3. Installing the software
Make sure that the LokProgrammer is connected as described
above and is ready for use.
As soon as you insert the CD-ROM into the drive the installation
program is starting automatically.
Should this not be the case select the CD-ROM drive in „Desk
Top“ or in the „Windows Explorer“ and click onto „Set up“.
Alternatively you may click on the START button in the tool bar
and select „Run“. Then type „x:\setup.exe“ and „OK“. Of
course you must enter the name of the CD-ROM drive instead
of the „x“ (usually „D“):
After a short while the program should start. Follow the
instructions on the monitor and wait until the program is installed
on the hard disk.
2.4. Starting the program
2.4. Starting the program
2.4. Starting the program
2.4. Starting the program
2.4. Starting the program
The installation program creates an entry in the start menu.
Select „LokProgrammer vX“ in the Start menu under „Pro-
grams“; „X“ stands for the version number of the software.
Select „LokProgrammer“. Then the program will start.
Fig.1.: Wiring the LokProgrammer
Summary of Contents for LokProgrammer
Page 35: ...35...


