background image

217

SureColor T5470/T5470M
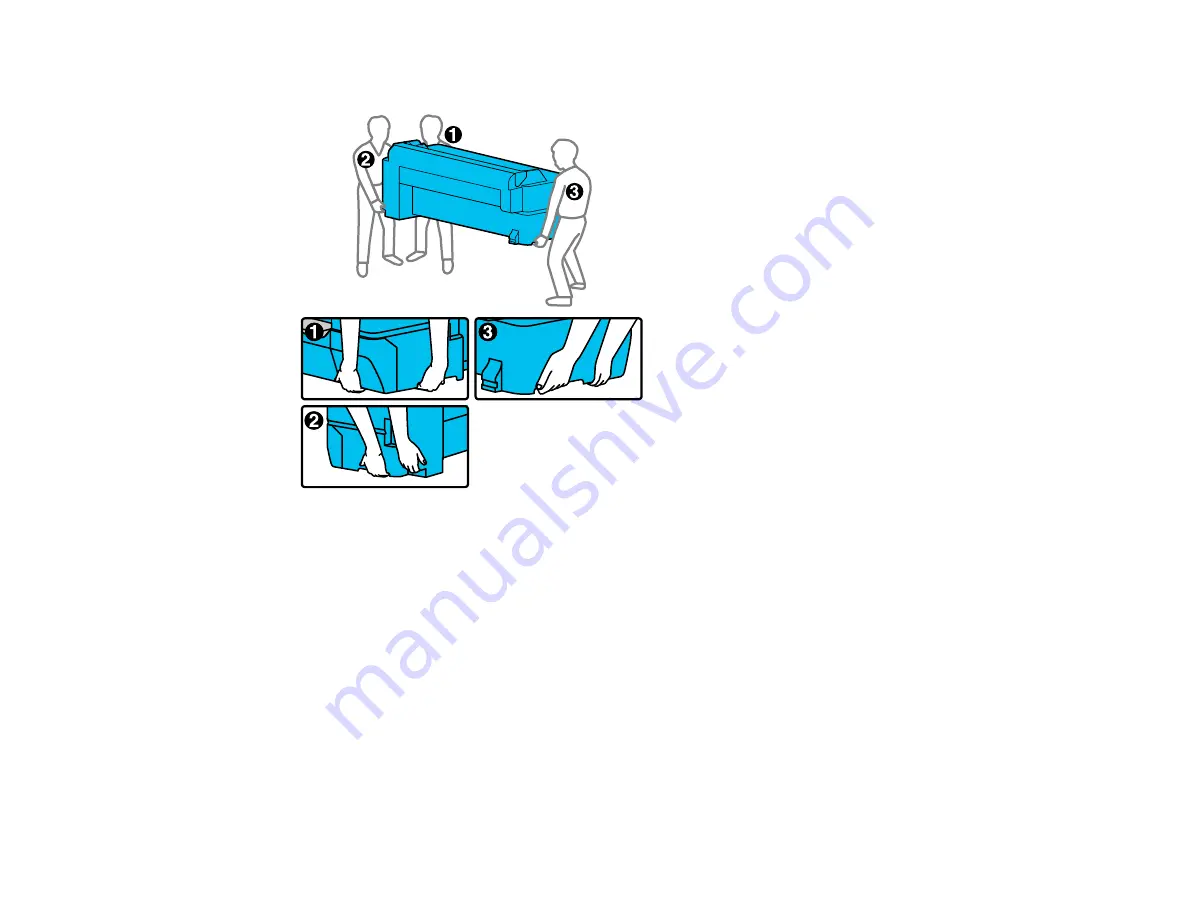
Warning:

The product is heavy and requires two or more people to move it.

7.

If you are moving the product on the stand, do the following:

• Close the paper basket.

• Release the caster locks.

• Move the product on an even floor surface.

• Lock the casters in the new location.

Caution:

Do not move the product with locked casters. Avoid areas with steps or uneven flooring.

Note:

If you are transporting or storing the product below 14°F (–10°C), you must discharge the ink.

See the link below for instructions.

Summary of Contents for SureColor T3470

Page 1: ...Epson SureColor T3470 T5470 T5470M User s Guide ...

Page 2: ......

Page 3: ... Date and Time 21 Setting a Password and Locking the Control Panel 22 Using AirPrint 24 Wi Fi or Wired Networking 25 Network Security Recommendations 25 Wi Fi Infrastructure Mode Setup 26 Selecting Wireless Network Settings from the Control Panel 27 Wi Fi Direct Mode Setup 29 Enabling Wi Fi Direct Mode 29 Wi Fi Protected Setup WPS 31 Using WPS to Connect to a Network 31 Printing a Network Status S...

Page 4: ... Creating Custom Paper Configurations 64 Selecting Custom Paper Configurations 64 Printing from a Computer 66 Printing with Windows 66 Selecting Basic Print Settings Windows 67 Document Size Options Windows 69 Paper Source Options Windows 69 Print Mode Options Windows 70 Color Mode Options Windows 70 Level Options Windows 71 Using Layout Manager Windows 73 Selecting Print Layout Options Windows 78...

Page 5: ...ac 101 Selecting Print Layout Options Mac 102 Selecting Advanced Settings Mac 102 Managing Color Mac 105 Color Matching Options Mac 106 Sizing Printed Images Mac 106 Selecting Printing Preferences Mac 107 Printing Preferences Mac 107 Printing Your Document Mac 108 Checking Print Status Mac 109 Printing CAD Drawings 110 Printing CAD Drawings from the Printer Driver 110 Printing CAD Drawings in HP G...

Page 6: ...ared Network Folder 136 Registering Contacts for Email Network or FTP Scanning Control Panel 138 Registering Contacts for Email Network Folder or FTP Scanning Web Config 140 Scanning to a Network Folder or FTP Server 141 Scan to Network Folder FTP Settings 143 Scanning to Email 145 Scan to Email Settings 147 Scanning to a Memory Device 149 Scan to Memory Device Settings 151 Using the Control Panel...

Page 7: ...el 186 Checking the Nozzles Using a Computer Utility 187 Print Head Cleaning 189 Cleaning the Print Head Using the Product Control Panel 190 Cleaning the Print Head Using a Computer Utility 191 Using the Powerful Cleaning Utility 193 Using Easy Adjustment 195 Adjusting Paper Feed Using the Product Control Panel 196 Adjusting Print Length Using the Product Control Panel 198 Aligning the Print Head ...

Page 8: ...er is Creased 230 Roll Paper Jam Problems 231 Cut Sheet Paper Jam Problems 233 Solving Print Quality Problems 234 Overall Print Quality is Poor 235 Lines Are Misaligned 236 Prints are Scuffed or Smeared 236 Prints are Not Positioned Properly 237 Cannot Make Enlarged Copies from Scanner 238 Solving Scanning Problems SureColor T5470M 238 Removing a Jammed Original SureColor T5470M 238 Cannot Feed Or...

Page 9: ...Network Interface Specifications 255 Scanning Specifications 256 Safety and Approvals Specifications 258 Notices 261 Important Safety Instructions 261 General Product Safety Instructions 261 Ink Cartridge Safety Instructions 263 LCD Screen Safety Instructions 264 Wireless Connection Safety Instructions 264 FCC Compliance Statement 264 Binding Arbitration and Class Waiver 265 Trademarks 268 Copyrig...

Page 10: ......

Page 11: ...5470M User s Guide Welcome to the SureColor T3470 T5470 T5470M User s Guide Note Depending on your model some LCD screens may look different and not all features may be available For a printable PDF copy of this guide click here ...

Page 12: ... generation UltraChrome XD2 4 color all pigment ink HP GL2 support for CAD software Wirelessly print from computers tablets or smartphones Reliability Improved anti dust design for reduced print head nozzle maintenance PrecisionCore Micro TFP print head offers Precision Droplet Control Nozzle Verification Technology detects nozzle condition and adjusts print quality High resolution Prints at resol...

Page 13: ... Epson ink paper and accessories from an Epson authorized reseller To find the nearest reseller visit proimaging epson com U S or proimaging epson ca Canada select your product series and product and click the Where to Buy button Or call 800 GO EPSON 800 463 7766 in the U S or 800 807 7766 in Canada Option or part Part number Roll media spindle 24 SureColor T3470 C12C933281 Roll media spindle 36 S...

Page 14: ...your equipment Notes contain important information about your printer Tips contain additional printing information Parent topic Introduction to Your Printer Printer Part Locations Check the printer part illustrations to learn about the parts on your printer Product Parts Front Product Parts Top Inside Product Parts Side Product Parts Scanner SureColor T5470M Control Panel Parent topic Introduction...

Page 15: ...15 Product Parts Front 1 Front cover 2 Maintenance box cover 3 Paper basket 4 Casters included with stand 5 Cartridge cover 6 Control panel 7 Roll paper cover 8 Alert light 9 Cut sheet cover ...

Page 16: ...ocations Product Parts Top Inside 1 Spindle holder 2 Paper feeder 3 Print head 4 Roll core adapters for 3 inch roll paper core 5 Roll paper spindle 6 Translucent paper stop 7 Cut sheet paper guide Parent topic Printer Part Locations ...

Page 17: ...flash drives 2 Air vents 3 AC inlet 4 USB port for computer connection 5 OPTION port for scanner connection 6 Ethernet LAN port 7 Data light 8 Status light Caution Do not block the air vents shown above Parent topic Printer Part Locations ...

Page 18: ...18 Product Parts Scanner SureColor T5470M 1 Document guide edge guide 2 Scanner paper slot 3 Scanner cover Parent topic Printer Part Locations ...

Page 19: ...19 Control Panel 1 home button 2 power light 3 power button 4 LCD touchscreen LCD Screen Display 1 Status messages ...

Page 20: ... established the number of bars indicates signal strength No Wi Fi Direct connection Wi Fi Direct connection established 8 Consumables status icons display remaining ink cartridge and maintenance box levels Parent topic Printer Part Locations Using the Control Panel See these sections to learn about the control panel and select control panel settings Changing the LCD Screen Language Selecting the ...

Page 21: ...sing your product select the current date time and daylight saving phase in your area and choose your preferred date and time format Note This setting can be locked by an administrator If you cannot access or change this setting contact your administrator for assistance 1 Press the home button if necessary 2 Select Settings General Settings Basic Settings Date Time Settings ...

Page 22: ...yboard to enter the current time and select OK 8 Press the home button to exit Parent topic Using the Control Panel Setting a Password and Locking the Control Panel You can set an administrator password to lock the following settings and prevent them from being changed Network settings Certain Printer Settings Certain Maintenance Settings System Administration settings Web Config settings EpsonNet...

Page 23: ...n settings see the Administrator s Guide 1 Press the home button if necessary 2 Select Settings General Settings System Administration Security Settings Admin Settings You see a screen like this 3 Select Admin Password 4 Select Register 5 Use the on screen keyboard to enter a password and select OK 6 Enter the password again to confirm and select OK Note Keep a copy of your password in a safe plac...

Page 24: ...nt AirPrint enables instant wireless printing from iPhone iPad and iPod touch with the latest version of iOS and Mac with the latest version of OS X or macOS 1 Load paper in your product 2 Set up your product for wireless printing See the link below 3 Connect your Apple device to the same wireless network that your product is using 4 Print from your device to your product Note For details see the ...

Page 25: ...ception of traffic over the wireless LAN Your router may already have a default password enabled by your Internet service provider ISP See your ISP and router documentation for instructions on how to change the default password and better secure your network Connect your product only to a network protected by a firewall Connecting your product directly to the Internet may leave it vulnerable to se...

Page 26: ...ter or access point can be connected to your computer over a wireless or wired network Note You cannot connect to a wired and wireless network at the same time 1 Epson product 2 Wireless router or access point 3 Computer with a wireless interface 4 Computer 5 Internet 6 Ethernet cable used only for wired connection to the wireless router or access point ...

Page 27: ...downloading it from the Epson website The installer program guides you through network setup Note This setting can be locked by an administrator If you cannot access or change this setting contact your administrator for assistance 1 Press the home button if necessary 2 Select the icon You see a screen like this 3 Select Router Start Setup o Change Settings Wi Fi Setup Wizard 4 Select the name of y...

Page 28: ...select To delete the previous character select To enter a space select Space 6 Select OK when you finish entering your password 7 Confirm the displayed network settings and select Start Setup to save them 8 If you want to print a network setup report select Print Check Report Otherwise select OK 9 Press the home button to exit You see the icon on the LCD screen and should be able to connect to you...

Page 29: ... or another device without requiring a wireless router or access point In Wi Fi Direct Mode the product itself acts as a network access point for up to 4 devices 1 Epson product 2 Computer with a wireless interface 3 Other wireless device Enabling Wi Fi Direct Mode Parent topic Wi Fi or Wired Networking Enabling Wi Fi Direct Mode You can enable Wi Fi Direct mode to allow direct communication betwe...

Page 30: ...strator If you cannot access or change this setting contact your administrator for assistance 1 Press the home button if necessary 2 Select the icon You see a screen like this 3 Select Wi Fi Direct Start Setup Start Setup You see a screen like this ...

Page 31: ... your network uses a WPS enabled wireless router or access point you can quickly connect your product to the network using Wi Fi Protected Setup WPS Note To check if your router is WPS enabled look for a button labeled WPS on your router or access point If there is no hardware button there may be a virtual WPS button in the software for the device Check your network product documentation for detai...

Page 32: ... If you are printing from a computer make sure you installed the network software from the Epson website Note If you don t see the icon repeat these steps to try again Parent topic Wi Fi Protected Setup WPS Printing a Network Status Sheet You can print a network status sheet to help you determine the causes of any problems you may have using your product on a network Before you begin make sure pap...

Page 33: ...heet to diagnose any problems you have Parent topic Wi Fi or Wired Networking Printing a Network Connection Report You can print a network connection report to view solutions to any problems you may have using your product on a network 1 Press the home button if necessary 2 Select Settings 3 Select General Settings ...

Page 34: ...work Settings 5 Select Connection Check 6 Select Print Check Report 7 Select Print Examine the error codes and solutions shown on the network connection report Network Connection Report Codes and Messages Parent topic Wi Fi or Wired Networking ...

Page 35: ...ote Error codes and messages listed here may not all apply to your product Error Codes and Messages Error code and message Solution E1 Confirm that the network cable is connected and network devices such as hub router or access point are turned on Make sure your router access point and or hub are turned on and the network cable is securely connected to your device and to your product If you are tr...

Page 36: ...and remove any obstacles between them Also move your product away from devices such as wireless phones or microwaves Confirm that the SSID shown on the network connection report matches the label on your router or access point Also make sure your SSID uses only ASCII characters and symbols or your product cannot display the SSID correctly If you are trying to connect using the WPS push button meth...

Page 37: ...t s MAC address so it is not filtered Locate the MAC address on the network connection report and check your router or access point documentation for instructions If your router or access point is using shared authentication with WEP security confirm that you are using the correct authentication key and index If your router or access point limits the number of connected devices raise the connectio...

Page 38: ...ed on and do the following If your product s Obtain IP Address setting is set to Manual check the IP address subnet mask and default gateway addresses on the network connection report to see if they are correct If not correct the settings If DHCP is enabled set your product s Obtain IP Address setting to Auto If you want to use the DHCP assigned address as a static address set the Obtain IP Addres...

Page 39: ...ork settings If your router or access point uses WEP security with several registered passwords make sure that the first registered password is set on your product E13 Confirm the following Entered security key password is correct Index of the security key password is set to the first number Connection and network setup of the PC or other device is correct Contact your network administrator for as...

Page 40: ... existing connected device first Parent topic Printing a Network Connection Report Changing or Updating Network Connections See these sections to change or update how your product connects to a network Accessing the Web Config Utility Changing a USB Connection to a Wi Fi Connection Changing a Wi Fi Connection to a Wired Network Connection Connecting to a New Wi Fi Router Disabling Wi Fi Features P...

Page 41: ...nect the USB cable from your product 2 Uninstall your product software 3 Download and install your product software from the Epson website using the instructions on the Start Here sheet Parent topic Changing or Updating Network Connections Related concepts Uninstall Your Product Software Changing a Wi Fi Connection to a Wired Network Connection If you have already connected your product to your co...

Page 42: ...i Fi Router If you change the wireless router you have been using on your network you need to update your product s Wi Fi connection to the new router Note If you switch to a 5 GHz wireless router set the router to operate in dual band 2 4 GHz and 5 GHz mode See your router documentation for instructions 1 Do one of the following Windows Uninstall your product software Mac Go to the next step 2 Do...

Page 43: ...ng Wi Fi features make a note of your product s SSID network name and password Note This setting can be locked by an administrator If you cannot access or change this setting contact your administrator for assistance 1 Press the home button if necessary 2 Select the icon You see a screen like this 3 Select Router Start Setup or Change Settings Others Disable Wi Fi 4 Select Yes to disable Wi Fi Par...

Page 44: ...per in your product Loading Roll Paper Cutting Roll Paper Removing Roll Paper Parent topic Media Handling Loading Roll Paper Load roll paper onto the spindle before loading the roll onto the printer Note To prevent dust from accumulating inside the printer always keep the roll paper cover and cut sheet cover closed unless you are loading or unloading media 1 Remove any tape and protective paper fr...

Page 45: ...Make sure Load paper is displayed on the home screen If it is not shown make sure to remove any roll paper or cut sheet paper from the printer 3 Open the cut sheet and roll paper covers 4 Remove the spindle ...

Page 46: ... the transparent paper stop from the spindle 6 Do one of the following 2 inch roll core If installed remove the 3 inch core adapters from both paper stops Push the two tabs on the paper stop to remove the adapter ...

Page 47: ...both paper stops Align the triangle marks on the paper stop with the triangle marks on the adapter and push the adapter in until the tabs are secured 7 Insert the spindle into the roll paper core as shown with the lead edge of the roll paper facing as shown ...

Page 48: ... gap between the paper stop and the roll paper 9 Attach the transparent paper stop to the spindle and press it in until there is no gap between the paper stop and the roll paper 10 Place the roll paper into the spindle holders with the black end of the spindle on the right ...

Page 49: ...d the roll 12 Insert the leading edge of the roll paper into the paper feeder until you hear a beep Note Make sure the leading edge of the roll paper is not bent or skewed or a paper jam or skew error may occur 13 Close the roll paper cover and the cut sheet cover ...

Page 50: ...cations Related tasks Removing Roll Paper Selecting Advanced Settings Mac Cutting Roll Paper The printer has a built in cutter that can automatically cut most paper types When Auto Cut is turned on paper is automatically cut after each page prints or if the roll paper leading edge is not straight Caution The built in cutter is not recommended for use with commercially available canvas or synthetic...

Page 51: ...turns to automatic cutting when you close the application If you are using a paper type that cannot be cut with the built in cutter turn off the setting in the control panel From the roll paper information area select Advanced Media Setting Auto Cut Off If you want to turn off Auto Cut during enlarged copying HP GL 2 mode printing or printing directly from the flash drive turn off the setting in t...

Page 52: ... in the control panel select Cut to manually cut the paper with scissors or select Print Cutting Guideline to print a line on the paper to guide with manual cutting Select Done when you are finished to rewind the paper Parent topic Cutting Roll Paper Removing Roll Paper When you finish printing on roll paper you should remove it from the printer to avoid indenting or creasing the lead edge of the ...

Page 53: ...53 2 Open the cut sheet cover and roll paper cover 3 Hold both ends of the spindle and lift it up from the spindle holders 4 Remove the transparent paper stop from the spindle ...

Page 54: ...kaging end caps are installed Never store roll paper on its side as a flat spot can develop and lead to imaging artifacts on the prints Do not store roll paper in dusty areas Print head maintenance and cleanings increase if dust accumulates on the paper 7 Attach the transparent paper stop to the empty spindle 8 Place the spindle back into the printer ...

Page 55: ... a variety of cut sheet paper types and sizes up to 24 inches 61 cm SureColor T3470 or 36 inches 91 cm SureColor T5470 T5470M wide and 0 1 inch 0 3 mm thick You can load and print on one sheet at a time Before printing on cut sheets remove any loaded roll paper 1 Make sure Load paper is displayed on the home screen If it is not shown make sure to remove any roll paper or cut sheet paper from the p...

Page 56: ...he printer and insert the paper into the printer 5 Insert the paper into the paper feeder until you hear a beep 6 Make sure the leading edge of the paper is straight to prevent a skew error or paper jam If it is straight select OK otherwise select Cancel and reload the paper 7 Select the paper type and size you loaded on the LCD screen ...

Page 57: ...find the nearest reseller visit proimaging epson com U S or proimaging epson ca Canada select your product series and product and click the Where to Buy button Or call 800 GO EPSON 800 463 7766 in the U S or 800 807 7766 in Canada Note Paper media availability varies by country For the most updated list of supported Epson papers visit proimaging epson com U S or proimaging epson ca Canada Roll Pap...

Page 58: ... m S041386 1 roll Epson Premium Luster Photo Paper 260 8 3 inches 211 mm 32 feet 9 8 m S041408 1 roll 13 inches 330 mm 32 feet 9 8 m S041409 1 roll 10 inches 254 mm 100 feet 30 5 m S042077 1 roll 16 inches 406 mm 100 feet 30 5 m S042079 1 roll 20 inches 508 mm 100 feet 30 5 m S042080 1 roll 24 inches 610 mm 100 feet 30 5 m S042081 1 roll 36 inches 914 mm 100 feet 30 5 m S042082 1 roll Epson Premiu...

Page 59: ...et 30 5 m S041391 1 roll Epson Premium Glossy Photo Paper 250 24 inches 610 mm 100 feet 30 5 m S041638 1 roll 36 inches 914 mm 100 feet 30 5 m S041639 1 roll Epson Enhanced Matte Paper 17 inches 432 mm 100 feet 30 5 m S041725 1 roll 24 inches 610 mm 100 feet 30 5 m S041595 1 roll 36 inches 914 mm 100 feet 30 5 m S041596 1 roll Enhanced Adhesive Synthetic Paper 24 inches 610 mm 100 feet 30 5 m S041...

Page 60: ...um Photo Paper Semi gloss Letter 8 5 11 inches 216 279 mm S041331 20 sheets Epson Premium Presentation Paper Matte Letter 8 5 11 inches 216 279 mm S041257 50 sheets Epson Singleweight Matte Paper 13 19 inches 330 483 mm S041909 100 sheets 17 22 inches 432 559 mm S041907 100 sheets Parent topic Media Handling Paper or Media Type Settings Printing Software For this paper Select this Paper Type or Me...

Page 61: ...Generic Tracing paper vellum paper Tracing Paper Tracing Paper Low Duty Matte Film Enhanced Synthetic Paper Enhanced Synthetic Paper Enhanced Adhesive Synthetic Paper Enhanced Adhesive Synthetic Paper Enhanced Low Adhesive Synthetic Paper Polyester banner generic Heavy Weight Polyester Banner Backlight Film Roll Backlight Film Roll Note The settings listed here are available only when printing fro...

Page 62: ...like this 3 Select the paper source you want to select settings for You see a screen like this 4 Select Change Paper Type Paper Size 5 Select Paper Type 6 Select the paper type for the paper you loaded 7 Select Paper Size ...

Page 63: ...e Epson Doubleweight Matte Paper Doubleweight Matte Epson Premium Presentation Paper Matte Enhanced Matte Archival Matte Coated paper generic Coated Paper Generic Epson Premium Glossy Photo Paper 170 Premium Glossy 170 Epson Premium Semigloss Photo Paper 170 Premium Semigloss 170 Epson Premium Photo Paper Glossy Premium Glossy Sheet Photo Paper Glossy Epson Premium Photo Paper Semi gloss Premium S...

Page 64: ...home button if necessary 3 Select Settings General Settings Printer Settings Custom Paper Setting 4 Select a number for the custom paper configuration 5 Select Change Name and enter a name 6 Select OK when you are done 7 Select Change Reference Paper 8 Select a paper type that is similar to the paper that you want to use 9 Select Advanced Media Setting 10 Select any additional settings as necessar...

Page 65: ...printer will ask you to load paper before continuing 3 Select Change Paper Type or Change Paper Type Paper Size 4 Select Paper Type Others Custom Paper 5 Select the custom paper configuration you want to use 6 Press the left arrow button to exit the menu Parent topic Creating Custom Paper Configurations ...

Page 66: ...from a Web Browser SureColor T5470M Printing with Windows You can print with your product using any Windows application as described in these sections Note If you are using your Epson product with the Windows 10 S operating system you cannot use the software described in this section You also cannot download and install any Epson product software from the Epson website for use with Windows 10 S yo...

Page 67: ... print icon on your screen the Print option in the File menu or another command See your application s help utility for details 3 If necessary select your product name as the printer you want to use Note You may also need to select Preferences Properties Print Settings or Printer Properties to view your print settings You see the Printer Settings window 4 Select the Current Settings option or a cu...

Page 68: ...tings that have been set in the printer s control panel select Use Printer Settings Note Click Acquire Info to refresh the settings if you loaded or changed paper after opening the print window 10 Select the Select Target setting that matches the type of document you are printing Note If you want the printer driver to determine print settings based on the document type select the Simple Settings c...

Page 69: ...ons Windows Using Layout Manager Windows Parent topic Printing with Windows Related tasks Printing Your Document or Photo Windows Document Size Options Windows You can select any of the Document Size options to size your printed image Same as Paper Size Sizes your printed image to fit the selected paper size Fit to Roll Paper Width Sizes your printed image to fit the width of the roll paper you lo...

Page 70: ...he Color Mode setting to fine tune the colors in your printout or turn off color management in your printer software EPSON Standard sRGB Optimizes the sRGB space and corrects the color Business Graphics Performs color correction to optimize your images based on the sRGB space Line Drawing Optimizes color correction for line drawings by processing the border between lines and the background as disc...

Page 71: ...ow where you can specify values for adjusting brightness contrast saturation and individual Cyan Magenta and Yellow color tones You can choose from two Gamma settings and use either a color circle or slide bar to adjust color Parent topic Selecting Basic Print Settings Windows Level Options Windows You can select a print speed or print quality priority for your printouts Speed Select to prioritize...

Page 72: ...print quality over print speed Max Quality Select to use the maximum print quality print speed may be slower Quality Options Select print speed or print quality levels using a slider Parent topic Selecting Basic Print Settings Windows ...

Page 73: ...73 Using Layout Manager Windows Layout Manager lets you include multiple pieces of print data created in different applications onto one sheet of paper for printing ...

Page 74: ...74 You can also place the same print data multiple times as shown here ...

Page 75: ...75 You can place print data in different sizes and orientations to maximize media usage as shown here ...

Page 76: ...76 You can place print data on roll paper as shown here 1 Open the file you want to print in your application 2 Select the print command in your application ...

Page 77: ...ne page in the layout 6 Leave the Layout Manager screen open and repeat steps 1 to 4 to arrange additional print data The pages are added to the Layout Manager screen 7 Do the following to arrange objects on the Layout Manager screen Drag pages to move and resize them Use the tool buttons and the Object menu to align and rotate pages Resize and replace whole pages in the Preference or Arrangement ...

Page 78: ...ave the file and close the Layout Manager screen To open the saved file later for editing or reprinting right click the printer icon in the Windows taskbar click Layout Manager and select the file Parent topic Selecting Basic Print Settings Windows Selecting Print Layout Options Windows You can select a variety of layout options for your document on the Layout tab To select multiple copies and the...

Page 79: ...ote Available options depend on the Paper Source setting Folded Double Side Prints two consecutive pages on one sheet of paper The second page is flipped and printed next to the first page allowing the sheet to be folded to make a 2 sided document Click Settings to select a binding edge option and set margins N up Prints 2 2 up or 4 4 up pages on one sheet of paper Click Settings to choose the num...

Page 80: ...heet paper with 14 mm margins above and below your print select Vertical Centering Note This setting is only available when the Source setting is set to Cut Sheet 1 sheet To adjust the ink saturation level select Advanced Media Control To create or edit custom printing settings select Custom Settings To print a color background on the page select the Print Bckg Color checkbox and click Color Setti...

Page 81: ... Windows Roll Paper Options Windows Select any of the available roll paper options Note Some settings may not be available depending on the Roll Paper Option you selected for your paper size Auto Cut Off Select this option to cut your prints manually Normal Cut Creates a margin at the top and bottom of your image and automatically cuts the paper These margins vary by media type and may be changed ...

Page 82: ...ally providing the cleanest edge for borderless printing Auto Rotate Automatically positions the image or print data to fit the roll paper Print Page Line Prints lines between pages as a guide for manual cutting Save Roll Paper When Auto Cut is enabled the printer cuts the roll paper at the end of the image as positioned on the page Parent topic Selecting Advanced Settings Windows ...

Page 83: ... the print head if you notice banding or gaps in your printouts Click Epson Status Monitor 3 to check the printer s status Click Monitoring Preferences to select the error notifications displayed on the Epson Status Monitor 3 screen or add a shortcut to the utility in the Windows taskbar Click Print Queue to display a list of all waiting print jobs view information on the data waiting to be printe...

Page 84: ...iple computers Select a Language option for the language you want to use for the printer software screens Parent topic Printing with Windows Related tasks Checking the Nozzles Using a Computer Utility Cleaning the Print Head Using a Computer Utility Printing Your Document or Photo Windows Once you have selected your print settings you are ready to save your settings and print 1 Click OK to save yo...

Page 85: ...Printing Your Document or Photo Windows Saving Sharing and Customizing the Printer Settings You can save groups of print settings or media settings so you can reuse them for future print jobs You can export these settings as a file so you can share them with other users You can also edit the settings displayed in the printer software screens Saving and Sharing Print Settings Windows Editing Print ...

Page 86: ... following as necessary If you need to delete a group of settings you have created select the name of the group of settings from the list and click Delete To export the settings select the name of the group of settings click Export select a location and enter a file name To import a group of settings click Import select the file you want to use and click Open Then use the settings to print Once cu...

Page 87: ... Print Settings Windows Printing Your Document or Photo Windows Editing Print Setting Displays Windows You can arrange the displayed print settings so you can easily select the settings you use most often 1 Click the Utility tab in the printer software 2 Select Menu Arrangement You see this window ...

Page 88: ...items within the folder remain 5 Click Save Parent topic Saving Sharing and Customizing the Printer Settings Selecting Default Print Settings Windows When you change your print settings in a program the changes apply only while you are printing in that program session If you want to change the print settings you use in all your Windows programs you can select new default print settings 1 Access th...

Page 89: ...them as needed for printing in any program session Parent topic Printing with Windows Related tasks Selecting Basic Print Settings Windows Changing the Language of the Printer Software Screens You can change the language used on the Windows printer software screens 1 Access the Windows Desktop and right click the icon for your product in the right side of the Windows taskbar or click the up arrow ...

Page 90: ...ick OK to close the printer software window The printer software screens appear in the language you selected the next time you access them Parent topic Printing with Windows Changing Automatic Update Options Your printer software for Windows automatically checks for updates to the product software You can change how often the software checks for updates or disable this feature ...

Page 91: ...c update feature you can check for updates manually Parent topic Printing with Windows Printing with the Built in Epson Driver Windows 10 S You can print with the built in Epson printer driver using any printing program on Windows 10 S as described in these sections Note The built in Epson driver in Windows 10 S does not include all the available print settings for your product To print with addit...

Page 92: ... 1 Select the print command in your application Note You may need to select a print icon on your screen the Print option in the File menu or another command See your application s help utility for details 2 If necessary select your product name as the printer you want to use Note You may also need to select Properties or Preferences to view your print settings You see a window like this ...

Page 93: ... for details 4 Click the Advanced button You see a window like this 5 Select the size of the paper you loaded as the Paper Size setting 6 To print multiple copies select or enter the number as the Copy Count setting 7 To print multiple copies of multi page documents in sets select the Collated checkbox 8 Click OK You return to the printing preferences window ...

Page 94: ...ick OK or Print to start printing Parent topic Printing with the Built in Epson Driver Windows 10 S Printing on a Mac You can print with your product using any Mac printing program as described in these sections Note If you have an Internet connection it is a good idea to check for updates to your product software on Epson s support website Selecting Basic Print Settings Mac ...

Page 95: ...elect the basic settings for the document you want to print 1 Open a document for printing 2 Select the print command in your application Note You may need to select a print icon on your screen the Print option in the File menu or another command See your application s help utility for details 3 Select your product as the Printer setting 4 If necessary click the arrow next to the Printer setting o...

Page 96: ...fferent depending on the Mac OS version and the application you are using 5 Select the Copies and Pages settings as necessary Note If you do not see these settings in the print window check for them in your application before printing They may be accessible by selecting Page Setup from the File menu ...

Page 97: ...from the pop up menu Note In certain programs you may need to select Advanced before you can select Printer Settings For more information about printer settings click the button You see a screen like this 9 If necessary select the Page Setup setting that matches the paper source you are using Note If you select Roll Paper select the width of the roll as the Roll Paper Width setting 10 If you want ...

Page 98: ...14 If you deselect the Simple Settings checkbox the following options are available Color choose a printout color Color Mode choose a color mode to fine tune printout colors Level choose speed or quality as the printing priority High Speed select to speed up printing but quality may be reduced Emphasize Thin Lines select to smooth out jagged edges in low resolution images Note The Emphasize Thin L...

Page 99: ...size Retain Scale Retains the size of the original image Banner Select when using an application designed for banners Parent topic Selecting Basic Print Settings Mac Paper Source Options Mac You can select any of the available options in the Source menu to print on the paper loaded in that source Roll Paper Selects roll paper loaded in the roll paper holder Sheet Selects the cut sheet loaded in th...

Page 100: ...rinter software EPSON Standard sRGB Optimizes the sRGB space and corrects the color Business Graphics Performs color correction to optimize your images based on the sRGB space Line Drawing Optimizes color correction for line drawings by processing the border between lines and the background as discontinuous GIS Performs optimal printing for topographic maps and other geographic information system ...

Page 101: ... and use either a color circle or slide bar to adjust color Parent topic Selecting Basic Print Settings Mac Level Options Mac You can select a print speed or print quality priority for your printouts Speed Select to prioritize print speed over print quality quality may be reduced Quality Select to prioritize print quality over print speed Max Quality Select to use the maximum print quality print s...

Page 102: ...er Sheet pop up menu To arrange the print order of the pages select a Layout Direction setting To print borders around each page on the sheet select a line setting from the Border pop up menu To invert or flip the printed image select the Reverse page orientation or Flip horizontally settings Parent topic Printing on a Mac Selecting Advanced Settings Mac You can select roll paper settings and adju...

Page 103: ...or your paper size 2 Select one of the following Auto Cut settings Off Select this option to cut your prints manually Normal Cut Creates a margin at the top and bottom of your image and automatically cuts the paper These margins vary by media type and may be changed from their defaults using custom media settings ...

Page 104: ...for borderless printing 3 Select the following settings as necessary Select the Auto Rotate checkbox to automatically position the image or print data to fit the roll paper Select the Print Page Line checkbox to print lines between pages as a guide for manual cutting When Auto Cut is enabled select the Save Roll Paper checkbox to have the printer cut the roll paper at the end of the image as posit...

Page 105: ...s option is available only when you choose a Paper Size setting with a Borderless option Parent topic Printing on a Mac Managing Color Mac You can adjust the Color Matching settings to fine tune the colors in your printout or turn off color management in your printer software 1 Select Color Matching from the pop up menu in the print window 2 Select one of the available options Color Matching Optio...

Page 106: ...r Handling from the pop up menu on the Print window To collate multiple copies into sets of documents select the Collate pages checkbox To print only selected pages in a multi page document select an option from the Pages to Print pop up menu To adjust the order in which pages are printed select an option from the Page Order pop up menu To scale the image to fit on a specific paper size select the...

Page 107: ...ck select System Preferences 2 Select Print Fax Print Scan or Printers Scanners select your product and select Options Supplies 3 Select Options You see a screen like this 4 Select any of the available printing options 5 Click OK Printing Preferences Mac Parent topic Printing on a Mac Printing Preferences Mac You can select from these settings on the Options tab ...

Page 108: ...whether or not to receive warning notifications from the printer software for various operating conditions Establish bidirectional communication Allows the product to communicate with the computer Do not change the default setting unless you experience issues when using a shared printing pool Default media type Select the Media Type that you want to use as the default in the printer driver Parent ...

Page 109: ...t window Checking Print Status Mac Parent topic Printing on a Mac Checking Print Status Mac During printing you can view the progress of your print job control printing and check ink status 1 Click the printer icon when it appears in the Dock ...

Page 110: ...Supply Levels Parent topic Printing Your Document Mac Printing CAD Drawings Your product can print CAD drawings from CAD software applications You can print them from the printer driver or change settings in the product to emulate HP GL 2 or HP RTL modes Note Not all HP GL 2 and HP RTL features are supported on the product Printing CAD Drawings from the Printer Driver Printing CAD Drawings in HP G...

Page 111: ...lect your product as the printer 3 Click Properties 4 On the Device and Document Settings tab click Custom Properties You see the printer driver window 5 Select the Document Size and Output Size settings as necessary 6 Select the Source setting 7 Select the Media Type setting 8 Choose one of the CAD Line Drawing options as the Select Target setting 9 Select any other printing settings as necessary...

Page 112: ...mphasized Note Not all HP GL 2 and HP RTL features are supported on the product 1 Press the home button on your product if necessary 2 On the LCD screen select Settings General Settings Printer Settings Universal Print Settings You see this screen 3 Make sure the Paper Source setting is set to Roll Paper Note If roll paper is not selected when HP GL2 or HP RTL print data is sent an error occurs 4 ...

Page 113: ...ting to HP GL 2 Note Make sure you return the Printing Language setting to Auto when you are done printing in HP GL 2 mode 10 Open the file you want to print in your CAD software 11 Click Plot and select your product as the printer 12 Start printing your drawing from the CAD software Parent topic Printing CAD Drawings Printing from a Shared Folder SureColor T5470M You can select and print a file f...

Page 114: ...r Settings Parent topic Printing from a Computer Setting Up a Shared Folder You must set up a shared network folder before printing from the folder The folder must already exist on a networked computer accessible by the product 1 Press the home button on your product if necessary 2 On the LCD screen select Settings General Settings Network Settings Advanced Shared Folder ...

Page 115: ...user name for the computer Password Enter the password for the computer 4 Select Proceed to set up the shared folder Parent topic Printing from a Shared Folder SureColor T5470M Network Folder Settings Basic Settings Setting Options Description Paper Source Roll Paper Cut Sheet 1 sheet Selects the paper source Color Mode Black White Color Selects the color mode to use when printing Advanced ...

Page 116: ...s with borderless printing you can specify whether to cut twice with a margin between the pages or cut once with the Cut for Borderless Print setting Bidirectional On Off Select On to print in both directions resulting in faster print speed but reduced accuracy Color Mode EPSON Standard sRGB Optimizes the sRGB space and corrects the color Business Graphics Performs color correction to optimize you...

Page 117: ...m a Shared Folder SureColor T5470M Printing from a Web Browser SureColor T5470M You can upload and print files directly from the Web Config interface This allows you to print from a computer without the printer driver for the product Note Not all HP GL 2 and HP RTL features are supported on the product 1 Make sure paper is loaded into the product 2 Access the Web Config interface via a web browser...

Page 118: ...cting a file 5 After you are done selecting print settings drag and drop your file onto the appropriate area to start printing or click Select Files to Upload and browse to the files you want to print You can print the following file types from the Web Config interface JPEG HP GL 2 HP RTL TIFF files scanned on the product PDF files scanned on the product Parent topic Printing from a Computer ...

Page 119: ...ory Device Requirements Make sure your USB memory device meets these requirements Note Connections that use an extension cable a USB hub or a card reader cannot be guaranteed Format type FAT32 FAT16 or exFAT No security functions such as encryption or passwords Parent topic Printing from a USB Memory Device Connecting and Printing from a USB Memory Device You can print from a USB memory device con...

Page 120: ...ividually TIFF Select the file name You see a screen like this 6 Select the paper source and either Black White or Color 7 Select the Advanced tab and select any necessary settings Note You can select Presets to use a previously saved group of settings 8 Select the number of copies and use the on screen keyboard to enter the amount if necessary 9 Select Print to begin printing Memory Device Settin...

Page 121: ...ine Specifies the print quality Page Margins option Clip By Margins Adds the value selected for the page margin inside the size selected for the base output size Oversize Adds the value selected for the page margin outside the size selected for the base output size when set to a standard size Borderless Enlarges the print size slightly to print a borderless image on roll paper Bidirectional On Off...

Page 122: ...ing Perform color correction when printing CAD drawings and other line drawings Off No Color Management Turns off color management in the printer Reduce Enlarge Auto Fit Page Select On to fit the short edge of the image to the width of the paper Note This setting is not available if paper is not loaded into the printer Custom Size Select Actual Size to print using the image size or select a differ...

Page 123: ...rted DS 530 DS 7500 DS 70000 Note Visit the Epson website for the most updated list of supported scanners Connecting a Scanner to Your Printer Placing Originals in the Scanner Printing Enlarged Copies from the Scanner Connecting a Scanner to Your Printer You can connect a supported scanner directly to the printer to print out enlarged copies SC T3470 T5470 1 Turn off the printer and the scanner ...

Page 124: ... sided document at a time even if your scanner supports double sided scanning Place the side you want copied facedown on the scanner glass or in the automatic document feeder ADF Make sure there are no originals in the ADF if you want to scan an original from the scanner glass Use the ADF to scan multi page originals Do not use the ADF if the original is printed on thick paper or cardstock Do not ...

Page 125: ...enlarged copies from the printer SureColor T3470 T5470 1 Turn on the printer and the scanner The Enlarged Copy option appears on the LCD screen Note If you do not see the Enlarged Copy option make sure the cables connecting the printer and scanner are secure and the scanner is turned on 2 Make sure roll paper is loaded in the printer Note Only roll paper is supported for enlarged copies 3 Select E...

Page 126: ...to fit the width of the roll paper 6 Select any other settings as necessary 7 Select the number of copies as the Copies setting 8 Select Copy on the printer LCD screen or press the scan button on the scanner to begin copying Supported Copy Sizes Parent topic Using Your Printer as a Copier SureColor T3470 T5470 Supported Copy Sizes The following original and output sizes are supported for enlarged ...

Page 127: ...nches 216 279 mm Output size A0 33 1 44 inches 841 1189 mm A1 23 4 33 1 inches 594 841 mm A2 16 5 23 4 inches 420 594 mm B1 27 8 39 4 inches 707 1000 mm B2 19 7 27 8 inches 500 707 mm 17 22 inches 432 559 mm 22 34 inches 559 864 mm 34 44 inches 864 1120 mm Note The available original sizes depend on the scanner you are using Not supported on the SureColor T3470 Parent topic Printing Enlarged Copie...

Page 128: ...erver Scanning to Email Scanning to a Memory Device Supported Document Sizes and Types You can load the following document types and sizes into the integrated scanner Document Size Width 5 8 to 36 inches 148 to 914 mm Length 5 8 to 120 inches 148 to 30480 mm Paper thickness 0 03 inches 0 8 mm or less 0 02 inches 0 55 mm with optional carrier sheet Supported Document Types Plain paper Recycled pape...

Page 129: ... clips or glue Originals with many holes such as loose leaf paper Irregularly shaped originals or originals that are not cut at right angles Originals with attached photos stickers or labels Transparent originals Glossy originals Torn or deteriorated originals Parent topic Using the Integrated Scanner SureColor T5470M Loading Originals You can load an original that meets the document specification...

Page 130: ...sert the top edge of the original into the scanner slot as shown below Align it with the right edge guide Continue inserting the original until you hear a beep 3 Move the left edge guide to the edge of the original Parent topic Using the Integrated Scanner SureColor T5470M ...

Page 131: ...arrier sheet the product cannot automatically detect the size of the original If you are copying the original set the Original Size setting to the size of your original If you are scanning the original set the Scan Size and Top Offset settings 1 Insert the original into the carrier sheet with the printed side facing the transparent sheet Align the top edge of the original with the top of the carri...

Page 132: ...lor T5470M Copying Documents or Photos You can copy documents or photos onto various sizes and types of paper including Epson special papers 1 Load the paper you want to print on in the product 2 Load the original into the scanner slot 3 Press the home button if necessary 4 Select Copy You see this screen ...

Page 133: ...lect Cancel Copy Settings Parent topic Using the Integrated Scanner SureColor T5470M Related tasks Using a Carrier Sheet Copy Settings Basic Settings Setting Options Description Copies 1 to 99 Specifies the number of copies to print Color Mode Black White Color Selects the color mode to use when printing Quality Speed Fine Super Fine Draft Selects the print quality Density 4 to 4 Choose the print ...

Page 134: ...n Clip by Margins Adds the value selected for the page margin inside the size selected for the base output size Oversize Adds the value selected for the page margin outside the size selected for the base output size when set to a standard size Borderless Enlarges the print size slightly to print a borderless image on roll paper Advanced Settings Setting Options Description Original Type Text Image...

Page 135: ...4 inches 0 0 to 100 0 mm Selects the amount of area at the top of the scanned original that will not be scanned If you are using the optional carrier sheet the value should be 19 mm Image Quality Contrast Adjusts the contrast of the image Sharpness Adjusts the sharpness of the image Remove Background Removes backgrounds from thin originals or images with unwanted backgrounds Bidirectional On Off S...

Page 136: ...der Registering Contacts for Email Network or FTP Scanning Control Panel Registering Contacts for Email Network Folder or FTP Scanning Web Config Parent topic Using the Integrated Scanner SureColor T5470M Creating a Shared Network Folder You can create a shared network folder on your computer or an FTP site and register its location to your product s Contacts list Note If you are creating a shared...

Page 137: ...f Windows See Windows Help for details on your operating system 2 If the computer s name uses any characters that are not alphanumeric letters or numbers do one of the following to change the computer s name Windows 10 or 8 x Select Rename this PC and follow the on screen prompts Windows 7 Select Change Settings change the computer s name and click OK See Windows Help for instructions if necessary...

Page 138: ...istrators who can now access the folder 12 Select the Sharing tab again and write down the Network Path listed under Network File and Folder Sharing at the top This is the path you will register to your product contacts list so you can select it for network scanning 13 Click OK or Close Now you can register the folder path to your product contacts list Parent topic Creating Scanning Contacts Regis...

Page 139: ...e up to 30 characters and select OK 10 Select the Index Word field Use the on screen keyboard to enter a word to use when searching for an entry up to 30 characters and select OK This field is optional 11 Do one of the following For an email contact select the Email Address field Use the on screen keyboard to enter the address and select OK For a network folder or FTP location select the Communica...

Page 140: ...fore you begin print a network status sheet and locate the IP address for your product on the sheet Note These instructions use Internet Explorer as an example browser 1 Start Internet Explorer on a computer that is using the same network as your product 2 Type your product s IP address into the address bar and press Enter 3 Click Continue to this website not recommended 4 Click Scan Copy Contacts...

Page 141: ... Validation For FTP locations select whether to require certification validation 8 Click Apply After a moment you see a message telling you that contact registration is complete 9 Close your web browser Parent topic Creating Scanning Contacts Related tasks Creating a Shared Network Folder Scanning to a Network Folder or FTP Server You can scan an image and save it to a network folder using your pr...

Page 142: ...ike this 5 Do one of the following Select from any displayed frequent contacts Select Keyboard select the Communication Mode field and select Network Folder SMB or FTP Then select the Location field and enter the folder location and press OK Enter other information as necessary ...

Page 143: ...ed by an administrator If you cannot access or change this setting contact your administrator for assistance 11 Press the Save icon Your product scans your original and saves it in the selected location 12 After scanning is complete hold the original and select OK to remove the original Scan to Network Folder FTP Settings Parent topic Using the Integrated Scanner SureColor T5470M Related tasks Cre...

Page 144: ...ARCH JIS B ISO B User Defined Determines the size of the scanned original In most cases Auto Detect should be used Tracing paper and the optional carrier sheet are not detected automatically Top Offset 0 0 to 3 94 inches 0 0 to 100 0 mm Selects the amount of area at the top of the scanned original that will not be scanned If you are using the optional carrier sheet the value should be 19 mm Origin...

Page 145: ...dd Time Adds the time to the file name Parent topic Scanning to a Network Folder or FTP Server Scanning to Email You can scan an original and email the scanned file using your product s control panel You need to have a preconfigured email server before you can scan to email You can either enter the email address directly on the product s control panel or select an address from the Contacts list Ma...

Page 146: ...n like this 4 Select Email You see a screen like this 5 Do one of the following Select from any displayed frequent contacts Select Keyboard to use the displayed keyboard to enter the address for the recipient and press OK ...

Page 147: ...d by an administrator If you cannot access or change this setting contact your administrator for assistance 11 Press the Save icon Your product scans your original and emails the scanned file 12 While holding the original select OK to remove the original from the product Scan to Email Settings Parent topic Using the Integrated Scanner SureColor T5470M Scan to Email Settings Setting Options Descrip...

Page 148: ...ARCH JIS B ISO B User Defined Determines the size of the scanned original In most cases Auto Detect should be used Tracing paper and the optional carrier sheet are not detected automatically Top Offset 0 0 to 3 94 inches 0 0 to 100 0 mm Selects the amount of area at the top of the scanned original that will not be scanned If you are using the optional carrier sheet the value should be 19 mm Origin...

Page 149: ... symbols Attached File Max Size 1MB 2MB 5MB 10MB 20MB 30MB Limits the size of the file attached to the email File Name Filename Prefix Adds a prefix to the file name The prefix is restricted to single byte characters and symbols Add Date Adds the date to the file name Add Time Adds the time to the file name Parent topic Scanning to Email Scanning to a Memory Device You can scan an original and sav...

Page 150: ...ke this 5 Select Memory Device You see a screen like this 6 Change any of the displayed settings on the Scan tab as necessary 7 Select the Advanced tab to view and change additional scan settings if necessary 8 On the Basic Settings tab press the Save icon to start scanning ...

Page 151: ...r Selects the color mode to use when printing File Format File Format Selects the file format for the saved image Compression Ratio Selects the compression ratio for the saved image PDF Settings Sets the permissions and passwords for the saved PDF Resolution 200 dpi 300 dpi 400 dpi 600 dpi Select the scanning resolution Scan Size Auto Detect ISO A US ANSI US ARCH JIS B ISO B User Defined Determine...

Page 152: ...original Advanced Setting Options Description Density 4 to 4 Choose the print density for the printed output Positive values increase the density Image Quality Contrast Adjusts the contrast of the image Sharpness Adjusts the sharpness of the image Remove Background Removes backgrounds from thin originals or images with unwanted backgrounds File Name Filename Prefix Adds a prefix to the file name T...

Page 153: ...c Settings Menu Printer Settings Menu Scan Settings Menu SureColor T5470M Network Settings Menu System Administrator Settings Menu Maintenance Menu Printer Status Print Menu Accessing the Printer s Menus You can use the printer menus to adjust the settings that control how your printer works 1 Press the home button if necessary 2 Select Settings on the LCD screen You see this screen ...

Page 154: ...ou can also select a setting to toggle it on or off 6 When you finish changing settings on a menu press the left arrow button to go back or press the home button to completely exit the menu Parent topic Using the Control Panel Menus Paper Setting Menu Select Paper Setting to customize paper options Roll Paper menu Setting Options Description Remove Rewinds the loaded roll paper until it is ejected...

Page 155: ...rint head Select Manual if an error appears during automatic alignment or if you are not satisfied with the results of the automatic alignment Advanced Media Setting Various options See the Advanced Media Setting table below Manage Remaining Amount Setup Select On to display and record the amount of remaining roll paper Remaining Amount Select the amount increment to display 16 4 to 492 feet 5 to ...

Page 156: ...o 3 Select this to adjust the distance between the paper and the print head Choose lower values for thinner papers Back Tension Auto Standard High Extra High Select High or Extra High if paper wrinkles during printing Note If the paper still wrinkles when you select High select Extra High and then change the level of suction by adjusting the Settings General Settings Printer Settings Paper Source ...

Page 157: ...ent Paper Feed Adjust Select Auto to automatically adjust the paper feed Select Manual if an error appears during automatic adjustment or if you are not satisfied with the results of the automatic adjustment Print Head Alignment Select Auto to automatically align the print head Select Manual if an error appears during automatic alignment or if you are not satisfied with the results of the automati...

Page 158: ...er setting error occurs when paper is correctly loaded Note If this setting is set to Off the printer may print beyond the edges of the paper causing ink to get on the printer Auto Cut On Off Select On to automatically cut roll paper after each page is printed or select Off to cut paper manually Remove Skew On Off Select On to enable paper skew reduction Parent topic Using the Control Panel Menus ...

Page 159: ... the printer turns off automatically Circuit Breaker Interlock Startup On Off Selects whether to turn the printer on or off when the circuit breaker switch is turned on Date Time Settings Date Time Enters the date and time Time Difference Sets the time difference for coordinated universal time UTC Language Various languages Selects the language used on the LCD screen Operation Time Out On Off Sele...

Page 160: ...printing mode Universal Print Settings Various options See the Universal Print Settings table below HP GL 2 Unique Settings Various options See the HP GL 2 Unique Settings table below Memory Device Interface Enable Disable Select Disable to prevent printing directly from a USB device Thick Paper On Off Select On to widen the platen gap to prevent scuffing if you are printing on thick paper Self Ch...

Page 161: ... output size or paper type settings are different between the driver and printer Roll Paper Setup Detect Paper Meandering Select On to display an error message and stop printing if the printer detects the paper is skewed Print Cutting Guideline Select On to print cut lines on roll paper if Auto Cut is turned off Cut for Borderless Print Select Two Cuts to insert a margin and cut twice between page...

Page 162: ...dard margins are as follows for the top and bottom CAD line drawings 3 mm Other 30 mm Select a different value as necessary Left and right margins are always 3 mm Paper Suction Select this to adjust the distance between the paper and the print head lower values for thinner papers Back Tension Select High or Extra High if paper wrinkles during printing Drying Time Drying Time per Pass Select from 0...

Page 163: ... each page is printed or select Off to cut paper manually Remove Skew Select On to enable paper skew reduction Restore Default Restores the custom setting to the defaults Universal Print Settings Adjust these settings as necessary when printing in HP GL 2 or HP RTL mode or when using AirPrint Setting Options Description Paper Source Roll Paper Cut Sheet 1 sheet Select the paper source from which y...

Page 164: ...3 mm 5 mm Select the top bottom left and right margin values for roll paper Note Margins are 3 mm for cut sheets regardless of the setting Smoothing On Off Select On to print at the maximum resolution for the selected paper type Note This may result in longer printing time or insufficient memory errors Base Output Size Various options When Auto the default setting is selected the hard clip area of...

Page 165: ...e Settings Adjust these settings as necessary when printing in HP GL 2 or HP RTL mode Setting Options Description Rotate 0 90 180 270 Rotate the coordinates of the drawn data counterclockwise before printing Origin Setup Left Edge Center Set the data coordinate origin Mirror Image On Select to horizontally flip the image using the center of the output size width as the basis line Off Select to pri...

Page 166: ...efault Print according to the built in printer palette settings logical pen with a pen width of 0 35 mm and 256 colors Palette A Palette B Print according to the built in printer palette settings specified under Define Palette Print Color Palette Print Select to print the selected palette in A3 size Define Palette Palette A Palette B Define a built in palette by specifying the pen width and color ...

Page 167: ... Check Checks the connection to the email server Scan Options Confirm Before Ejecting Scanned Document On Off Selects whether to hold the ejected original and display a removal confirmation screen after scanning Correct Skewed Image On Off Automatically corrects and saves scanned images that are skewed Should only be enabled if the Original Size or Scan Size settings have been set to Auto Document...

Page 168: ...ation status and connection settings Wi Fi Direct Status Displays the number of connected devices and connection settings Print Status Sheet Prints the current network connection information Connection Check Confirms the network status You can also print a connection check report Advanced Displays advanced information such as TCP IP settings You can enable or disable other network settings Parent ...

Page 169: ... See the Administrator s Guide for instructions on creating user accounts Admin Settings Lets you add or change the administrator password If you choose to add a password set the Lock Setting to On to enable password entry for certain features and settings Restore Default Settings Network Settings Select Yes to restore all network settings to their defaults Clear All Data and Settings Select Yes t...

Page 170: ... is displayed on the LCD screen if new firmware is found Restrictions SureColor T5470M When Lock Setting is enabled the following settings can be enabled or disabled individually Setting Options Access to Register Delete Contacts Allows users to register new contacts or edit and delete existing contacts Access to Recent of Scan to Email Controls the display of the recent Scan to Email entries Acce...

Page 171: ...duplicated or text is blurred Print Head Nozzle Check Prints a nozzle check pattern so you can check for clogged nozzles Head Cleaning Perform if the nozzle check pattern has faint or missing areas Ink Cartridge s Replacement Moves the print head to the correct position so you can replace ink cartridges Displays the ink cartridge replacement procedure Replace Maintenance Box Displays the maintenan...

Page 172: ...Removing and Installing Ink Cartridges Replacing the Maintenance Box Using the Powerful Cleaning Utility Printer Status Print Menu Select Settings Printer Status Print to view current printer and network settings Setting Options Description Print Status Sheet Configuration Status Sheet Prints a summary of current printer settings Network Wired LAN Wi Fi Status Displays current communication status...

Page 173: ...Epson for proper disposal please go to epson com recycle for more information Check Cartridge and Maintenance Box Status Purchase Epson Ink Cartridges and Maintenance Box Removing and Installing Ink Cartridges Replacing the Maintenance Box Check Cartridge and Maintenance Box Status Your product and its software will let you know when an ink cartridge is low or expended or when the maintenance box ...

Page 174: ...ce Box Status Related tasks Removing and Installing Ink Cartridges Replacing the Maintenance Box Checking Ink Cartridge and Maintenance Box Status with Windows You can check your ink cartridge or maintenance box status at any time using a utility on your Windows computer 1 To check your status access the Windows Desktop and click the icon for your product in the right side of the Windows taskbar o...

Page 175: ...ent topic Check Cartridge and Maintenance Box Status Related tasks Removing and Installing Ink Cartridges Replacing the Maintenance Box Checking Cartridge and Maintenance Box Status Mac You can check the status of your ink cartridges and maintenance box using a utility on your Mac 1 In the Apple menu or the Dock select System Preferences Select Print Fax Print Scan or Printers Scanners select your...

Page 176: ...or any ink cartridge as indicated on the screen Note If any of the cartridges installed in the product is broken incompatible with the product model or improperly installed Epson Status Monitor will not display an accurate cartridge status Parent topic Check Cartridge and Maintenance Box Status Related tasks Removing and Installing Ink Cartridges Replacing the Maintenance Box ...

Page 177: ...tings paper type frequency of use and temperature For print quality a variable amount of ink remains in the cartridge after the replace cartridge indicator comes on Ink Cartridge and Maintenance Box Part Numbers Parent topic Replacing Ink Cartridges and Maintenance Boxes Ink Cartridge and Maintenance Box Part Numbers Use these part numbers when you order or purchase a new ink cartridge or maintena...

Page 178: ...y of the ink cartridges are expended or missing 1 Turn on your product 2 Open the ink cartridge cover 3 Remove the new ink cartridge from the bag and gently shake it horizontally for about 10 seconds approximately 30 times Caution Do not touch the chip on the cartridge ...

Page 179: ... the old cartridge out of the printer 5 With the label facing you slide the new ink cartridge all the way into the slot Note Make sure to insert the cartridge into the correct color location 6 Repeat steps 3 to 5 as necessary to replace any other cartridges ...

Page 180: ...ly is designed to contain any excess ink but do not touch the ink supply port or surrounding area Parent topic Replacing Ink Cartridges and Maintenance Boxes Related concepts Purchase Epson Ink Cartridges and Maintenance Box Replacing the Maintenance Box Replace the maintenance box when a message or icon is displayed on the LCD screen telling you that the maintenance box is near or at the end of i...

Page 181: ...tenance boxes located behind the maintenance box cover Note You can view the replacement procedure on the LCD screen Press the home button if necessary and select Settings Maintenance Replace Maintenance Box See Guide 1 Open the maintenance box cover ...

Page 182: ...e maintenance box Warning If ink gets on your skin wash it thoroughly with soap and water If ink gets into your eyes flush them immediately with water If ink gets into your mouth spit it out and see a doctor right away ...

Page 183: ...w maintenance box from the package 5 Insert the new maintenance box into the printer Caution Do not touch the chip on the maintenance box or you may damage the product Note Repeat the above procedure for the second maintenance box on the SureColor T5470 T5470M if necessary If you are only replacing one of the maintenance boxes make sure it is the correct one ...

Page 184: ... the maintenance box cover Parent topic Replacing Ink Cartridges and Maintenance Boxes Related concepts Purchase Epson Ink Cartridges and Maintenance Box Related references Optional Equipment and Replacement Parts ...

Page 185: ...duct Control Panel Aligning the Print Head Using the Product Control Panel Cleaning the Roll Paper Feeder Print Head Maintenance If your printouts become too light or you see dark or light bands across them you may need to clean the print head nozzles Cleaning uses ink so clean the nozzles only if print quality declines You can check for clogged nozzles before you clean them so you don t clean the...

Page 186: ...panel on your product 1 Make sure roll paper or cut sheet paper is loaded in the printer 2 Press the home button if necessary 3 Select Settings Maintenance Print Head Nozzle Check You see a screen like this 4 If you want to change the paper source that the nozzle check pattern prints on select Paper Source Otherwise select Start to print the nozzle check pattern The nozzle check pattern prints ...

Page 187: ...imes perform a Powerful Cleaning Parent topic Print Head Nozzle Check Related tasks Checking the Nozzles Using a Computer Utility Cleaning the Print Head Using the Product Control Panel Using the Powerful Cleaning Utility Checking the Nozzles Using a Computer Utility You can check the print head nozzles using a utility on your Windows or Mac computer 1 Make sure roll paper or cut sheet paper is lo...

Page 188: ...stem Preferences Select Print Fax Print Scan or Printers Scanners select your product and select Options Supplies Select Utility and select Open Printer Utility 3 Select Nozzle Check You see a window like this 4 Click Print The nozzle pattern prints ...

Page 189: ...ning the Print Head Using a Computer Utility Using the Powerful Cleaning Utility Print Head Cleaning If print quality has declined and the nozzle check pattern indicates clogged nozzles you can clean the print head Note Your printer automatically checks the print head nozzles when the printer is turned on and before printing and cleans them when it detects clogged nozzles To change this setting se...

Page 190: ...r product 1 Make sure roll paper or cut sheet paper is loaded in the printer 2 Press the home button if necessary 3 Select Settings Maintenance Head Cleaning You see a screen like this 4 Select Start to begin the cleaning cycle When the cleaning cycle is finished the power light stops flashing and a confirmation screen appears Caution Never open any covers or turn off the product during a cleaning...

Page 191: ...leaning Utility Checking the Nozzles Using the Product Control Panel Cleaning the Print Head Using a Computer Utility You can clean the print head using a utility on your Windows computer or Mac 1 Make sure roll paper or cut sheet paper is loaded in the printer 2 Do one of the following Windows Access the Windows Desktop and click the icon for your product in the right side of the Windows taskbar ...

Page 192: ... cycle When the cleaning cycle is finished the power light stops flashing and a confirmation screen appears Caution Never open any covers or turn off the product during a cleaning cycle or you may damage it 5 Click Print Nozzle Check Pattern The nozzle pattern prints ...

Page 193: ...leaning the Print Head Using the Product Control Panel Using the Powerful Cleaning Utility Checking the Nozzles Using a Computer Utility Using the Powerful Cleaning Utility If print head nozzles are still clogged after cleaning the print head three times run the Powerful Cleaning utility from the product control panel This process consumes a lot of ink to clean the clogged nozzles 1 Press the home...

Page 194: ...When the cleaning cycle is finished the power light stops flashing and a confirmation screen appears Caution Never open any covers or turn off the product during a cleaning cycle or you may damage it 4 Select Yes Start to print a nozzle check pattern The nozzle pattern prints ...

Page 195: ... the Print Head Using the Product Control Panel Cleaning the Print Head Using a Computer Utility Using Easy Adjustment You can use Easy Adjustment to run the Paper Feed Adjust and Print Head Alignment functions and automatically optimize the settings Use Easy Adjustment in the following cases You create custom paper settings Note Even if the paper types are the same roll paper and cut sheets will ...

Page 196: ...ome button if necessary 3 Do one of the following Roll paper Select Roll paper information area Media Adjust Easy Adjustment Cut Sheet Select Paper Setting Cut Sheet 1 sheet Media Adjust Easy Adjustment 4 Select Start to begin the adjustment process When the adjustment cycle is finished a confirmation screen appears If you get an error message when using Easy Adjustment or want to run the automati...

Page 197: ... of adjustment patterns prints Note If you are printing on roll paper with Auto Cut turned off do not remove or pull out the paper until the second set of alignment patterns prints 5 Follow the instructions on the LCD screen to select the best patterns for the first set of adjustment patterns and select OK The second set of adjustment patterns prints Note If you are printing on cut sheets smaller ...

Page 198: ...printer 2 Press the home button if necessary 3 Select the roll paper information area and select Media Adjust Paper Feed Adjust Print length adjustment 4 Select Start to print the adjustment pattern 5 Using a ruler measure the distance between the symbols 6 Enter the measured length on the LCD screen and select OK After adjustment the screen displays a confirmation message Parent topic Adjusting P...

Page 199: ...structions on the LCD screen to select the best patterns for each set of adjustment patterns and select OK The screen displays a confirmation message and returns to the home screen Parent topic Adjusting Print Quality Related references Paper Setting Menu Related tasks Loading Roll Paper Loading Single Cut Sheets Cleaning the Roll Paper Feeder If ink smears on a printout when printing on roll pape...

Page 200: ...200 Related references Paper Setting Menu Related tasks Loading Roll Paper ...

Page 201: ...Transporting Your Product Replacing the Cutter If you notice that your paper does not cut cleanly you may need to replace the cutter You will need a Phillips head screwdriver Caution Do not remove the protective material from the new cutter until instructed to do so Do not drop the cutter or knock it against anything or you may chip the blade 1 Remove all paper from the printer 2 Press the home bu...

Page 202: ... loosen the screw holding the cutter in place and carefully pull the cutter straight out Place the cutter in a plastic bag and dispose of it properly Warning Keep the cutter out of the reach of children The blade is sharp and can cause injury ...

Page 203: ...ly Note Make sure the screw is tightened securely otherwise the cut position may shift slightly 6 Select OK The cutter moves into position and cuts off the protective piece Remove the protective piece from the printer Parent topic Maintenance and Transportation Related references Optional Equipment and Replacement Parts ...

Page 204: ...s in the areas where you notice ink on your prints You do not need to replace all of the borderless pads You will need a Borderless Replacement Pad Kit part number C13S400064 to perform the replacement 1 Turn off the product wait for the LCD screen to turn off and unplug the power cable from the electrical outlet 2 Wait for one minute before continuing 3 Open the front cover ...

Page 205: ...205 4 Using tweezers pull out the borderless pads in the areas where ink transfer occurs 5 Use cleaning sticks to wipe off the accumulated ink in the following locations Bottom ...

Page 206: ...206 Sides Center groove ...

Page 207: ...207 6 Bend a new borderless pad as shown below Note Do not bend the borderless pad except at the designated spot ...

Page 208: ...208 7 Insert the leg of the borderless pad all the way into the hole ...

Page 209: ...209 8 Push the protrusions on the sides of the borderless pad into the grooves on the left and right 9 Gently press the borderless pad until it is seated in place ...

Page 210: ...rderless Pad Edges Carefully follow the steps here to clean the platen and borderless pad edges to remove ink paper particles and lint Caution If ink remains on these parts it could transfer to your printouts Continued use of your product with ink paper particles or lint on these surfaces could damage the print heads or clog the nozzles 1 Turn off the product wait for the LCD screen to turn off an...

Page 211: ...lean the area shown in blue in the image below Wipe from the inside to the outside of the platen to clean it as shown here Note For stubborn dirt dampen a soft cloth with neutral detergent and wring it out then clean the platen as shown above Dry the platen with a soft dry cloth when you are finished ...

Page 212: ... a pointed object such as a toothpick to push the material into the holes 6 Remove any paper particles or dust around the outer edges of the borderless pads using cotton swabs 7 Close the front cover plug in the power cord and turn the product back on Parent topic Maintenance and Transportation ...

Page 213: ...y dirty use the optional cleaning kit Follow the instructions below when cleaning the scanner Do not use volatile chemicals such as alcohol or paint thinners Do not apply excessive force to glass surfaces Do not use brushes or hard objects they may scratch the glass surface and affect scan quality Do not spray liquids directly on the scanner or glass surfaces 1 Open the scanner cover ...

Page 214: ...214 2 Using a soft cloth wipe off any dust dirt or paper particles from the areas highlighted below 3 Using the cleaning kit or the clean side of the soft cloth thoroughly wipe the areas shown below ...

Page 215: ... transportation and storage follow these guidelines Avoid tilting the product placing it vertically or turning it upside down otherwise ink may leak Leave the ink cartridges installed Removing the cartridges can dry out the print head and may prevent the product from printing or ink may leak Note Before storing your product for a long period replace low expended or expired ink to help prevent the ...

Page 216: ...5 Close all covers on the product 6 If you are moving the product without the stand you will need two people for the SureColor T3470 and three for the SureColor T5470 T5470M Lift the product using the indented areas as shown SureColor T3470 ...

Page 217: ...owing Close the paper basket Release the caster locks Move the product on an even floor surface Lock the casters in the new location Caution Do not move the product with locked casters Avoid areas with steps or uneven flooring Note If you are transporting or storing the product below 14 F 10 C you must discharge the ink See the link below for instructions ...

Page 218: ...ur product when the temperature is 14 F 10 C or lower you must first discharge the ink to keep the print head in optimum condition Note The maintenance box needs enough capacity to discharge the ink Replace the maintenance box first if the remaining capacity is low 1 Turn on the product 2 Remove all the paper from the product 3 Press the home button if necessary 4 Select Settings Maintenance Disch...

Page 219: ...ur product Windows Your printer software automatically checks for updates You can also manually update the software by selecting Software Update here Access the Windows Desktop and right clicking the icon for your product in the right side of the Windows taskbar or clicking the up arrow and right clicking On the Maintenance tab in the printer settings window You can also update the software by sel...

Page 220: ...int head cleaning Do not perform head cleaning until you replace the maintenance box with a new one The used maintenance box may be reinstalled after cleaning is completed Command Error Check the printer driver setting Select Cancel to stop printing Make sure that the printer driver you are using supports your product Scanner Error Refer to manual for details Release the scanner transportation loc...

Page 221: ...de them with the displayed printer error code Parent topic Solving Problems Resetting Control Panel Defaults If you have a problem with settings on the product control panel you can reset them to their factory defaults You can choose which settings to reset or reset them all Note This setting can be locked by an administrator If you cannot access or change this setting contact your administrator f...

Page 222: ...Check these sections if you have problems operating your product Printer Does Not Turn On LCD Screen Shuts Off Parent topic Solving Problems Printer Does Not Turn On If the printer does not turn on try these solutions Make sure the power cable is securely connected Make sure the power outlet works by connecting the power cable for another electronic device Parent topic Solving Printer Problems LCD...

Page 223: ...a Wi Fi Protected Setup WPS and the Wi Fi icon on your product s LCD screen is not lit or does not appear make sure you select one of the WPS options from the product control panel within 2 minutes of pressing the WPS button on your router Make sure to place your product within contact range of your 2 4 GHz router or access point Avoid placing your product near a microwave oven 2 4 GHz cordless ph...

Page 224: ... Fi Direct you may have exceeded the maximum number of devices connected to your product 4 Print a network status sheet or access Web Config on the browser for your device and check the number of connected devices If 4 devices are already connected disconnect a device by deleting the product s SSID from the Wi Fi screen of that device If fewer than 4 devices are connected check the accuracy of you...

Page 225: ...t to the new router Note If you are using a 5 GHz wireless router set the router to operate in dual band 2 4 GHz and 5 GHz mode If your router uses a single network name SSID for both the 2 4 GHz and 5 GHz band give each band its own network name SSID instead such as Home Network 2 4 GHz and Home Network 5 GHz See your router documentation or contact your internet service provider for instructions...

Page 226: ... on Make sure you install your product s network software as described in your product documentation Print a network status sheet and verify that the network settings are correct If the network status is Disconnected check any cable connections and turn your product off and then on again If you are using TCP IP make sure the product s IP address is set correctly for your network If your network do...

Page 227: ...ake sure the Ethernet cable is securely connected to your product and to your router access point switch or hub Try connecting your product to a different port or a different router access point switch or hub Try connecting with a different Ethernet cable Try printing to your product from another computer on the network Note If you are using a 5 GHz wireless router set the router to operate in dua...

Page 228: ...r directly to your computer instead of the hub Make sure the USB hub is recognized correctly on the computer Disconnect all USB hubs from the computer and connect the printer directly to the computer s USB port Make sure the USB cable length does not exceed 10 feet 3 m Parent topic Solving Printing Problems Related references Interface Specifications Print Head Moves But Nothing Prints If the prin...

Page 229: ...paper If roll paper does not feed cut the end straight across and uncurl it by rolling it backward if necessary Then reload the paper Make sure there are no gaps between the roll paper and the paper stops on the spindle If wrinkles appear on roll paper adjust the Back Tension setting If you cannot insert paper easily into the paper feed slot make sure the paper is perfectly flat and not curled Do ...

Page 230: ...Use your hands to lightly press the paper into the paper basket as it is ejected from the printer If the paper creases as it ejects into the paper basket close the paper basket and support the printout with your hands before it touches the floor Parent topic Solving Paper Problems Paper is Creased If the paper is creased when it exits the printer try these solutions Make sure you are printing at n...

Page 231: ...blems If roll paper has jammed in the printer follow the steps here to clear the jam 1 Open the cut sheet cover and roll paper cover 2 Cut the paper above the paper feeder 3 Close the roll paper cover and the cut sheet cover ...

Page 232: ...other jammed paper as necessary Caution Do not touch the print head 6 Close the front cover 7 Turn the printer off wait a moment and then turn it back on 8 Cut the edge of the roll paper straight horizontally and reload the roll paper Note Make sure to cut off any jagged or folded sections of paper ...

Page 233: ...Problems Related tasks Loading Roll Paper Cut Sheet Paper Jam Problems If cut sheet paper has jammed in the product follow the steps here to clear the jam 1 Remove any jammed paper from the front of the product 2 Open the front cover ...

Page 234: ...en turn it back on 6 Reload a cut sheet Parent topic Solving Paper Problems Related tasks Loading Single Cut Sheets Solving Print Quality Problems Check these sections if you have problems with print quality Overall Print Quality is Poor Lines Are Misaligned Prints are Scuffed or Smeared Prints are Not Positioned Properly Parent topic Solving Problems ...

Page 235: ...them in the printer Remove and shake the cartridges every three months Make sure you selected the correct Media Type setting in the printer driver that matches the paper loaded in the printer Compare the print result with the image on your computer screen Since monitors and printers produce colors differently printed colors and screen colors do not always look the same Make sure that all printer c...

Page 236: ...t Media Type setting in the printer driver that matches the paper loaded in the printer Parent topic Solving Print Quality Problems Related tasks Aligning the Print Head Using the Product Control Panel Selecting Basic Print Settings Mac Selecting Basic Print Settings Windows Prints are Scuffed or Smeared If your prints are scuffed or smeared try these solutions Make sure your paper meets the speci...

Page 237: ...r settings and on the control panel for custom paper configuration settings If the back of your prints are smeared with ink clean the platen and replace any borderless printing pads as necessary Parent topic Solving Print Quality Problems Related references Paper Setting Menu Printer Settings Menu Paper Specifications Related tasks Selecting Basic Print Settings Mac Selecting Basic Print Settings ...

Page 238: ...er is turned on Make sure the scanner connected to the printer is compatible Visit the Epson website for the most updated list of supported scanners Parent topic Solving Problems Related tasks Connecting a Scanner to Your Printer Solving Scanning Problems SureColor T5470M Check these sections if you have problems scanning with the integrated scanner in your product Removing a Jammed Original SureC...

Page 239: ...239 1 Open the scanner cover 2 Remove the jammed original ...

Page 240: ... T5470M Cannot Feed Originals Correctly SureColor T5470M If you cannot feed originals into the scanner successfully try these solutions Make sure the edge guides are in the correct position If you are loading an original directly align the right edge guide with the document line ...

Page 241: ...lving Scanning Problems SureColor T5470M Scanned Image is Misaligned SureColor T5470M If the scanned image is not aligned correctly try these solutions Change the direction of the original If the original is curled try to correct the curl before loading the original Perform Image Stitching Adjustment Use the optional carrier sheet Adjusting Scanned Image Stitching Parent topic Solving Scanning Pro...

Page 242: ...ome button if necessary 2 Select Settings General Settings Scan Settings Scan Options Image Stitching Adjustment You see a screen like this 3 Tap the adjustment value area to adjust the value directly or use the buttons to change the value Shifting the value of the adjustment by 1 will correct the misalignment by approximately 0 1 mm ...

Page 243: ... T5470M If lines appear on copy results or scanned images clean the inside of the scanner Parent topic Solving Scanning Problems SureColor T5470M Scanned Image Size Does Not Match Print Size SureColor T5470M If your roll paper printouts need to match the length of your scanned or copied files exactly you can adjust the document feed 1 Press the home button if necessary 2 Select Settings General Se...

Page 244: ...f the original is 50 cm and the print result is 50 1 cm the formula would look like 50 50 1 100 100 0 1996 rounded to 0 2 You would enter 0 2 as the adjustment value 4 Select OK to enter the value Parent topic Solving Scanning Problems SureColor T5470M Uninstall Your Product Software If you have a problem that requires you to uninstall and re install your software follow the instructions for your ...

Page 245: ...ams Programs and Features Select the uninstall option for your Epson product then select Uninstall Change Note If you see a User Account Control window click Yes or Continue Select your product again if necessary then select OK and click Yes to confirm the uninstallation Windows other versions Click or Start and select All Programs or Programs Select Epson select your product then click EPSON Prin...

Page 246: ...d 5 Double click the Uninstaller icon 6 In the Epson Uninstaller screen select the checkbox for each software program you want to uninstall 7 Click Uninstall 8 Follow the on screen instructions to uninstall the software 9 Reinstall your product software Note If you uninstall the printer driver and your product name remains in the Print Fax Print Scan or Printers Scanners window select your product...

Page 247: ...ions Note For help using any other software on your system see the documentation for that software for technical support information Purchase Supplies and Accessories You can purchase genuine Epson ink paper and accessories from an Epson authorized reseller To find the nearest reseller visit proimaging epson com U S or proimaging epson ca Canada select your product series and product and click the...

Page 248: ...ations Environmental Specifications Interface Specifications Network Interface Specifications Scanning Specifications Safety and Approvals Specifications Windows System Requirements To use your product and its software your computer should meet these requirements Microsoft Windows OS version 32 and 64 bit compatible Windows 10 Windows 8 x Windows 7 Windows Vista Windows Server 2016 Windows Server ...

Page 249: ... For the latest product software available for your operating system visit the Epson support site at epson com support U S epson ca support Canada or epson com jm support Caribbean select your product and select Downloads Parent topic Technical Specifications Paper Specifications Note Since the quality of any particular brand or type of paper may be changed by the manufacturer at any time Epson ca...

Page 250: ... mm SureColor T5470 T5470M 8 26 to 36 inches 210 to 914 mm Length 11 to 62 2 inches 279 4 to 1580 mm Thickness 0 003 to 0 011 inch 0 08 to 0 3 mm Parent topic Technical Specifications Printable Area Specifications Roll paper Note Margins may change depending on the Top Bottom Margins setting that you select The numbers below are the standard settings ...

Page 251: ...in 0 12 to 1 38 inches 3 to 35 mm 5 Top margin 0 12 to 0 59 inches 3 to 15 mm Cut sheet 1 sheet 1 Printable width SureColor T3470 8 27 to 24 inches 210 to 610 mm SureColor T5470 T5470M 8 27 to 36 inches 210 to 914 mm 2 Left right bottom margin 0 12 inch 3 mm left right margins will be 0 inches 0 mm with borderless printing Top margin 0 78 inch 20 mm Note Top and bottom margins vary depending on pr...

Page 252: ...riable amount of ink remains in the cartridge after the replace cartridge indicator comes on Type Epson ink cartridges Pigment ink Cyan Magenta Yellow Black Cartridge life See the expiration date on the package or cartridge Print quality guarantee 1 year after installation in the printer Temperature Transportation in package 4 to 140 F 20 to 60 C Storage in package and after installation 4 to 104 ...

Page 253: ...66 mm Weight without ink cartridges Approx 141 09 lb 64 kg SureColor T5470 Dimensions include the opened paper basket Height 41 73 inches 1060 mm Width 54 52 inches 1385 mm Depth 38 03 inches 966 mm Weight without ink cartridges 167 55 lb 76 kg SureColor T5470M Dimensions include the opened paper basket Height 41 73 inches 1060 mm Width 54 52 inches 1385 mm Depth 38 03 inches 966 mm Weight without...

Page 254: ...eady mode approximately 13 W Sleep mode approximately 1 3 W Power off mode approximately 0 25 W SureColor T5470 Printing approximately 38 W Ready mode approximately 13 W Sleep mode approximately 1 3 W Power off mode approximately 0 25 W SureColor T5470M Printing approximately 38 W Ready mode approximately 19 W Sleep mode approximately 1 6 W Power off mode approximately 0 25 W Parent topic Technica...

Page 255: ...to 60 RH Storage 5 to 85 RH Parent topic Technical Specifications Interface Specifications Interface type High Speed USB port compatible with USB 2 0 specification OPTION port for scanner connection SuperSpeed USB port compatible with USB 3 0 specification USB port for computer connection Parent topic Technical Specifications Network Interface Specifications Wi Fi Standards IEEE802 11b g n Securit...

Page 256: ...thernet connected device should comply with IEEE802 3az standards Note Use a category 5 or higher shielded twisted pair cable for all interfaces Parent topic Technical Specifications Scanning Specifications Scanner type Color Simplex Sheet Fed Scanner Photoelectric device RGB color filter CIS Effective pixels 21600 pixels 600 dpi main scanning direction Document size Maximum 36 1200 inches 914 4 3...

Page 257: ...TIFF no tilt compensation 1200 inches 30480 mm at full resolution JPEG TIFF with tilt compensation 600 dpi 103 3 inches 2624 mm 400 dpi 156 3 inches 3972 mm 300 dpi 207 inches 5260 mm 200 dpi 310 8 inches 7895 mm PDF black and white no tilt compensation 5080 mm full resolution PDF color grayscale black and white with tilt compensation 600 dpi 103 3 inches 2624 mm 400 dpi 156 3 inches 3972 mm 300 d...

Page 258: ...erference and 2 this device must accept any interference received including interference that may cause undesired operation of the device To prevent radio interference to the licensed service this device is intended to be operated indoors and away from windows to provide maximum shielding Equipment or its transmit antenna that is installed outdoors is subject to licensing This equipment complies w...

Page 259: ...the device Product Model K331A SureColor T3470 T5470 WLAN Module Model WLU6320 D69 RoHS Brand EPSON IFT Certification Number RCPEPWL14 0107 Product Model K332A SureColor T5470M WLAN Module Model J26H006 Brand EPSON IFT Certification Number RCPEPJ218 0025 Notice for Paraguay Imported by Fastrax S A Av Perú esq Río de Janeiro Barrios Las Mercedes Asunción Paraguay Imported by Sol Control S R L Av Gr...

Page 260: ...orporation Address 3 3 5 Owa Suwa shi Nagano Ken 392 8502 Japan Product Model SureColor T5470M K332A Brand EPSON This product uses the following WLAN module WLAN Module Model J26H006 FCC ID BKMFBJ26H006 Product Manufacturer Seiko Epson Corporation Address 3 3 5 Owa Suwa shi Nagano Ken 392 8502 Japan Parent topic Technical Specifications ...

Page 261: ...Safety Instructions Be sure to follow all warnings and instructions marked on the product Use only the type of power source indicated on the product s label Use only the power cord that comes with the product Use of another cord may cause fires or shock Do not use the cord with any other equipment Place the product near a wall outlet where the plug can be easily unplugged Connect your product to a...

Page 262: ... cover openings in the cabinet or insert objects through the slots Keep the product away from potential sources of electromagnetic interference such as loudspeakers or the base units of cordless telephones When connecting the product to a computer or other device with a cable ensure the correct orientation of the connectors Each connector has only one correct orientation Inserting a connector in t...

Page 263: ...d ink on the supply port may cause ink leaks when the cartridge is reinserted and used Wipe off any excess ink before reinserting Do not insert or remove replacement cartridges during printing Do not remove the transparent seal from the ink supply port This may cause the cartridge to become unusable The green IC chip on this ink cartridge retains a variety of cartridge related information such as ...

Page 264: ...upport Parent topic Important Safety Instructions Wireless Connection Safety Instructions Radio waves from this product may adversely affect the operation of medical equipment or automatically controlled devices such as pacemakers automatic doors or fire alarms When using this product near such devices or inside a medical facility follow the directions from authorized staff members at the facility...

Page 265: ...INDING INDIVIDUAL ARBITRATION AND WAIVER OF CLASS ACTIONS AND CLASS ARBITRATIONS 1 1 Disputes The terms of this Section 1 shall apply to all Disputes between you and Epson The term Dispute is meant to have the broadest meaning permissible under law and includes any dispute claim controversy or action between you and Epson arising out of or relating to this Agreement Epson branded products hardware...

Page 266: ...the small claims court of your state or municipality if the action is within that court s jurisdiction and is pending only in that court 1 5 WAIVER OF CLASS ACTIONS AND CLASS ARBITRATIONS YOU AND EPSON AGREE THAT EACH PARTY MAY BRING DISPUTES AGAINST THE OTHER PARTY ONLY IN AN INDIVIDUAL CAPACITY AND NOT AS A PLAINTIFF OR CLASS MEMBER IN ANY CLASS OR REPRESENTATIVE PROCEEDING INCLUDING WITHOUT LIM...

Page 267: ...propriate filing fee to JAMS 500 North State College Blvd Suite 600 Orange CA 92868 U S A iii Send one copy of the Demand for Arbitration to the other party same address as the Dispute Notice or as otherwise agreed by the parties b Hearing Format During the arbitration the amount of any settlement offer made shall not be disclosed to the arbitrator until after the arbitrator determines the amount ...

Page 268: ... dispute resolution procedure and class action waiver provisions other than a change to Epson s address in this Agreement Epson will obtain your affirmative assent to the applicable amendment If you do not affirmatively assent to the applicable amendment you are agreeing that you will arbitrate any Dispute between the parties in accordance with the language of this Section 1 or resolve disputes as...

Page 269: ...difications repairs or alterations to this product or excluding the U S failure to strictly comply with Seiko Epson Corporation s operating and maintenance instructions Seiko Epson Corporation shall not be liable for any damages or problems arising from the use of any options or any consumable products other than those designated as Original Epson Products or Epson Approved Products by Seiko Epson...

Page 270: ...y Times for Power Management for Epson Products This product will enter sleep mode after a period of nonuse This is to ensure that the product meets Energy Star standards of energy efficiency More energy savings can be achieved by setting the time to sleep to a shorter interval Parent topic Copyright Notice Copyright Attribution 2019 Epson America Inc 9 19 CPD 56271R1 Parent topic Copyright Notice...

Reviews: