background image

41

41

The Epson Stylus Pro GS6000 prints on a variety of roll media in widths 
from 12 to 64 inches (300 to 1625 mm).

This chapter includes the following information:

Selecting media for your printer

Loading media

Checking the print quality

Adjusting the print head height

Setting up paper configurations and print using them

Adjusting the feeding position

Aligning the print head

Controlling media curl

Cutting off prints

Removing prints from the Auto Take-Up Reel

Replacing roll media

Selecting Media for Your Printer

The Epson Stylus Pro GS6000 prints on a variety of solvent media products 
up to 64 inches (1625 mm) in width. Unlike other Epson Stylus Pro 
printers, Epson is not the primary media provider for this class of printers. 
Our goal is to partner with the industry leaders in solvent media and work 
with them to assure compatibility.

There are a large variety of media selections offered by each of our media 
partners. You can select from a full range of vinyls, banners, films, fabrics, 
and specialty media, as well as a wide selection of protective overlaminate 
materials. All products are readily available in the market and all of our 
Epson Stylus Pro GS6000 resellers carry products from these companies. 

In addition to the solvent media available from our partners, Epson will offer 
a few solvent media products that will optimize image and output quality for 
specialty applications. Please check 

http://www.proimaging.epson.com

 to 

see a list of Epson Stylus Pro GS6000 media and to find links to our 
partner's websites. 

Chapter 2:  
Handling Media 
and Printouts

Summary of Contents for Stylus Pro GS6000

Page 1: ...Epson Stylus Pro GS6000 SETUP AND USE GUIDE ...

Page 2: ... may be trademarks of their respective owners Epson disclaims any and all rights in those marks This information is subject to change without notice The ENERGY STAR emblem does not represent EPA endorsement of any product or service Legal Notices Neither Seiko Epson Corporation nor its affiliates shall be liable to the purchaser of this product or third parties for damages losses costs or expenses...

Page 3: ...mful interference and 2 this device must accept any interference received including interference that may cause undesired operation WARNING The connection of a non shielded equipment interface cable to this equipment will invalidate the FCC Certification of this device and may cause interference levels which exceed the limits established by the FCC for this equipment It is the responsibility of th...

Page 4: ......

Page 5: ...d 21 Installing the Auto Take Up Reel 24 Removing the Printer Packing Materials 27 Connecting the Power Cord 31 Installing Ink 33 Installing Your Software 37 Connecting to Your System 37 Updating Your Printer Firmware 38 Checking the Current Firmware Version 38 Downloading the Firmware 38 Updating the Firmware 38 Configuring the Printer for Your Network 39 2 Handling Media and Printouts Selecting ...

Page 6: ...inter Checking the Ink Status 70 Checking the Printer Status 70 Printing Status Information 71 Viewing Status Information 71 Checking the Print Head Nozzles 73 Cleaning the Print Head 74 Replacing Ink Cartridges 75 Disposing of Waste Ink 78 Cleaning the Cleaning Wiper Capping Assemblies and Print Head Casings 79 Replacing the Flushing Pad 84 Washing the Ink System 86 4 Cleaning Storing and Transpo...

Page 7: ...g Media Jams 107 A Printer Parts and Controls Summary Printer Parts 109 Control Panel Buttons and Lights 110 Buttons 110 Lights 111 LCD Display Icons 113 Menu Setting Summary 114 Paper Setup Option Summary 117 Using Maintenance Mode 120 B Specifications Environmental 121 Electrical 121 Dimensions and Weight 122 Printer Interfaces 122 Safety Approvals 122 Media 122 Ink Cartridges 123 Index ...

Page 8: ...8 8 Contents ...

Page 9: ...e and printer maintenance loading media replacing ink cartridges cleaning and maintaining the printer and ink system and keeping track of media types Attach it to your printer for easy reference The Setup and Use Guide is available for on screen viewing on the printer software DVD and covers the same subjects as this book Warnings Cautions Notes and Tips Please follow these guidelines as you use t...

Page 10: ...oimaging epson com U S sales or www epson ca Canadian sales Optional upgrades Option Part number Additional One year Epson Preferred Plus Service EPPGS6KB1 Additional Two year Epson Preferred Plus Service EPPGS6KB2 Consumables and user replaceable parts Part Part number Ink Cartridges See page 75 for a complete list Additional Printer Maintenance Kit one year supply see page 78 C12C890611 Addition...

Page 11: ...vice or e mail Epson with your questions Windows System Requirements To use your printer in either a stand alone USB or peer to peer network environment your system should meet these requirements IBM compatible PC with a Pentium 4 3 GHz or higher processor recommended Microsoft Windows Vista or Windows XP At least 1GB of RAM 2GB or more recommended At least 30GB of free hard disk space for softwar...

Page 12: ...p the printer make sure you have enough space around it for sufficient ventilation Place the printer on a flat stable surface The printer will not operate properly if it is tilted or at an angle Avoid places subject to shocks and vibrations Keep the printer away from dusty areas Keep your entire computer system away from potential sources of electromagnetic interference such as loudspeakers or the...

Page 13: ...ess instructed to do so by an Epson service technician otherwise you may damage the printer Do not touch the post heater during printing It is hot and may cause a burn Do not touch the paper feed slot platen or post heater while the heaters are operating They are hot and may cause a burn Do not touch the steel belt inside the printer otherwise you may be injured Do not insert objects through the s...

Page 14: ...nk gets on the grid roller beneath it the ink may damage it and paper may not feed correctly Clean the print head casing if dust or ink accumulates on it If you do not clean it print quality may decline Do not bend or pull the waste ink drain tube The ink may leak and damage the printer Do not attempt to service the printer yourself Power down the printer from the control panel unplug the printer ...

Page 15: ...stalled previously shake it very gently Do not use an ink cartridge beyond the date printed on the cartridge Use up the ink cartridge within six months of installation for best results Do not dismantle ink cartridges or try to refill them This could damage the print head After bringing an ink cartridge inside from a cold storage site allow it to warm up at room temperature for at least three hours...

Page 16: ...e careful not to inhale the vapors Wear a protective mask eyewear gloves long sleeves and long trousers to avoid contact with the ink during waste ink disposal Work clothes that become soiled with the ink should be thoroughly cleaned Wash your hands and gargle well after disposing of the ink Do not bring food near the waste ink Keep waste ink out of reach of children If ink gets on your skin wash ...

Page 17: ...for using the Pro GS6000 You need an even larger floor space to assemble the printer and stand so be sure to prepare a large clear area before unpacking them Also make sure you save the box and packaging in case you need to ship the printer later Chapter 1 Setting Up the Printer WARNING Six people are required to unpack and set up the printer Note When choosing a place for the printer leave adequa...

Page 18: ...wrench to fasten the leg with the two bolts Note You also need a long handled Phillips head screwdriver to assemble the stand 2 bases 2 legs Horizontal strut 8 wing screws Hex wrench 8 bolts 4 hex screws Tank bracket 2 cable supports Note You can also assemble the stand by placing the legs upside down temporarily Make sure you tighten all bolts before moving to the next section Right leg Front of ...

Page 19: ...he Printer 19 3 Assemble the left leg and base in the same way 4 Attach the horizontal strut as shown then fasten it with two bolts at each end Left leg Front of stand Right leg Front of stand Left leg Front of stand ...

Page 20: ...he bracket for the waste ink tank to the outside of the right leg using the four hex screws 6 Make sure all of the screws are tightened securely 7 Rotate the feet clockwise to stabilize the stand before installing the printer on it Right leg ...

Page 21: ...nsert the pipes into the guides beneath the printer WARNING Six or more people are required to lift the printer Caution Do not remove the packing tape from the printer at this point The tape holds the printer parts in place as you complete installation Do not lift the printer from beneath the black plastic areas in back lift it from the metal area in the middle Front of the stand Front of the stan...

Page 22: ...2 22 Setting Up the Printer Be careful not to damage the waste ink connector and tube hanging beneath the printer as you place it on the stand 2 Attach the printer to the stand using the four wing screws ...

Page 23: ...tach the waste ink tube to the tank Be careful not to crimp the waste ink tube as you attach it Caution Make sure you close the spigot valve all the way to prevent spills Waste ink tank Caution Make sure you remove the plastic from the end of the tube or waste ink may be unable to drain and may back up into the printer Also make sure to securely attach the tube to the tank to prevent spills IMPORT...

Page 24: ...ms shown below in the Auto Take Up Reel box 2 Loosen the four screws securing the mounting plate to the right controller bracket then remove the bracket Scroller bar with empty media core Leftmounting bracket Right controller bracket Cushioning roller Hex wrench Ten hex bolts Loosen screws only ...

Page 25: ...e stand and secure it with four hex bolts using the hex wrench 4 Install the right controller bracket on the mounting bracket as shown then tighten the screws 5 Install the left mounting bracket onto the left base of the stand as shown then secure it with four hex bolts Tighten screws ...

Page 26: ... two hex bolts 8 Place the right end of the scroller bar the end with the metal collar down between the rollers in the right controller Then place the other end between the white rollers on the left mounting bracket Make sure the scroller bar rests between the rollers at each end Caution Make sure the tip of the cushioning roller bracket sits between the rubber stoppers Rubber stoppers Post Cautio...

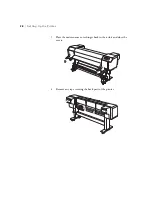
Page 27: ...ing Materials Now you can remove the packing materials from the printer 1 Remove all the tape and coverings from the printer 2 Press in on the top of the maintenance covers to open them then lift them off of the printer and remove the protective coverings ...

Page 28: ...28 28 Setting Up the Printer 3 Place the maintenance cover hinges back in their slots and close the covers 4 Remove any tape securing the back parts of the printer ...

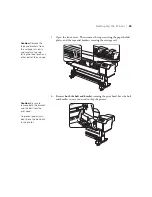
Page 29: ... and bracket securing the print head Save the bolt and bracket in case you need to ship the printer Caution Remove the tape and brackets from the carriage rail slowly and carefully to avoid letting the tape touch any other part of the carriage Caution Be sure to remove both the bracket and the bolt from the print head To prevent paper jams don t place the bolt back in the printer ...

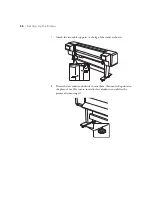
Page 30: ...Attach the two cable supports to the leg of the stand as shown 8 Rotate the feet counter clockwise to raise them then move the printer to the place of use Be sure to rotate the feet clockwise to stabilize the printer after moving it ...

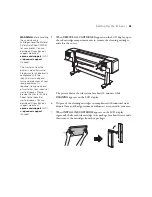
Page 31: ... power the printer 1 Route the two printer power cords through the cable supports as shown Caution The printer requires 22 Amps of power Make sure the outlet provides that power or plug the cables into two different outlets Do not use an outlet that is controlled by an automatic timer or wall switch Otherwise you may accidentally shut off the printer and cause damage 3 power cords ...

Page 32: ...nlets on the back underside of the printer Then connect them to a properly grounded electrical outlet 3 Turn off the Auto Take Up Reel using the power switch on the back then plug its power cord into its AC inlet and into an electrical outlet Back of the Auto Take Up Reel ...

Page 33: ...o be used in each cartridge Make sure you order a set of cartridges as soon as possible First you install the cleaning cartridges then you remove them and install the ink cartridges when messages on the LCD display instruct you to do so 1 Press the P Power button to turn on the printer In a moment INSTALL NEW CLEANING CARTRIDGES appears on the LCD display 8 ink cartridges 8 cleaning cartridges Pow...

Page 34: ...structions on the LCD display to check the status of the waste ink tank The printer processes the cleaning cartridges for about eight minutes while CLEANING appears on the LCD display Caution Be sure to install the cleaning cartridges not the ink cartridges at this point Follow the instructions on the LCD display Cleaning cartridge Note You need to be present during the ink installation process Do...

Page 35: ...n its package for about five seconds then remove the cartridges from their packages WARNING Before handling the used cleaning cartridges read the Material Safety Data Sheet MSDS for your printer You can download it from Epson s support website at epson com support U S or epson ca support Canada The waste ink from the printer is industrial waste Proper waste ink disposal in compliance with the indu...

Page 36: ...very system for about 18 minutes while CHARGING INK appears on the LCD display Charging is finished when the PAPER OUT LOAD PAPER message appears To load paper see page 42 8 7 6 5 Cyan Magenta Yellow Black 4 3 2 1 Light Cyan Light Magenta Green Orange Caution Charging takes about 18 minutes Never turn off the printer release the paper lever or open the front cover while ink is charging or you may ...

Page 37: ...ot connect the printer until a software installation screen prompts you to To connect to a network hub you need a standard RJ 45 CAT 6 network cable To connect directly to your computer s network interface you need an RJ 45 CAT 6 crossover cable 1 Plug the interface cable into the appropriate port on the printer 2 Plug the other end of the cable into the appropriate connector on your computer or n...

Page 38: ...version for Windows and follow the instructions on the screen You may also need to download the latest version of the EPSON LFP Remote Panel utility Updating the Firmware 1 Double click the firmware file to extract it 2 Click the EPSON LFP Remote Panel icon on your desktop You see the LFP Remote Panel Make sure your printer is selected 3 Click the Firmware Updater button 4 Click one of the Update ...

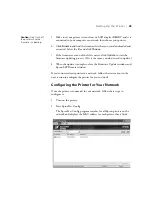
Page 39: ... need to update 8 When the update is complete close the Firmware Updater window and Epson LFP Remote window If you connected your printer to a network follow the instructions in the next section to configure the printer for your network Configuring the Printer for Your Network Once the printer is connected to your network follow these steps to configure it 1 Turn on the printer 2 Start EpsonNet Co...

Page 40: ...inter 3 Highlight the printer that you want to configure and click Configuration to access the TCP IP selection screen 4 If necessary contact your network administrator for instructions on assigning an appropriate IP address ...

Page 41: ... primary media provider for this class of printers Our goal is to partner with the industry leaders in solvent media and work with them to assure compatibility There are a large variety of media selections offered by each of our media partners You can select from a full range of vinyls banners films fabrics and specialty media as well as a wide selection of protective overlaminate materials All pr...

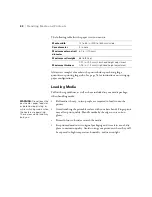
Page 42: ...nt quality Handle media by the edges or use cotton gloves Be careful not to bend or scratch the media Keep unused media in its original packaging and store it in a cool dry place to maintain quality Avoid storing your printouts where they will be exposed to high temperature humidity or direct sunlight Media width 12 to 64 in 300 to 1625 mm wide Core diameter 3 in core Maximum external roll diamete...

Page 43: ...CD display 2 Make sure the P Power light is not flashing then release the paper lever LEVER RELEASED appears on the LCD display 3 Flip up the levers to release the roll paper holders on the back of the printer then slide the holders apart Caution Do not release the paper lever while the P Power light is flashing or you may damage the printer ...

Page 44: ...own to lock it in place Then place the left end of the roll media on the holder Orient the roll based on the printable side of the media 5 Slide the right holder onto the right end of the roll media as shown Then flip the lever all the way down to lock the holder in place Printable side out Printable side in ...

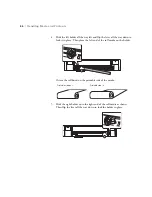
Page 45: ...nter of the roll to the d mark on the printer and flip the levers all the way down 7 Open the front cover 8 At the back of the printer carefully feed the roll media into the slot and beneath the guides Feed it all the way through to the front of the printer keeping the roll tightly wound Center mark ...

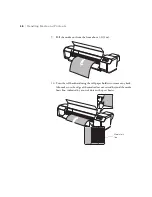
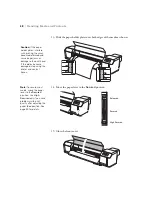
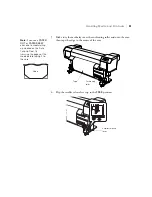
Page 46: ... out from the front about 3 ft 1 m 10 Turn the roll backward using the roll paper holders to remove any slack Also make sure the edge of the media does not extend beyond the media limit line indicated by a row of dots on the post heater Media limit line ...

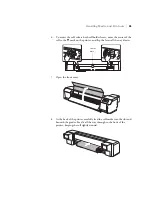
Page 47: ...om the edge of the nearest pressure roller as shown If you need to adjust the media s horizontal position release both roll holder levers move the media and holders as necessary and lock the levers in place 12 If you loaded thick media you may need to adjust the platen gap head height setting See page 54 for instructions 0 2 inch 5 mm Incorrect Correct Pressure rollers 0 2 inch 5 mm ...

Page 48: ...der plates interfere with printing they may become deformed and cause paper jams or damage to the print head If the plates become damaged stop using the printer and contact Epson Note To secure most media move the paper lever to the Secured position Use High Secured only if you have problems with print quality after adjusting the paper feed position See page 59 for details Released Secured High Se...

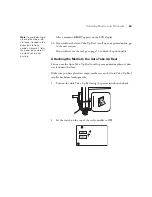
Page 49: ...can use the Auto Take Up Reel to roll up your printed media so it does not feed onto the floor Make sure you have placed an empty media core on the Auto Take Up Reel scroller bar before loading media 1 Turn on the Auto Take Up Reel using the power switch on the back 2 Set the switch on the top of the reel controller to OFF Note To avoid denting or creasing the media do not leave it loaded in the p...

Page 50: ...e Up Reel 4 If the media is not positioned in the center of the empty take up core adjust the core s horizontal position using the adjustment knob on the side of the Auto Take Up Reel controller Turn the knob clockwise to move the core left or counter clockwise to move the core right Empty take up core Horizontal adjustment knob ...

Page 51: ...e the edge to the center of the core 6 Flip the scroller release lever up to the FREE position Note If you see a PAPER OUT or PAPER SKEW error due to media rolling up crooked on the Auto Take Up Reel try trimming the edges of the media before taping it to the core Media Tape Cushioning roller Scroller release lever ...

Page 52: ...touts 7 Turn the scroller counter clockwise to take up the media one and a half rotations 8 Flip down the scroller release lever to the SET position then pull the cushioning roller all the way forward Turn one and a half rotations ...

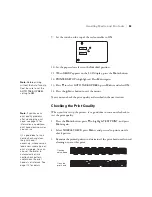
Page 53: ... highlight TEST PRINT and press Menu again 2 Select NOZZLE CHECK press Menu and press to print a nozzle check pattern 3 Examine the printed pattern to determine if the print head nozzles need cleaning or not at this point Note Before printing without the Auto Take Up Reel be sure to set the AUTO TAKE UP REEL setting to OFF Note If you have any print quality problems after cleaning the print head s...

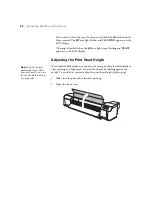
Page 54: ...ars on the LCD display Adjusting the Print Head Height If you loaded thick media or notice any smearing on sharply curled media or after printing at a high speed the print head may be rubbing against the media To avoid this you can adjust the print head height platen gap 1 Make sure the printer has finished printing 2 Open the front cover Note Raising the print head height may affect your print qu...

Page 55: ...tion shown The highest lever position is directly horizontal and the normal position is not quite vertical Do not place the lever in any other position 4 When you finish printing on the affected media return the head height adjustment lever to the normal position 5 Close the front cover Highest position Normal position ...

Page 56: ... loaded in the printer Then follow these steps 1 Press the Menu button 2 Press the d button until PAPER SETUP is highlighted then press Menu 3 Press d to highlight PAPER SETUP again then press Menu again 4 Press d to select the paper configuration number 1 to 30 that you want to use for this media type Then press Menu 5 Select the following settings for your media based on the information supplied...

Page 57: ...n 2 Press the d button to highlight TEST PRINT then press Menu 3 Press d until CUSTOM PAPER is highlighted then press Menu 4 Press to print your paper configurations Printing Using a Paper Configuration Once you have created a paper configuration you can select it whenever you print on that media 1 Press the Menu button 2 Press the d button to highlight PAPER SETUP then press Menu 3 Press the d bu...

Page 58: ...R M W ADJUSTMENT MicroWeave PAPER SUCTION DRYING TIME CARRIAGE MOVEMENT PRINT MULTIPLE LAYER Print a nozzle check pattern and clean the print heads if necessary Perform a 500 mm Line Feed Adjustment to fine tune the paper feeding position Print a sample pattern and select the best setting to further refine the paper feeding position Print a bidirectional alignment pattern and select the best setti...

Page 59: ...W Adjustment See page 117 for details on selecting these settings on the PAPER SETUP menu Then follow these steps to adjust the paper feeding position on the same menu 1 Press u or d to select PAPER FEED ADJUST then press Menu 2 Press u or d to select LINE FEED ADJUST then press Menu 3 Press u or d to set the feed length to 100mm 250mm or 500mm recommended then press Menu 4 Press to print an initi...

Page 60: ...hem See page 62 for instructions 12 Examine the sets of patterns to identify which one has the most consistent printing pattern with no black or white lines running through it 13 Press u or d to select the number of the best pattern then press the button to save the setting 14 Press the Pause button to exit the menu If you were not able to print a sample pattern completely without lines running th...

Page 61: ...ever is in the correct position See page 54 for details 1 Make sure the printer is turned on and media is loaded 2 Press the Menu button 3 Press the d button to highlight PAPER SETUP then press Menu 4 Press the d button to highlight PAPER TYPE then press Menu 5 Press u or d to select the paper configuration number for the loaded media 6 Press The configuration number you selected appears on the LC...

Page 62: ...nished press the Pause button to exit Cutting Off Prints When you finish printing and need to remove your printouts follow the steps below to cut off the prints 1 Make sure READY appears on the LCD display 2 Press u or d to adjust the cutting position of the media if necessary When you are using the Auto Take Up Reel you cannot feed the media backward 3 Open the front cover 4 If you are not using ...

Page 63: ...l along the cutting groove in the post heater as shown 6 If you are using the Auto Take Up Reel the scroller rotates to take up your printed media To stop media take up set the switch on the top of the reel controller to OFF WARNING Do not place your fingers in the path of the cutting tool to avoid injuring yourself ...

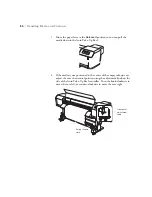
Page 64: ...1 Make sure the reel controller is set to OFF 2 Flip the scroller release lever up to the FREE position 3 Lift the entire scroller bar off of the printer 4 Remove the paper holders from one end of the scroller bar 5 Remove the media and core from the scroller bar 6 Place another empty take up core onto the scroller bar You can use a core from an expended media roll or a new core Scroller release l...

Page 65: ...with the metal collar down between the rollers in the right controller Then place the other end between the white rollers on the left mounting bracket Make sure the scroller bar rests between the rollers at each end 8 Flip down the scroller release lever to the SET position Metal collar ...

Page 66: ...ht is not flashing then release the paper lever LEVER RELEASED appears on the LCD display 2 Turn the roll backward using the roll paper holders and remove any remaining media from the feed slot 3 Release the right roll paper lever and slide the holder off the end of the roll Caution Do not release the paper lever while the P Power light is flashing or you may damage the printer ...

Page 67: ...ndling Media and Printouts 67 4 If necessary release the left roll paper lever and remove the holder from the other end of the roll 5 Place a new roll on the printer as necessary See page 43 for instructions ...

Page 68: ...68 68 Handling Media and Printouts ...

Page 69: ...lity as described in this chapter Checking the ink status Checking the printer status Checking the print head nozzles Cleaning the print head Replacing ink cartridges Disposing of waste ink If these procedures do not completely solve your print quality problems you may periodically need to perform the following ink system maintenance procedures Cleaning the cleaning wiper capping assemblies and pr...

Page 70: ...ed cartridge is almost expended Make sure you have a replacement cartridge When the Check H ink light stays on and REPLACE INK CARTRIDGE is displayed the cartridge is expended You must replace the cartridge before you can continue printing See page 75 for instructions You can also view or print detailed information on ink levels as described below Checking the Printer Status Using the control pane...

Page 71: ...network settings 1 Make sure media is loaded in the printer 2 Press the Menu button 3 Press the d button to highlight TEST PRINT then press Menu 4 Press d to highlight STATUS SHEET then press Menu You see PRINT 5 Press to start printing The level of ink left in the cartridges is indicated as follows on the status sheet E F 100 81 of ink capacity remaining E F 80 61 E F 60 41 E F 40 21 E F 20 11 le...

Page 72: ...of ink used in milliliters and media used press d to highlight USAGE COUNT then press Menu When done press l You can clear this setting with the CLEAR USAGE COUNT option To check the job history press d to highlight JOB HISTORY then press Menu For the last 10 print jobs saved in the printer you see the ink used in milliliters and media used in square centimeters The most recent job is saved as No ...

Page 73: ...for instructions Follow these steps to manually print a nozzle check pattern 1 Press the Menu button 2 Press the d button until TEST PRINT is highlighted then press Menu NOZZLE CHECK is selected 3 Press Menu then press to start printing the nozzle check pattern Two patterns are printed one for each print head 4 After the patterns print use at least a 10 eye loupe to examine them If the patterns lo...

Page 74: ... and make sure the Check H ink light on the printer s LCD display is not on or flashing 2 Do one of the following To run a standard light cleaning cycle press and hold down the Menu button for three seconds Go to step 7 To run another level of cleaning cycle go to step 3 3 Press the Menu button 4 Press the d button until MAINTENANCE is highlighted then press Menu 5 Press d until one of the followi...

Page 75: ...eller visit www proimaging epson com U S sales www epson ca Canadian sales or call 800 GO EPSON 800 463 7766 Or you can purchase online at www proimaging epson com U S sales or www epson ca Canadian sales Slot no Cartridge Part number 1 Orange T624800 2 Green T624700 3 Light Magenta T624600 4 Light Cyan T624500 5 Black T624100 6 Yellow T624400 7 Magenta T624300 8 Cyan T624200 Note You must use at ...

Page 76: ...k cartridge from the printer Caution Leave the expended cartridge in the printer until you are ready to replace it To prevent ink reporting errors never replace the ink cartridges with the printer turned off 8 7 6 5 Cyan Magenta Yellow Black 4 3 2 1 Light Cyan Light Magenta Green Orange WARNING Do not shake the expended cartridge or ink may leak out If ink gets on your hands wash them thoroughly w...

Page 77: ... 7 Close the ink compartment cover The printer returns to its READY state Note If you can t insert the cartridge smoothly you may have the wrong cartridge Check the package and product code If the Check H ink light remains on after installing the cartridge it may not be inserted fully Caution Do not remove and re insert cartridges more often than necessary Doing so can compromise the needle valve ...

Page 78: ...old the empty container beneath the spigot on the printer s waste ink tank then turn the valve as shown to drain the waste ink Keep the container close to the spigot to avoid splashing the waste ink WARNING Before handling the waste ink read the Material Safety Data Sheet MSDS for your printer You can download it from Epson s support website at epson com support U S or epson ca support Canada The ...

Page 79: ...ean them if you notice blurred ink or gaps in your printouts after cleaning the print head You will need the plastic gloves and a cleaning swabs that came in the Maintenance Kit and the metal tray included with your printer to clean the cleaning wiper capping assemblies and print head casings Place your used gloves and swabs in the metal tray when you are finished to avoid getting ink on any of th...

Page 80: ...NCE then press Menu 5 Press The print head moves to the left the cleaning wiper moves forward and OPEN MAINT COVERS appears on the LCD display 6 To clean the cleaning wiper and capping assemblies push in the top of the maintenance cover beneath the control panel then release it to open the cover Caution Do not place any supplies on the open maintenance cover or it may fall off ...

Page 81: ...oved with a dry cleaning swab you need to clean them using the optional Print Head Cleaning Kit which includes special cleaning fluid and a cup When ordering the Print Head Cleaning Kit ask for part number C12C890621 See page 10 for ordering information Caution Do not touch the cleaning wiper or any other internal part with your hands to prevent oil from your skin interfering with head cleaning op...

Page 82: ...ling the ink cleaner read the Material Safety Data Sheet MSDS for your printer You can download it from Epson s support website at epson com support U S or epson ca support Canada Make sure your workspace is well ventilated and free of any open flame before opening the ink cleaner Keep ink cleaner out of the reach of children Do not let ink cleaner contact your skin eyes or clothing If it gets on ...

Page 83: ...ou may want to place the metal tray in the maintenance bay to catch any ink that may fall off Wipe back and forth and up and down around the print head casings Caution Do not touch the print head or the tip of the swab with your hands to prevent oil on your skin from damaging the print head Do not moisten the cleaning swab with water or it may damage the print head Do not let the cleaning swab tou...

Page 84: ... 18 Replace the maintenance cover close it and press it until it locks in place 19 Press the Pause button to return the printer to the READY state Replacing the Flushing Pad Once a year you need the replace the printer s flushing pad You may also need to replace it if you notice ink smears on your media or if the pad becomes damaged or excessively soiled You will need the replacement flushing pad ...

Page 85: ...s to the left the cleaning wiper moves forward and OPEN MAINT COVERS appears on the LCD display 6 Push in the top of the maintenance cover beneath the control panel then release it to open the cover 7 Put on a plastic glove and grasp the tab on the used flushing pad to remove it from the left side of the maintenance bay Place the pad in the metal tray Caution Do not place any supplies on the open ...

Page 86: ...cycle you can wash the ink system to clear the clogged nozzles Washing the ink system involves the following procedures Removing the ink cartridges Emptying the waste ink tank Inserting the cleaning cartridges Emptying the waste ink tank again Removing the cleaning cartridges Emptying the waste ink tank again Installing ink cartridges and charging the ink system WARNING Before handling the waste i...

Page 87: ...ft in them 1 Turn on the printer 2 Press the Menu button 3 Press the d button to highlight MAINTENANCE then press Menu 4 Press d to highlight HEAD WASHING then press Menu 5 Carefully follow all the instructions as they appear on the LCD display For detailed instructions see these sections Removing ink cartridges see page 75 Emptying the waste ink tank see page 78 Inserting and removing cleaning ca...

Page 88: ...88 88 Maintaining the Printer ...

Page 89: ...hts to turn off 3 Unplug the power cord and disconnect the printer from your system 4 Wait one minute then open the front cover Chapter 4 Cleaning Storing and Transporting the Printer Caution Be careful not to touch the gears inside the printer To avoid damaging the components as well as the case never use alcohol or thinners to clean the printer Be careful not to get water on the printer mechanis...

Page 90: ...h to clean the platen and the post heater 7 If the outer case is dirty close the front cover and clean the case with a soft clean cloth dampened with mild detergent Keep the ink cartridge compartments and maintenance covers closed to prevent water from getting inside Caution Do not use tools such as compressed air to clean away dust or dirt It may blow debris into the printer ...

Page 91: ... power cord and any interface cables 7 Store the printer in a location with a flat level surface To maintain print quality during storage clean the print head once a week see page 74 Moving or Transporting the Printer If you are moving the printer a short distance for example in the same building you can roll it on its stand as described on page 92 To ship the printer a longer distance you should ...

Page 92: ...on to turn off the printer 4 Disconnect the power cord and interface cable 5 Make sure the front cover is closed 6 Rotate the feet counter clockwise to raise them 7 Carefully roll the printer to its new location then rotate the feet clockwise to stabilize the stand Caution Do not remove the ink cartridges or leave the print head uncapped when moving the printer otherwise the print head may dry out...

Page 93: ...heck again Never move the print head by hand 2 Press the P Power button to turn off the printer 3 Dispose of any waste ink in the waste ink tank see page 78 Then remove the waste ink tank from the printer cover the end of the waste ink tube with plastic and secure it with tape to prevent leaks Do not remove the ink cartridges from the printer 4 Remove the following parts Power cord and interface c...

Page 94: ...idges to wash the ink system in these steps see page 10 for ordering information This process also uses ink from your ink cartridges to re initialize the printer 1 Dispose of any waste ink in the waste ink tank see page 78 2 Turn on the printer 3 Press the Menu button 4 Press the d button to highlight MAINTENANCE then press Menu 5 Press d to highlight HEAD WASHING then press Menu Caution Never tur...

Page 95: ...llowing parts Power cord and interface cables Loaded media Auto Take up Reel 9 Reinstall the bolt and bracket securing the print head that you removed during setup 10 Close any open covers on the printer and tape them shut 11 Follow the steps on page 96 to remove the printer from the stand When you set up the printer again follow the steps in Chapter 1 to attach the printer to the stand install th...

Page 96: ...printer again you may need to contact Epson see page 11 for additional instructions on preparing the ink system for printing using a new set of cartridges Removing the printer from the stand 1 Rotate the feet clockwise to stabilize the stand before removing the printer from it 2 Remove the four wing screws securing the printer to the stand Keep them in a safe place Tip For more secure transportati...

Page 97: ...teel pipes available at hardware stores Insert the pipes into the guides beneath the printer 4 Repack the printer using the original box and packing materials if possible WARNING Six or more people are required to lift the printer Caution Do not lift the printer from beneath the black plastic areas in back lift it from the metal area in the middle Carrying bar method ...

Page 98: ...98 98 Cleaning Storing and Transporting the Printer ...

Page 99: ...lems including clearing media jams Diagnosing Problems The printer includes a number of ways to help you diagnose problems To identify the most common problems check the messages and lights on the control panel See the list beginning on page 100 for more information To determine whether the problem is caused by the printer itself print a status sheet from the control panel See page 71 for instruct...

Page 100: ... a message appears on the LCD display and the large Error alert lamp and the lights on the control panel come on or flash LCD display Power button and light Pause resume or delete button and light Heater Type button Paper and ink Check lights Menu or cleaning button Paper feed backward button Paper feed forward button High Heat button and light Low Heat buttonand light Enter button Control panel E...

Page 101: ...ront cover F W INSTALL ERROR UPDATE FAILED RESTART THE PRINTER Firmware update failed Restart the printer then update the firmware again see page 38 for instructions INK CARTRIDGE NON GENUINE CARTRIDGE MAY NOT PERFORM AT OPTIMUM CONTINUE YES NO A non genuine ink cartridge is installed Press the r button to select NO and replace the ink cartridge with a genuine Epson ink cartridge see page 75 Other...

Page 102: ...ee page 75 Print quality may decline when ink is low LEVER RELEASED LOAD PAPER Paper is not loaded Load paper and set the lever to the Secured position See page 43 for instructions LEVER RELEASED LOWER THE PAPER SET LEVER Paper lever is released Set the paper lever to the Secured position Start printing again from the beginning for best results MAINT COVER OPEN CLOSE RIGHT MAINT COVER The indicate...

Page 103: ...n PRINTER ERROR RESTART THE PRINTER You tried to print while an error condition was present Press the P Power button to turn off the printer Unplug the printer and wait 30 seconds Then plug it in and turn it back on SERVICE CALL ERROR If the error code is 1133 or 1137 the print head is locked Remove the bracket securing the print head see page 27 If the error code is 3000 a power cord is not plugg...

Page 104: ...e printing can start If none of these suggestions help try the solutions below Problem Solution Printing will not start If the heaters have not reached the selected temperature for your media printing cannot start Wait for the heaters to reach the desired temperature see page 112 The printer stops printing unexpectedly If the Pause light is flashing the printer is performing a maintenance procedur...

Page 105: ...ning cycle see page 73 Check the expiration date printed on the ink cartridge If the cartridge is too old replace it as described on page 75 Check that the heater settings are correct for your media see page 118 Check the ink indicators and light and replace ink cartridges if your ink supply is low as described on page 70 Make sure color settings in your application are correct Your print has gaps...

Page 106: ...ure the printer isn t located in a brightly lit area or in direct sunlight the paper sensors may not operate correctly Your print appears blurry or smeared Try adjusting your paper configuration settings See page 56 for instructions Your media doesn t meet the required specifications or wasn t stored in a dry humidity free environment Load new media Check that the heater settings are correct for y...

Page 107: ...ts jammed in the printer printing stops and you see a PAPER JAM message on the LCD display Follow these steps to clear a jam 1 Turn off the printer 2 Open the front cover 3 Slide the print head to the right and off of the jammed media 4 Release the paper lever ...

Page 108: ...ve any remaining media from the feed slot 7 Remove any remaining pieces of torn or jammed media from the printer 8 Close the front cover 9 Press the P Power button to turn the printer back on 10 Make sure the Check b paper light is on and the following message appears on the LCD display PAPER OUT LOAD PAPER Then reload your media WARNING Do not place your fingers in the path of the cutting tool to...

Page 109: ...ode settings see page 120 Printer Parts Appendix A Printer Parts and Controls Summary Roll paper holder Paper lever Control panel Ink cartridge compartment Ink cartridge compartment Front cover Network interface USB interface Maintenance cover Error alert lamp Waste ink tank Feet Caster AC inlets Auto Take Up Reel Post heater Maintenance cover Paper holder plate Platen heater Pressure rollers Pape...

Page 110: ...p if flashing an error has occurred Button Description P Power Turns the printer on and off Pause Stops printing temporarily Resumes printing when printing was paused In menu mode returns the printer to READY state When held for three seconds deletes the print job r Menu Accesses the printer menus Selects menus and settings within menu mode During printing enters the PRINTER STATUS menu When held ...

Page 111: ...erature of the currently selected heater type selected with the l Heater Type button and indicated on the LCD display Light Description P Power On printer is turned on Flashing printer is processing or printing a print job performing a cleaning operation warming up or shutting down Off printer is turned off Pause On printer is paused or in menu mode Check b Paper On no media is loaded media is out...

Page 112: ...t light Description On On All three heaters have reached their preset temperature Flashing Off At least one of the heaters is warming up to its preset temperature Flashing Flashing A heater error has occurred Off Off All three heaters are turned off High Heat light Low Heat light Description On On You can select a higher or lower temperature than the current setting On Off You can select only a hi...

Page 113: ...ilable or or Ink is getting low make sure you have a new cartridge Flashing Ink is low example shows the yellow cartridge Ink is expended example shows the yellow cartridge Cartridge error or no cartridge Platen gap print head height icons High Low Heater icons Arrow and numeric value indicate preset temperature target thermometer icon level indicates current heater temperature Printer status mess...

Page 114: ...ve an error even if the print job is out of range of the loaded media PRINT NOZZLE PATTERN Selects whether to automatically print the nozzle check pattern before printing each print job or before every tenth sheet OFF ON EVERY PAGE ON EVERY 10 PAGES HEATING TIME Selects the length of time to preheat the heaters The heaters turn off after this time has passed after turning on the printer or finishi...

Page 115: ...ged or you clean the print head manually OFF 1h to 6h 9h 12h 18h 24h INITIALIZE SETTINGS Resets the PRINTER SETUP menu settings to their default settings PAPER SETUP menu see page 117 for details PAPER TYPE Selects the type of media you want to print on PAPER SETUP Selects whether to print with default settings for all media setup options STANDARD or to set up a paper number 1 to 30 with custom se...

Page 116: ...TUS SHEET Prints a sheet showing the status of various printer parts and settings see page 71 for details NETWORK STATUS SHEET Prints a sheet showing the network settings JOB INFORMATION Prints a sheet showing information about the last 10 print jobs CUSTOM PAPER Prints information about paper configurations you have created see page 56 for details PRINTER STATUS menu see page 71 for details VERSI...

Page 117: ...he Bonjour network settings if necessary INIT NETWORK SETTING Returns the network settings to their default settings Option and parameters Description PRINT MODE MAX QUALITY For photo printing with priority on print quality QUALITY1 For photo printing balancing print quality and efficiency QUALITY2 For photo printing with priority on efficiency QUALITY3 For graphic printing with standard print qua...

Page 118: ...ns that came with your media to select the correct temperature for the pre heater 30 C to 50 C 86 F to 122 F PLATEN HEATER OFF Sets the temperature of the heater beneath the print head that warms the ink See the instructions that came with your media to select the correct temperature for the platen heater 30 C to 50 C 86 F to 122 F Option and parameters Description Note All three heaters must reac...

Page 119: ... uneven print density is evident in prints using MEDIUM A HIGH A to D Prints like MEDIUM M W ADJUSTMENT but slower to improve print quality Select HIGH B C or D if white lines or uneven print density is evident in prints using HIGH A EXTRA HIGH A to B Prints like HIGH M W ADJUSTMENT but only on half of the print head nozzles EXTRA HIGH A uses one half and EXTRA HIGH B uses the other half Select EX...

Page 120: ...n the printer in normal mode CARRIAGE MOVEMENT DATA WIDTH Sets the print head to move only to the width of the print data to improve print speed PRINTER FULL WIDTH Sets the print head to move the maximum width at all times to improve print consistency for certain types of images PRINT MULTIPLE LAYER OFF Sets printing to overwrite lines a select number of times for greater density also called multi...

Page 121: ...1 A Heater 11 A Power consumption Printing Approx 680 W Ready mode Approx 680 W idle heat On Approx 48 W idle heat Off Sleep mode Approx 24 W Power Off mode Approx 3W Appendix B Specifications Note We recommend that you use genuine Epson cartridges and do not refill them The use of other products may affect your print quality and could result in printer damage Yields vary considerably based on ima...

Page 122: ...el Weight without ink cartridges 331 lb 150 kg printer 75 lb 34 kg stand 42 lb 19 kg Auto Take Up Reel Safety standards UL 60950 1 CSA 22 2 No 60950 1 EMC FCC part 15 subpart B class A CAN CSA CEI IEC CISPR 22 Class A Media width 12 to 64 inches 300 to 1625 mm Maximum media thickness 0 01 inches 0 3 mm Low head height adjustment 0 05 inches 1 3 mm High head height adjustment Core diameter 3 inches...

Page 123: ...range Cartridge life See production date on package if unopened Within 6 months after opening package Temperature storage Uninstalled 4 to 104 F 20 to 40 C 1 month at 104 F 40 C Installed 14 to 104 F 10 to 40 C 4 days at 90 F 32 C Capacity 950 ml Dimensions W D H 2 09 12 4 5 75 inches 53 1 316 1 146 2 mm ...

Page 124: ...124 124 Specifications ...

Page 125: ...printer 89 to 90 Cleaning cartridges installing 33 to 35 86 to 87 ordering 10 Cleaning wiper cleaning 79 to 84 Color problems 105 Configuring media 56 to 58 Connecting printer 37 Control panel buttons 100 110 to 111 changing language 120 changing measurement units 120 illustration 100 110 ink levels checking 70 70 to 72 113 LCD display 113 lights 100 110 to 112 messages 100 to 103 restoring defaul...

Page 126: ...5 to 77 safety instructions 15 to 16 specifications 123 Ink cleaning using 81 to 84 Ink light 70 111 Ink system maintaining 69 to 87 washing 86 to 87 95 Ink waste see Waste ink Interface specifications 122 J Jams media 107 to 108 Job history 72 L Language control panel 120 LCD display 113 Length units 120 LFP Remote Panel 38 to 39 Lights control panel 100 110 to 112 Loading media 42 to 49 M Mainte...

Page 127: ... to 62 casing cleaning 79 to 84 cleaning wiper cleaning 79 to 84 Print head continued cleaning nozzles 74 to 75 locking 94 95 unlocking 29 Print Head Cleaning Kit ordering 10 using 81 to 84 Print quality problems 105 to 106 Printable pages checking 72 Printer cable 37 checking status 71 to 72 checklist 58 cleaning 89 to 90 connecting 37 default settings restoring 120 dimensions and weight 122 firm...

Page 128: ...g printer on 21 to 23 stabilizing 30 Status checking ink 70 printer 70 to 72 waste ink 78 Storing printer 91 Support Epson 11 System connecting to 37 requirements 11 T Take Up Reel Auto attaching media to 49 to 53 core replacement 10 installing 24 to 26 plugging in 31 to 32 removing prints from 64 to 65 Technical support 11 Temperature requirements 121 units 120 Test Print menu 71 73 116 Total pri...

Reviews: