background image

Product Information

358

System Requirements

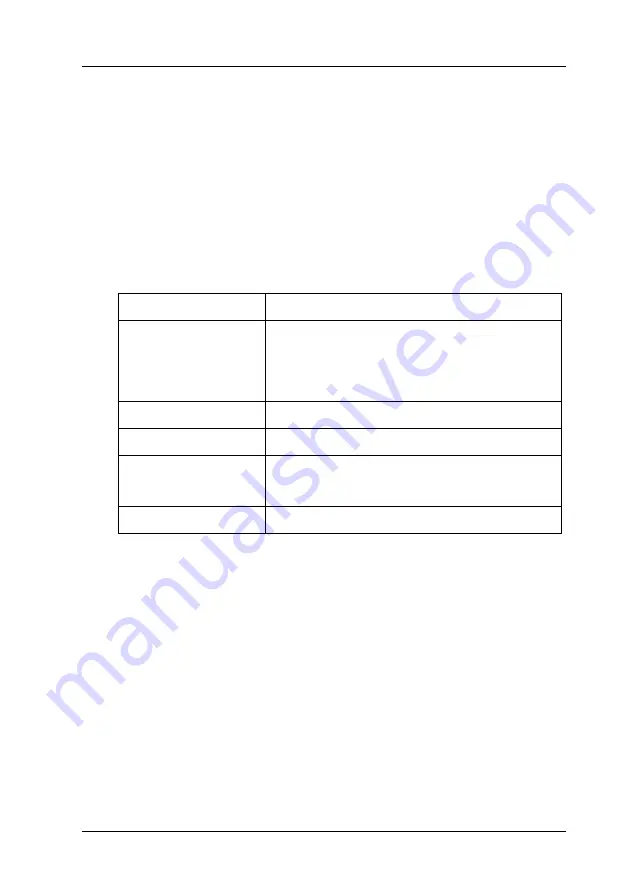
Your computer should meet the following system requirements 
to use the printer driver.

To use your printer with Windows

Your computer should also meet the following system 
requirements:

Note:

For Windows 2000, you must log in as a user with administrator 
rights (a user belonging to the Administrators group).

For Windows XP/Vista, you must log in as a user with an 
Administrator account. You cannot install the printer driver with 
a limited account. When you install the printer software in 
Windows Vista, the password may be required. If you are asked for 
the password, enter it and continue the operation.

Operating system

Windows Vista x64, Vista, XP x64, XP, 2000

CPU

Epson Stylus Pro 7880/7880C/7450:

Pentium 4 1.6 GHz or higher processor

Epson Stylus Pro 9880/9880C/9450:

Pentium 4 1.8 GHz or higher processor

Memory

256 MB RAM or more 

Hard disk space

8 GB or more free hard disk space

Interface

USB2.0 High Speed

Ethernet 10BaseT/100BaseTX

Display

SVGA (800 

×

 600) or higher resolution

Summary of Contents for Stylus Pro 7450

Page 1: ...User s Guide NDP2996 00 ...

Page 2: ...nd maintenance instructions Seiko Epson Corporation shall not be liable for any damages or problems arising from the useofanyoptionsorany consumable productsotherthanthose designated asOriginal Epson Products or Epson Approved Products by Seiko Epson Corporation Seiko Epson Corporation shall not be held liable for any damage resulting from electromagnetic interference that occurs from the use of a...

Page 3: ...s Front view Rear view roll paper spindles roll paper cover paper lever paper basket ink cartridge compartment front cover mounting brackets control panel USB interface connector AC inlet Network interface connector ...

Page 4: ... Printer Software Introduction 15 Printer driver 15 EPSON Status Monitor 3 17 EPSON LFP Remote Panel 17 Accessing the Printer Driver 18 From Windows applications 18 From the Printer icon 21 Getting Information Through Online Help 23 Basic Settings 25 Setting the printer driver 25 Checking the printer status 26 Canceling printing 27 When problem occurs during printing 30 Using the Printer Utilities...

Page 5: ... 52 Using Printer Utilities 53 Accessing EPSON Printer Utility2 54 Using EPSON StatusMonitor 55 Uninstalling the Printer Software 57 Uninstalling the printer driver 57 Uninstalling EPSON LFP Remote Panel 61 Chapter 3 Variety of Printings Using Color Management 62 Color management 63 Color adjustment by the printer driver 77 Black and White Photo Printing 83 Borderless Printing 87 Supported media t...

Page 6: ...ment 141 Exporting or Importing 144 Chapter 4 The Control Panel Buttons Lights Messages and Icons 147 Buttons 147 Lights 149 Combination of buttons 151 Messages 151 Icons 152 Menu Settings 155 When to use Menu mode 155 Menu list 156 Basic Menu setting procedure 161 Details of Menu mode 163 Checking the print head nozzles 176 Aligning the print head 178 Making the paper settings 188 Printing a stat...

Page 7: ...ia 228 Loading cut sheet media 228 Printing on thick paper 0 5 to 1 5 mm 234 Setting the Paper Basket 237 For EPSON Stylus Pro 9880 9880C 9450 237 For EPSON Stylus Pro 7880 7880C 7450 242 Chapter 6 Maintenance and Transportation Replacing Ink Cartridges 245 Converting the Black Ink Cartridges 250 Updating the printer driver information 259 Replacing the Maintenance Tank 260 Replacing the Paper Cut...

Page 8: ...ly 308 When feeding paper forward 309 When feeding paper backward 310 Clearing paper jams 312 Troubleshooting on the Optional Auto Take up Reel Unit 315 Contacting Customer Support 316 Paper Information 326 Roll paper 328 Cut sheets 338 Technical Support Web Site 345 Chapter 8 Product Information Printer Specifications 346 Printing 346 Printable area 349 Mechanical 350 Electrical 351 Environmental...

Page 9: ... and Consumable Products Options 361 Roll paper spindle 361 Auto Take Up Reel Unit 362 Manual Cutter Unit 362 Consumable Products 363 Paper cutter 363 Maintenance Tank 363 Ink cartridges 363 Epson Special Media 365 Glossary Index ...

Page 10: ...d to avoid damage to your equipment Notes contain important information and useful tips on the operation of this printer When choosing a place for this product Place this product on a flat stable surface that is larger than this product This product will not operate properly if it is tilted or at an angle Avoid places subject to rapid changes in temperature and humidity Alsokeepitawayfromdirectsun...

Page 11: ...itch on and off Avoid electrical outlets controlled by wall switches or automatic timers Keeptheentirecomputersystemawayfrompotentialsources of electromagnetic interference such as loudspeakers or the base units of cordless telephones Use only the type of power source indicated on the product s label Use only the power cord that comes with this product Use of another cord may result in fire or ele...

Page 12: ...ection for this printer the building installation must be protected by a 10 or 16 amp circuit breaker If damage occurs to the plug replace the cord set or consult a qualified electrician If there are fuses in the plug make sure you replace them with fuses of the correct size and rating When using this product Do not put your hand inside this product or touch the ink cartridges during printing Do n...

Page 13: ...ter Shaketheinkcartridgewellbeforeinstallingitforbestresults cCaution Do not shake cartridges that have been installed previously with too much force Do not use an ink cartridge beyond the date printed on the cartridge carton Use up the ink cartridge within six months of installation for best results Do not dismantle the ink cartridges or try to refill them This could damage the print head Store i...

Page 14: ...the amount of ink remaining so that a cartridge may be removed and reinserted freely If you remove an ink cartridge for later use protect the ink supply area from dirt and dust and store it in the same environment as this product Note that there is a valve in the inksupplyport makingcoversorplugsunnecessary butcare is needed to prevent the ink from staining items that the cartridge touches Do not ...

Page 15: ...oftware Printer driver EPSON Status Monitor 3 EPSON LFP Remote Panel Note The printer driver screens that appear in this manual are provided for EPSON Stylus Pro 9450 running on Windows XP The screens of EPSON Stylus Pro 9880 9880C 7880 7880C 7450 and EPSON Stylus Pro 9450 are almost the same except as noted Printer driver The printer driver lets you print documents from applications to the printe...

Page 16: ...e media type paper size You can register these settings and you can also easily import or export these registered settings Executes the printer maintenance functions and sets the operation of the printer driver in the Utility tab You can also import or export printer settings ...

Page 17: ...ink cartridge status the free space of the maintenance tank and it also checks for printer error EPSON Status Monitor 3 is installed with the printer driver automatically EPSON LFP Remote Panel EPSON LFP Remote Panel gives the user a broad range of control over the printer to obtain better print quality in printing on various media ...

Page 18: ...ns From the Printer icon From Windows applications Access the printer driver from your application when you make the print settings The following procedures may differ depending on the application you use 1 From the File menu select Print or Page Setup 2 Make sure your printer is selected and click Printer Setup Options Properties or Preferences ...

Page 19: ...Using the Printer Software Windows 19 Example Example ...

Page 20: ...Using the Printer Software Windows 20 The printer driver window appears Make the settings as necessary and then start printing ...

Page 21: ... and Faxes or Printers folder For Windows XP Click Start click Control Panel click Printers and Other Hardware and then click Printers and Faxes Note If your Control Panel is in the Classic View click Start click Control Panel and then click Printers and Faxes For Windows Vista Click click Control Panel click Hardware and Sound and then click Printers For Windows 2000 Click Start point to Settings...

Page 22: ... the Printer Software Windows 22 2 Right click your printer icon and click Printing Preferences The printer driver window appears The settings you make here become the default settings of the printer driver ...

Page 23: ...Using the Printer Software Windows 23 Getting Information Through Online Help You can view a detailed explanation using the following ways Right click the item and then click Help ...

Page 24: ...Using the Printer Software Windows 24 For Windows XP 2000 click the button on the top right of the printer driver window and then click the item ...

Page 25: ...bes how to print your data from an application using the Epson printer driver Setting the printer driver First make the print data using the application software Before printing open the printer driver window and confirm the print settings such as the media type paper size ...

Page 26: ...printer status in the following windows Progress Meter The Progress Meter appears on your display when you start printing It indicates the progress of the current print job and provides printer status information such as ink remaining and product number of the ink cartridges Also you can cancel a print job using Progress Meter ...

Page 27: ... computer If the printing is already started you need to cancel printing by the printer Canceling printing by the printer Press and hold the Pause button for 3 seconds to reset the printer Even when it is printing a job the printer is reset After resetting ittakesawhilebeforetheprinterisinthereadystate Theprinter s paper operation differs depending on the icon displayed on the control panel Note Y...

Page 28: ...ing Click Stop on the EPSON Progress Meter dialog box Note The Progress Meter shows the progress of the current print job It disappears when the job has been sent to the printer You cannot cancel a print job that has been sent to the printer In this case cancel the print job by the printer ...

Page 29: ...om the Printer menu select Cancel all documents If you want to delete a specific job select the job and select Cancel from the Document menu Note The print queue windows shows the progress of each print job It disappears when the job has been sent to the printer You cannot cancel a print job that has been sent to the printer In this case cancel the print job by the printer ...

Page 30: ...0 When problem occurs during printing If a problem occurs during printing an error message appears in the EPSON Status Monitor window Click How to and EPSON Status Monitor will lead you step by step through a procedure to solve a problem ...

Page 31: ...he print head nozzles to see if they are clogged and need to be cleaned Check the nozzles when you notice the print quality has declined and after cleaning to confirm that the print head nozzles have been cleaned If the print head nozzles are clogged perform head cleaning Head Cleaning This utility cleans the color and black print heads You may need to clean the print head if you notice the print ...

Page 32: ...tion Monitoring Preferences This function lets you specify the monitoring feature of EPSON Status Monitor 3 See Using Monitoring Preferences on page 36 for detailed information Print Queue This function displays the job waiting list You can check the list of all jobs waiting and their information and also cancel or restart print jobs Speed Progress You can make settings related to print speed and ...

Page 33: ...tor 3 EPSON Status Monitor 3 provides you with detailed printer status information a graphic display of the ink cartridge status and the free space of the maintenance tank and status messages To know the detailed status of the printer open the printer detailed window EPSON Status Monitor 3 starts to monitor the printer status when the printing begins and if there are any problems it shows an error...

Page 34: ...PSON Status Monitor 3 Note In the Monitoring Preferences dialog box select the Shortcut Icon check box to display a shortcut icon on your Windows taskbar Right click the shortcut icon and select the printer name to display the EPSON Status Monitor 3 dialog box See Viewing information in Monitoring Preferences on page 37 for detailed information ...

Page 35: ...Status Monitor 3 provides you with detailed printer status information a graphic display of the ink cartridge status and the free space of the maintenance tank and status messages If a problem occurs during printing an error message appears Check the message and solve the problem accordingly ...

Page 36: ...dows 36 Using Monitoring Preferences This function lets you specify the monitoring feature of EPSON Status Monitor 3 Accessing Monitoring Preferences Opentheprinterdriverwindow clicktheUtilitytab andthenclick Monitoring Preferences ...

Page 37: ...s taskbar Right click the shortcut icon and select Monitoring Preferences to open the Monitoring Preferences dialog box Viewing information in Monitoring Preferences In the Monitoring Preferences dialog box you can select error types for which you wish to receive notification and you can make the shortcut icon setting and monitoring of shared printers setting ...

Page 38: ...If you are asked for the password enter it and continue the operation For Windows 2000 you must log in as a user with administrator rights a user belonging to the Administrators group Uninstalling the printer driver To uninstall the printer driver follow the steps below 1 Turn off the printer and unplug the interface cable connected with the computer and printer 2 Click Add or Remove Programs or A...

Page 39: ... Select EPSON Printer Software and then click Change Remove or Uninstall Change 4 Select the target printer icon and then click OK 5 Follow the on screen instructions to complete uninstallation When the confirmation message appears click Yes ...

Page 40: ...ettings you have registered when you reinstall the printer driver Click No if you plan to reinstall the printer driver later or click Yes to delete the file completely Restart the computer when you reinstall the printer driver Uninstalling EPSON LFP Remote Panel EPSON LFP Remote Panel can be uninstalled from Add or Remove Programs or Add Remove Programs in the Control Panel Fordetailedinformation ...

Page 41: ...e Unpacking and Setup Guide for installing the software and its online help for detailed information for each software Printer driver EPSON Printer Utility2 EPSON StatusMonitor EPSON LFP Remote Panel Printer driver The printer driver lets you print documents from applications to the printer The following are main functions of the printer driver Sends the print data to the printer ...

Page 42: ...pe paper size You can register these settings and you can also easily import or export these registered settings EPSON Printer Utility2 You can execute the printer maintenance functions such as NozzleCheck HeadCleaning EPSONPrinterUtility2isinstalled with the printer driver automatically ...

Page 43: ...ng the Printer Software Mac OS X 43 EPSON StatusMonitor This utility provides you with printer status information such as the ink cartridge status the free space of the maintenance tank and a printer error ...

Page 44: ...in better print quality in printing on various media Accessing the Printer Driver To access the printer driver follow the steps below The following procedures may differ depending on the application you use Page Setup dialog You can make the paper settings such as media type paper size Print dialog You can make the settings related to print quality ...

Page 45: ... the Page Setup dialog To access the Page Setup dialog click Page Setup on the File menu of your application The Page Setup dialog is displayed You can select a paper size borderless printing a paper source and a print area in the Paper Size setting ...

Page 46: ...inter Software Mac OS X 46 Accessing the Print dialog To access the Print dialog click Print on the File menu of your application The Print dialog is displayed Make the settings as necessary and then start printing ...

Page 47: ...Using the Printer Software Mac OS X 47 Getting Information Through Online Help To access the online help click the button in the dialog of the printer driver ...

Page 48: ...ibes how to print your data from an application using the Epson printer driver Setting the printer driver First make the print data using the application software Before printing open the printer driver window and confirm the print settings such as the media type paper size ...

Page 49: ...Using the Printer Software Mac OS X 49 Checking the printer status 1 Click the Printer icon in the Dock 2 Youcancheckthejobswaiting andtheirinformation andalso cancel the printing ...

Page 50: ...Canceling printing by the printer Press and hold the Pause button for 3 seconds to reset the printer Even when it is printing a job the printer is reset After resetting it takes a while before the printer is in the ready state Note You cannot cancel a job waiting in the computer To cancel a job waiting in the computer see the next section Canceling printing by the computer on page 51 ...

Page 51: ...r 1 Click the Printer icon in the Dock 2 Click the job you want to delete and then click Delete Note You can delete a job waiting with the same procedures above You cannot cancel a print job that has been sent to the printer In this case cancel the print job by the printer ...

Page 52: ...lem occurs during printing If a problem occurs during printing an error message appears If you are not sure how to solve the problem cancel printing and then start EPSON StatusMonitor that leads you step by step through a procedure to solve a problem ...

Page 53: ...pace of the maintenance tank and a printer error Nozzle Check This utility checks the print head nozzles to see if they are clogged and need to be cleaned Check the nozzles when you notice the print quality has declined and after cleaning to confirm that the print head nozzles have been cleaned If the print head nozzles are clogged perform head cleaning Head Cleaning This utility cleans the color ...

Page 54: ...N LFP Remote Panel Thisutilityletsyouoptimizeyourprinter Youcanstartthisutility onlyifitisinstalled SeetheEPSONLFPRemotePanelonlinehelp for detailed information Manual You can access the User s Guide If the User s Guide is not installed it will access a technical support Web site Accessing EPSON Printer Utility2 You can access the EPSON Printer Utility2 using the following ways In the Print dialog...

Page 55: ...ormation a graphic display of the ink cartridge status and the free space of the maintenance tank and status messages Note The printer error message appears automatically on your screen even if EPSON StatusMonitor is not opened Accessing EPSON StatusMonitor Open the EPSON Printer Utility2 window and then click EPSON StatusMonitor ...

Page 56: ... StatusMonitor provides you with detailed printer status information a graphic display of the ink cartridge status and the free space of the maintenance tank and status messages If a problemoccurs during printing anerror message appears Check the message and solve the problem accordingly ...

Page 57: ...are follow the steps below Uninstalling the printer driver To uninstall the printer driver and EPSON Printer Utility2 follow the steps below 1 Turn off the printer and unplug the interface cable connected with the computer and printer 2 Close the all application software 3 Double click the hard disk icon ...

Page 58: ...r Software Mac OS X 58 4 Double click the Applications folder and then double click the Utilities folder 5 Double click the Print Center icon for Mac OS X 10 2 x or Printer Setup Utility icon for Mac OS X 10 3 or later ...

Page 59: ...he printer and then click Delete After clicking Delete close the dialog 7 Insert the printer software CD ROM into the CD ROM drive 8 Double click the Printer Driver folder Note If the folder does not appear double click the EPSON icon on the desk top ...

Page 60: ...uble click the EPSON_IJ_Printer icon 10 If the Authenticate dialog appears enter the password or phrase and then click OK To uninstall the printer driver you must log in as a user with administrator rights 11 Click Continue and then click Accept ...

Page 61: ...ull down menu and then click the Uninstall button 13 Follow the on screen instructions to uninstall the printer driver Uninstalling EPSON LFP Remote Panel Drag the EPSON LFP Remote Panel folder to the Trash See the EPSON LFP Remote Panel online help for more information ...

Page 62: ...ides a setting for performing color management to printing data and a color adjustment that produces better looking prints by using only the printer driver Color adjustment is performed without adjusting the color of the original data See Methods for color management on page 64 for detailed information ...

Page 63: ...m supports the color management system such as ICM for Windows and ColorSync for Mac OS When performing color management using the printer driver the color management system of the operating system is also used In this color management system a color definition file called the ICC profile is used for performing color matching between devices TheICCprofileispreparedforeachprintermodelandeachmedia t...

Page 64: ... between each device Methods for color management Color management by printer driver Application Printer driver Printer Color management by Driver ICM Windows only Specify the Input profile Specify the printer profile Color management is performed by specifying the input profile and the printer profile by the printer driver Color management can be performed even if you print data from an applicati...

Page 65: ...r ColorSync on page 70 Application Printer driver Printer Color management by application Specify the input profile Specify the printer profile The color management is performed by specifying the input profile and the printer profile by the application You can select this method when an application supports its own color management function Color compensation should be turned off no color adjustme...

Page 66: ... following procedures are for Adobe Photoshop CS2 running on Windows XP When using this function with an application which does not support a color management function you need to perform the color matching process from step 4 1 From the File menu select Print with Preview ...

Page 67: ...of Printings 67 2 Select Color Management and select Document for the Print SelectNo Color ManagementfortheColorHandling Then click Done 3 Open the printer driver window See From Windows applications on page 18 ...

Page 68: ...Variety of Printings 68 4 Select Custom for the Mode in the Main menu and select ICM and then click Advanced ...

Page 69: ...ialogbox selectDriver ICM Basic orDriver ICM Advanced for the ICM Mode If you select Driver ICM Advanced you can specify the profiles and intent for image graphics and text data individually 6 Check other settings and then start printing ...

Page 70: ...CM or ColorSync The following procedures are for Adobe Photoshop CS2 running on Windows XP Note Use image data in which an input profile has been embedded The application needs to support ICM or ColorSync 1 From the File menu select Print with Preview ...

Page 71: ...ent for the Print Select Let Printer Determine Colors for the Color Handling Then click Done 3 Open the printer driver window Windows or the Print dialog Mac OS X For Windows see From Windows applications on page 18 For Mac OS X see Accessing the Printer Driver on page 44 ...

Page 72: ...Variety of Printings 72 4 For Windows select Custom for the Mode in the Main menu and select ICM and then click Advanced For Mac OS X select Printer Color Management ...

Page 73: ...Variety of Printings 73 5 Select Host ICM Windows or ColorSync Mac OS X in the Printer Color Management dialog 6 Check other settings and then start printing ...

Page 74: ...74 Color management by application The following procedures are for Adobe Photoshop CS2 running on Windows XP Refer to the application s user manual for details of the settings 1 From the File menu select Print with Preview ...

Page 75: ...Photoshop Determine Colors for the Color Handling Select the Printer Profile and the Rendering Intent Then click Done 3 Open the printer driver window Windows or the Print dialog Mac OS X For Windows see From Windows applications on page 18 For Mac OS X see Accessing the Printer Driver on page 44 ...

Page 76: ... 4 For Windows select Custom for the Mode in the Main menu and then select No Color Adjustment For Mac OS X select Off No Color Adjustment in the Printer Color Management dialog 5 Check other settings and then start printing ...

Page 77: ...mage data automatically Color adjustment by the Color Controls Youcanperformcolormanagementbytheprinterdriver Usethis function if the application does not support color management or if you want to manually perform color management Note If you use the color management of the printer driver from an application such as Adobe Photoshop CS2 turn off the color management function of the application ...

Page 78: ...cessing the Printer Driver on page 18 For Mac OS X see Accessing the Printer Driver on page 44 2 For Windows select Custom for the Mode in the Main menu and select Color Controls and then click Advanced For Mac OS X select Printer Color Management and click Color Controls and then click Advanced Settings Windows ...

Page 79: ...Variety of Printings 79 Mac OS X 3 Make the necessary settings See the online help of the printer driver for detailed information Windows ...

Page 80: ...X Note For Windows users you can perform the color adjustment by checking the sample image on the left side of the window You can also use the color circle for the fine color adjustment 4 Check other settings and then start printing ...

Page 81: ...ty of image correction settings that you can apply to your photo images before printing Photo Enhance does not affect your original data 1 Open the printer driver window See Accessing the Printer Driver on page 18 2 Click Custom for the Mode in the Main menu and select Photo Enhance and then click Advanced ...

Page 82: ...Variety of Printings 82 3 In the Photo Enhance dialog box select the effect settings See the online help of the printer driver for detailed information 4 Check other settings and then start printing ...

Page 83: ... image is adjusted without affecting the original data You need to use the media that is suitable for black and white photo printing Note The Advanced B W Photo printing is available for EPSON Stylus Pro 9880 9880C 7880 7880C only 1 Open the printer driver window Windows or the Print dialog Mac OS X For Windows see Accessing the Printer Driver on page 18 For Mac OS X see Accessing the Printer Driv...

Page 84: ...Variety of Printings 84 2 Select Advanced B W Photo for the Color Windows Mac OS X ...

Page 85: ...Variety of Printings 85 3 For Windows click Custom for the Mode in the Main menu and select Color Controls and then click Advanced For Mac OS X select Printer Color Management Windows Mac OS X ...

Page 86: ...Variety of Printings 86 4 Make the necessary settings and then start printing For more detailed information see the online help of the printer driver Windows Mac OS X ...

Page 87: ...erless printing Note If you are using roll paper all four sides can be borderless and if you are using a sheet of paper only left and right sides can be borderless Auto Expand Enlarge the size of print data automatically and print without margins Enlarged areas that exceed the paper size will not be printed on the paper ...

Page 88: ...nprinted areas appearing along the all four edges The printer driver does not enlarge the image data Enlarging 3 mm in both the left and right directions total of 6 mm is recommended by using the application that created the data Select this setting if you do not want to change the ratio of your print data by the printer driver ...

Page 89: ... always 14 mm The ink may contaminate the platen of the printer In this case wipe the ink away using a cloth Printing with this feature takes longer time than normal printing When Premium Glossy Photo Paper 250 roll paper or Premium Semigloss Photo Paper 250 roll paper is used in printing the top margin is always 20 mm Paper width 10 inch 254 mm 300 mm 13 inch 329 mm Super A3 B 16 inch 406 4 mm 17...

Page 90: ...e of the image data using the Page Setting dialog box of the application software For Auto Expand Set the same paper size as used for printing If your application has margin settings set the margin to 0 mm Make the image data as large as the paper size For Retain Size Enlarge 3 mm in both the left and right directions total of 6 mm using the application that created the data If your application ha...

Page 91: ... For Windows 1 Open the printer driver window See Accessing the Printer Driver on page 18 2 In the Main menu select the media type paper source page size or paper size 3 When you print on roll paper click Roll Paper Option and select the Auto Cut setting See Roll paper cut for borderless printing on page 97 ...

Page 92: ...Variety of Printings 92 4 Select Borderless and then click Expansion ...

Page 93: ...lider towards Min decreases the amount of the image enlargement however as this amount decreases margins may appear on one or more sides of the paper 6 Check the other settings and then start printing Max 3 mm for left and 5 mm for right the image shifts 1 mm to the right Standard 3 mm for left and right Min 1 5 mm for left and right ...

Page 94: ... Open the Page Setup dialog See Accessing the Printer Driver on page 44 2 Select the paper size and borderless printing such as Auto Expand or Retain Size and then click OK 3 Open the Print dialog See Accessing the Printer Driver on page 44 ...

Page 95: ...oving the slider towards Min decreases the amount of the image enlargement however as this amount decreases margins may appear on one or more sides of the paper Max 3 mm for left and 5 mm for right the image shifts 1 mm to the right Standard 3 mm for left and right Min 1 5 mm for left and right ...

Page 96: ...rint Settings dialog select the media type 6 If you print on roll paper select the Auto Cut setting in the Roll Paper Option dialog See Roll paper cut for borderless printing on page 97 7 Check the other settings and then start printing ...

Page 97: ...rent according to the Borderless and Auto Cut settings of the printer driver No margins for left and right No margins for all directions single cut No margins for all directions double cut Printer driver setting Borderless Enable Borderless Enable Borderless Enable Auto Cut Normal Cut Auto Cut Single Cut Auto Cut Double Cut Printer operations ...

Page 98: ... operationwillbethe same as Double Cut If you print more than one paper continuously cut 1 mm along the inside of each picture to avoid creating a margin between pictures The top area may smearbecausethe top area of the roll paper is cut while the print operation is stopped Because inside of each picture is cut in order to not leave a white area in the top and bottom position the size of the paper...

Page 99: ...e size of your data to the size of paper you print on There are three ways to enlarge or reduce the size of your data Fit to Page Windows only Proportionally enlarges or reduces the size of your data to make it fit the paper size you have selected in the Output Paper Size ...

Page 100: ...Paper Width Windows only Proportionally enlarges or reduces the size of your data to make it fit the width of the roll paper you have selected in Output Paper Size Custom Lets you define the percentage you want to enlarge or reduce a data ...

Page 101: ...ws only Youcan fit thesizeof your data to the sizeof paper you toprint on 1 Open the printer driver window See Accessing the Printer Driver on page 18 2 Click the Page Layout tab and then select the same paper size as the paper size of the data ...

Page 102: ...per size that is loaded in the printer from the Output Paper list Proportionally enlarges or reduces the size of your data to make it fit the paper size you have selected for the Output Paper 4 Check the other settings and then start printing ...

Page 103: ...tings 103 Fit to Roll Paper Width Windows only 1 Open the printer driver window See Accessing the Printer Driver on page 18 2 Click the Page Layout tab and then select the same paper size as the paper size of the data ...

Page 104: ...ty of Printings 104 3 Select Reduce Enlarge and then click Fit to Roll Paper Width Proportionally enlarges or reduces the size of your data to make it fit the paper size you have selected for the Roll Width ...

Page 105: ...Variety of Printings 105 4 Select the roll paper width that is loaded in the printer from the Roll Width list 5 Check the other settings and then start printing ...

Page 106: ...ver on page 18 2 Click the Page Layout tab and then select the same paper size as the paper size of the data 3 Select the paper size that is loaded in the printer from Output Paper or Roll Width 4 Select Reduce Enlarge and then click Custom Click the arrows next to the Scale box to select a proportion from 10 to 650 5 Check the other settings and then start printing ...

Page 107: ...he Page Setup dialog See Accessing the Printer Driver on page 44 2 Select the printer and paper size Select the paper size that is loaded in the printer 3 Set the value for Scale between 25 to 400 4 Check the other settings and then start printing ...

Page 108: ...ow Note For Windows users use the printer driver s function for layout printing For Mac OS X use the standard feature of the operating system for layout printing You cannot use the Multi Page function of Windows printer driver if you are using Borderless printing For Windows users using the Fit to Page function you can print the data on different sizes of paper See Enlarge or Reduce Size Printing ...

Page 109: ...ck the Page Layout tab select the Multi Page check box select N up and then click Settings 3 In the Print Layout dialog box specify the order in which the pages will be printed To print frames around the pages printed on each sheet check the Print page frames check box 4 Check the other settings and then start printing ...

Page 110: ... Driver on page 44 2 Select a target printer and then select Layout from the list to specify the order in which the pages will be printed Note If you select other than None for Border the frames around the pages are printed on each sheet 3 Check the other settings and then start printing ...

Page 111: ...ster printing You can print a borderless poster size image by automatically enlarging one page to cover several sheets of paper You can make a poster just by joining the several printed sheets of paper together Because the image data is enlarged beyond the paper size the area that exceeds the sheets cannot be printed This function is available for roll paper only Note Borderless poster printing ma...

Page 112: ...int a poster size image by automatically enlarging one page to cover several sheets of paper You need to cut the margins and then join the several sheets of paper together to make a poster 1 Open the printer driver window See Accessing the Printer Driver on page 18 ...

Page 113: ...tab select the Multi Page check box select Poster and then click Settings 3 In the Poster Settings dialog box select the number of printed pages you want the poster to cover Note You can make a larger poster if you select a greater number for division ...

Page 114: ...u want margins around the poster make sure the Borderless Poster Print check box is cleared and make the other settings as necessary Note Regarding the size when the parts are joined together The finished size whether Trim Lines is selected or not is the same However if Print Cutting Guides is selected the finished size is smaller by the amount of the overlap 6 Check the other settings and then st...

Page 115: ...explains how to join the four printed pages together Join the printed pages together appropriately and stick them on the back of sheets using the cellophane tape Join them by the following order indicated in the illustration below Note Poster printing may not produce a seamless poster image which consists of multiple printed sheets of paper If you want a seamless image try the Poster printing with...

Page 116: ...th margins When you select Overlapping Alignment Marks the following marks are printed on the paper See the procedures below to join the four printed pages together using the alignment marks The four sheets are joined together by the following order ...

Page 117: ...ite printing 2 Lay the upper left sheet on top of the upper right sheet The X marks should be matched as in the illustration below and join the upper left sheet to the upper right sheet with cellophane tape temporarily 3 Cut the upper sheets along the alignment mark vertical red line The guide is black for the black and white printing ...

Page 118: ...ft and right sheets together with cellophane tape on the back of the sheets 5 Try step 1 to 4 for the lower sheets 6 Cut the bottom of upper sheets along the alignment mark horizontal blue line The guide is black for the black and white printing ...

Page 119: ...ower sheets The X marks should be matched as in the illustration below and join the upper sheets and lower sheets together with cellophane tape temporarily 8 Cut the sheets along the alignment mark horizontal red line The guide is black for black and white printing ...

Page 120: ...Variety of Printings 120 9 Join the upper sheets and lower sheets together with cellophane tape on the back of the sheets 10 After joining all the sheets together cut the margins along the outer guide ...

Page 121: ...int size is dependent on the application the paper size set in the printer or the computer environment Note For Mac OS X you can set a larger size in the Custom Paper Size than the size that you can set in the printer however it does not print correctly The available output size may be limited depending on the application software Paper width For EPSON Stylus Pro 9880 9880C 9450 89 to 1118 mm For ...

Page 122: ...ntings 122 For Windows 1 Open the printer driver window See Accessing the Printer Driver on page 18 2 Click User Defined in the Main menu Note You cannot select User Definedif Borderlessis selected for Paper Settings ...

Page 123: ...ct Ratio and select either Landscape or Portrait for the Base In this case you can only adjust either the Paper Width or Paper Height Note To change the paper size you have registered select the paper size name in the list and then change the size To delete the user defined size you have registered select the paper size name in the list and then click Delete You can register up to 100 paper sizes ...

Page 124: ... Mac OS X 1 Open the Page Setup dialog See Accessing the Printer Driver on page 44 2 Select Manage Custom Sizes in Paper Size 3 Click and enter the paper size name 4 Enter the paper width paper height and margins and then click OK ...

Page 125: ...ti page data on roll paper continuously with 3 mm left and right margins and 0 mm top and bottom margins Roll Paper Borderless Banner Prints multi page data on roll paper continuously without margins Sheet Prints on cut sheet paper with 14 mm bottom margin and 3 mm top left and right margins Sheet Borderless Auto Expand Prints data enlarged on cut sheet paper with 3 mm top margin 14 mm bottom marg...

Page 126: ... and then click Duplicate To delete the paper size you have registered click the paper size name from the list and then click The custom paper size setting is different depending on the version of the operating system See your operating system s documentation for details 5 Click OK The custom paper size is registered in the Paper Size pop up menu Now you can print by taking the same steps as usual...

Page 127: ...per This section explains how to print a banner and panorama pictures There are two ways to print a banner Paper source Application Roll Paper Document preparation tool image and editing software Roll Paper Banner Software that supports banner printing ...

Page 128: ...g on the application and the computer used for printing Application settings You need to make the data for printing a banner using an application If the paper size you want to print is equal to or smaller than the maximum setting size the application can set select the paper size you prefer Paper width For EPSON Stylus Pro 9880 9880C 9450 89 to 1118 mm For EPSON Stylus Pro 7880 7880C 7450 89 to 61...

Page 129: ...Variety of Printings 129 Printer driver settings For Windows 1 Open the printer driver window See Accessing the Printer Driver on page 18 2 In the Main menu select media type ...

Page 130: ... Select Roll Paper or Roll paper Banner from the Source list Note Roll Paper Banner can be used for an application that supports banner printing 4 Click Roll Paper Option and then select Normal Cut or Off from the Auto Cut list ...

Page 131: ...t tab and select Reduce Enlarge and then select Fit to Page or Fit to Roll Paper Width Note If you are using an application that supports banner printing you do not need to make Enlarge Reduce setting if Roll Paper Banner is selected for the Source ...

Page 132: ...ll Width You can customize the paper size by selecting User Defined Note If you are using an application that supports banner printing you do not need to set the user defined size if you select Roll Paper Banner for the Source Paper width For EPSON Stylus Pro 9880 9880C 9450 89 to 1118 mm For EPSON Stylus Pro 7880 7880C 7450 89 to 610 mm Paper height 127 to 15000 mm ...

Page 133: ...Variety of Printings 133 7 Select the paper size from the Output Paper list and make sure the Optimize Enlargement check box is selected 8 Check the other settings and then start printing ...

Page 134: ...4 2 Make sure your printer is selected and select the document size created using the application You can also customize the paper size by selecting Manage Custom Sizes Paper width For EPSON Stylus Pro 9880 9880C 9450 89 to 1118 mm For EPSON Stylus Pro 7880 7880C 7450 89 to 610 mm Paper height 127 to 15240 mm ...

Page 135: ...Variety of Printings 135 3 Input a scale to reduce or enlarge the size of your data 4 Check the other settings and then start printing ...

Page 136: ...e to check the paper characteristics such as paper tension ink fixing or paper thickness before setting the custom paper See the description that comes with the paper for information on the paper characteristics The settings you make on the Paper Configuration dialog box have priority over the settings you make on the printer s control panel You can register the custom paper or printer settings on...

Page 137: ...lso export thesettingsas a file and make the same printer driver settings to multiple computers Saving the printer driver settings You can save up to 100 settings Saving as a favorite You can save all the setting items of the printer driver 1 Change the settings in the Main and Page Layout menu 2 Click Save Del in the Main or Page Layout menu ...

Page 138: ...Variety of Printings 138 3 Enter the name in the Name box and then click Save You can choose a setting you have registered from the Select Setting list box ...

Page 139: ...Variety of Printings 139 Saving as a custom media You can save the items of the Media Settings in the Main menu 1 Change the Media Settings items in the Main menu ...

Page 140: ...Variety of Printings 140 2 Click Custom Settings 3 Enter the name in the Name box and then click Save YoucanchooseasettingyouhaveregisteredfromtheMediaType list box ...

Page 141: ...Variety of Printings 141 Menu arrangement You can arrange the Select Setting Media Type and Paper Size items 1 Click the Utility tab and then click Menu Arrangement ...

Page 142: ...ct the edit item 3 In the List box arrange the items as you prefer or classify the items into groups You can arrange the list items by drag and drop operation To add a new group click Add Group To delete the group click Delete Group ...

Page 143: ...Variety of Printings 143 Move the unused items into the Not Display group Note You cannot delete the default items 4 Click Save ...

Page 144: ...ttings you have registered as a file Exporting the settings 1 Open the Save or Deletes Select Settings dialog box or the Saves or deletes Custom Media dialog box 2 Select the setting in the List box and click Export 3 Select the location and enter the file name and then click Save ...

Page 145: ... Printings 145 Importing the settings 1 Open the Save or Deletes Select Settings dialog box or the Saves or deletes Custom Media dialog box 2 Click Import 3 Select the file you want to import and then click Open ...

Page 146: ...r import the all of the printer driver settings as a file 1 Click the Utility tab and then click Export or Import 2 Click Export or Import 3 To export the setting enter the file name and then click Save To import the setting select the file you want to import and then click Open ...

Page 147: ...s section describes the functions of the buttons on the control panel Button Description 1 Power button Turns the printer on or off 2 Pause button Stops printing temporarily Restarts printing if pressed when the printer is in the pause mode The printer returns to the READY state when this button is pressed in Menu mode Clears print data in the printer memory if pressed and held for 3 seconds ...

Page 148: ... pressed in Menu mode Enters the cutter replacement mode if pressed and held for 3 seconds 5 Paper Feed button d Feeds paper in the forward direction Changes the parameters in the forward order when selecting a desired parameter in Menu mode 6 Paper Feed button u Feeds paper in the reverse direction as much as the paper has been fed by using the Paper Feed d button Note If you have fed the paper f...

Page 149: ...d this button cuts the paper automatically if pressed and held for 3 seconds When Roll Auto Cut Off is selected this button feeds the paper if pressed and held for 3 seconds Then the paper is cut using the manual cutter unit When the printer is drying ink this button stops the ink drying process and ejects the paper if pressed and held for 3 seconds Light Description 1 Power light green On The pri...

Page 150: ...er is in the released position The loaded paper is too thick for head cleaning Flashing Paper is jammed Paper is almost out Paper is not cut correctly after the print job when Roll Auto Cut On is selected as the paper source Paper is not loaded straight Paper is not detected Cut sheet is not ejected correctly 4 Ink check light red On The installed ink cartridge is expended The installed ink cartri...

Page 151: ...d holding the Pause button the printer enters Maintenance mode 1 Pause button 2 Paper Source button l By pressing the Pause button and Paper Source l button you can switch the Roll Paper Counter setting on and off Note To use this combination of buttons REMAINING PPR SETUP in Maintenance mode and ROLL PAPER COUNTER in Menu mode should be on Message Description READY The printer is ready to print d...

Page 152: ...k tubes PRESS PAUSE BUTTON Press the Pause button CHARGING INK The printer is charging the ink delivery system RESETTING PLEASE WAIT The printer is resetting Wait a while UPDATING FIRMWARE The printer is updating the firmware FIRMWARE UPDATE COMPLETE The printer has completed update of the firmware POWER OFF PLEASE WAIT The printer is turning off Icons Description Roll Auto Cut On Roll Auto Cut Of...

Page 153: ...s on Icons Description Widest Wider Wide Narrow Icons Description Displays the top and bottom roll paper margins This icon does not appear when Default is selected 15mm Top and bottom margins are15 mm and right and left margins are 3 mm 35 15mm Top margin is 35 mm bottom margin is 15 mm and right and left margins are 3 mm 3mm Margins of all sides are 3 mm 15mm Margins of all sides are 15 mm Icons ...

Page 154: ...ntenance icon for EPSON Stylus Pro 7880 7880C 7450 and two maintenance icon for EPSON Stylus Pro 9880 9880C 9450 Icons Description 100 81 80 61 60 41 40 21 20 to nearly full Ink low Ink end Cartridge error or no cartridge Icons Description 100 81 80 61 60 41 40 21 20 to nearly full Maintenance tank nearly full Maintenance tank full Maintenance tank error or no Maintenance tank ...

Page 155: ...ake in the driver or software as well as other additional settings directly from the control panel Note Some applications may send commands to the printer that override the Menu settings If you are not getting the results you expect check your application s settings To see the current Menu settings print a status sheet Icons Description Large 168 Normal 60 Small 0 ...

Page 156: ... NETWORK CODE PAGE on page 164 PC437 PC850 ROLL PAPER MARGIN on page 165 DEFAULT TOP BOTTOM 15 mm TOP 35 BOTTOM 15 mm 3 mm 15 mm PAPER SIZE CHECK on page 166 ON OFF PAPER SKEW CHECK on page 166 ON OFF TIME OUT on page 166 OFF 30sec 60sec 180sec 300sec CUTTER ADJUSTMENT on page 167 EXECUTE REFRESH MARGIN on page 167 ON OFF AUTO NOZZLE CHECK on page 167 OFF ON AUTO CLEANING on page 167 ON OFF QUIET ...

Page 157: ... Stylus Pro 9880 9880C 7880 7880C LIGHT LIGHT BLACK xxxxxx PAGES VIVID LIGHT MAGENTA xxxxxx PAGES LIGHT CYAN xxxxxx PAGES LIGHT BLACK xxxxxx PAGES MATTE BLACK PHOTO BLACK xxxxxx PAGES CYAN xxxxxx PAGES VIVID MAGENTA xxxxxx PAGES YELLOW xxxxxx PAGES PRINTABLE PAGES on page 169 EPSON Stylus Pro 9450 7450 MATTE BLACK xxxxxx PAGES MATTE BLACK 2 xxxxxx PAGES MAGENTA xxxxxx PAGES MAGENTA 2 xxxxxx PAGES ...

Page 158: ... PHOTO BLACK E F E F E F E F E F nn 0 CYAN E F E F E F E F E F nn 0 VIVID MAGENTA E F E F E F E F E F nn 0 YELLOW E F E F E F E F E F nn 0 INK LEVEL on page 169 EPSON Stylus Pro 9450 7450 MATTE BLACK E F E F E F E F E F nn 0 MATTEBLACK2E F E F E F E F E F nn 0 MAGENTA E F E F E F E F E F nn 0 MAGENTA 2 E F E F E F E F E F nn 0 CYAN E F E F E F E F E F nn 0 CYAN 2 E F E F E F E F E F nn 0 YELLOW E ...

Page 159: ...Y on page 170 No 0 No 9 TOTAL PRINTS on page 170 xxxxxx PAGES SERVICE LIFE on page 171 CUTTER E F E F E F E F E F nn 0 CR MOTOR E F E F E F E F E F nn 0 PF MOTOR E F E F E F E F E F nn 0 PRESSURE MOTOR E F E F E F E F E F nn 0 HEAD UNIT E F E F E F E F E F nn 0 CLEANING UNIT E F E F E F E F E F nn 0 EDM STATUS on page 171 NOT STARTED ENABLED DISABLED LAST UPLOADED MM DD YY HH MM GMT NOT UPLOADED ...

Page 160: ... 70 0 70 DRYING TIME on page 173 0 0 sec 10 0 sec PAPER SUCTION on page 173 STANDARD 1 2 3 4 M W ADJUSTMENT on page 173 STANDARD 1 2 MAINTENANCE on page 174 CUTTER REPLACEMENT on page 174 EXECUTE BK INK CHANGE for EPSON Stylus Pro 9880 9880C 7880 7880C only on page 174 EXECUTE POWER CLEANING on page 174 EXECUTE CLOCK SETTING on page 174 MM DD YY HH MM CONTRAST ADJUSTMENT on page 174 20 dec to 20 d...

Page 161: ...ter Menu mode Make sure that READY appears on the LCD panel and then press the Menu r button The first menu appears on the LCD panel NETWORK SETUP on page 175 NETWORK SETUP on page 175 DISABLE ENABLE IP ADDRESS SETTING on page 175 AUTO PANEL IP SM DG SETTING on page 175 IP ADDRESS 000 000 000 000 192 168 192 168 255 255 255 255 SUBNET MASK 000 000 000 000 255 255 255 000 255 255 255 255 DEFAULT GA...

Page 162: ...select a desired item 5 Set the item Press the Menu r button to enter the selected item The first parameter appears on the LCD panel 6 Select a parameter Press the Paper Feed d button or Paper Feed u button to select a parameter for the item 7 Set the parameter Press the Menu r button to store the selected parameter If the parameter is for execution only press the Enter button to execute the funct...

Page 163: ...u can set the roll paper length from 5 0 to 99 5 m and the roll length alert from 1 to 15 m Note This setting is available only when you select ROLL for REMAINING PPR SETUP in Maintenance mode See REMAINING PPR SETUP on page 197 for details PLATEN GAP You can adjust the distance between the print head and paper Normally leave this set to STANDARD If you find that printed images are smeared select ...

Page 164: ...RK only the selected interface receives your print data If no more print job is received the printer returns to an idle state after 10 seconds or more CODE PAGE You can select a code page PC437 extended graphics or PC850 multilingual Paper Source Print Page Line Printer s Operation Roll Auto Cut On On Prints a page line on the right side only and cuts paper automatically after the print job Roll A...

Page 165: ... 3 mm 3 mm 3 mm Roll Paper Top Bottom Left Right Enhanced Matte Paper Premium Luster Photo Paper 260 Premium Glossy Photo Paper 170 Premium Semigloss Photo Paper 170 Epson Proofing Paper White Semimatte Epson Proofing Paper Publication Textured Fine Art Paper Plain Paper Tracing Paper Singleweight Matte Paper Plain Paper line drawing Singleweight Matte Paper line drawing UltraSmooth Fine Art Paper...

Page 166: ...ON PAPER SKEW CHECK When you select ON if the paper is not straight PAPER SKEW appears on the LCD panel and the printer stops printing When you select OFF a paper align error does not occur even if the printed data is out of range of the paper and the printer continues to print TIME OUT The setting range is 30 to 300 seconds If the cable of your printer is unplugged or your printer hangs up for mo...

Page 167: ...ing for each print job Note Do not select ON if you are using non Epson special media or if the width of paper you are using is less than 210 mm This setting is available only when you select ON for AUTO CLEANING AUTO CLEANING When you select ON and perform a nozzle check from the printer driver or the control panel the printer not only checks for clogged nozzles but also performs head cleaning au...

Page 168: ...s are delivering ink properly For details see Checking the print head nozzles on page 176 Note You can print a nozzle check pattern using the Utility menu in the printer software For Windows see Using the Printer Utilities on page 31 For Mac OS X see Using Printer Utilities on page 53 STATUS SHEET You can print the current status For details see Printing a status sheet on page 192 JOB INFORMATION ...

Page 169: ...items VERSION You can see the firmware version PRINTABLE PAGES You can see the number of pages printable for each ink cartridge INK LEVEL You can see the amount of ink left in each ink cartridge E F 100 81 E F 80 61 E F 60 41 E F 40 21 E F 20 11 nn less than 10 0 ink end ...

Page 170: ... USAGE COUNT are rough indications CLEAR USAGE COUNT You can clear the values set in USAGE COUNT JOB HISTORY You can see the ink consumption INK in milliliters and paper consumption PAPER in cm2 foreachprintjobsavedintheprinter The latest job is saved as No 0 TOTAL PRINTS You can see the total amount of pages you have printed E F 100 81 E F 80 61 E F 60 41 E F 40 21 E F 20 11 nn less than 10 0 mai...

Page 171: ...the EDM status was last uploaded is displayed CUTTER You can see the cutter life Note Values displayed on the LCD panel are rough indications CR MOTOR For maintenance service person only PF MOTOR For maintenance service person only PRESSURE MOTOR For maintenance service person only HEAD UNIT For maintenance service person only CLEANING UNIT For maintenance service person only ...

Page 172: ...settings you have made Note If you select STANDARD the printer prints data according to the driver settings IfyouselectNo X thecontrolpanelsettingsoverridethedriver settings PLATEN GAP You can adjust the distance between the print head and paper Normally leave this set to STANDARD If you find that printed imagesaresmeared selectWIDE SelectNARROW forprintingonthin paper or WIDER for printing on thi...

Page 173: ...method STANDARD THIN PAPER THICK PAPER FAST or THICK PAPER SLOW PAPER FEED ADJUST You can set the paper feed amount The range is 0 70 to 0 70 DRYING TIME Youcansettheinkdryingtimeforeachprintheadpass Therange is 0 to 10 seconds PAPER SUCTION You can set the suction pressure used to feed the printed paper Select STANDARD 1 2 3 or 4 M W ADJUSTMENT You can adjust the MicroWeave mode The setting range...

Page 174: ...k Ink Cartridges on page 250 for details POWER CLEANING You can use this function to clean the print head more effectively than normal head cleaning CLOCK SETTING You can set year month date hour and minute CONTRAST ADJUSTMENT You can adjust the contrast of the LCD panel HEAD ALIGNMENT This menu contains the following items PAPER THICKNESS You can adjust the thickness of the paper to use If you us...

Page 175: ...S SETTING You can select the method to set the IP address to the printer When AUTO is selected IP SM DG SETTING is not displayed Select PANEL to set these addresses using the printer s control panel Choose PANEL when setting the IP address subnet mask and default gateway using the printer s control panel Choose AUTO when getting the IP address from a DHCP server The IP address is automatically obt...

Page 176: ...t ON for AUTO CLEANING and then select ON for AUTO NOZZLE CHECK Before you start printing your data make sure that nozzle check pattern printing is complete otherwise the print quality may decline 1 Make sure that paper is loaded in the printer 2 Press the Menu r button to enter Menu mode 3 Press the Paper Feed d button or Paper Feed u button to display TEST PRINT and then press the Menu r button ...

Page 177: ...ng from the test lines in the pattern you need to clean the print heads Press the Menu r buttonformorethan3secondsoraccesstheHeadCleaningutility software For Windows see Using the Printer Utilities on page 31 For Mac OS X see Using Printer Utilities on page 53 good head cleaning necessary ...

Page 178: ...ern use the same media that you normally use to print your data 2 Press the Menu r button to enter Menu mode 3 Press the Paper Feed d button or Paper Feed u button to display HEAD ALIGNMENT and then press the Menu r button 4 When PAPER THICKNESS appears press the Menu r button 5 Press the Paper Feed d button or Paper Feed u button to select STANDARD or a paper thickness value between 0 1 mm and 1 ...

Page 179: ...urce l button to return to the previous level and then select BI D ALL If you are not satisfied with the result of the BI D ALL alignment try UNI D You can also align the print head individually by selecting BI D 1 BI D 2 or BI D 3 Select an ink dot size from BI D 1 to BI D 3 depending on the media you use and the print mode you want to try The table in Ink dot size on page 180 illustrates which p...

Page 180: ...gleweight Matte Paper Doubleweight Matte Paper Enhanced Matte Paper Archival Matte Paper 1 2 2 1 2 2 3 3 Premium Glossy Photo Paper 170 Premium Semigloss Photo Paper 170 Enhanced Matte Poster Board 2 2 3 2 2 3 3 EnhancedSynthetic Paper Enhanced Adhensive Synthetic Paper 1 2 1 2 2 Plain Paper 1 2 1 1 2 2 2 Plain Paper line drawing 1 2 1 2 2 Singleweight Matte Paper line drawing 1 2 1 2 3 Tracing Pa...

Page 181: ...tic Advanced Settings Print Quality A B C D E F G H Photo Quality Ink Jet Paper Singleweight Matte Paper Doubleweight Matte Paper Enhanced Matte Paper Archival Matte Paper 1 2 2 1 2 3 Premium Glossy Photo Paper 170 Premium Semigloss Photo Paper 170 Enhanced Matte Poster Board 2 2 3 2 3 Enhanced Synthetic Paper Enhanced Adhensive Synthetic Paper 1 2 1 2 Plain Paper 1 2 1 1 2 2 Plain Paper line draw...

Page 182: ...emium Glossy Photo Paper Premium Semigloss Photo Paper Premium Luster Photo Paper Photo Paper Gloss 250 Epson Proofing Paper White Semimatte Epson Proofing Paper Publication Epson Proofing Paper Commercial Enhanced Matte Poster Board 2 3 3 2 3 3 Velvet Fine Art Paper Textured Fine Art Paper UltraSmooth Fine Art Paper 3 3 3 3 Watercolor Paper Radiant White Canvas 2 3 2 3 Doubleweight Matte Paper Si...

Page 183: ...he Control Panel 183 Print Quality A Speed B Quality C Max Quality Enhanced Matte Paper Archival Matte Paper 2 3 3 1 2 3 3 Plain Paper 1 2 1 1 2 2 Plain Paper line drawing 1 2 1 2 2 Tracing Paper 1 2 1 2 ...

Page 184: ... Premium Glossy Photo Paper 170 Premium Semigloss Photo Paper 170 Premium Glossy Photo Paper Premium Semigloss Photo Paper Premium Luster Photo Paper Photo Paper Gloss 250 Epson Proofing Paper White Semimatte Epson Proofing Paper Publication Epson Proofing Paper Commercial Enhanced Matte Poster Board 2 3 3 2 3 3 Velvet Fine Art Paper Textured Fine Art Paper UltraSmooth Fine Art Paper 3 3 3 3 Water...

Page 185: ...inter driver is selected select 2 When Super Microweave is not selected select 1 Doubleweight Matte Paper Singleweight Matte Paper Photo Quality Ink Jet Paper Singleweight Matte Paper line drawing 1 2 3 1 2 3 Enhanced Matte Paper Archival Matte Paper 2 3 3 1 2 3 3 Plain Paper 1 2 1 1 2 2 Plain Paper line drawing 1 2 1 2 2 Tracing Paper 1 2 1 2 ...

Page 186: ...ess the Paper Feed d button or Paper Feed u button to select STANDARD or a paper thickness value between 0 1 mm and 1 5 mm When the paper thickness value is 0 2 mm or 1 2 mm select STANDARD otherwise select the actual paper thickness value 5 Press the Enter button to register your value 6 Press the Paper Source l button then press the Paper Feed d button 7 When ALIGNMENT appears on the lower row o...

Page 187: ...y the number for that set 11 Press the Enter button to register the set number The next pattern number appears Then repeat step 10 If you are not satisfied with the result of this alignment press the Paper Source l button to return to the previous level and then select BI D ALL If you are not satisfied with the result of the BI D ALL alignment try UNI D 12 After you set the patterns press the Paus...

Page 188: ...tings You can register and recallyourown paper settings for anymedia The paper settings you can make are Paper number Platen gap Thickness pattern Thickness number Cut method Paper feed adjustment Drying time Paper suction MicroWeave adjustment ...

Page 189: ...register as the setting If you use Epson special media select STANDARD and then go tostep11 Youdonotneedtomakethepaperthicknesssetting because STANDARD automatically determines the paper thickness 6 Press the Enter button to register the paper number 7 Press the Paper Source l button 8 Select PLATEN GAP and then press the Menu r button Press the Paper Feed d button or Paper Feed u button to select...

Page 190: ...THOD and then press the Menu r button Press the Paper Feed d button or Paper Feed u button to select STANDARD THICK PAPER SLOW THICK PAPER FAST or THIN PAPER and then press the Enter button 15 Press the Paper Source l button 16 Select PAPER FEED ADJUST and then press the Menu r button Press the Paper Feed d button or Paper Feed u button to set the paper feed amount and then press the Enter button ...

Page 191: ...egistered settings To select the registered settings follow the steps below 1 Press the Menu r button to enter Menu mode 2 Press the Paper Feed d button or Paper Feed u button to display CUSTOM PAPER and then press the Menu r button 3 Press the Paper Feed d button or Paper Feed u button to display PAPER NUMBER and then press the Menu r button 4 Press the Paper Feed d button or Paper Feed u button ...

Page 192: ...S SHEET and then press the Menu r button 5 Press the Enter button again to start printing a status sheet After printing is finished follow the message on the LCD panel to return to the READY state Setting the alert value of the paper You can get a message when there is not much roll paper left by setting the alert value using the steps below Note This setting is available only when you select ROLL...

Page 193: ...t value between 1 and 15 m or 3 and 50 ft 6 Press the Enter button to set the alert value 7 After you set the alert value press the Pause button to return to the READY state Maintenance Mode Maintenance mode setting procedure This section describes how to enter Maintenance mode and make settings with the buttons on the control panel To make Maintenance mode settings follow the steps below Note Pre...

Page 194: ...irst parameter is displayed on the LCD panel 4 Select a parameter Press the Paper Feed d button or Paper Feed u button to select a parameter for the item 5 Set the parameter Press the Enter button to store the selected parameter If the parameter is used for execution only press the Enter button to execute the function for the item Note If a second parameter is displayed on the LCD panel repeat ste...

Page 195: ...196 PRINT EXECUTE LANGUAGE on page 197 ENGLISH FRENCH ITALIAN GERMAN PORTUGUE SPANISH DUTCH REMAINING PPR SETUP on page 197 OFF ROLL UNIT on page 198 METER FEET INCH CUT PRESSURE on page 198 0 150 SS CLEANING on page 198 EXECUTE PWR ON ROLL PPR FEED on page 198 ON OFF DEFAULT PANEL on page 198 EXECUTE ...

Page 196: ...ed u button to display HEX DUMP 3 Press the Menu r button to display PRINT and then press the Enter button again to start printing INK INFO MENU on page 198 EPSON Stylus Pro 9880 9880C 7880 7880 C LIGHT LIGHT BLACK VIVID LIGHT MAGENTA LIGHT CYAN LIGHT BLACK MATTE BLACK or PHOTO BLACK CYAN VIVID MAGENTA YELLOW EPSON Stylus Pro 9450 7450 MATTE BLACK MATTE BLACK 2 CYAN CYAN 2 MAGENTA MAGENTA 2 YELLOW...

Page 197: ... u button to display LANGUAGE and then press the Menu r button 2 Press the Paper Feed d button or Paper Feed u button to select a suitable language 3 Press the Enter button to set the language Make sure that READY or similar word in the language selected appears on the LCD panel Note It takes a while until READY or similar word in the language selected appears REMAINING PPR SETUP You can select a ...

Page 198: ... u button to display UNIT and then press the Menu r button 2 Press the Paper Feed d button or Paper Feed u button to select a suitable unit 3 Press the Enter button to set the unit CUT PRESSURE You can select a cutting pressure SS CLEANING You can perform ultrasonic head cleaning PWR ON ROLL PPR FEED You can save roll paper by not feeding paper after the power is on DEFAULT PANEL You can set all s...

Page 199: ...as fingerprints may reduce the print quality Whenever possible use gloves to handle media Using Epson special media Epson provides special media that can enhance the usage and expressive power of the printing results When using Epson special media make sure the appropriate settings are made in the printer driver For information on Epson special media see Paper Information on page 326 Note Use Epso...

Page 200: ... to avoid moisture problems Avoid storing the media in places exposed to high temperature humidity or direct sunlight Using paper other than Epson special media When you use paper other than Epson special media or print using the RIP Raster Images Processor see the instructions included with the paper or RIP system or contact your supplier for more information ...

Page 201: ...n installing the roll paper onto the spindle follow the steps below 1 Slide the black movable flange off the end of the spindle 2 When attaching roll paper with a 2 inch core remove the gray attachments from the flanges Note Keep the gray attachments in a safe place for future use ...

Page 202: ...rollpaperonaflatsurfacesothatitdoesnotunwind Slide the roll paper onto the spindle and onto the white flange until it fixes into place Note Do not stand the spindle when attaching the roll paper It may cause slant paper feeding 4 Slide the black movable flange removed in step 1 onto the spindle and into the end of the roll paper until it fixes into place ...

Page 203: ... spindle by tapping the same end of the spindle with your hand to loosen it The flange is removed cCaution To remove the black movable flange from the spindle do not hold the spindle vertically and tap the end on the floor otherwise damage may occur 3 Remove the roll paper from the spindle Note Store unused roll paper in its original package Put the roll paper into the plastic bag and outer packag...

Page 204: ...the spindle from the printer clear the roll paper from the paper insertion slot then reverse the steps below 1 Open the roll paper cover 2 Make sure that the movable flange is fixed into the end of the roll paper properly 3 Hold the roll paper spindle so that the fixed flange is on the right side Then place the spindle on the groove on top of the printer once ...

Page 205: ...le correctly match the color on the end of the spindle with the mounting bracket 4 Lift the spindle again then place it on the mounting brackets inside the printer 5 Close the roll paper cover or see Loading roll paper on page 206 to load paper ...

Page 206: ...oll paper cover Make sure that the roll paper is attached to the printer properly 2 Make sure that the printer is on 3 Make sure that the Power light is not flashing and then set thepaperlevertothereleasedposition TheLEVER RELEASED LOAD PAPER appears on the LCD panel cCaution Do not set the paper lever to the released position while the Power light is flashing Doing so may damage the printer ...

Page 207: ...ndling 207 4 Load the paper into the paper insertion slot 5 Pull the paper down through the paper insertion slot so that it comes out below Note If the roll paper does not come out follow the instructions below ...

Page 208: ...aper Feed d button to decrease the power If the paper does not come out even after you execute the procedure above open the front cover and then pull the paper out manually 6 Holding the bottom edge of the paper turn the roll paper to remove the slack Make sure that the bottom edge of the paper is straight and that it is aligned with the horizontal line Note You do not have to align the right end ...

Page 209: ...e printing position automatically READY appears on the LCD panel 9 Press the Paper Source l button to select Roll Auto Cut On or Roll Auto Cut Off cCaution If you are loading thick roll paper select Auto Roll Cut Off Paper that is too thick may damage the paper cutter Now the printer is ready to print While the printer is printing do not open the front cover If the front cover is opened while prin...

Page 210: ...t The roll paper belt is packed with the optional 2 3 inch Dual Roll Feed Spindle You can also purchase the optional roll paper belt To use the roll paper belt tap the end of the roll paper belt lightly on the roll paper The belt will wrap itself around the roll paper To remove the roll paper belt simply unwrap it from the paper When not using the roll paper belt keep it wound around the end of th...

Page 211: ...time to proceed with cutting after printing is finished Cutting the roll paper automatically To cut the roll paper automatically after printing follow the steps below 1 Before printing press the Paper Source l button to select Roll Auto Cut On 2 Print your data To make the auto cut setting using the printer driver see Roll paper cut for borderless printing on page 97 Cutting the roll paper manuall...

Page 212: ...paper pressthe Pause button The printer becomes online Printing page lines If you want to print continuously on roll paper and then cut the pages yourself after you finish printing use the Print Page Line setting To make the Print Page Line setting using the control panel see PAGE LINE on page 164 To make the Print Page Line setting using the printer software see the online help for detailed infor...

Page 213: ...nformation on installing the unit onto your printer Note Auto Take up Reel Unit is designed for EPSON Stylus Pro 9880 9880C 9450 only When using the Auto Take up Reel Unit be sure to set the Auto Cut setting to off using the printer control panel or the printer driver See Roll paper cut for borderless printing on page 97 for detailed information You can use the Auto Take up Reel Unit while setting...

Page 214: ... with the printer as shown below Then attach the paper guides packaged with the Auto Take up Reel Unit taking care to space them evenly Control box The control box is located on the drive unit attached to the lower right side of the printer The roles of switches and meanings of the Sensor light are as follows Auto Switch Manual Switch ...

Page 215: ... the paper is blown out of the sensor area it will not be taken up properly To adjust the sensor position follow the steps below ON Indicates that the light detector is aligned with the light emitter This means that the Auto Take up Reel Unit is ready to wind your printout Flashing Indicates that the light detector and light emitter are not aligned properly See Adjusting the sensor on page 215 for...

Page 216: ...Paper Handling 216 1 Loosen the knob on the light emitter 2 Adjust the horizontal angle of the emitter so that the Sensor light turns on 3 Holding the detector in position retighten the knob ...

Page 217: ... sure the take up reel unit is installed properly and securely Bodily injury may occur if it falls Before you load roll paper onto the take up reel core check the following Make sure that the leading edge of the roll paper is straight Be sure to remove the center shaft from the upper basket hooks and the lower shafts from the holes on the bottom of the base unit and put the paper basket under the ...

Page 218: ...ow the steps below 1 Attach the three paper guides packaged with the Auto Take up Reel Unit taking care to space them evenly 2 Make sure that the roll paper is loaded in the printer properly For instructions see Loading roll paper on page 206 3 Press the Paper Source l button to select Roll Auto Cut Off 4 Press the Paper Feed d button on the printer to advance the roll paper ...

Page 219: ...Paper Handling 219 5 Set the Auto switch on the control box to Off 6 Tape the leading edge of the roll paper to the take up reel core in three places ...

Page 220: ...rward and create a loop of slack 8 Move and hold the Manual switch on the Auto Take up Reel Unit to the Forward position and take up at least one turn of paper on the take up reel core Make sure that adequate slack remains between the roll paper and the take up reel core ...

Page 221: ...l unit to wind paper backward Follow the steps below 1 Remove the paper guides from the printer 2 Make sure that the roll paper is loaded in the printer properly For instructions see Loading roll paper on page 206 3 Press the Paper Source l button to select Roll Auto Cut Off 4 Press the Paper Feed d button on the printer to advance the roll paper ...

Page 222: ...ing 222 5 Set the Auto switch on the control box to Off 6 Pull the bottom of the roll paper around the back of the reel core as shown below Then tape the leading edge of the paper to the reel core in three places ...

Page 223: ...er forward and create a loop of slack 8 Move and hold the Manual switch on the Auto Take up Reel Unit to the Backward position and take up at least one turn of paper on the take up reel core Make sure that adequate slackremainsbetweentherollpaperandthetake upreelcore ...

Page 224: ...wWarning Do not touch the Auto Take up Reel Unit while it is operating Doing so may result in injury Do not look directly at the sensor beam Doing so may cause permanent eye damage cCaution During operation be sure to stay out of the sensor detection area Interruptingthesensorbeamcancausepapertobetakenupunder tension and adversely affect printing Light detector Light emitter Light detector sensor ...

Page 225: ...up with the Auto switch on the control box 3 Send a print job to the printer The printer starts printing The AutoTake upReelUnittakesuptherollpaperinthedirection you set in step 2 Note Do not touch the Manual switch while printing is in progress Doing so may damage your prints To wind forward To wind backward ...

Page 226: ... roll paper is cut automatically Note If you are printing on very thick roll paper it is recommended that you set the Auto Cut setting to off on the printer s control panel and in the printer driver and press the Paper Feed d button on the printer to feed the paper and then cut the paper yourself otherwise the paper cutter may be damaged See Cutting the roll paper manually on page 211 3 Turn the l...

Page 227: ...Paper Handling 227 4 Remove the take up reel core from the flange knob on the movable unit 5 Similarly remove the take up reel core from the flange knob on the drive unit ...

Page 228: ...nting on thick paper 0 5 to 1 5 mm see Printing on thick paper 0 5 to 1 5 mm on page 234 Loading cut sheet media longer than A3 or Legal To load cut sheet media longer than A3 or Legal follow the steps below cCaution As much as possible keep your fingers off the printable surface of the media as fingerprints may reduce printout quality 1 Make sure that the printer is on and the roll paper cover is...

Page 229: ...light is not flashing and then set the paper lever to the released position LEVER RELEASED LOAD PAPER appears on the LCD panel cCaution Do not set the paper lever to the released position while the Power light is flashing otherwise damage may occur ...

Page 230: ...per insertion slot until it comes out below Make sure that the right and bottom edges of the sheet arestraightandinlinewiththehorizontallineandthevertical line 5 Set the paper lever to the secured position PRESS PAUSE BUTTON appears on the LCD panel ...

Page 231: ...ter is printing do not open the front cover If the front cover is opened while printingisinprogress theprinterstopsprinting andthenrestarts printing when the front cover is closed Stopping and restarting printing may reduce the print quality cCaution Do not leave the paper in the printer for a long period of time its qualitywilldeteriorate Werecommendthatyouremovethepaper from the printer after pr...

Page 232: ...e roll paper cover is closed 2 Press the Paper Source l button repeatedly until Sheet appears 3 Make sure that the paper lever is in the secured position and then load the sheet into the paper insertion slot until it meets resistance Make sure that the right edge of the paper is straight and in line with the right edge of the scale on the roll paper cover PRESS PAUSE BUTTON appears on the LCD pane...

Page 233: ...g printing may reduce the print quality When printing is complete the printer supports the printed media and PAPER OUT LOAD PAPER is displayed on the LCD panel To remove the paper press the Paper Feed button and then release the paper lever while holding the paper The paper can be removed from the printer cCaution Do not leave the paper in the printer for a long period of time its qualitywilldeter...

Page 234: ...e first You may want to select the Landscape setting in your printer driver 1 Set the paper basket forward as described in When feeding paper forward Roll Paper Banner 1580 mm or more thick 0 5 to 1 5 mm cut sheet on page 237 2 Make sure that the printer is on 3 Press the Paper Source l button repeatedly until Sheet appears 4 Make sure that the Power light is not flashing and then set the paper le...

Page 235: ...over 6 Load the sheet into the paper insertion slot so that the bottom edgeofthepaperrestsbehindtheopenfrontcover Makesure that the right and bottom edges of the sheet are straight and in line with the horizontal line and the vertical line ...

Page 236: ...RESS PAUSE BUTTON appears on the LCD panel 8 Press the Pause button and then follow the same procedure used for other cut sheet media cCaution Do not leave the paper in the printer for a long period of time its qualitywilldeteriorate Werecommendthatyouremovethepaper from the printer after printing ...

Page 237: ...n feeding paper forward Roll Paper Banner 1580 mm or more thick 0 5 to 1 5 mm cut sheet cCaution Do not load thick paper longer than 24 inches length otherwise damage to your printouts may occur Be sure to feed the paper forward if it is thick 0 5 to 1 5 mm or roll paper banner 1580 mm or more otherwise damage to your printouts may occur 1 Make sure that the upper hooks are fully inserted and the ...

Page 238: ... B0 size backward make sure that your printer has at least 30 cm 12 inches of space to its rear This prevents the printed paper edges from folding When you feed paper backward remove the flange from the drive unit and fully slide the movable unit to the left side of the printer otherwise the printed paper may conflict with the Auto Take up Reel Unit and a paper feed error may occur ...

Page 239: ...Handling 239 1 Take off the center shaft from the upper basket hooks to pass under the paper guides 2 Pull the upper hooks out to their full length Hook both ends of the center shaft on the upper basket hooks ...

Page 240: ...Paper Handling 240 3 Gently pinch the upper part of each paper guide and push it to the back position to allow the printout to come out properly ...

Page 241: ...9880 9880C 9450 users be sure to pull the paper guides to the forward position when using Enhanced Matte Paper or Doubleweight Matte Paper 4 Make sure the lower shafts are in the upward position and hook the basket rings on the upper basket hooks ...

Page 242: ...lus Pro 7880 7880C 7450 When feeding paper forward When feeding paper forward put the paper basket down in the forward position as shown below Note Feed the paper forward if it is thick 0 5 to 1 5 mm or its length is 914 4 mm or more ...

Page 243: ...kward follow the steps below Note You can feed the paper backward when its length is shorter than 914 4 mm otherwise feed the paper forward If the paper thickness is 0 5 mm or more feed the paper forward 1 Gently pinch the upper part of each paper guide and push it to the back position to allow the printout to come out properly ...

Page 244: ...Paper Handling 244 2 Turn the paper basket to the backward position as shown below ...

Page 245: ...tinue to print Epson recommends the use of genuine Epson ink cartridges Other products not manufactured by Epson may cause damage to your printer not covered by Epson s warranties For detailed information on ink cartridges see Ink cartridges on page 356 To check the product codes of ink cartridges see Consumable Products on page 363 To replace an ink cartridge follow the steps below cCaution Leave...

Page 246: ...Maintenance and Transportation 246 2 Open the ink compartment cover by pushing it 3 Raise the ink levers to the released position ...

Page 247: ...hem thoroughly with soap and water If ink gets into your eyes flush them immediately with water cCaution Do not shake cartridges that have been installed previously with too much force 5 Make sure the replacement ink cartridge is the correct color and remove it from the package Shake the ink cartridge well before installing it for best results ...

Page 248: ...pointing to the rear of the printer and then insert it into the slot Do not force the cartridge in further by hand Note If the Ink check light remains on this indicates the ink cartridge may not be installed correctly Remove the ink cartridge and then reinsert it as described above If you install an ink cartridge in the wrong slot the ink icon of the slot that you installed wrong ink cartridge bli...

Page 249: ...Maintenance and Transportation 249 7 Lower the ink lever to the secured position 8 Close the ink compartment cover The printer returns to the previous status ...

Page 250: ...ot remove the maintenance tank Do not unplug the power cord Note If an electrical power failure occurs during this operation turn the printer on again You can continue your procedure at the breakpoint The Black Ink Conversion Kit is required when changing the black ink Also the black ink cartridge either Matte or Photo that you want to convert is required To check the product code see Consumable P...

Page 251: ...u mode 3 Press the Paper Feed d button or Paper Feed u button to select MAINTENANCE and then press the Menu r button 4 Press the Paper Feed d button or Paper Feed u button to display BK INK CHANGE and then press the Menu r button 5 Press the Enter button to execute 6 Make sure OPEN THE RIGHT COVER appears on the LCD panel and then open the right ink compartment cover ...

Page 252: ...the LCD panel and then raise the ink lever on the right ink compartment 8 Make sure OPEN THE LEFT COVER appears on the LCD panel and then open the left ink compartment cover 9 Make sure RAISE THE LEFT INK LEVER appears on the LCD panel andthenraise the inkleveron the leftinkcompartment ...

Page 253: ...GES ON THE RIGHT SIDE appears on the LCD panel and then remove all four ink cartridges from the right ink compartment 11 Make sure INSTALL C M Y CONVERSION CARTRIDGES appears on the LCD panel and then insert three conversion cartridges in the slots on the right ink compartment ...

Page 254: ...ION CRTG LIFE REPLACE CONVERSION CRTG WITH A NEW ONE appears on the LCD panel press the Pause button Remove the old conversion cartridge s from the right ink compartment and then insert the new conversion cartridge s Finally go to step 4 to start again ...

Page 255: ...5 12 Make sure LOWER THE RIGHT INK LEVER appears on the LCD panel and then lower the ink lever on the right ink compartment 13 The printer starts draining ink and DRAINING INK XX appears on the LCD panel Wait until draining is complete ...

Page 256: ...ete RAISE THE RIGHT INK LEVER appears on the LCD panel Raise the ink lever on the right ink compartment 15 Make sure REMOVE C M Y CONVERSION CARTRIDGES appears on the LCD panel and then remove the conversion cartridges from the slots on the right ink compartment ...

Page 257: ... the LCD panel and then insert the cartridges in their specified slots 17 Make sure LOWER THE RIGHT INK LEVER appears on the LCD panel and then lower the ink lever on the right ink compartment Make sure LOWER THE LEFT INK LEVER appears on the LCD panel and then lower the ink lever on the left ink compartment ...

Page 258: ...messages appear on the LCD panel When a message appears on the LCD panel raise or lower the ink levers accordingly Note Because ink charging after black ink conversion consumes a large quantity of ink you may need to replace the ink cartridges soon 20 When LOWER THE RIGHT INK LEVER AND CLOSE THE COVER appears on the LCD panel lower the right ink lever and close the cover Then when LOWER THE LEFT I...

Page 259: ...w For Windows Click the Main tab and make sure that the correct ink cartridge is displayed If not set the information manually by clicking the Utility tab and then the Printer and Option Information button For Mac OS X Remove the printer from the Print Center for Mac OS X 10 2 x or the Printer Setup Utility for Mac OS X 10 3 x or later and then add it again ...

Page 260: ...ow the steps below 1 Open the package of a new maintenance tank 2 Put your hand on the handle on the side of the printer then gently pull the maintenance tank outward Note EPSON Stylus Pro 9880 9880C 9450 has two maintenance tanks Make sure which maintenance tank is needed to be replaced with the message on the LCD panel 3 Put the used maintenance tank in the plastic bag provided Note Do not tilt ...

Page 261: ...3 To replace the paper cutter follow the steps below 1 Make sure the printer is on 2 Press the Menu r button to enter Menu mode 3 Press the Paper Feed d button or Paper Feed u button to display MAINTENANCE and then press the Menu r button 4 Press the Paper Feed d button or Paper Feed u button to display CUTTER REPLACEMENT 5 Press the Menu r button EXECUTE is displayed on the LCD panel then press t...

Page 262: ...er stops at the replacement position OPEN FRONT COVER TO SEE CUTTER REPLACEMENT LABEL appears Open the front cover 7 When SEE LABEL TO REPLACE CUTTER appears on the LCD panel push in the side pin while turning the paper cutter cover to the right to open the casing ...

Page 263: ...nt head when replacing the cutter blade Be careful not to touch the parts highlighted below otherwise the printer may be damaged 8 Slowly take your finger off the side pin The paper cutter raises so it can be removed Note Be careful not to let the cutter or the spring coil pop out of the casing ...

Page 264: ...old cutter from the printer 10 Remove the new paper cutter from its package 11 Make sure the spring coil is inside the cutter holder and if necessary reinstall the coil 12 Fully insert the new cutter into the paper cutter holder in the direction as shown below ...

Page 265: ...ing the paper cutter cover to the left to close the casing 14 Make sure that CLOSE FRONT COVER is displayed then close the front cover The cutter holder moves to the home far right position 15 Wait until READY appears on the LCD panel Paper cutter replacement is complete ...

Page 266: ...utter unit has either two or three holes on each side The illustration used here is a manual cutter unit with three holes The instructions are the same except as noted 1 Make sure that the printer is turned off 2 Using the screwdriver loosen the four screws silver ones on the platen and then remove them Note Do not loosen the black screws ...

Page 267: ...er unit and hook its left side to the left square hole on the platen 4 Similarly hook the other side to the right square hole on the platen 5 Secure the cutter unit with the four screws you removed in step 2 Use the second and third holes from the top ...

Page 268: ...de unit fully slide it to the left so that it will not damage your print data See the Manual Paper Cutter Unit manual shipped with your Manual Paper Cutter Unit for Using the Manual Cutter Unit Removing the Manual Cutter Unit Remove the manual cutter unit when you transport the printer 1 Using the screw driver loosen the screws on the platen 2 Unhook and remove the cutter from the printer 3 Secure...

Page 269: ...alcohol or thinners to clean the printer these chemicals can damage the components as well as the case Be careful not to get water on the printer mechanism or electronic components Do not use a hard or abrasive brush Do not spray the inside of the printer with lubricants unsuitable oils can damage the mechanism Contact your dealer or a qualified service person if lubrication is needed See Contacti...

Page 270: ...er cord Leave the printer for a minute cCaution Do not touch the following parts otherwise printouts may be soiled 2 Open the front cover and use a soft clean cloth to carefully clean away any dust or dirt inside the printer Wipe the gray part by following the directions of the arrows Roller Ink absorption Print head guide ...

Page 271: ... there is a serious problem of dirt on the inside of the printer clean it using a soft clean cloth dampened with mild detergent Then wipe the inside of the printer dry with a dry soft cloth cCaution Becarefulnottotouchthepartshighlightedbelow otherwise the printer may be damaged ...

Page 272: ...ove the paper basket Then clean away any dust or dirt around the leg assembly using a soft brush 5 If the outer case is dirty clean it using a soft clean cloth dampened with mild detergent Keep the ink compartment covers closed to prevent water from getting inside 6 To wash the paper basket remove the shafts from the basket and then wash it with mild detergent ...

Page 273: ...the Menu r button for more than 3 seconds To clean the print head using the printer software see Using the Printer Utilities on page 31 for Windows or Using Printer Utilities on page 53 for Mac OS X If you have not used your printer for more than one month the printer requires head cleaning If POWER CLEANING YOU MUST MOVE INK LEVERS WHEN CLEANING appears on the LCD panel when you turn on the print...

Page 274: ...t Do not tilt or vibrate the printer otherwise ink may leak from the ink cartridges or maintenance tank 1 First turn off the printer and make sure the print heads are in the home far right position If not turn the printer back on wait until the print heads move to the home position then turn off the printer 2 Remove the following parts Power cord Interface cable Paper basket Roll paper spindle Rol...

Page 275: ...emove the ink cartridges Regardless of your choice you must keep the inklevers raised when transporting the printer otherwise ink may leak from the printer 4 Make sure the print head is in the home far right position 5 Install the metal plate and tighten the screw to lock the print head ...

Page 276: ... cCaution Becarefulnottotouchthepartshighlightedbelow otherwise the printer may be damaged 6 Repack the printer using the original box and packing materials Contact your dealer for assistance See Contacting Customer Support on page 316 ...

Page 277: ...he print heads move to the home position then turn off the printer 2 Remove the following parts Power cord Interface cable Paper basket Roll paper spindle Roll and cut sheet media Optional Auto Take Up Reel Unit if installed Optional Manual Cutter Unit if installed 3 Raise the ink levers You can choose whether to remove the ink cartridges Regardless of your choice you must keep the inklevers raise...

Page 278: ...nit are locked For Stylus Pro 7880 7880C 7450 users Make sure that the casters at the base unit are locked and that the stabilizer knobs of the base unit are extended to the floor Note Place the casters sideways and lock them so they will not move 5 Remove the left and right side wing nuts Keep them in a safe place ...

Page 279: ...handgripsshownbelow Theprinterunit weighs approximately 90 kg 198 lb and should be lifted carefully For Stylus Pro 7880 7880C 7450 users Have two or more people lift the printer unit off of the base unit using the four hand grips shown below The printer unit weighs approximately 49 kg 107 8 lb and should be lifted carefully for Stylus Pro 9880 9880C 9450 ...

Page 280: ...n 280 for Stylus Pro 7880 7880C 7450 7 Move the printer horizontally When you set up the printer and perform a nozzle check and realign the print heads after transporting see Setting up the printer after transporting it on page 283 ...

Page 281: ...aution Do not slide the printer on angled or uneven surfaces 1 Make sure that the power cord interface cable roll paper spindles and sheet media are removed and the roll paper cover and front cover are closed Note Ifyouonlyneedtotransportyourprinteraveryshortdistanceusing the casters you do not need to remove the ink cartridges 2 Fully insert the upper hooks and put up the lower shafts as shown be...

Page 282: ...880 9880C 9450 users Release the front casters For Stylus Pro 7880 7880C 7450 users Release the front casters and retract the stabilizer knobs 4 Move the printer to the place of use carefully Relock the casters and extend the stabilizer knobs after moving ...

Page 283: ...t head and also realign the print head to ensure print quality To perform a nozzle check using the control panel see Checking the print head nozzles on page 176 To perform a nozzle check using the printer software see Using the Printer Utilities on page 31 for Windows or Using Printer Utilities on page 53 for Mac OS X To clean the print head using the control panel press the Menu r button for 3 se...

Page 284: ...ING PLEASE WAIT CHARGING INK or INK DRYING appears on the LCD panel respectively Wait until the printer resumes printing An error has occurred Many common printer problems and their solutions can be identified by the messages on the LCD panel You can also check the lights on the control panel for errors See Lights on page 149 For other messages not included in the following table see Messages on p...

Page 285: ...is nearly expended Replacement of the ink cartridge is nearly needed Although you can continue printing in INK LOW situation the print quality may decline MAINTENANCE REQUEST nnnn A part used in the printer has nearly reached the end of its life nnnn shows the code of the part Note the code and contact your dealer See Contacting Customer Support on page 316 PAPER LOW The roll paper is almost finis...

Page 286: ...dedinthe printer Load paper correctly The roll paper is out while printing is in progress Load a new roll paper BORDERLESS ERROR LOAD CORRECT SIZE PAPER An A2 size cut sheet media or roll paper that does not support the borderless printing has been installed for borderless printing Install a different size of cut sheet media or roll paper See Borderless Printing on page 87 PAPER ERROR LOAD PAPER P...

Page 287: ...er Cutter on page 261 Paper cutter may be blunt Replace the paper cutter See Replacing the Paper Cutter on page 261 COMMAND ERROR CHECK DRIVER SETTINGS Damaged data is sent to the printer Stop printing and then press the Pause button for 3 seconds The printer receives data with a wrong command The installed printer driver is not correct for the printer Stop printing and then press the Pause button...

Page 288: ... press the Pause button PAPER SETTING ERROR LOAD ROLL PAPER The roll paper is not set correctly Load the roll paper correctly and then select Roll Auto Cut On or Roll Auto Cut Off See Loading roll paper on page 206 CONVERSION CRTG LIFE CONVERSION CRTG NEAR END OF SERVICE LIFE Theconversioncartridge needs to be replaced soon The remaining time of the conversion cartridge appears on the LCD panel Re...

Page 289: ...ith a genuine Epson ink cartridge See Replacing Ink Cartridges on page 245 and Consumable Products on page 363 INK CARTRIDGE NON GENUINE CARTRIDGE MAY NOT PERFORM AT OPTIMUM CONTINUE YES NO Non genuine ink cartridge is installed Select NO press the Menu r button to replace the ink cartridge with a genuine Epson ink cartridge See Replacing Ink Cartridges on page 245 Otherwise select YES press the P...

Page 290: ...black ink needs to be changed Select YES to change theblackink otherwise select NO See Converting the Black InkCartridges onpage 250 INK CARTRIDGE ERROR INSTALL CORRECT CARTRIDGE An ink cartridge that cannot be used with this printer is installed Remove the ink cartridge and then install an ink cartridge that can be used with this printer See Consumable Products on page 363 INK CARTRIDGE ERROR REP...

Page 291: ...tenance Tank on page 260 MAINT TANK NEAR FULL REPLACE THE RIGHT SIDE MAINTENANCE TANK The right side maintenance tank is almost full Replace the right side maintenance tank with a new one See Replacing the Maintenance Tank on page 260 MAINT TANK NEAR FULL REPLACE THE MAINTENANCE TANK The maintenance tank is almost full Replace the maintenance tank with a new one See Replacing the Maintenance Tank ...

Page 292: ...n the printer off leave it for a while and then turn it on again See Clearing paper jams on page 312 NOMAINTENANCE TANK INSTALL THE LEFT SIDE MAINTENANCE TANK The left side maintenance tank is not set in the printer Install the left side maintenance tank NOMAINTENANCE TANK INSTALL THE RIGHT SIDE MAINTENANCE TANK The right side maintenance tank is not set in the printer Install the right side maint...

Page 293: ...red Restart the printer by pressing the Power button SERVICE CALL ERROR nnnnnnnn The print head is locked Remove the metal plate on the left side of the print head to release the print head A fatal error has occurred Turn the printer off leave it for a while and then turn the printer on again If this message appears on the LCD panel again note the codeandthencontact your dealer See Contacting Cust...

Page 294: ...he power cord is securely plugged into the printer Make sure your outlet works and is not controlled by a wall switch or timer Make sure the supplied voltage to the printer matches the rating voltage labeledontheprinter Ifnot turnoff theprinter and unplug the power cord immediately Contact your dealer for assistance See Contacting Customer Support on page 316 cCaution If the supplied voltage and r...

Page 295: ... through any device such as a printer switching device or extension cable Your Epson printer is not selected as the default printer Install the printer driver if it is not installed yet and follow the steps below to select your Epson printer as the default printer For Windows XP 1 Click Start click Control Panel click Printers and Other Hardware and then click Printers and Faxes 2 Right click EPSO...

Page 296: ...e Print Center or the Printer Setup Utility Printer port setting does not match the printer connection port for Windows only To select the printer port follow the steps below For Windows XP 1 Click Start click Control Panel click Printers and Other Hardware and then click Printers and Faxes 2 Right click EPSON Stylus Pro XXXX then select Properties 3 Click the Ports tab 4 Make sure that your print...

Page 297: ... see Using the Printer Utilities on page 31 For Mac OS X see Using Printer Utilities on page 53 If the Head Cleaning utility does not work replace the ink cartridges See Replacing Ink Cartridges on page 245 Printouts are not what you expected Incorrect garbled characters or blank pages print Try one or more of these solutions For Windows clear any stalled print jobs from the Progress Meter See Del...

Page 298: ...turn off the Flip Horizontal setting in the Print Settings dialog See the online help for more information Printed color differs from the color on the screen Try one or more of these solutions Adjust the Color Density in the Paper Configuration dialog box See the online help for more information Make sure the media type setting matches the paper being used Since monitors and printers produce color...

Page 299: ...ialog See the online help for more information A ruled line shifts Perform the print head alignment If the problem persists perform the print head cleaning For Windows see Using the Printer Utilities on page 31 For Mac OS X see Using Printer Utilities on page 53 Printout has smears on the bottom edge Try one or more of these solutions If the paper is curled towards the printable side flatten it or...

Page 300: ...NTER SETTING of Menu mode See PRINTER SETUP on page 163 Print quality could be better Click the caption under the illustration that best resembles your printout If you are having print quality problems try the solutions offered here Horizontal banding on page 301 Vertical misalignment or banding on page 302 Color documents print in black only on page 305 Faint printout or gaps on page 303 Blurry o...

Page 301: ...ion Make sure the printable side of the paper is face up Run the Head Cleaning utility to clear any clogged ink nozzles For Windows see Using the Printer Utilities on page 31 For Mac OS X see Using Printer Utilities on page 53 You can also clean the print head nozzles using the control panel To clean the print head nozzles press the Menu r button for 3 seconds Check the Paper Feed value Reduce the...

Page 302: ...ity Options dialog box See the online help for more information For Mac OS X turn off the High Speed setting in the Print Settings selected in the Print dialog See the online help for more information Run the Print Head Alignment utility For Windows see Using the Printer Utilities on page 31 For Mac OS X see Using Printer Utilities on page 53 ...

Page 303: ...in the Print dialog Make sure it is correct for the paper you are using See the online help for more information Run the Head Cleaning utility to clear any clogged ink nozzles For Windows see Using the Printer Utilities on page 31 For Mac OS X see Using Printer Utilities on page 53 You can also clean the print head nozzles using the control panel To clean the print head nozzles press the Menu r bu...

Page 304: ...ing is not supported by the printer driver make the paper thickness setting in Menu mode See CUSTOM PAPER on page 172 Make sure your paper is dry and the printable side is face up Also make sure you are using the correct type of paper See Paper on page 353 for specifications Ink may have leaked inside the printer wipe the inside of the printer with a soft clean cloth Run the Head Cleaning utility ...

Page 305: ...peed check box in the Quality Options dialog box See the online help for more information For Mac OS X select the High Speed check box in the Print Settings selected in the Print dialog See the online help for more information For Windows select Quality Options for the Print Quality in the Main menu In the Quality Options dialog box move the slider towards Speed to increase print speed See the onl...

Page 306: ...per Source l button to select it Make sure that Normal Cut Single Cut or Double Cut is selected as the Auto Cut in the printer driver See Roll paper cut for borderless printing on page 97 Cut the roll paper by hand if necessary Check that the paper thickness of the roll paper loaded in the printer matches the paper specification see Paper on page 353 If so the paper cutter may be blunt and require...

Page 307: ... or wrinkled Make sure the paper is flattened Make sure printing occurs within the operational temperature range Make sure the paper is not damp Make sure the paper is not too thick or too thin See Paper on page 353 Make sure no foreign objects are inside the printer For Windows check the Media Type setting in the Main menu Make sure it is correct for the paper you are using See the online help fo...

Page 308: ...enu mode See Making the paper settings on page 188 Whenever loading non Epson special media test if the paper can be loaded correctly before printing To clear Paper jams see Clearing paper jams on page 312 Roll paper does not eject properly Roll paper is wound tightly and may feed with a curl If so attach the paper guides to the printer cCaution The paper guides only need to be used when the paper...

Page 309: ...e There are two paper guides for EPSON Stylus Pro 7880 7880C 7450 and five for EPSON Stylus Pro 9880 9880C 9450 When feeding paper forward Attach the paper guides to the printer so they rest on the front of the paper basket ...

Page 310: ...Problem Solver 310 When feeding paper backward Attach the paper guides to the printer so that they rest on the back of the paper basket ...

Page 311: ...Problem Solver 311 Then gently pinch the upper part of each paper guide and push it to the back position to allow the printout to come out properly ...

Page 312: ... Solver 312 Clearing paper jams To remove jammed paper follow these steps 1 If roll paper is jammed cut the paper at the paper insertion slot 2 Set the paper lever to the released position to release the paper ...

Page 313: ...r if necessary 4 Carefully pull down the jammed paper cCaution Do not touch the circuit board attached to the printer head when handling the jammed paper Be careful not to touch the parts highlighted below otherwise the printer may be damaged ...

Page 314: ...d on the LCD panel To load the paper see Using Roll Paper on page 201 or Using Cut Sheet Media on page 228 If you do not resume printing afterwards make sure the print heads are in the home far right position If not turn the printer on wait until the print heads move to the home position then turn off the printer cCaution If the print heads are not left in the home position print quality may decli...

Page 315: ...een the emitter and detector or sensor adjustment may not be set properly Check for an obstacle in the space where the paper is needed for taking up or adjust the sensor position See Adjusting the sensor on page 215 If the Sensor light is still flashing the printer will print the job for approximately three meters and stop printing Set the paper lever to the released position then check that the r...

Page 316: ...erial number label is usually on the back of the product Product model Product software version Click About Version Info or similar button in the product software Brand and model of your computer Your computer operating system name and version Names and versions of the software applications you normally use with your product Help for Users in North America New Use Inkjet SPC and other products Onl...

Page 317: ...scription of the problem Note For help using any other software on your system seethe documentation for that software for technical support information Purchase Supplies and Accessories You can purchase genuine Epson ink cartridges ribbon cartridges paper and accessories from an Epson authorized reseller To find the nearest reseller call 800 GO EPSON 800 463 7766 Or you can purchase online at http...

Page 318: ... a download area for drivers Epson contact points new product information and technical support e mail Epson Helpdesk Epson Helpdesk is provided as a final backup to make sure our clients have access to advice Operators on the Helpdesk can aid you in installing configuring and operating your Epson product Our Pre sales Helpdesk staff can provide literature on new Epson products and advise where th...

Page 319: ... the following over the phone Sales enquiries and product information Product usage questions or problem Enquiries on repair service and warranty Help for Users in Thailand New For all products Contact for information support and services are World Wide Web http www epson co th Information on product specifications drivers for download Frequently Asked Questions FAQ and e mail are available Epson ...

Page 320: ...ation on product specifications drivers for download Frequently Asked Questions FAQ Sales Enquiries questions through e mail Epson Hotline Sales enquiries and product information Technical support Epson Service Center Epson Hotline Phone 84 8 823 9239 Service Center 80 Truong Dinh Street District 1 Hochiminh City Vietnam Phone 62 21 572 4350 Fax 62 21 572 4357 Jakarta Mangga Dua Mall 3rd floor No ...

Page 321: ...No 12 Jl Kusuma Bangsa 116 118 Surabaya Phone 62 31 5355035 Fax 62 31 5477837 Yogyakarta Hotel Natour Garuda Jl Malioboro No 60 Yogyakarta Phone 62 274 565478 Medan Wisma HSBC 4th floor Jl Diponegoro No 11 Medan Phone Fax 62 61 4516173 Makassar MTC Karebosi Lt Ill Kav P7 8 JI Ahmad Yani No 49 Makassar Phone 62 411 350147 411 350148 ...

Page 322: ...hed a local home page in both Chinese and English on the Internet to provide users with the following information Product information Answers to Frequently Asked Questions FAQs Latest versions of Epson product drivers Users can access our World Wide Web home page at http www epson com hk Technical Support Hotline You can also contact our technical staff at the following telephone and fax numbers P...

Page 323: ...duct specifications drivers for download Frequently Asked Questions FAQ Sales Enquiries questions through e mail Epson Trading M Sdn Bhd Head Office Epson Helpdesk Sales enquiries and product information Infoline Enquiries on repair services warranty product usage and technical support Techline Phone 603 56288288 Fax 603 56288388 399 Phone 603 56288222 Phone 603 56288333 ...

Page 324: ...ndia Head Office Bangalore Epson India Regional Offices Phone 080 30515000 Fax 30515005 Location Telephone number Fax number Mumbai 022 28261515 16 17 022 28257287 Delhi 011 30615000 011 30615005 Chennai 044 30277500 044 30277575 Kolkata 033 22831589 90 033 22831591 Hyderabad 040 66331738 39 040 66328633 Cochin 0484 2357950 0484 2357950 Coimbatore 0422 2380002 NA Pune 020 30286000 30286001 3028600...

Page 325: ... the Epson Philippines Corporation at the telephone and fax numbers and e mail address below World Wide Web http www epson com ph Information on product specifications drivers for download Frequently Asked Questions FAQ and E mail Enquiries are available Epson Helpdesk Phone 63 2 813 6567 Our Hotline team can help you with the following over the phone Sales enquiries and product information Produc...

Page 326: ...ether borderless printing is available R or Recommended R stands for Recommended The recommended paper for borderless printing Possible Borderless printing is possible Impossible Borderless printing is not supported You can print without margins on paper however it may deteriorate print quality or may produce unwanted margins due to paper expansion or shrinkage Also some ordinary paper products ca...

Page 327: ...Be sure to match the media type you set in the printer driver and the paper loaded in the printer otherwise the print quality may decline Auto Cut Describes whether Auto Cut is supported Y Auto Cut is supported N Auto Cut is not supported Use a cutter sold at a store to cut the paper Item Explanation ...

Page 328: ...er driver Auto Cut Photo Black Matte Black Photo Paper Premium Glossy Photo Paper 250 Y Pro9880_7880 PGPP250 icc Premium Semigloss Photo Paper 250 Recommended application Photograph Contract Proof Size Borderless Thickness Core diameter Spindle tension 406 mm 16 R 0 27 mm 3 Normal 610 mm 24 914 mm 36 1118 mm 44 ICC profile Media type of the printer driver Auto Cut Photo Black Matte Black Photo Pap...

Page 329: ...derless Thickness Core diameter Spindle tension 254 mm 10 R 0 27 mm 3 Normal 300 mm 406 mm 16 508 mm 20 Impossible 610 mm 24 R 914 mm 36 1118 mm 44 ICC profile Media type of the printer driver Auto Cut Photo Black Matte Black Photo Paper Premium Luster Photo Paper 260 Y Pro9880_7880 PLPP260 icc ...

Page 330: ...ack Matte Black Photo Paper Photo Paper Gloss 250 Y Pro9880_7880 PPG250 icc Premium Glossy Photo Paper 170 Recommended application Photograph Contract Proof Size Borderless Thickness Core diameter Spindle tension 420 mm A2 Impossible 0 18 mm 2 Normal 610 mm 24 R 914 mm 36 1118 mm 44 ICC profile Media type of the printer driver Auto Cut Photo Black Matte Black Photo Paper Premium Glossy Photo Paper...

Page 331: ...Black Matte Black Photo Paper Premium Semigloss Photo Paper 170 Y Pro9880_7880 PSPP170 icc Pro9450_7450 PSPP170 icc Doubleweight Matte Paper Recommended application Indoor Signage Photograph Proof Size Borderless Thickness Core diameter Spindle tension 610 mm 24 R 0 21 mm 2 Normal 914 mm 36 1118 mm 44 ICC profile Media type of the printer driver Auto Cut Photo Black Matte Black Matte Paper Doublew...

Page 332: ...rless Thickness Core diameter Spindle tension 432 mm 17 Possible 0 14 mm 2 Normal 610 mm 24 914 mm 36 1118 mm 44 ICC profile Media type of the printer driver Auto Cut Photo Black Matte Black Matte Paper Singleweight Matte Paper Y Pro9880_7880 SWMP_PK icc Pro9880_7880 SWMP_MK icc Pro9450_7450 SWMP icc ...

Page 333: ...of Size Borderless Thickness Core diameter Spindle tension 329 mm 13 Possible 0 25 mm 3 Normal 432 mm 17 610 mm 24 914 mm 36 1118 mm 44 ICC profile Media type of the printer driver Auto Cut Photo Black Matte Black Proofing Paper Epson Proofing Paper White Semimatte Y Pro9880_7880 Proof_WS icc ...

Page 334: ...of Size Borderless Thickness Core diameter Spindle tension 329 mm 13 Possible 0 2 mm 3 Normal 432 mm 17 610 mm 24 914 mm 36 1118 mm 44 ICC profile Media type of the printer driver Auto Cut Photo Black Matte Black Proofing Paper Epson Proofing Paper Publication Y Pro9880_7880 Proof_Pub icc ...

Page 335: ...n Proof Size Borderless Thickness Core diameter Spindle tension 432 mm 17 Possible 0 25 mm 3 Normal 610 mm 24 914 mm 36 1118 mm 44 ICC profile Media type of the printer driver Auto Cut Photo Black Matte Black Matte Paper Enhanced Matte Paper Y Pro9880_7880 EMP_PK icc Pro9880_7880 EMP_MK icc Pro9450_7450 EMP icc ...

Page 336: ...ack Matte Black Fine Art Paper Watercolor Paper Radiant White Y Pro9880_7880 WCRW_PK icc Pro9880_7880 WCRW_MK icc UltraSmooth Fine Art Paper Recommended application Photograph Fine Art Reproduction Size Borderless Thickness Core diameter Spindle tension 432 mm 17 Possible 0 32 mm 3 High 610 mm 24 1118 mm 44 ICC profile Media type of the printer driver Auto Cut Photo Black Matte Black Fine Art Pape...

Page 337: ...river Auto Cut Photo Black Matte Black Fine Art Paper Textured Fine Art Paper N Pro9880_7880 TFAP_PK icc Pro9880_7880 TFAP_MK icc Canvas Recommended application Photograph Fine Art Reproduction Size Borderless Thickness Core diameter Spindle tension 610 mm 24 Possible 0 46 mm 2 Normal 914 mm 36 1118 mm 44 ICC profile Media type of the printer driver Auto Cut Photo Black Matte Black Fine Art Paper ...

Page 338: ... type of the printer driver Photo Black Matte Black Photo Paper Premium Glossy Photo Paper Pro9880_7880 PGPP icc Premium Semigloss Photo Paper Recommended application Photograph Contract Proof Size Borderless Thickness Super A3 B Possible 0 27 mm ICC profile Media type of the printer driver Photo Black Matte Black Photo Paper Premium Semigloss Photo Paper Pro9880_7880 PSPP icc ...

Page 339: ...ck Matte Black Photo Paper Premium Luster Photo Paper Pro9880_7880 PLPP icc Singleweight Matte Paper Recommended application Indoor Signage Proof Size Borderless Thickness Super A3 B Possible 0 14 mm A2 Impossible US C Possible ICC profile Media type of the printer driver Photo Black Matte Black Matte Paper Singleweight Matte Paper Pro9880_7880 SWMP_PK icc Pro9880_7880 SWMP_MK icc Pro9450_7450 SWM...

Page 340: ...k Matte Black Matte Paper Photo Quality Ink Jet Paper Pro9880_7880 PQIJP_PK icc Pro9880_7880 PQIJP_MK icc Pro9450_7450 PQIJP icc Epson Proofing Paper White Semimatte Recommended application Contract Proof Size Borderless Thickness Super A3 B Possible 0 25 mm ICC profile Media type of the printer driver Photo Black Matte Black Proofing Paper EpsonProofingPaper White Semimatte Pro9880_7880 Proof_WS ...

Page 341: ...to Black Matte Black Matte Paper Enhanced Matte Paper Pro9880_7880 EMP_PK icc Pro9880_7880 EMP_MK icc Pro9450_7450 EMP icc Archival Matte Paper Recommended application Indoor Signage Photograph Fine Art Reproduction Proof Size Borderless Thickness Super A3 B Possible 0 26 mm ICC profile Media type of the printer driver Photo Black Matte Black Matte Paper Archival Matte Paper Pro9880_7880 ARMP_PK i...

Page 342: ...ack Fine Art Paper Watercolor Paper Radiant White Pro9880_7880 WCRW_PK icc Pro9880_7880 WCRW_MK icc UltraSmooth Fine Art Paper Recommended application Photograph Fine Art Reproduction Size Borderless Thickness Super A3 B Possible 0 46 mm A2 Impossible US C Possible ICC profile Media type of the printer driver Photo Black Matte Black Fine Art Paper UltraSmooth Fine Art Paper Pro9880_7880 USFAP_PK i...

Page 343: ...river Photo Black Matte Black Fine Art Paper Velvet Fine Art Paper Pro9880_7880 VFAP_PK icc Pro9880_7880 VFAP_MK icc Textured Fine Art Paper Recommended application Photograph Fine Art Reproduction Size Borderless Thickness 24 30 Possible 0 69 mm 30 40 Impossible ICC profile Media type of the printer driver Photo Black Matte Black Fine Art Paper Textured Fine Art Paper Pro9880_7880 TFAP_PK icc Pro...

Page 344: ...ation Indoor Signage Fine Art Reproduction Proof Size Borderless Thickness 24 30 Possible 1 3 mm 30 40 Impossible ICC profile Media type of the printer driver Photo Black Matte Black Others Enhanced Matte Poster Board Pro9880_7880 EMPB_PK icc Pro9880_7880 EMPB_MK icc ...

Page 345: ...on net index htm product Stylus_Pro_7450 http support epson net index htm product Stylus_Pro_7880 http support epson net index htm product Stylus_Pro_7880C http support epson net index htm product Stylus_Pro_9450 http support epson net index htm product Stylus_Pro_9880 http support epson net index htm product Stylus_Pro_9880C If you need the latest drivers FAQ s manuals or other downloadables acce...

Page 346: ... 180 nozzles 2 Matte Black 2 Color 180 nozzles 6 Cyan 2 Magenta 2 Yellow 2 EPSON Stylus Pro 9880 9880C 7880 7880C Black 180 nozzles 3 Photo Black or Matte Black Light Black Light Light Black Color 180 nozzles 5 Cyan Vivid Magenta Light Cyan Vivid Light Magenta Yellow Character mode Character Pitch Printing Column 10 cpi 237 EPSON Stylus Pro 7880 7880C 7450 437 EPSON Stylus Pro 9880 9880C 9450 ...

Page 347: ...ches 8 753 720 dpi 617 6 mm 24 31 inches 17 506 1440 dpi 617 6 mm 24 31 inches 35 013 2880 dpi 617 6 mm 24 31 inches 70 027 Raster graphic mode EPSON Stylus Pro 9880 9880C 9450 Horizontal resolution Printable width Available dots 360 dpi 1125 6 mm 44 31 inches 15 953 720 dpi 1125 6 mm 44 31 inches 31 906 1440 dpi 1125 6 mm 44 31 inches 63 813 2880 dpi 1125 6 mm 44 31 inches 127 627 ...

Page 348: ...P Raster Line spacing 1 6 inch or programmable in 1440 inch increments Paper feed speed 245 10 mm seconds per 1 6 inch line RAM 64 MB EPSON Stylus Pro 7880 7880C 7450 128 MB EPSON Stylus Pro 9880 9880C 9450 Character tables PC 437 US Standard Europe PC 850 Multilingual Character sets EPSON Courier 10 cpi ...

Page 349: ...12 B L Roll paper The minimum left margin is 0 0 mm 0 Cut sheets The minimum left margin is 0 0 mm 0 B R Roll paper The minimum right margin is 0 0 mm 0 Cut sheets The minimum right margin is 0 0 mm 0 C Roll paper The minimum bottom margin is 3 0 mm 0 12 Cut sheets The minimum bottom margin is 14 0 mm 0 55 Parameter A B L B R C TOP BOTTOM 15 mm 15 mm 3 mm 3 mm 15 mm TOP 35 BOTTOM 15 mm 35 mm 3 mm ...

Page 350: ... manual insertion Dimensions EPSON Stylus Pro 7880 7880C 7450 without Stand Width 1178 mm 47 12 inches Depth 501 mm 20 04 inches Height 560 mm 22 4 inches EPSON Stylus Pro 9880 9880C 9450 Width 1702 mm 68 08 inches Depth 678 mm 27 12 inches Height 1196 mm 47 84 inches Weight EPSON Stylus Pro 7880 7880C 7450 Approx 49 kg 107 8 lb without consumables EPSON Stylus Pro 9880 9880C 9450 Approx 90 kg 198...

Page 351: ...ed voltage 100 to 240 V Input voltage range 90 to 264 V Rated frequency range 50 to 60 Hz Input frequency range 49 to 61 Hz Rated current 1 0 0 5 A Power consumption EPSON Stylus Pro 7880 7880C 7450 Approx 50 W EPSON Stylus Pro 9880 9880C 9450 Approx 58 W 6 W or less in Sleep mode 1 W or less in Power off mode ...

Page 352: ...hipping container Operational conditions temperature and humidity Temperature Operation 10 to 35 C 50 to 95 F Print Quality Guarantee 15 to 25 C 59 to 77 F Storage 20 to 40 C 4 to 104 F Humidity Operation 20 to 80 RH Print Quality Guarantee 40 to 60 RH Storage 20 to 85 RH ...

Page 353: ... 2 EN 61000 3 3 Size Epson Stylus Pro 7880 7880C 7450 203 mm 8 inches to 610 mm 24 4 inches W 45000 mm 1800 inches L when internal diameter is 2 inches 203 mm 8 inches to 610 mm 24 4 inches W 202000 mm 8080 inches L when internal diameter is 3 inches Size Epson Stylus Pro 9880 9880C 9450 203 mm 8 inches to 1118 mm 44 72 inches W 45000 mm 1800 inches L when internal diameter is 2 inches 203 mm 8 in...

Page 354: ...oading Outer diameter 103 mm 4 12 inches maximum when 2 3 dual roll feed spindle is set as 2 inch roll paper spindle 150 mm 6 inches maximum when 2 3 dual roll feed spindle is set as 3 inch roll paper spindle Paper types Plain paper special papers distributed by Epson Thickness for plain paper 0 08 to 0 11 mm 0 003 to 0 004 inches Weight for plain paper 64 gf m 17 lb to 90 gf m 24 lb Size EPSON St...

Page 355: ...D 22 34 inches US E 34 44 inches A4 210 297 mm A3 297 420 mm Super A3 B 329 483 mm A2 420 594 mm A1 594 841 mm Super A1 24 36 inches A0 841 1189 mm Super A0 914 1292 mm B5 182 257 mm B4 257 364 mm B3 364 514 mm B2 515 728 mm B1 728 1030 mm B1 Landscape 1030 728 mm B0 1030 1456 mm Super B0 1118 1580 mm 44 36 inches 30 24 inches 16 20 inches 11 14 inches 8 10 inches 60 90 cm 40 60 cm 30 40 cm ...

Page 356: ... Cyan Vivid Magenta Yellow Light Cyan Light Magenta Cartridge life 2 years from production date if unopened Within 6 months after opening package Temperature Storage uninstalled 20 to 40 C 4 to 104 F 1 month at 40 C 104 F Storage installed 20 to 40 C 4 to 104 F 1 month at 40 C 104 F Capacity 110 ml 220 ml Dimensions 110 ml 220ml 27 1 mm W 185 mm D 107 mm H 1 08 inches W 7 4 inches D 4 28 inches H ...

Page 357: ...ontheimagesthatyou are printing the paper type that you are using the frequency of your printings and environmental conditions such as temperature To ensure you receive premium print quality and to help protect yourprinthead avariableinksafetyreserveremainsinthecartridge when your printer indicates to replace the cartridge Ink is consumed during the following operations print head cleaning and ink...

Page 358: ...nistrator account You cannot install the printer driver with a limited account When you install the printer software in Windows Vista the password may be required If you are asked for the password enter it and continue the operation Operating system Windows Vista x64 Vista XP x64 XP 2000 CPU Epson Stylus Pro 7880 7880C 7450 Pentium 4 1 6 GHz or higher processor Epson Stylus Pro 9880 9880C 9450 Pen...

Page 359: ... running Mac OS X 10 2 8 or later Intel based Macintosh computers with Rosetta CPU Epson Stylus Pro 7880 7880C 7450 PowerPC G4 1 0GHz or higher processor Epson Stylus Pro 9880 9880C 9450 PowerPC G4 1 25GHz or higher processor Memory 256 MB or more available memory Hard disk space 8 GB or more free disk space ...

Page 360: ...cs Note Only computer equipped with a USB connector and running Windows XP Vista 2000 or Mac OS X 10 x support the USB interface Ethernet interface The printer has a built in Ethernet interface Use a 10BaseT and 100BaseTX STP shielded twisted pair cable via the RJ 45 connector to connect to a network Standard Based on Universal Serial Bus Specifications Revision 2 0 Universal Serial Bus Specificat...

Page 361: ...Roll paper spindle To use optional spindles see Using Roll Paper on page 201 2 3 inch Dual Roll Feed Spindle for Stylus Pro 9880 9880C 9450 C12C811151 2 3 inch Dual Roll Feed Spindle High Tension for Stylus Pro 9880 9880C 9450 C12C811152 2 3 inch Dual Roll Feed Spindle for Stylus Pro 7880 7880C 7450 C12C811161 2 3 inch Dual Roll Feed Spindle High Tension for Stylus Pro 7880 7880C 7450 C12C811155 R...

Page 362: ...to the printer and drafting tape To install and use this option see the optional Auto Take Up Reel Unit User s Guide Manual Cutter Unit This option helps you cut your printed roll paper manually To install and use the cutter see the attached manual Auto Take Up Reel Unit C12C815251 Take Up Reel Core C12C815121 Manual Cutter Unit for Stylus Pro 9880 9880C 9450 C12C815182 Manual Cutter Unit for Styl...

Page 363: ... you can replacethecutterblade See ReplacingthePaperCutter onpage 261 Maintenance Tank This tank absorbs discharged liquid If it becomes full you need to replace it See Replacing the Maintenance Tank on page 260 Ink cartridges To replace ink cartridges see Replacing Ink Cartridges on page 245 Note The product number varies by country Auto Cutter Spare Blade C12C815291 Maintenance Tank C12C890191 ...

Page 364: ...ge Yellow 110 ml T6114 220 ml T6124 Ink cartridge Photo Black 110 ml T6021 220 ml T6031 T6041 Ink cartridge Matte Black 110 ml T6118 220 ml T6128 Ink cartridge Cyan 110 ml T6022 220 ml T6032 T6042 Ink cartridge Vivid Magenta 110 ml T6023 220 ml T6033 T6043 Ink cartridge Yellow 110 ml T6024 220 ml T6034 T6044 Ink cartridge Light Cyan 110 ml T6025 220 ml T6035 T6045 Ink cartridge Vivd Light Magenta ...

Page 365: ...rmation see Paper Information on page 326 Note The availability of special media varies by country The names of some special media vary by country Use the product number to confirm the type of special media you need or have For the latest information on media available in your area contact Epson customer support web site See Contacting Customer Support on page 316 Ink cartridge Light Light Black 1...

Page 366: ...git 0 or 1 which is the smallest unit of information used by a printer or computer brightness The lightness or darkness of an image buffer The portion of the printer s memory used to store data before printing it byte A unit of information consisting of eight bits characters per inch cpi A measure of the size of text characters sometimes referred to as pitch CMYK Cyan blue green magenta yellow and...

Page 367: ...he resolution See also resolution drive A memory device such as CD ROM hard disk or floppy disk In Windows a letter is assigned to each drive for easy management driver A software program that sends instructions to a computer peripheral to tell it what to do For example your printer driver accepts print data from your word processor application and sends instructions to the printer on how to print...

Page 368: ...ed to reproduce an image halftoning Method of using dot patterns to represent an image Halftoning makes it possible to produce varying shades of gray using only black dots or a nearly infinite array of colors using only a few colors of dots See also halftones head alignment The operation to correct any misalignment of the print heads Vertical banding will be corrected head cleaning The operation t...

Page 369: ...on that is sent to the printer from the computer is stored in the memory temporarily See also RAM and ROM MicroWeave Printing in which images are printed in finer increments to reduce the possibility of banding and to produce laser like images See also banding monochrome This means printing with only one color of ink which is generally black ink nozzle Fine tubes in the print head through which in...

Page 370: ...us Pro 9880 9880C 7880 7880C has four printing mode settings SuperPhoto 2880 dpi SuperFine 1440 dpi Fine 720 dpi and Normal 360 dpi print queue If your printer is connected to a network print jobs that are sent to the printer while it is busy are stored in a waiting line or print queue until they can be printed Progress Meter A meter that shows the progress of the current print job for Windows RAM...

Page 371: ...to the printer directly or to the print server Spool Manager The software program that converts print data into codes that your printer understands See also spool sRGB Windows software that is designed so you get WYSIWYG What You See Is What You Get color output This software prints colors as you see them on your screen Status Monitor The software program that allows you to check the printer s sta...

Page 372: ...d spindle 201 E Enlarge size printing 99 EPSON Printer Utility2 42 EPSON special media 199 326 365 EPSON StatusMonitor Mac OS X 55 EPSON Status Monitor 3 Windows 33 Error indication 284 Error message 30 F Fit to Page 99 H Head Alignment 178 Help Mac OS X 47 Help Windows 23 Host ICM 70 I Ink cartridges 245 250 363 L Loading cut sheet media 228 Loading roll paper 206 M Maintenance Mode 193 Maintenan...

Page 373: ... Ink cartridges 245 Maintenance tank 260 Roll paper loading 206 media type 365 S Specifications electrical 351 interface 360 Standards and Approvals 353 Spindle attaching and removing 204 attaching the roll paper 201 removing the roll paper 203 Status Message 151 Status Sheet 192 Supported media type for borderless printing 89 System requirements Windows 358 T Technical support 316 345 Thick paper...

Reviews: