


42
Error code and message
Solution
E2, E3, or E7
No wireless network names (SSID) found.
Confirm that the router/access point is
turned on and the wireless network (SSID)
is set up correctly. Contact your network
administrator for assistance.
No wireless network names (SSID) found.
Confirm that the wireless network name
(SSID) of the PC you wish to connect is set
up correctly. Contact your network
administrator for assistance.
Entered security key/password does not
match the one set for your router/access
point. Confirm security key/password.
Contact your network administrator for
assistance.
Check the following:
• Make sure your router or access point is turned on, and
is correctly connected to your computer or network
device.
• Turn off the router or access point, wait about 10
seconds, and turn it on again.
• Move your product closer to your router or access point,
and remove any obstacles between them. Also move
your product away from devices such as wireless
phones or microwaves.
• Confirm that the SSID shown on the network
connection report matches the label on your router or
access point. Also make sure your SSID uses only
ASCII characters and symbols, or your product cannot
display the SSID correctly.
• If you are trying to connect using the WPS push button
method, make sure your router or access point supports
it.
• If you are using a network password, check the label on
your router or access point to confirm that you are using
the correct password, or check with your network
administrator or router/access point documentation.
• If you are connecting to a smart device that generates
an SSID, check the device documentation for the SSID
and password you should use.
• If your wireless connection suddenly disconnects, and
another smart device was added to the network using a
WPS push button method or your network was set up
using a non-WPS push button method, try downloading
and installing your product software again.
Summary of Contents for L4160 series
Page 1: ...L4160 User s Guide ...
Page 2: ......
Page 17: ...17 Product Parts Inside 1 Document cover 2 Scanner glass 3 Scanner unit 4 Control panel ...
Page 63: ...63 Related topics Copying Scanning ...
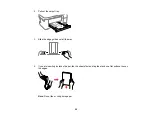
Page 146: ...146 1 Turn on your product 2 Lift up the scanner unit ...
Page 147: ...147 3 Open the ink tank cover then open the cap for the ink tank you are going to fill ...
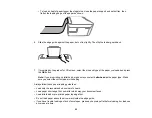
Page 190: ...190 2 Remove any jammed paper from the rear paper feed ...
Page 191: ...191 3 Lift the scanner unit and remove any jammed paper inside ...


