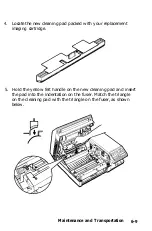
4. Locate the new cleaning pad packed with your replacement
imaging cartridge.
5. Hold the yellow felt handle on the new cleaning pad and insert
the pad into the indentation on the fuser. Match the triangle
on the cleaning pad with the triangle on the fuser, as shown
below.
Maintenance and Transportation
6-9
Summary of Contents for EPL-7500
Page 1: ......
Page 3: ......
Page 52: ...Testing the Printer 2 12 Testing and Connecting Your Printer ...
Page 237: ...V Ventilation grill 6 15 W Weight paper 8 4 printer 8 8 Index IN 5 ...
Page 242: ......
Page 243: ......
Page 244: ......

