


Section 17: Upgrading the Operational
Firmware
172
Installing New Firmware onto Your
Computer
Firmware upgrades are available at any time by downloading the firmware file
from the Epilog web site -
www.epiloglaser.com
under the Downloads tab. Or,
you can contact Epilog Technical Support and they can e-mail the appropriate file
to you. (You can also join our Driver Notification mailing list to be automatically
notified when new versions of firmware or the driver become available!). The
firmware version that your system is currently running is displayed on the LCD
panel when you first power up your laser system – it will read Version 1_0_X_X.
Downloading
– From the Epilog web site download the new firmware and save.
Normally, the default Save location is onto your Desktop folder. Use a thumb
drive, flash drive or other portable media to move the downloaded file from one
computer to another if you need to.
When you download the firmware it comes as a compressed file in the following
format: legendMini_1_0_X_X.exe. The X’s designate the actual version of the
firmware. Once this file is on the computer that is attached to your laser you will
need to extract (Unzip or decompress) it so it’s in a format that can be transferred
to the laser.
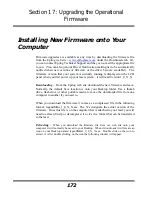
Extracting
–
When you download the firmware file from our web site onto your
computer it will normally be saved to your Desktop. When it downloads it will create an
icon on your Desktop named legendMini1_0_0_X_X.exe. Double click on the icon to
extract it. After double clicking on the icon the following window will appear:
Summary of Contents for Fusion 13000
Page 2: ...ii THIS PAGE WAS INTENTIONALLY LEFT BLANK ...
Page 4: ...Contents at a Glance iv THIS PAGE WAS INTENTIONALLY LEFT BLANK ...
Page 8: ...Table of Contents viii INDEX 195 THIS PAGE WAS INTENTIONALLY LEFT BLANK ...
Page 10: ...Fire Warning x SEE PREVIOUS PAGE ...
Page 14: ...Introduction xiv THIS PAGE WAS INTENTIONALLY LEFT BLANK ...
Page 15: ...1 Manual Epilog Laser Setup ...
Page 16: ...2 THIS PAGE WAS INTENTIONALLY LEFT BLANK ...
Page 26: ...Section 1 Safety 10 ...
Page 27: ...Section 1 Safety 11 ...
Page 28: ...Section 1 Safety 12 THIS PAGE WAS INTENTIONALLY LEFT BLANK ...
Page 41: ...Section 3 Getting Started 11 THIS PAGE WAS INTENTIONALLY LEFT BLANK ...
Page 44: ...Section 4 Installing the ECC 14 ...
Page 51: ...Section 4 Installing the ECC 21 THIS PAGE WAS INTENTIONALLY LEFT BLANK ...
Page 58: ...Section 5 Installing the Epilog Dashboard Print Driver 28 10 Click on Update Driver ...
Page 68: ...Section 5 Installing the Epilog Dashboard Print Driver 38 Click on Add Local Printer ...
Page 108: ...Section 6 Using the Epilog Dashboard 78 THIS PAGE WAS INTENTIONALLY LEFT BLANK ...
Page 109: ...79 Manual Basic Operations ...
Page 110: ...80 THIS PAGE WAS INTENTIONALLY LEFT BLANK ...
Page 130: ...Section 8 Using the Front Control Panel 100 THIS PAGE WAS INTENTIONALLY LEFT BLANK ...
Page 136: ...Section 9 Using the ECC Epilog Control Center 106 THIS PAGE WAS INTENTIONALLY LEFT BLANK ...
Page 148: ...Section 10 Standard Optional Machine Features 118 ...
Page 152: ...Section 11 Engraving Machine Cleaning 122 Crash Bar and locating pins ...
Page 160: ...Section 11 Engraving Machine Cleaning 130 ...
Page 184: ...Section 13 Material Engraving Techniques 154 THIS PAGE WAS INTENTIONALLY LEFT BLANK ...
Page 191: ...161 Manual Technical Support Troubleshooting and Specifications ...
Page 192: ...162 THIS PAGE WAS INTENTIONALLY LEFT BLANK ...
Page 194: ...Section 15 In Case of Difficulty 164 THIS PAGE WAS INTENTIONALLY LEFT BLANK ...
Page 200: ...Section 16 Specifications 170 THIS PAGE WAS INTENTIONALLY LEFT BLANK ...
Page 208: ...APPENDIX A 178 THIS PAGE WAS INTENTIONALLY LEFT BLANK ...
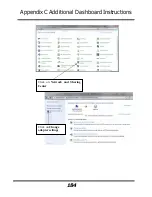
Page 218: ...Appendix C Additional Dashboard Instructions 188 ...


