


Section 12: Speed and Power
Recommendations
132
Recommendations
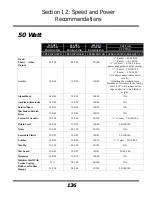
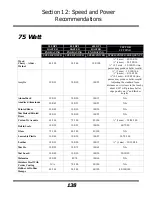
The Epilog Mini Speed and Power guidelines are included on the following pages.
Please remember that these are only guidelines. Depth of cut is a matter of personal
preference. As such, there is no “correct” setting. Working with the Speed and
Power settings becomes fairly intuitive in a very short period of time for most users.
If you have a material that is not listed, try to compare its hardness and feel to some
of the materials listed and use the settings of a similar material as your starting point
for Speed and Power settings.
The two most basic rules for determining Speed and Power are:
1.
Hard materials generally engrave and cut at low speeds and high power.
2.
Soft materials generally engrave and cut at high speeds and low power.
Depth will increase if the power is increased, or if the speed is decreased. If you do
not achieve the results you are looking for with the following recommended settings,
try resending the job and start by changing only the Power setting. If this does not
provide the desired results, revert back to the recommended Settings and change the
Speed settings. Changing only one variable at a time will help to determine the
correct setting for your material. It is easiest to change the speed or power variable in
10% increments when you are experimenting. This will save time and allow you to
refine your settings later in 1 or 2% increments.
Because there are many factors that influence the time it takes to engrave or cut a
given image, the Speed settings were designed to be reference numbers only. The
Speed setting scale of 1% to 100% is not linear – i.e. 100% speed will not be twice as
fast as 50% speed. This non-linear scale is very useful in compensating for the
different factors that affect engraving time, but using speed to predict a jobs
engraving time is not practical.
The Power settings are linear – i.e. 50% power is half as much as 100% power.
An important note:
Speed and Power settings can sometimes be confusing because
not all materials that
can
be marked at the highest speeds and powers
should
be
marked at the highest speed or power. Many users feel that if a mark
can
be made at
high speed, it’s just a matter of adjusting the power to produce an acceptable mark.
Unfortunately, for some materials, this isn’t always the case. For some materials, the
length of time the laser reacts with the material is much more important to producing
Summary of Contents for Fusion 13000
Page 2: ...ii THIS PAGE WAS INTENTIONALLY LEFT BLANK ...
Page 4: ...Contents at a Glance iv THIS PAGE WAS INTENTIONALLY LEFT BLANK ...
Page 8: ...Table of Contents viii INDEX 195 THIS PAGE WAS INTENTIONALLY LEFT BLANK ...
Page 10: ...Fire Warning x SEE PREVIOUS PAGE ...
Page 14: ...Introduction xiv THIS PAGE WAS INTENTIONALLY LEFT BLANK ...
Page 15: ...1 Manual Epilog Laser Setup ...
Page 16: ...2 THIS PAGE WAS INTENTIONALLY LEFT BLANK ...
Page 26: ...Section 1 Safety 10 ...
Page 27: ...Section 1 Safety 11 ...
Page 28: ...Section 1 Safety 12 THIS PAGE WAS INTENTIONALLY LEFT BLANK ...
Page 41: ...Section 3 Getting Started 11 THIS PAGE WAS INTENTIONALLY LEFT BLANK ...
Page 44: ...Section 4 Installing the ECC 14 ...
Page 51: ...Section 4 Installing the ECC 21 THIS PAGE WAS INTENTIONALLY LEFT BLANK ...
Page 58: ...Section 5 Installing the Epilog Dashboard Print Driver 28 10 Click on Update Driver ...
Page 68: ...Section 5 Installing the Epilog Dashboard Print Driver 38 Click on Add Local Printer ...
Page 108: ...Section 6 Using the Epilog Dashboard 78 THIS PAGE WAS INTENTIONALLY LEFT BLANK ...
Page 109: ...79 Manual Basic Operations ...
Page 110: ...80 THIS PAGE WAS INTENTIONALLY LEFT BLANK ...
Page 130: ...Section 8 Using the Front Control Panel 100 THIS PAGE WAS INTENTIONALLY LEFT BLANK ...
Page 136: ...Section 9 Using the ECC Epilog Control Center 106 THIS PAGE WAS INTENTIONALLY LEFT BLANK ...
Page 148: ...Section 10 Standard Optional Machine Features 118 ...
Page 152: ...Section 11 Engraving Machine Cleaning 122 Crash Bar and locating pins ...
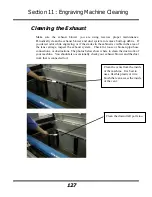
Page 160: ...Section 11 Engraving Machine Cleaning 130 ...
Page 184: ...Section 13 Material Engraving Techniques 154 THIS PAGE WAS INTENTIONALLY LEFT BLANK ...
Page 191: ...161 Manual Technical Support Troubleshooting and Specifications ...
Page 192: ...162 THIS PAGE WAS INTENTIONALLY LEFT BLANK ...
Page 194: ...Section 15 In Case of Difficulty 164 THIS PAGE WAS INTENTIONALLY LEFT BLANK ...
Page 200: ...Section 16 Specifications 170 THIS PAGE WAS INTENTIONALLY LEFT BLANK ...
Page 208: ...APPENDIX A 178 THIS PAGE WAS INTENTIONALLY LEFT BLANK ...
Page 218: ...Appendix C Additional Dashboard Instructions 188 ...


