


Section 7: Quick Start & Easy Setup
85
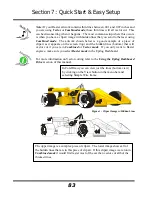
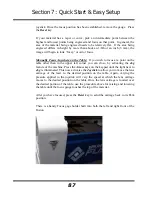
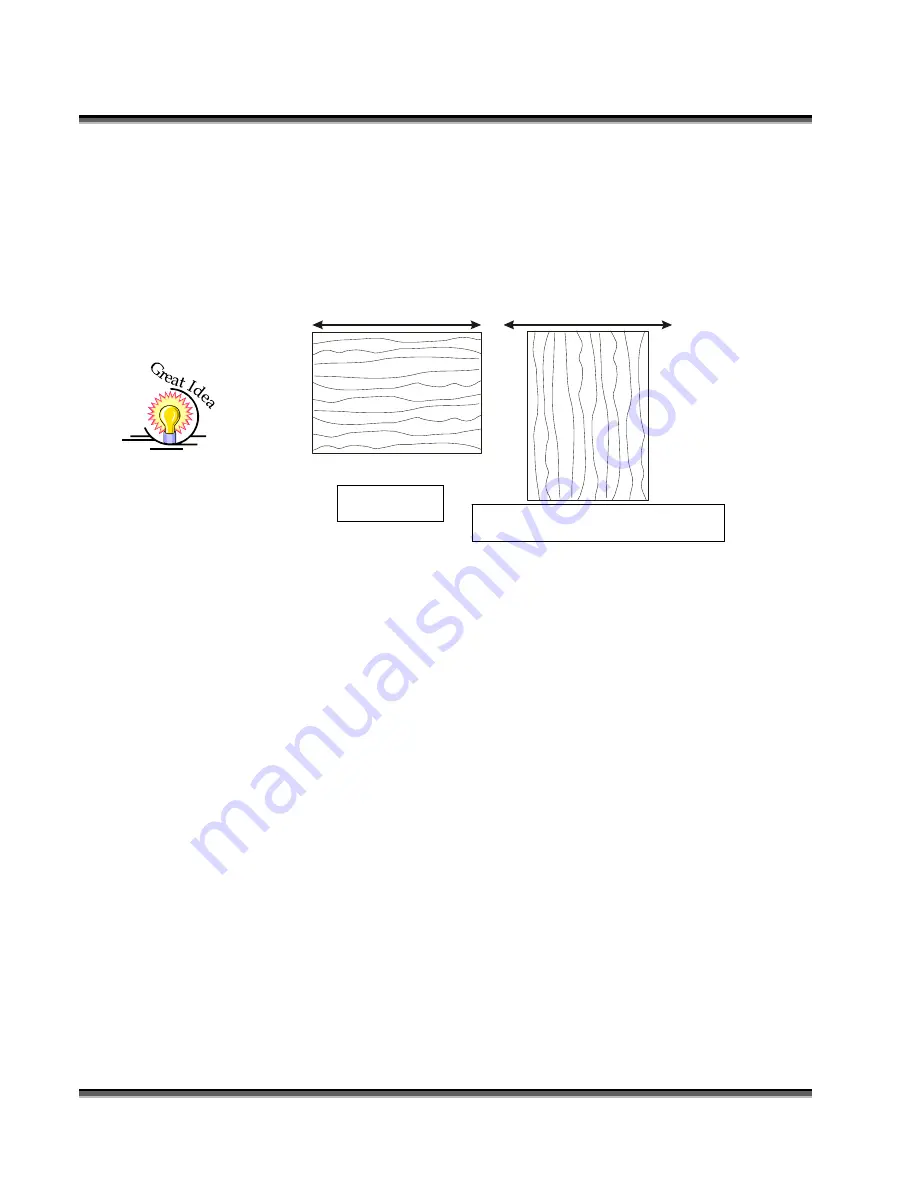
Material Orientation
Some materials such as wood or plastics that have a grain (brushed look) will look
nicer when engraved if the grain of the material runs parallel with the X-stroke of
the carriage. The orientation of material without a grain pattern is usually not
important.
Piece and Page Size
Many users like to create their artwork on a page size in Corel that matches the
size of the piece that is to be lasered. Compensating for beveled edges or placing
an image in an exact location is easy when there is a one-for-one relationship
between the material and the page size of the artwork. If this method works for
you, remember that you must also set the Piece Size dimensions in the Dashboard
to match the page size you have set in your graphics software.
On the other hand, many users do not want to change the Piece Size dimensions in
the Dashboard every time they print something new. They prefer to use a page
size that matches the table size (18 x 12 (458 x 305 mm) for the Mini 18) and
place their artwork into the upper left corner of the page. Both methods are
effective and it is a matter of personal preference which method is used.
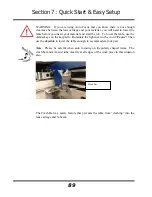
Place the material to be engraved on the engraving table in the upper left hand
corner, pressing the material firmly against the metal rulers along the top and left
edges.
Most material does not need to be held or clamped in place. Simply setting it on
the table and letting gravity hold it in place is enough. If you are using a material
that is likely to move during operation or is very thin, you can hold it in place
Wood showing grain
Wood showing grain
Travel direction of carriage
Travel direction of carriage
Preferred
Less desirable
Preferred
Less Desirable Orientation
Summary of Contents for Fusion 13000
Page 2: ...ii THIS PAGE WAS INTENTIONALLY LEFT BLANK ...
Page 4: ...Contents at a Glance iv THIS PAGE WAS INTENTIONALLY LEFT BLANK ...
Page 8: ...Table of Contents viii INDEX 195 THIS PAGE WAS INTENTIONALLY LEFT BLANK ...
Page 10: ...Fire Warning x SEE PREVIOUS PAGE ...
Page 14: ...Introduction xiv THIS PAGE WAS INTENTIONALLY LEFT BLANK ...
Page 15: ...1 Manual Epilog Laser Setup ...
Page 16: ...2 THIS PAGE WAS INTENTIONALLY LEFT BLANK ...
Page 26: ...Section 1 Safety 10 ...
Page 27: ...Section 1 Safety 11 ...
Page 28: ...Section 1 Safety 12 THIS PAGE WAS INTENTIONALLY LEFT BLANK ...
Page 41: ...Section 3 Getting Started 11 THIS PAGE WAS INTENTIONALLY LEFT BLANK ...
Page 44: ...Section 4 Installing the ECC 14 ...
Page 51: ...Section 4 Installing the ECC 21 THIS PAGE WAS INTENTIONALLY LEFT BLANK ...
Page 58: ...Section 5 Installing the Epilog Dashboard Print Driver 28 10 Click on Update Driver ...
Page 68: ...Section 5 Installing the Epilog Dashboard Print Driver 38 Click on Add Local Printer ...
Page 108: ...Section 6 Using the Epilog Dashboard 78 THIS PAGE WAS INTENTIONALLY LEFT BLANK ...
Page 109: ...79 Manual Basic Operations ...
Page 110: ...80 THIS PAGE WAS INTENTIONALLY LEFT BLANK ...
Page 130: ...Section 8 Using the Front Control Panel 100 THIS PAGE WAS INTENTIONALLY LEFT BLANK ...
Page 136: ...Section 9 Using the ECC Epilog Control Center 106 THIS PAGE WAS INTENTIONALLY LEFT BLANK ...
Page 148: ...Section 10 Standard Optional Machine Features 118 ...
Page 152: ...Section 11 Engraving Machine Cleaning 122 Crash Bar and locating pins ...
Page 160: ...Section 11 Engraving Machine Cleaning 130 ...
Page 184: ...Section 13 Material Engraving Techniques 154 THIS PAGE WAS INTENTIONALLY LEFT BLANK ...
Page 191: ...161 Manual Technical Support Troubleshooting and Specifications ...
Page 192: ...162 THIS PAGE WAS INTENTIONALLY LEFT BLANK ...
Page 194: ...Section 15 In Case of Difficulty 164 THIS PAGE WAS INTENTIONALLY LEFT BLANK ...
Page 200: ...Section 16 Specifications 170 THIS PAGE WAS INTENTIONALLY LEFT BLANK ...
Page 208: ...APPENDIX A 178 THIS PAGE WAS INTENTIONALLY LEFT BLANK ...
Page 218: ...Appendix C Additional Dashboard Instructions 188 ...


