


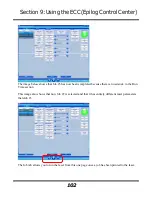
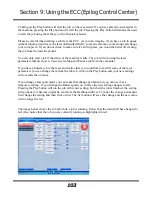
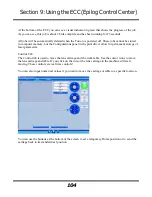


Section 8: Using the Front Control Panel
97
6)
Serial # - This establishes a S/N for USB use.
999
7)
IP Address – This sets the IP Address of the laser system.
192.168l.3.4
8)
Subnet Mask – This sets the Subnet mask for the laser system.
255.255.255.0
9)
Gateway – This sets the Gateway for the laser system.
192.168.0.254
10)
Laser - This shows which type laser is installed in the machine.
CO2
11)
Vector Grid – This indicates if the Vector Grid is installed.
Yes
12)
AirA Raster – This tells the machine to activate Air assist during all Raster jobs.
Yes
13)
AirA Vector - This tells the machine to activate Air assist during all Vector jobs.
Yes
14)
Laser Match – This sets the left-right raster line alignment.
0
15)
Stamp Match - This sets the left-right raster line alignment in Stamp mode.
0
16)
Set Home – This sets a new Home Position
17)
Go Home – This restores the carriage lens to its standard Home position.
18)
AutoF Installed – This indicates Auto Focus is installed.
Yes
19)
AirA Installed - This indicates Air Assist is installed.
Yes
20)
X ADJ – This calibrates the accuracy in the X-axis.
0
21)
Y ADJ– This calibrates the accuracy in the Y-axis.
0
22)
Laser TI – This sets the Tickle of the laser tube.
1
23)
Bed Size – This indicates the bed size.
32x20
24)
Sys Unit – Sets units
Inch
25)
Joystick Cal – Calibrates the feel of the Joystick.
26)
System Version –Firmware version.
001.000.000.001
If you are using the keyboard to change any X, Y or Focus value you will need to use the Joystick
and you will need to be careful about the correct sequence of Joystick actions.
Summary of Contents for Fusion 13000
Page 2: ...ii THIS PAGE WAS INTENTIONALLY LEFT BLANK ...
Page 4: ...Contents at a Glance iv THIS PAGE WAS INTENTIONALLY LEFT BLANK ...
Page 8: ...Table of Contents viii INDEX 195 THIS PAGE WAS INTENTIONALLY LEFT BLANK ...
Page 10: ...Fire Warning x SEE PREVIOUS PAGE ...
Page 14: ...Introduction xiv THIS PAGE WAS INTENTIONALLY LEFT BLANK ...
Page 15: ...1 Manual Epilog Laser Setup ...
Page 16: ...2 THIS PAGE WAS INTENTIONALLY LEFT BLANK ...
Page 26: ...Section 1 Safety 10 ...
Page 27: ...Section 1 Safety 11 ...
Page 28: ...Section 1 Safety 12 THIS PAGE WAS INTENTIONALLY LEFT BLANK ...
Page 41: ...Section 3 Getting Started 11 THIS PAGE WAS INTENTIONALLY LEFT BLANK ...
Page 44: ...Section 4 Installing the ECC 14 ...
Page 51: ...Section 4 Installing the ECC 21 THIS PAGE WAS INTENTIONALLY LEFT BLANK ...
Page 58: ...Section 5 Installing the Epilog Dashboard Print Driver 28 10 Click on Update Driver ...
Page 68: ...Section 5 Installing the Epilog Dashboard Print Driver 38 Click on Add Local Printer ...
Page 108: ...Section 6 Using the Epilog Dashboard 78 THIS PAGE WAS INTENTIONALLY LEFT BLANK ...
Page 109: ...79 Manual Basic Operations ...
Page 110: ...80 THIS PAGE WAS INTENTIONALLY LEFT BLANK ...
Page 130: ...Section 8 Using the Front Control Panel 100 THIS PAGE WAS INTENTIONALLY LEFT BLANK ...
Page 136: ...Section 9 Using the ECC Epilog Control Center 106 THIS PAGE WAS INTENTIONALLY LEFT BLANK ...
Page 148: ...Section 10 Standard Optional Machine Features 118 ...
Page 152: ...Section 11 Engraving Machine Cleaning 122 Crash Bar and locating pins ...
Page 160: ...Section 11 Engraving Machine Cleaning 130 ...
Page 184: ...Section 13 Material Engraving Techniques 154 THIS PAGE WAS INTENTIONALLY LEFT BLANK ...
Page 191: ...161 Manual Technical Support Troubleshooting and Specifications ...
Page 192: ...162 THIS PAGE WAS INTENTIONALLY LEFT BLANK ...
Page 194: ...Section 15 In Case of Difficulty 164 THIS PAGE WAS INTENTIONALLY LEFT BLANK ...
Page 200: ...Section 16 Specifications 170 THIS PAGE WAS INTENTIONALLY LEFT BLANK ...
Page 208: ...APPENDIX A 178 THIS PAGE WAS INTENTIONALLY LEFT BLANK ...
Page 218: ...Appendix C Additional Dashboard Instructions 188 ...


