background image

Envent Engineering Ltd – 131S & 132S Software Manual – Revision 1 

 Page 19 


4.2


Component Properties 


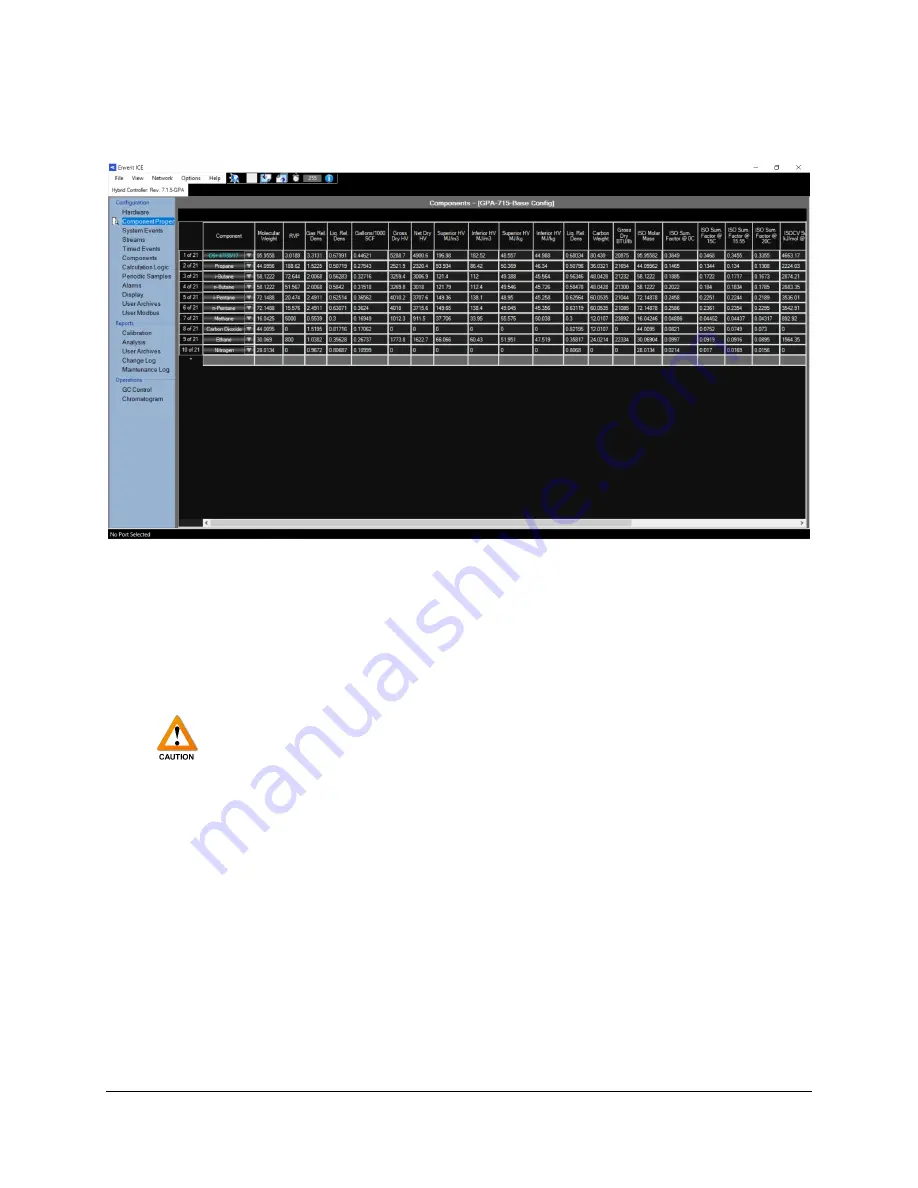
Components 

This page includes the physical properties tables for each of the selected 
components in the table. Up to 21 components can be selected from a pre-
defined list by clicking the drop-down in the blank area. 

The values defined here are critical to the output and operation of the gas 
chromatograph. Adjusting these values can have a negative impact on 
measurement. For assistance regarding any changes in components, contact 
Envent Engineering Ltd. 


Summary of Contents for 131S

Page 1: ...Gas Chromatograph Models 131S 132S Alternative Models 131S T4 and 132S T4 ICE Version 9 1 X X Software Manual Revision 1 06 Jul 2022 ...

Page 2: ......

Page 3: ...9 Uploading a Device file to the Analyzer 7 2 10 Changing System Units 7 2 11 Using the System Variables Blue Menu 8 3 0 Connection Interfaces 9 3 1 Connection Via USB 9 3 2 Connection Via Ethernet 10 3 3 Configuration of the Ethernet Interface 12 4 0 Device Configuration 13 4 1 Hardware 14 4 2 Component Properties 19 4 3 System Events 20 4 4 Streams 22 4 5 Timed Events 23 4 6 Components 24 4 7 Ca...

Page 4: ...3 User Archives Reports 38 5 4 Change Log Maintenance Log 39 6 0 GC Operations 40 6 1 GC Control 40 6 2 Chromatogram 44 6 3 Calibration 46 6 3 1 Automatic Calibration 46 6 3 2 Manual Calibration 47 6 3 3 Forced Calibration 48 Contact Us 52 ...

Page 5: ...m the start up date whichever comes first During the warranty period the manufacturer can choose to either repair or replace products which prove to be defective The manufacturer or its representative can provide warranty service at the buyer s facility only upon prior agreement In all cases the buyer has the option of returning the product for warranty service to a service facility designated by ...

Page 6: ...tice 1 2 2 Disclaimer No other warranty is expressed or implied The manufacturer specially disclaims the implied warranties of merchantability and fitness for a particular purpose The sole remedy of the buyer shall in no case exceed the purchase price of the analyzer The manufacturer shall not be liable for personal injury or property damage suffered in servicing the product The product should not...

Page 7: ...enus have underlines on some of the letters these indicate hot keys which can quickly access menu items To use the hot keys use the Alt key and press the letter underlined For example Alt F will open the file menu then continuing to hold Alt and pressing N will open the new file dialogue 2 1 Overview Below is an overview showing all the basic parts of the ICE software The user should become famili...

Page 8: ...d a firmware revision to the analyzer Printer Setup Opens the Windows printer setup Page Setup Opens the Windows page setup Exit Exits the software 2 3 View Menu View Preferences Allows the user to change software preferences such as the time units chart preferences and temperature pressure units displayed Serial Port Setup Allows the user to adjust the timing on the serial port Reporting Opens a ...

Page 9: ...ogue same functionality as the View Reporting option Modcom Advanced use ICE built in modbus simulation tool GPA Calculations Advanced use ICE built in GPA calculation tool GPA Component Builder Advanced use More advanced GPA component building and calculation tool 2 6 Help Menu Help About Displays the about information for Envent ICE ...

Page 10: ...urrently selected device Read from device Reads the device file from the currently connected device Write to device Writes the currently open device file to the currently connected device Synchronize Clock with PC Clicking this button will immediately synchronize the real time clock RTC on the analyzer with the system clock on the currently connected PC Address of Connected Device Allows the user ...

Page 11: ...Uploading a Device file to the Analyzer It may be required to upload an older or preconfigured device file to the analyzer 1 Connect to the device using one of the methods described in Section 3 of this manual Ensure that the device is connected and has been read and all parameters are sucessfully in the software 2 Close the current configuration by navigating to File Close The user can also right...

Page 12: ...tire folders to be dragged 1 Identify the variable that is needed and locate it in the folders 2 Drag the variable into the required field see screenshot below To remove variables the variable can often be deleted by highlighting it and pressing the Delete key on the keyboard In the example below a Discrete Input Low He was dragged to create a new alarm point Please note For some variables we must...

Page 13: ...the operating system In Windows 7 8 or 10 the device manager can be found by navigating to the system s control panel For assistance with installing the USB driver contact Envent Support 1 Connect the USB cable from the PC to the gas chromatograph s interface 2 In Envent ICE click the connection globe on the menu bar select USB Speed and the correct communications port in the screenshot below COM7...

Page 14: ...host PC and Envent Analyzer must be on the same sub network to communicate The default connection parameters are as follows IP Address 192 168 1 105 Subnet Mask 255 255 255 0 Gateway 192 168 1 1 Host Name Typically SN of the board If the default settings are lost please contact Envent Support for instructions on retrieving the settings 1 Connect the Ethernet cable from the PC to the gas chromatogr...

Page 15: ...nt on the user s machine the speed selection at the top of this interface does not matter 4 Click the read button and monitor the connection bar at the bottom of the software s interface The connection bar should indicate which port is open as well as a progress bar indicating read progress Once the connection bar has concluded then the software has successfully read the parameters from the device...

Page 16: ... s PC is on the same network even if the device is directly connected 2 Refer to the previous section to scan the network and find the analyzer on the network 3 In the Network menu point at the device using the mouse cursor and select the Edit option 4 A dialogue menu will open the new parameters of the network interface card can be programmed here once complete click the Send Changes button this ...

Page 17: ...rization for correct analytical operation Adjusting values without a proper understanding of their function can have consequences including but not limited to loss of measurement damage to analytical components and or injury or loss of life to operators Make sure to read and understand the contents of this manual fully and consult Envent Engineering Ltd if there are any concerns or doubts to the o...

Page 18: ...vent Engineering Ltd 131S 132S Software Manual Revision 1 Page 14 4 1 Hardware Layout The layout tab shows a diagram of the Electronics Main board This tab can be used to visually identify all components ...

Page 19: ...rete inputs IO Name Input the name of the DI for example Low He Active State Closed The DI looks for when the signal is shorted and outputs a 1 indicating the alarm state Open The DI looks for when the signal is open and outputs a 1 indicating the alarm state Analog Inputs Analog inputs are critical to the functionality of the gas chromatograph and should not be adjusted by the end user Adjusting ...

Page 20: ... user defined modbus modbus master mode or SIM2251 configuration Parity No parity even parity or odd parity Comm ID Comm ID of the RS485 port must be unique on the network If this value is set to 0 then Comm ID Plug ID Use 2 Stopbits Check to enable 2 stopbit communication as opposed to 1 Plug ID When Comm ID or Network Comm ID are set to 0 they use the Plug ID instead Site ID User defined ID numb...

Page 21: ...y and up to 11 telemetry points for other indication or control These points are typically configured at the factory and should not be adjusted without consultation of Envent Engineering Ltd Adjusting the solenoid outputs may inadvertently affect analyzer operation IO Name Input the name of the DO for example 10 PORT Active State Energized When the state of the DO is active the circuitry is energi...

Page 22: ...t used to control a device Signal Output used for signal ex to DCS IO Name The name of the signal Ex Oven Temp Zero Value to be output at 4 mA Span Value to be output at 20 mA Factory Zero Factory set do not adjust Factory Span Factory set do not adjust Variable The variable to be output selected by the blue variable list to the right Below is a screenshot showing an example of how a variable has ...

Page 23: ...elected components in the table Up to 21 components can be selected from a pre defined list by clicking the drop down in the blank area The values defined here are critical to the output and operation of the gas chromatograph Adjusting these values can have a negative impact on measurement For assistance regarding any changes in components contact Envent Engineering Ltd ...

Page 24: ...r a new event To remove events highlight the event by clicking its index number ex 5 of 32 and press the delete key on the keyboard To access each event s additional configuration click the event to highlight it and the white space to the right will become a configuration panel This allows powerful automation to be added to the gas chromatograph see the screenshot below for an example of an Auto C...

Page 25: ... where the gas chromatograph is idle and does not inject any sample Bypass This system state is not used in the gas chromatograph Acknowledge This system state acknowledges active alarms Activation Allows the user to select from one of the system events configured above to activate the system state Latch Timeout A timer in seconds after which the system state is disabled Output Controls Allows the...

Page 26: ...ss customer end stream Reference Calibration standard as an unknown Calibration Calibration standard can adjust calibration factors Baseline Can run without sample Purge Time Optional time to purge the stream before running Purge Outputs Optional outputs which will be turned on to purge the stream Valid Run Count Calibration Only controls the number of runs the calibration will average for the fin...

Page 27: ...s chromatograph The user must ensure they read and understand each value before adjusting them Contact Envent Engineering Ltd for assistance 4 5 Timed Events Timed Events Multiple tables can be configured Timed events allow the gas chromatograph to automatically control the timing of valves inhibits filtering etc to produce a proper output and chromatogram The timing is critical to the functionali...

Page 28: ...The top half of this page is where the calibration tables and component split tables can be defined and configured See below for a description of each configurable field Sensor Defines on which sensor the component will be measured Component Drop down selecting the component defined in Component Properties Cal Gas Units Selectable units which appear on the calibration standard Cal Gas Defines the ...

Page 29: ...lculates concentration based on peak height Fixed Area Fixes the peak area to the last forced calibration peak area Fixed Height Fixes the peak height to the last forced calibration peak height RT Update Calibration Uses calibration run to update the retention time recommended Analysis Uses analysis run to update the retention time None Does not update the retention time Baseline Removal Drop Remo...

Page 30: ...ently There is a blank space under the tabs for the user entered name of the stream Below this point there are several drop down menus from left to right they are Sensor selection default is primary timed events table selection stream selection streams which are set up in the Streams page and calibration table selection The Cycle Time box is the time that the stream will run before restarting A sp...

Page 31: ...lso an interval to calibrate daily at 8 AM again running 3 times Telemetry The telemetry section allows the user to define telemetry for the stream When the stream is running the selected discrete outputs will be active In the example to the left the CAL 1 LED has been checked which will illuminate the CAL 1 LED when the calibration stream is running Lockouts Lockouts allow the user to specify whe...

Page 32: ...hich component in the stream is tied to which component in the calibration tables This is important to define as there may be multiple components with the same name but with different calibration standard values in the case of an analyzer with multiple streams and multiple calibrations as seen in the example below ...

Page 33: ... user to create custom calculations which can be performed at a specified interval A calculation is created in the factory to control the oven temperature Please do not adjust any variables on the Heater PID control calculation or significant and irreparable damage may occur to the analytical components of the gas chromatograph ...

Page 34: ...d they can be used elsewhere in the software for display alarm points outputs etc Variable User can select the variable on which an averaging calculation should be performed Activation Select a system event which will begin the averaging Reset Select a system event which will stop the averaging default is No Reset An example is shown below which averages the Board Temperature C on a minute by minu...

Page 35: ... is ascending or descending Setpoint User defined setpoint for the alarm Reset User defined reset point for the alarm Deadband Absolute difference between set and reset points Latch Checked Alarm will remain until acknowledged Unchecked Alarm will clear when the state clears Output Controls Select which discrete outputs are changed when the alarm state is true Alarm On Timer Allows a grace period ...

Page 36: ...ection of this page allows the user to define which variables will appear on the display Caption User defined display name of the variable Variable Variable selected from the System Variables on the right Units User defined engineering units of the variable Decimals User defined number of decimals to use ...

Page 37: ...e back lighting of the display Menu Timeout Sec Timeout for the additional menu of the display Layout Type Allows the user to select between 1 line to 4 line display Top Button Function Bypass Top button makes the analyzer go into bypass not used on GC Halt Top button halts the GC Acknowledge Top button acknowledges all alarms Disable Top button does nothing Bottom Left Area A system variable can ...

Page 38: ...ng The lower section is for user configuration Items When items are added from the System Variables they appear in a list format here Multiple lists can be added into the Items column Groups of variables are treated as a group or array Archive Name User defined name for the archive to appear on reports Rollover Count The number of records before the archive is rolled over First in first out Activa...

Page 39: ...st be dragged from the System Variables interface on the right side of the screen variables can also be double clicked to add them to the modbus table A default modbus 32 bit configuration is supplied with every GC analyzer Above the configurable table there are three selectable modbus options Enron Also known as Daniel mode Uses 32 bit registers Modicon16 Switches the registers to 16 bit register...

Page 40: ...dditional options on the calibration report page Open Opens a report which was saved from the save function Save Saves the currently open report in a format only readable by ICE Print Preview Opens the Windows print dialogue Clipboard Copies the report to a tab separated format for pasting into Excel From Analyzer Clicking this button pulls reports from the analyzer Table x A drop down menu to sel...

Page 41: ... user to generate analysis reports The analysis report contains the raw and analytical data for analytical runs Load Report Loads a report saved in an ICE format From Chart Parses data from a chromatogram chart file into a report From Analyzer Downloads the selected number of reports from the analyzer ...

Page 42: ...t the records and the second is to indicate how many records to retrieve For example if 20 of records is selected the analyzer will send the previous 20 records if an offset of 1 is entered the analyzer will send 20 previous records beginning with the 2nd most previous The Read Archive Records button begins the operation the Abort button stops the operation There is a progress bar for indication B...

Page 43: ...ipboard Clicking this button copies the selected data to the clipboard as a tab separated format for pasting into Excel Auto Fit Clicking this button automatically re sizes all the data views to fit the information Additional to the buttons there is also an option to filter the data based on a date range Each column can also be filtered based on largest to smallest or smallest to largest by clicki...

Page 44: ...dle of the page are two bar graphs indicating the analog output readings as well as a vertical graph indicating the frequency output reading The bottom of the page has an array of boxes indicating all the discrete output states Right clicking the discrete outputs allows the user to manually change the state of the outputs or switch the outputs back to automatic control Please note manually changin...

Page 45: ...nvent Engineering Ltd 131S 132S Software Manual Revision 1 Page 41 Enunciator Dashboard The second tab of the GC Control page allows the user to see the state of alarms and active states of the analyzer ...

Page 46: ...l system event for that stream defined in the Components page of Configuration Clicking the Continuous checkbox will queue up the stream in the analysis sequence but will run indefinitely until the checkbox is unchecked The Abort Current Run button at the top will immediately cancel the analysis regardless of the timing of the run and put the analyzer into idle mode Extreme caution must be taken w...

Page 47: ... are the control buttons the table below describes the function of each Run Analysis Sequence Starts the GC and runs the current sequence Reset Analysis Sequence Resets the analysis sequence to the default state Halt Halts the GC after the current run is finished Run Brings the GC out of idle mode and runs the current analysis this button also cancels a halt request Clear Alarm Latches Clears all ...

Page 48: ...y holding left click and moving the mouse When the right click button is held and the mouse is moved a box is drawn to zoom in on a desired portion of the chromatogram Double left click recenters the view and resets the scaling to the default scale Right clicking anywhere on the chromatogram brings up the context menu for more operations including the ability to convert the chromatogram into an An...

Page 49: ...e chromatograms to the PC s internal memory If they are not saved using the file dialogue they are lost forever when closed Starts the software playing the live chromatogram from the analyzer as it appears real time The Cal Button enters the currently viewed chromatogram into calibration mode Which enables more features Clicking the Popups button enables contextual popups on the chromatogram indic...

Page 50: ...ressure flow is set up for the calibration stream that needs verification calibration Calibration involves adjusting measurement sensitive factors in the analyzer and will have an impact on the performance and output of the analyzer 6 3 1 Automatic Calibration The gas chromatograph can be programmed to run the calibration on a regular basis automatically The following steps outline the general pro...

Page 51: ...ipped with automatic calibration or a manual calibration is desired follow these steps 1 Navigate to the GC Control page under Operations 2 Click the gray button for the calibration stream that needs to be run this will queue the calibration to be run next do not click the Continuous check box that is for forced calibration 3 The calibration automatically does 3 runs and generates a calibration re...

Page 52: ...ocess for a forced calibration is as follows Run calibration standard continuously until chromatograms are stable Verify stability of chromatograms Verify the positioning of each of the peaks Select one chromatogram and enter calibration mode Force the calibration factors from the chromatogram into the calibration table Write the calibration factors to the analyzer Steps Follow the steps below to ...

Page 53: ...ot below shows what 5 stacked and stable chromatograms could look like If there are any significant variations between the runs then there is likely a hardware problem Note the actual chromatogram depicted may be different depending on the analyzer 4 If the chromatograms are stable continue If the chromatograms are not stable contact Envent Engineering Ltd as more troubleshooting is likely require...

Page 54: ...eak s location The operator must ensure they have properly identified each peak which eluted and the order that they were detected Prior to making any severe adjustments to the Retention Times contact Envent Engineering Ltd 7 Select one of the stable chromatograms and enter calibration mode by clicking the Cal Button on the toolbar at the bottom of the screen An interactive system will open showin...

Page 55: ...libration table 8 Write the calibration factors into the analyzer by clicking the write button 9 Take the analyzer out of continuous mode by unchecking the Continuous check box on the GC Control page 10 Perform a manual calibration if desired to ensure the analyzer has properly calibrated 11 Calibration reports can be pulled from the analyzer as required ...

Page 56: ...solve any issues you may have Please have this manual readily available when calling for assistance For further information on our products or to access our most recently updated manuals and product catalogues please visit our website at www enventengineering com Canada Main Toll Free 1 877 936 8368 Tel 403 253 4012 Fax 403 253 4016 Email info envent eng com USA Tel 1 713 567 4421 China Tel 86 138...

Reviews: