Cont. "Operator with PULL arm system"
PULL
b
2x
4
5
6
210
C
L 1
L 2
c
a
2
1
3
Operator should be attached usingthe top/centered bolt first, then followpattern
1005088-EMEI-11.0
Issue 2014-11-24
38
9 Mechanical installation
Page 1: ...Swing Door Operator EM SW EMO ILL 01780 Installation and Service Manual Original instructions 1005088 EMEI 11 0 Issue 2014 11 24...
Page 2: ...AB Copying scanning alterations or modifications are expressly forbidden without the prior written consent of Entrematic Group AB Rights reserved for changes without prior notice Backtrack information...
Page 3: ...e backup batteries are installed optional 14 5 4 7 Nurse and bed functionality 14 5 5 Functions on the extension unit EXU SA optional 14 5 5 1 Presence impulse approach door mounted 14 5 5 2 Presence...
Page 4: ...nd accessories 59 12 Cover 59 12 1 Fitting and removing the cover 60 12 2 Middle piece cover 61 13 Signage 62 14 Changing group of parameters 63 15 Classification 63 15 1 Entering the program mode cla...
Page 5: ...ements 31 Updated back plate 32 Updated back plate 33 Updated back plate and measurements 35 Updated back plate 36 Updated back plate and measurements 37 Updated back plate 38 Updated back plate 39 Up...
Page 6: ...given supervision or in struction by a person responsible for their safety concerning safe operator use and the possible hazards involved Thisdoesnothoweverpreventthosepersonstousethedoorwhere the op...
Page 7: ...oidbodilyinjury materialdamageandmalfunctionoftheproduct theinstructionscontained in this manual must be strictly observed during installation adjustment repairs and service etc Training is needed to...
Page 8: ...batteries containingmaterialswhicharehazardoustotheenvironment Disconnectpowerbeforeremoving electronics and battery and make sure it is disposed of properly according to local regulations how and whe...
Page 9: ...fuse F1 F2 Max 1200 mm Door width 45 90 kg Door weight For PUSH 45 kg m2 Max Inertia J For PULL 16 kg m2 Inertia Door weight x Door width 2 3 Selectable 12V DC max 500 mA 24 V DC max 250 mA Electro m...
Page 10: ...34 75 18 110 ILL 01607 4 1 Permitted door weight and door width 0 50 100 150 200 250 300 350 400 450 0 8 0 9 1 1 1 1 2 1 3 1 4 PUSH arm PULL arm J 45 kgm J 16 kgm Door weight kg Door width m 1005088...
Page 11: ...2 swing door 1 Type of door leaf digit 3 not suitable for use as a fire protection door 0 Suitability for use as a fire protec tion door digit 4 low energy 3 Drive safety devices digit 5 no special re...
Page 12: ...y the motor 5 3 Functions on the basic control unit CU ESD Also see page 50 for more information 5 3 1 Power failure During power failure the operator acts as a door closer with controlled closing spe...
Page 13: ...no longer active operator will resume normal operation If KILL function must have manual reset jumper must be removed and reset button connected to terminal No 8 and Ground The lock will lock when KIL...
Page 14: ...d by in up to 1 week waiting for KEY impulse 5 4 7 Nurse and bed functionality To make it possible to open the master door only in a double door connect a 0 1 switch to the slave operator EXU SI board...
Page 15: ...k as a manual door closer 5 5 4 Open door indication A relay output is used to indicate an opening cycle or a specific position of the door The indication position is set by adjusting the inhibit blan...
Page 16: ...e operator suits both pushing and pulling arm systems 6 1 EM SW EMO standard cover wall mounted EM SW EMO is the standard operator Pushing arm system shown Measurement from hinge centerline to outgoin...
Page 17: ...3557 Cable kit 331006340 4 Door stop body 331003540 5 Top end plate 6 Bottom end plate 331003543 7 Cover 331004998 8 Power ON OFF switch 331003581 9 ON OFF HOLD open switch optional 331003582 Cable ho...
Page 18: ...10 300 mm 230 mm extension Art No 173004 A Joint part Art No 173191 7 2 Arm system PULL Art No 1003577BK PULL This arm system is delivered with drive arm guide shoe and door fitting It is used if the...
Page 19: ...ed 7 4 1 Options for ST V ST H Door fitting standard Art No 172071 Door fitting Break out pivot doors Art No 172325 right reveal A 0 60 mm or left when A 60 100 mm Art No 172327 right reveal A 60 100...
Page 20: ...l not operate electric lock P N 1003582 F U N C T I O N O N O F F H O L D White Brown Green Art No 1003582 Program Function Impulses from activation units connected to XIMP are forwarded into inner im...
Page 21: ...nual and or automatic activators The electric strike if fitted is open AUTO Normalpos ition The door is held permanently open by the motor OPEN 7 8 Sync cable for double doors synchronizing of 2 opera...
Page 22: ...Disable For Double egress doors these functions must be set separately for MASTER and SLAVE as the arm systems as well as the air pressure may be different Note Locks on the MASTER and SLAVE doors mu...
Page 23: ...ctions Art No 1003554 1 2 3 4 5 6 7 8 9 10 11 12 13 1 ON 2 3 4 5 AIU Audible warning signal Art No 656083 24 V DC ILL 01887 7 10 Battery backup unit Note Disconnect mains power when replacing battery...
Page 24: ...27 Emergency break out DIN right door Art No 1001785 Emergency break out DIN left door Art No 1001786 Activation by disabled people Click Art No 1003963 Operator designed for disabled people Art No 10...
Page 25: ...for the door leaves and that there are no sharp edges Projecting parts shall not create any potential hazards If glass is used bare glass edges shall not come in contact with other glass Toughened or...
Page 26: ...or rivnut A Wood reinforcement B Expansion shell bolt for brick wall min M6x85 UPAT PSEA B10 25 C Aluminium profile system 1 Plasterboard wall 2 Reinforced concrete wall and brick wall 3 Plasterboard...
Page 27: ...crewdriver Philips size 2 Nut driver 5 mm Carpenter s level Tape rule Power drill and set of drill bits Center punch Wire stripper Silicone sealant Installation and Service Manual this manual 8 6 Inst...
Page 28: ...ons and signaling wires before preparing back plate 9 1 Operator with PUSH arm system 0 100 34 PUSH C L2 2 17 2 37 2 67 2 87 48 68 50 20 98 70 X Y _ 118 X Y 36 16 75 1 330 mm with longer telescopic pa...
Page 29: ...Cont Operator with PUSH arm system 3 C L 1 210 34 X 16 Y 16 75 19 633 248 45 38 8x 4x 42 16 2 DIN Right PUSH DIN Right 29 Issue 2014 11 24 1005088 EMEI 11 0 9 Mechanical installation...
Page 30: ...th PUSH arm system PUSH 4 5 4x C L 1 210 C L 2 1 2 4 3 a b c c a 2x b Operator should be attached using the top centered bolt first then follow pattern 1005088 EMEI 11 0 Issue 2014 11 24 30 9 Mechanic...
Page 31: ...Cont Operator with PUSH arm system 3 2 PUSH C L 1 210 34 X 16 Y 16 75 19 633 248 45 38 8x 4x DIN Left DIN Left 31 Issue 2014 11 24 1005088 EMEI 11 0 9 Mechanical installation...
Page 32: ...th PUSH arm system 5 4 PUSH C L 1 c c 2x 4x a 210 1 2 b b C L 2 3 a 4 Operator should be attached using the top centered bolt first then fol low pattern 1005088 EMEI 11 0 Issue 2014 11 24 32 9 Mechani...
Page 33: ...Cont Operator with PUSH arm system 6 I I I I I I I I I I I I I I I I I I 25 Nm 7 90 2x 8 b a PUSH C L 1 C L 2 33 Issue 2014 11 24 1005088 EMEI 11 0 9 Mechanical installation...
Page 34: ...9 2 Operator with PULL arm system 48 68 98 118 Z _ 40 x 60 0 130 23 C L 2 20 50 70 PULL 16 75 Z 34 36 1 1005088 EMEI 11 0 Issue 2014 11 24 34 9 Mechanical installation...
Page 35: ...Cont Operator with PULL arm system 2 3 DIN Left PULL 210 34 Z 16 23 75 109 582 38 8x 4x C L 1 210 34 19 633 DIN Left 35 Issue 2014 11 24 1005088 EMEI 11 0 9 Mechanical installation...
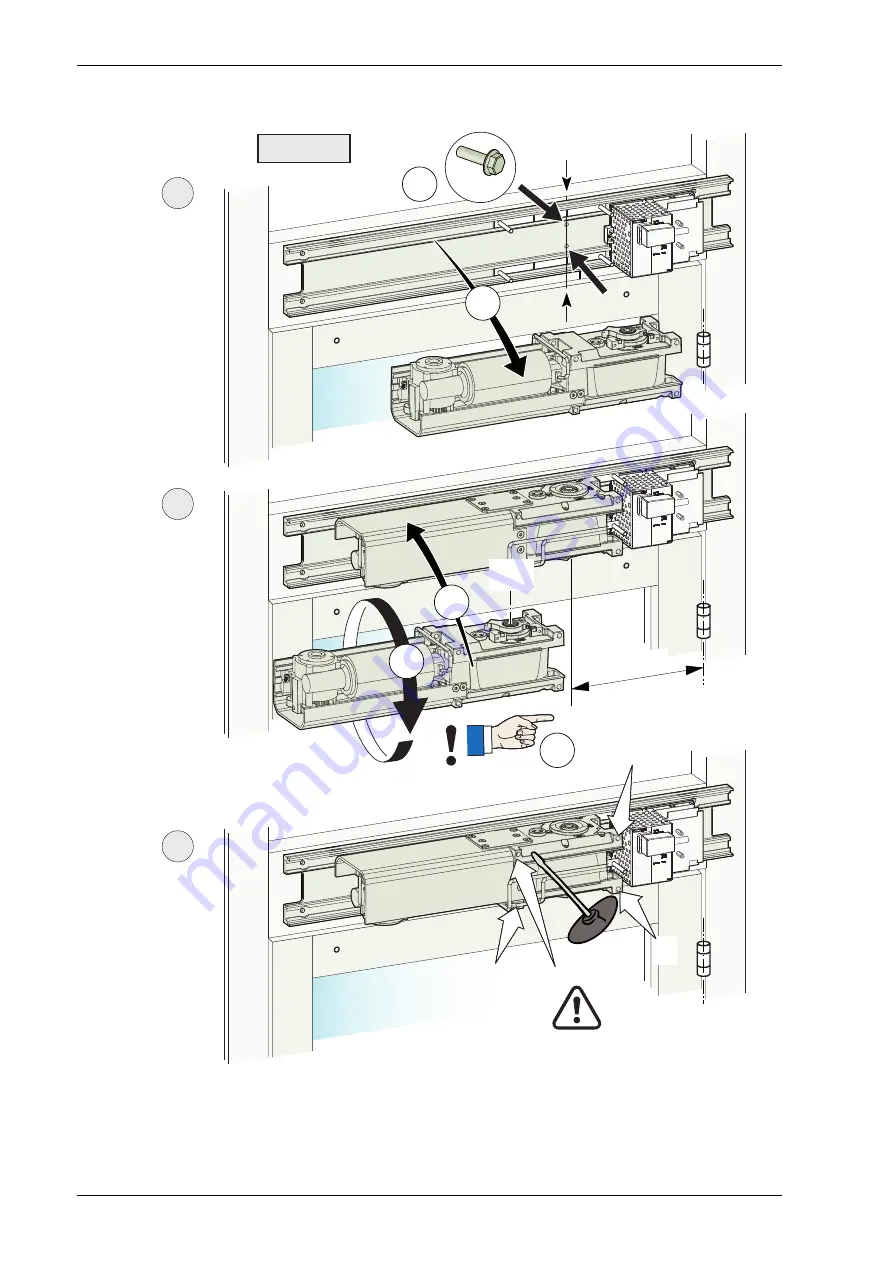
Page 36: ...ULL arm system PULL b 2x 4 5 6 C L 2 210 C L 1 C L 2 c a C L 2 a b 2 4 1 3 Operator should be attached using the top centered bolt first then follow pattern 1005088 EMEI 11 0 Issue 2014 11 24 36 9 Mec...
Page 37: ...Cont Operator with PULL arm system 2 3 PULL 210 34 Z 16 23 75 19 633 109 582 38 8x C L 1 DIN Right 4x DIN Right 37 Issue 2014 11 24 1005088 EMEI 11 0 9 Mechanical installation...
Page 38: ...ULL arm system PULL b 2x 4 5 6 210 C L 1 C L 2 C L 2 c a a C L 2 b 2 4 1 3 Operator should be attached using the top centered bolt first then follow pattern 1005088 EMEI 11 0 Issue 2014 11 24 38 9 Mec...
Page 39: ...m system 7 8 I I I I I I I I I I I I I I I I I I 25 Nm 8 d C L 1 C L 2 2x Click Click a a b c b c C L 1 C L 1 DIN Right DIN Left c e a b e PULL DIN Right DIN Left 39 Issue 2014 11 24 1005088 EMEI 11 0...
Page 40: ...9 3 Installation of operator with arm system ST 1 ILL 01599 34 42 57 A C L 2 A 60 100 A 0 60 ST 16 75 36 1005088 EMEI 11 0 Issue 2014 11 24 40 9 Mechanical installation...
Page 41: ...Cont Installation of operator with arm system ST 42 73 75 34 2 C L C L 3 ST 43 248 100 633 6x 6x DIN Left a b Outside open door DIN Left 41 Issue 2014 11 24 1005088 EMEI 11 0 9 Mechanical installation...
Page 42: ...T ST 3 2 4 1 4 C L Operator should be attached using the top centered bolt first then follow pattern Operator should be attached using the top centered bolt first then fol low pattern 1005088 EMEI 11...
Page 43: ...Cont Installation of operator with arm system ST 42 73 75 34 2 C L C L 3 ST 43 248 100 633 6x 6x DIN Right Outside open door DIN Right 43 Issue 2014 11 24 1005088 EMEI 11 0 9 Mechanical installation...
Page 44: ...nstallation of operator with arm system ST ST 4 2 1 4 3 C L Operator should be attached us ing the top centered bolt first then follow pattern 1005088 EMEI 11 0 Issue 2014 11 24 44 9 Mechanical instal...
Page 45: ...Cont Installation of operator with arm system ST 5 6 7 ST 143 65 I I I I I I I I I I I I I I I I I I 25 Nm C L 45 Issue 2014 11 24 1005088 EMEI 11 0 9 Mechanical installation...
Page 46: ...Cont Installation of operator with arm system ST a b c 9 45 90 0 8 ST 1005088 EMEI 11 0 Issue 2014 11 24 46 9 Mechanical installation...
Page 47: ...Cont Installation of operator with arm system ST 10 11 ST 5 1 mm 2x 2x 2x 47 Issue 2014 11 24 1005088 EMEI 11 0 9 Mechanical installation...
Page 48: ...nstallation of operator with arm system ST 12 b c b c 13 90 5 30 46 DIN Right DIN Left C L a C L a Cut out for arm bracket DIN Right DIN Left 1005088 EMEI 11 0 Issue 2014 11 24 48 9 Mechanical install...
Page 49: ...hazard 10 1 Mains connection a Switch off the mains power b Assemble the bottom end plates and tighten the two screws firmly c Connect the plug contact to the wall socket or connect to the mains swit...
Page 50: ...Mat safety Inner impulse Ground Overhead presence detection incl 24 V LOUT and Safety Impulse ERROR Hold open time DIP switches shown in OFF position Closing torque Power assist Closing speed Opening...
Page 51: ...ions the extension units can be mounted on top of the control unit CU ESD separately or combined EXU SA EXU SI CU ESD ILL 01610 Torx T10 5 mm nut driver Tag strip long 2 pcs EXU short 1 pcs EXU Main c...
Page 52: ...4 V DC max 250 mA see DIP switch No 1 below Potentiometer for opening delay2 Manual kill reset jumper off Automatic kill reset jumper on Battery monitoring Lock kick1 Lock release2 Locked without powe...
Page 53: ...tion and presence impulse External error indication Open door indication Relay output External error indica tion or Open door indication see above 24 V 1 A Sensor test Presence detection NC 1 Presence...
Page 54: ...the door stop a Close the door b Turn the potentiometer SPTE to 0 if not already on 0 CU ESD 0 SPTE c Switch on the mains power the operator will find its closed position 0 0 d Open the door to requi...
Page 55: ...t if necessary with the screw on the stop block c a b c g Close the door by turning the potentiometer SPTE to 0 and let the door close Note Impulses are not accepted if SPTE is more than 0 0 SPTE 1 4...
Page 56: ...ch check 11 2 1 One push two pushes on the LEARN BUTTON LRN Note Remain clear of swing path of door as door may close rapidly The door has no safety during auto learn cycle One push delayed opening Pu...
Page 57: ...d c Adjust the closing speed CLSP Turning counter clockwise decreases the speed See the Guide for installers of Powered Pedestrian Swing Doors document PRA 0006 for calculation of speed d Connect the...
Page 58: ...operator 1 2 3 4 1 2 3 4 5 6 7 8 PRESS TO OPEN 1 2 3 4 5 1 4 CU ESD CU ESD EXU SI CU ESD EXU SA CU ESD EXU SA EXU SI EXU SI 5 6 2 3 EXU SI 7 3 7 3 6 2 1 5 13 3 4 3 4 6 1 3 1 3 6 1 2 1 2 3 1 5 3 10 SP...
Page 59: ...r cover see illustration Apply the EM logotype to the cover see illustration Only for SE Apply the SITAC label next to the product label see illustration 40 25 SITAC XXXX TG XXXX XX Ers tter l s med f...
Page 60: ...12 2 Middle piece cover X 4 4 X 8 X 4 1005088 EMEI 11 0 Issue 2014 11 24 60 12 Cover...
Page 61: ...pean directives and equivalent national legislation outside the European Union Product label Mandatory A Emergency break out Mandatory if approved for escape route B Entrematic Group door sticker Mand...
Page 62: ...Locked dur ing KILL Locked dur ing KILL KILL mode Reverses when ob structed Door closer Door closer Door closer Door closer Reverses when ob structed Door closer Door closer Door closer Door closer OB...
Page 63: ...er it will start at number one again Push the button until you get the requested classification Disconnect the mains plug Next time you connect the mains the operator will use the new classification 1...
Page 64: ...to 80 open or minimum closing time from 90 to 10 open Door mass kg Width of door leaf mm 90 80 70 60 50 Time s min 3 5 3 3 3 2 3 2 3 0 750 3 6 3 4 3 2 3 1 3 1 850 4 2 4 0 3 7 3 4 3 2 1000 5 1 4 8 4 5...
Page 65: ...reverts to learn the fully open position g Remove the stop h The door reverts to closed position 16 2 Revert to default values for back and latch check a Disconnect batteries if any b Disconnect the...
Page 66: ...educes the tension or Moving the door towards closed position increases the tension e Tighten the drive arm f Turn the potentiometer SPTE to 0 g Open the door to required open position plus approx 15...
Page 67: ...w to find the correct opening and closing time Measure the door width If the door weight is unknown follow the instructions in Diagrams for door weight Go into the diagram below to find the correct mi...
Page 68: ...the first diagram for Aluminium Frame with glass Start with the area and follow the line up to the 12 mm glass go left to receive the door weight 95 kg Note The weights can vary depending on the door...
Page 69: ...be connec ted to kill a Drill a 9 5 mm 3 8 hole in the door leaf just behind the magnet for the magnetic switch G1 b Extend the cable length for the switch G1 c Mount the magnetic switch G1 and the f...
Page 70: ...stop l Adjust the spring pre tension on the ball catch to its maximum and then release 2 turns m Mount the drive arm to the operator see installation manual n Check break out force with a balance by p...
Page 71: ...t the door in required open position Tighten the arm system Turn SPTE to 0 Arm system has come loose Change the setting of the control switch Control switch is set to HOLD The door does not close Remo...
Page 72: ...flashes pause etc Check the encoder cable Open and close the door manually and thereafter check the automatic function If the operator is still out of function replace the drive unit Encoder error Fo...
Page 73: ...e and proper operation of an automatic door unit The Service Log Book shall be used together with the Site Acceptance Test and Risk Assessment document provided Keep both documents available for maint...
Page 74: ...Entrematic Group AB Lodjursgatan 10 SE 261 44 Landskrona Sweden Tel 46 10 47 48 300 Fax 46 418 201 15 www entrematic com info em entrematic com...