background image

 
Chapter 7. Advanced Settings 

MCU Settings 

xPoint Standard (S) Ver. 1.5 User Guide 


  68 


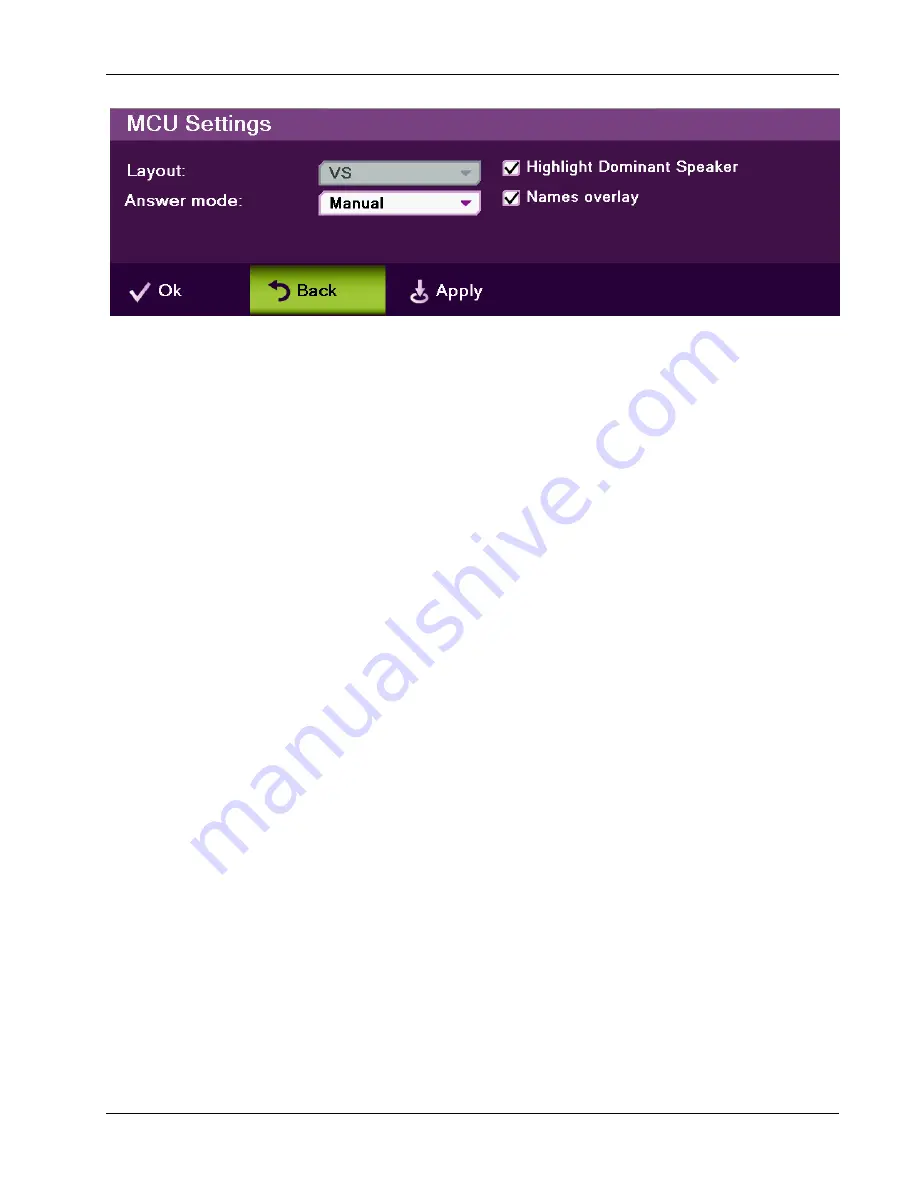
Figure 31.  MCU Settings Window 

2. 

In the MCU window, set the following options and parameters: 

o


Layout

 – Set the default layout for a multipoint call: 

Ö


Auto

 – The system will change the layout automatically 

according to the following principle: for up to 4 participants, the 
2

¯

2 layout is used; for 5 or 6 participants, the 5+1 layout is 

used; for 7 and up to 9 participants, the 3

¯

3 layout is used. 

Ö


VS

 (voice switched) – The video stream of the dominant speaker 

is shown. The current dominant speaker sees the previous 
dominant speaker. 

Ö


2

¯

2

 – The screen is divided into 4 quadrants of the same size. 

Each quadrant contains an image. If there are more than 4 
endpoints in the call using this layout, the dominant speaker 
appears, replacing an image of a non-dominant speaker. 

Ö


3

¯

3

 – The screen is divided into 9 rectangle portions of the 

same size. Each quadrant contains an image. 

Ö


5+1

 – This layout divides the screen into six rectangle portions. 

One is larger than the other parts and contains the image of the 
dominant speaker at any given time.  

o


Answer Mode

 – Set the default answer mode for the second and 

subsequent calls: 

Ö


Accept

 – Automatically accept incoming calls 

Ö


Reject All

 – Automatically reject all incoming calls 

Ö


Manual

 – Display a prompt each time a call comes in 

o


Highlight Dominant Speaker

 – Display a green frame around the 

quadrant of the dominant speaker, except for in the 5+1 layout. 

o


Names Overlay

 – Display the remote station name overlaid on 

each participant image. 

3. Select 

Apply

.  

Incoming calls will be answered using the settings you configured. 

Summary of Contents for xPointS

Page 1: ...xPointS User Guide Document Part No DOC 02 003 09 10 Executive Videoconferencing System Version 1 5...

Page 2: ...ts of this document is the intellectual property of Emblaze VCON Ltd and is protected under international copyright laws and treaties Reproduction redistribution translation disassembling or any editi...

Page 3: ...Details 19 Configuring the Camera 19 Configuring the Audio 21 Configuring the Display 23 Chapter 4 Videoconferencing 25 Starting Calls 25 Auto Answering Calls 27 Ending Calls 27 Muting the Video 28 Sw...

Page 4: ...39 Using Speed Dial via the Remote Control 40 Using Speed Dial via the Address Book 40 Adding numbers to the Speed Dial 40 Editing Speed Dial Numbers 40 Deleting Speed Dial entries 41 Using Online Dir...

Page 5: ...Secure Connect Settings 69 Chapter 8 Web Access and Management 70 Accessing the xPointS Unit via a Browser 70 Viewing a Stream Session 71 Viewing a Multicast Videoconference 72 Importing Exporting th...

Page 6: ...ce with other people and organizations xPointS enables you to record and stream video calls to multiple locations with up to 8 additional participants Using Interactive Multicast VCON s patented techn...

Page 7: ...via a Web interface Downloading sharing files via a USB flash drive Interactive multicast chair participant Session multicast Embedded broadcast viewer Calling via address book log entries or speed di...

Page 8: ...n 1 5 of xPointS include Embedded MCU for multipoint sessions The embedded MCU optional component enables connecting up to 4 endpoints simultaneously from various locations This MCU capability include...

Page 9: ...ide by side view enables viewing both the remote and local video streams at equal size on the screen side by side To switch to side by side PIP view via the remote control press the PIP button on the...

Page 10: ...End mute indicator An indication that the remote side has muted its microphone is now available The indication appears on the screen if it is supported by the remote system Note this option is not av...

Page 11: ...een Menu Displaying System Information Using the Remote Control You can navigate the xPointS on screen graphic user interface GUI using the infrared remote control bundled with the unit A separate inf...

Page 12: ...anumeric Keypad The remote control includes an alphanumeric keypad with buttons from 0 to 9 as well as and Clear Backspace buttons In different windows you can toggle between numbers and letters depen...

Page 13: ...ar End Control the position PTZ of the camera at the near far end Camera Control Configure the camera position settings Preset Recall Recall a camera PTZ preset position Preset Set Set a camera PTZ pr...

Page 14: ...on highlighted in green on the screen Volume Up Down Increases decreases the volume or switches between lower and upper case Zoom In Out Zooms in or out with the camera Make Call Start a new call End...

Page 15: ...S Ver 1 5 User Guide 14 Figure 3 xPointS Main Menu Navigate the xPointS menu using the remote control To expand menu options Press the right arrow on the joystick when the expandable option is selecte...

Page 16: ...Point Standard S Ver 1 5 User Guide 15 Figure 4 xPointS Expanded Menu Options To access a category option Press OK when the category option is selected highlighted in green To collapse the menu option...

Page 17: ...ll user defined settings and returns the unit to its factory default settings Shutdown Shut down the unit Restart Reboot the unit Open Open the selected folder file Next Continue to the next step Fini...

Page 18: ...IP You can use this IP address to access and manage the unit via a browser see Accessing the xPointS Unit via a Browser Secure Connect IP Indicates whether xPointS uses a secure IP connection if such...

Page 19: ...settings see System Settings ISDN Number ISDN number that is currently being used MAC Address MAC address of the xPointS unit Media Indicates whether a recording streaming session currently takes pla...

Page 20: ...d of your IP address To set the user settings 1 Select Settings General User the User Settings window appears 2 In the User Settings window enter the following details o First Name Type your first nam...

Page 21: ...uring the Camera xPoint Standard S Ver 1 5 User Guide 20 2 Using the remote control s joystick select Settings Camera and then press OK the Camera Settings window appears Figure 6 Entering Camera Sett...

Page 22: ...Communication Port you are using default is Com 1 4 Select the correct option from the Camera Model and Analog Video Format drop down lists 5 Optional for PTZ cameras select the Allow Far End Camera...

Page 23: ...ring the Audio xPoint Standard S Ver 1 5 User Guide 22 Figure 8 Entering Audio Settings Figure 9 Audio Settings Window To configure the audio settings 1 In the Audio Settings window set the following...

Page 24: ...Lip Synchronization If the voice you hear is not synchronized with the lip movement in the video display move the slider as follows Towards Delay Video if voice is heard after the lip movement Towards...

Page 25: ...re connected o Keep Aspect Ratio Select this option to keep the original aspect ratio on screens that have different aspect ratio o Change display settings see Display Adapter Settings in Chapter 7 Ad...

Page 26: ...ing Calls Ending Calls Muting the Video Switching Image Modes Switching Call View Modes Using Picture In Picture PIP Modes Call State Indications Using Call Tones Recording and Streaming Data Sharing...

Page 27: ...or ISDN number to which you want to call Alternatively instead of an IP address you can also use an Alias E 164 number or a DNS address if such are defined on your network To type numbers make sure t...

Page 28: ...answer option is not selected and an incoming call is received a message is displayed on the screen You can accept or reject the call using the buttons on the remote control or via the screen message...

Page 29: ...sentation change Far End Mode You can control the view at the Far End camera By pressing Far End you can control the camera of the remote person you are having a conversation with Switching Call View...

Page 30: ...n to all corners then hides the PIP image and starts again on a subsequent button press The default video mode is PIP 1 in which the local caller s video is displayed in the small upper left corner wh...

Page 31: ...P Modes Call State Indications Various call states are represented by icons on the screen when videoconferencing is taking place GUI Icon Indication The current call is encrypted The local microphone...

Page 32: ...uccessful gatekeeper registration Successful gatekeeper registration Passive multicast mode MCU VS layout mode Currently recording Currently streaming Using Call Tones When making calls the call opera...

Page 33: ...e with the parties connected through the data sharing option Through the xPointS Web management system remote users can view all previously recorded sessions and downloaded them for later viewing with...

Page 34: ...tart Streaming Session streaming allows any remote system with the Microsoft Media Player application to view played recordings or whatever your camera microphone are transmitting from the xPointS sys...

Page 35: ...oosing the Data Source In order for the system to recognize data sources you need to be connected to a USB flash drive a laptop or have recorded files saved locally in your system To choose a data sou...

Page 36: ...en opened during a videoconference recordings are shared To view recorded files 1 Select Data Sharing File the Document Selection window appears Figure 14 Document Selection Window 2 Select the record...

Page 37: ...om where calls can be made directly Using the Address Book via the Remote Control You can select the address book using the remote control To select the address book via the remote control 1 On the re...

Page 38: ...select the address book from the New Call bar To select the address book via the New Call bar 1 Select New Call on the main menu the New Call bar appears 2 In the New Call bar select Address Book the...

Page 39: ...Save Note if necessary you can change the dialing method H 323 or ISDN and bandwidth that are used specifically for the contact that you edit If you choose ISDN the number to be dialed must be predefi...

Page 40: ...ddress book You can add Call Log to the Address book for reuse later To add call log entry to the address book 1 In the Call Log select the entry you want to add to the address book and then press OK...

Page 41: ...t with the joystick and scrolling down 2 Select the number to dial and then press OK The contact number is copied to the new call field 3 Select Call or press Make Call the Calling screen is displayed...

Page 42: ...the Remote Control You can access the address book using the remote control To access the address book via the remote control 1 On the remote control press the address book button The address book op...

Page 43: ...aling Methods Using Online Directories xPoint Standard S Ver 1 5 User Guide 42 3 Select Call or press Make Call the Calling screen is displayed When the call is answered on the far end the system swit...

Page 44: ...seen heard at a time while the rest are passive participants The Chair can allow numerous participants to join the session but the bandwidth used is for one person only The Chair limits the total par...

Page 45: ...wers Select this option to enable anyone to freely join the conference as a viewer When this option is selected the Require Password option below is disabled o Require Password Select this option to r...

Page 46: ...ve Multicast Overview Adding Participants to the Interactive Multicast You can wait for participants to join the interactive multicast or you can actively add participants to the session To add a part...

Page 47: ...he Chair side the following options are available during an interactive multicast session Grant Talk to a Participant Grant Floor to a Participant Automatically Grant Floor Set the Answer Mode Reclaim...

Page 48: ...uto Reject Automatically rejects any request to join the session any incoming call The Chair may use this option to prevent disruption or when only specific participants were added or are to be added...

Page 49: ...hair can accept the request A blinking camera icon is displayed on the Chair side as long as the participant is waiting for the Chair s authorization Note participants to which the floor is granted ar...

Page 50: ...s Multicast Settings Recording and Streaming Settings MCU Settings Secure Connect Settings Display Adapter Settings In addition to the basic display settings see Configuring the Display you can set th...

Page 51: ...elect Yes the system opens the embedded Windows Display Properties dialog box Figure 18 Display Properties Dialog Box To set dual monitor display 1 Access the Display Properties dialog box and click t...

Page 52: ...ch was previously grayed out see Configuring the Display 7 Click Apply the dual monitor display settings are now activated Administration Settings The administration settings define general system pro...

Page 53: ...he access to the advanced configuration When typing the password each letter is visible for one second and then turn into an asterisk o Advanced Services opens a new window with the following options...

Page 54: ...w 2 In the Call Settings window set the following options and parameters o Auto Answer Enables auto answering of incoming calls Does not apply to MCU or IMC calls o Enable H 239 Enables data sharing p...

Page 55: ...lect Apply Call Security Calling securely requires setting the encryption protocol or using defaults which include automatic encryption Alternatively you can disable the encryption if it is not needed...

Page 56: ...e Online Directory server type If you are not sure which type to select consult with your system administrator An LDAP Lightweight Directory Access Protocol server is usually used o Server Address The...

Page 57: ...single user repository for their organization that can be used by multiple applications to both authenticate and retrieve stored information for users such as access levels and user profiles System a...

Page 58: ...ed details in the following fields Server Address Enter the IP address of the MXM server User Name Enter the user name used to log into the MXM server User Number Enter your user number used for ident...

Page 59: ...r MXM on the server side To verify that MXM mode is active 1 Press Status on the remote control and check in the displayed information that an MXM icon appears 2 Select Settings Network IP H 323 and c...

Page 60: ...Settings window appears Figure 25 QoS Settings Window 2 In the QoS Settings window set the following options and parameters o No Priority QoS Select this option if QoS prioritization is not required o...

Page 61: ...ation method that best suits your network from Probability of Timely Forwarding at level 0 to level 7 3 Select Apply License Settings You can check your xPointS license and functionality details which...

Page 62: ...ased networks using up to 4 ISDN BRI lines reaching connection bandwidth of up to 512 kbps To configure ISDN settings 1 Select Settings Network ISDN the ISDN Settings configuration wizard appears Note...

Page 63: ...C Address of the ISDN adapter o Line Indicators Displays the line status after connecting Line 1 ISDN line status for line number 1 Line 2 ISDN line status for line number 2 Line 3 Not available in xP...

Page 64: ...Line Settings Select Finish to save the ISDN lines configuration and complete the configuration wizard System Settings In the System Settings window you can configure TCP IP networking parameters for...

Page 65: ...rver the address obtained from the DHCP server is displayed o Default Gateway Set the IP address of the default gateway router If using a DHCP server the address obtained from the DHCP server is displ...

Page 66: ...cally 100MB Full Duplex Set the link to 100MB full duplex 100MB Half Duplex Set the link to 100MB half duplex 10MB Full Duplex Set the link to 10MB full duplex 10MB Half Duplex Set the link to 10MB ha...

Page 67: ...o Video Port Number of the port through which the video multicast passes o Maximum Video Resolution Select the required video resolution from the drop down list o Audio Format The Audio codec responsi...

Page 68: ...reaming ports The default number of streaming ports is 10 o Streaming Port 1 65535 Enter the streaming port number The default port is 12100 3 Select Apply MCU Settings The embedded MCU optional featu...

Page 69: ...more than 4 endpoints in the call using this layout the dominant speaker appears replacing an image of a non dominant speaker 3 3 The screen is divided into 9 rectangle portions of the same size Each...

Page 70: ...Select Settings Network IP Sec Connect the Secure Connect window appears Figure 32 Secure Connect Settings Window 2 Select the Enable Secure Connect checkbox the following fields become available o Ad...

Page 71: ...the user options shared by both GUIs are generally the same this chapter focuses mainly on the exclusive Web options and includes the following sections Accessing the xPointS Unit via a Browser Viewi...

Page 72: ...t who can check the unit s IP address as explained in Displaying System Information Figure 33 Web Login Page 3 If a password was set for Web access see Administration Settings in the Password field en...

Page 73: ...videoconference is viewed in the browser using Window Media Player or Apple QuickTime plug in embedding Note viewing a multicast videoconference does not require you to enter your password and you do...

Page 74: ...ISDN Number of ISDN lines available for use o Laptop Sharing Indicates whether the laptop sharing functionality is enabled or disabled o MCU Maximum number of endpoints that can participate in videoc...

Page 75: ...ck any other day of the current week to display the recordings that were saved on that specific weekday o Last week Click to display only the recordings that were saved last week o 2 Weeks Ago Click t...

Page 76: ...was made and saved o Size Size of the recording file in kilobytes or megabytes o Duration The recording s length The currently available disk space size labeled Free Space is displayed above the list...

Page 77: ...message you want to send and display on the far end screen and then click Start Figure 37 Running Text Box Web To stop the display of the running text message on the far end click Stop Viewing Call S...

Page 78: ...eo Bandwidth Bandwidth used by the video in this call Video Frame Rate Video frame rate used in this call Audio Codec Audio codec used to sound audio in this call Audio Bandwidth Bandwidth used by the...

Page 79: ...em upgrade is performed and then the system reboots Performing System Restore Whenever necessary you can discard all manual configuration and restore the factory default settings To reset the xPointS...

Page 80: ...e released at the next official product update Emblaze VCON Ltd assumes no responsibility for errors or omissions Emblaze VCON Ltd reserves the right to make changes to this document without prior not...

Reviews: