background image

6

INSTALLATION

Front Panel Controls


1.

     Standby

 Button

2.

     Display window


3.

     Disc Tray


4.

  OPEN/CLOSETray


Button 


5

.

   Previous track

6

.

     Play button

7

.

     Next track


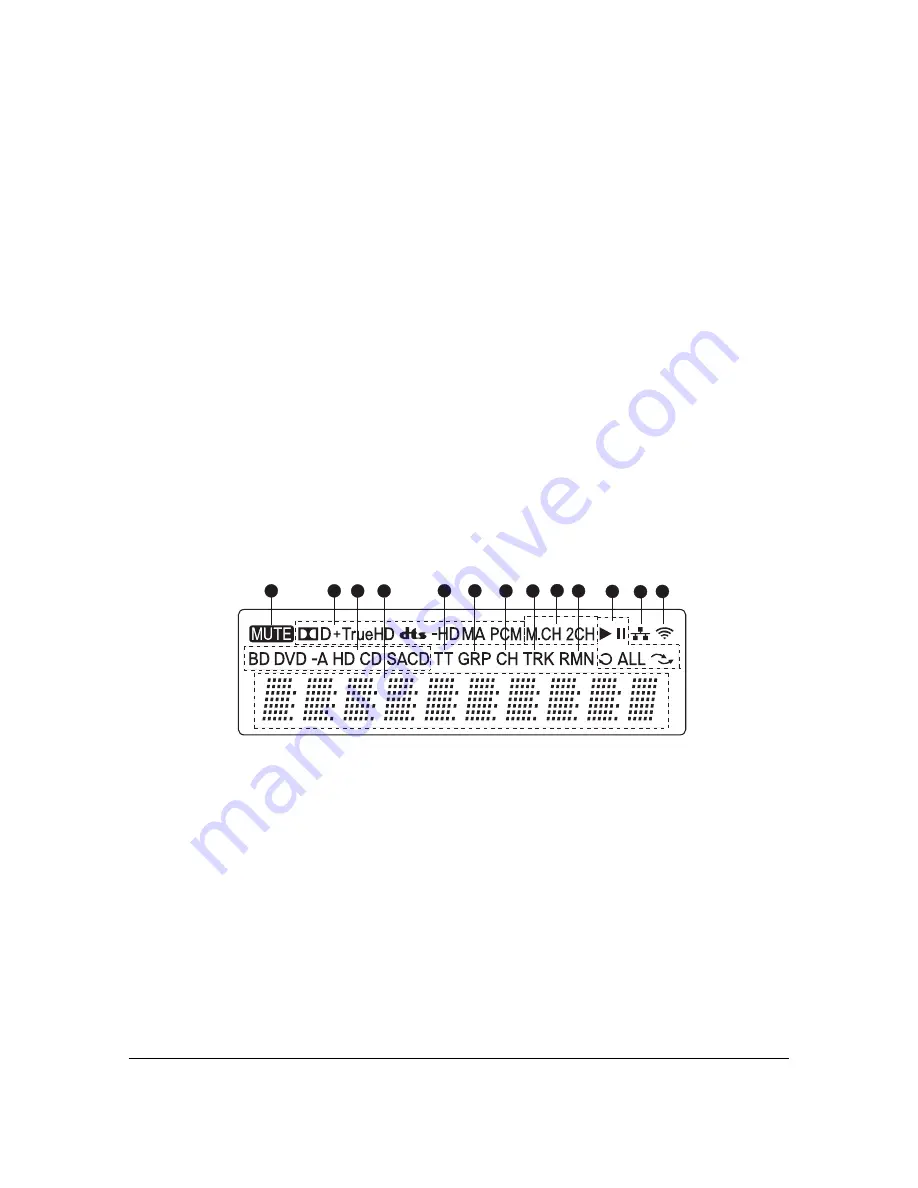
Front Panel Display Windows

3

5

6

7

8

9

13

12

10

11

2

1

13

4

1.

Mute Icon – Indicates that the audio is muted

2.

Audio Type Indication – Indicates the type of audio 
tracks being played

3.

Disc Type Indication – Indicates the currently
playing disc type

4.

Main Display – Text messages and numeric display

5.

Title – When illuminated, the displayed time applies to 
a title

6.

Group – When illuminated, the displayed time applies
to a group

7.

Chapter – When illuminated, the displayed time
applies to a chapter

8.

Track – When illuminated, the displayed time applies to
a track

9.

Audio Channel Indication – Indicates whether the audio
being played is 2ch stereo or multi-channel surround

10. Remaining – When illuminated, the displayed time is

the remaining play time

11. Playback Status – Indicates playback status such as

Play, Pause, Repeat, Repeat All, and Random Mode

12. Ethernet – Indicates that an active Ethernet cable is

attached

13. Wireless – Indicates that the player is connected to a 

wireless network

Summary of Contents for EMP 3

Page 1: ...PBD 1 High Performance Blu ray Player Owner s Manual EN ENGLISH...

Page 2: ...trol 8 Remote Control Buttons 8 Back Side 9 Battery Installation 9 Using the Remote Control 9 Changing the Remote Code 10 Changing the Backlight Method 10 Common Connection Methods 11 Connecting to an...

Page 3: ...7 Mute 28 Audio Language Track Selection 28 Subtitle Selection 29 HDMI INPUT Selection 29 Audio Return Channel ARC Selection 29 BD Live 30 ADVANCED OPERATIONS 31 Output Resolution 31 Zooming and Aspec...

Page 4: ...m 48 Playback Setup 51 Video Setup 53 Picture Adjustment 56 HDMI Options 59 Audio Format Setup 61 Audio Signal Reference Chart 64 Recommended Audio Format Options 65 Audio Processing Setup 67 Speaker...

Page 5: ...pparatus has been damaged in any way such as power supply cord or plug is damaged liquid has been spilled or objects have fallen into the apparatus the apparatus has been exposed to rain or moisture d...

Page 6: ...the player Should this occur the player may not operate properly In such a case please turn the unit on for 1 2 hours without a disc to facilitate moisture evaporation FCC Statement This equipment has...

Page 7: ...d the Symbol together are registered trademarks DTS HD Master Audio is a trademark of DTS Inc Product includes software DTS Inc All Rights Reserved x Manufactured under license from Dolby Laboratories...

Page 8: ...pe the disc from the center out along the radial direction Do not wipe the disc in a circular motion x Do not use record cleaning sprays or solvents such as benzene thinner and anti static spray x Do...

Page 9: ...ote Control with AA Batteries Music and Video recognition technology and related data are provided by Gracenote Gracenote is the industry standard in music and video recognition technology and related...

Page 10: ...uminated the displayed time applies to a title 6 Group When illuminated the displayed time applies to a group 7 Chapter When illuminated the displayed time applies to a chapter 8 Track When illuminate...

Page 11: ...3 Diagnostic Video Output 4 Coaxial Digital Audio Output 5 Optical Digital Audio Output 6 HDMI 2 Output 3D Compatible 7 HDMI 1 Output 3D Compatible 8 USB 2 0 Input AudioOutputs 9 USB 2 0 Input 10 IR I...

Page 12: ...A B REPLAY Repeat play the selected section 18 RESOLUTION Switch output resolution 19 OPEN Open close the disc tray 20 INPUT Select the input source 21 VUDU VUDU access button 22 MUTE Mute audio 23 V...

Page 13: ...playback control buttons STOP PLAY PAUSE PREV NEXT REV FWD 3 Battery Cover Remove to replace batteries or set remote code 4 Batteries Use 2 AA or LR6 batteries 5 Remote Code Switch Adjust the position...

Page 14: ...button is pressed in this mode the light will stay on for 10 seconds and pressing any other button will keep the backlight on To switch between these two backlight methods press and hold the LIGHT but...

Page 15: ...NOTE HDMI High Definition Multimedia Interface is a single cable that can transport both audio and video from your player to your display Be aware however that HDMI is an evolving standard and there m...

Page 16: ...tails In this way you can utilize the dedicated video processor available for the HDMI 1 output and allow your receiver which has no HDMI 1 4 inputs to work without any loss to the digital audio signa...

Page 17: ...dedicated Marvell QDEO video processor x You may remove the HDMI cable and connect the DIAG diagnostic output to the TV through a regular composite video cable not included when there is a problem wit...

Page 18: ...that you connect your main TV the one with larger screen size or the one that you would watch more often to HDMI 1 OUT in order to benefit from the dedicated video processor and set the Dual HDMI opt...

Page 19: ...terminals of the player to the TV Make sure the audio cables are connected to the same input terminal group on the TV as the DVI input Usually the input terminals are marked as DVI Audio or PC Audio...

Page 20: ...Down Mix option in the Setup Menu to 5 1 to make sure that any 7 1 channel signals are converted to 5 1 channels refer to Down Mix Mode on page 68 x If your audio system offers only stereo audio inpu...

Page 21: ...xial or optical digital audio output A reduced resolution version of the same audio track will be output instead To listen to high resolution audio formats in their best quality please use the HDMI co...

Page 22: ...th of which can accept up to 1080p high definition video and digital audio You can use the included HDMI cable to connect a source device such as a digital TV box camcorder to the HDMI IN port You can...

Page 23: ...and 72 for more information regarding firmware updates In order to utilize the BD Live feature or to update the firmware via the Internet the player needs to be connected to a broadband Internet conne...

Page 24: ...y Internet connection through wireless adaptor x The wireless adaptor included in the PBD 1 package has been pre configured to work with your player It is compatible with 802 11B G and N 2 4GHz wirele...

Page 25: ...ndow on the front panel will be disabled x We cannot guarantee that the IR IN port will be compatible with devices that are not manufactured by us Connecting the IR IN port to an incompatible device m...

Page 26: ...may accept input signals with lower or higher resolutions than its native resolution In such cases the electronics in the TV will upscale or downscale the video to fit its display component Unfortuna...

Page 27: ...width is 4 3 or 1 33 times the height Newer wide screen television sets have a 16 9 aspect ratio the width is 16 9 or 1 78 times the height For best performance the video output of your player needs...

Page 28: ...ressing the PLAY button x Certain Blu ray Discs with BD Java technology do not support resume playback Pressing the STOP button during playback of such discs will completely stop the disc Pressing the...

Page 29: ...age 56 Fast Playback REV FWD You may fast forward or reverse during playback 1 Pressing the FWD button on the remote control to start fast forwarding playback Each press of the FWD button increases th...

Page 30: ...rs at the beginning of playback after the previews and copyright messages The Pop up Menu can be accessed during the movie without interrupting playback 2 During playback press the POP UP MENU button...

Page 31: ...fast forward reverse status x Bit rate meter an indication of the bit rate of the audio and video stream x Current and total title numbers DVD and Blu ray Discs x Current and total chapter numbers of...

Page 32: ...tatus Audio Language Track Selection AUDIO 1 To select the audio language or track press the AUDIO button on the remote control during playback 2 Repeat pressing the AUDIO button or use the UP DOWN AR...

Page 33: ...D 1 through an HDMI connection press the INPUT button on the remote to bring the Input Source menu 2 Use the UP DOWN ARROW buttons to choose the required ARC channel 3 You can always select BLU RAY PL...

Page 34: ...and the capacity of the BD Live content servers can all affect how fast BD Live content is downloaded If you encounter slow downloading or intermittent playback please play the disc without accessing...

Page 35: ...ay also press the RESOLUTION button multiple times to cycle through the available output resolutions 5 Press the ENTER button to apply the selected output resolution If you do not want to change the o...

Page 36: ...et to 1 1 when the disc is ejected or when the player is turned off The following zoom levels may be useful for specific applications 1 Playing 16 9 BD or DVD when TV Aspect Ratio is set to 16 9 Wide...

Page 37: ...orter and wider than they should be x Full Screen This zoom level maintains the correct aspect ratio but crops the top and bottom slightly in order to fit the 4 3 image to the 16 9 screen m o o Z n e...

Page 38: ...text is shown on the screen and then use the UP DOWN ARROW buttons to move the subtitle text to the desired position 4 Press the ENTER button to set the subtitle display position Once the Subtitle Shi...

Page 39: ...te the Shuffle and Random modes Each press of the BLUE button switches the playback mode in the following sequence Shuffle Random Normal In normal playback mode each track is played back in sequential...

Page 40: ...to enter the hours minutes and seconds for your specific search and press the ENTER button 1 7 5 25 00 22 14 00 40 06 2 Chapter time search Searches for a specific time within the currently playing c...

Page 41: ...switches the search mode in the following sequence Track or Disc Time Search Track Search On screen Display 1 Track time search Searches for a specific time within the currently playing track x Press...

Page 42: ...ill always play from the beginning Viewing Pictures on DVD Audio Discs PAGE UP DOWN Some DVD Audio discs contain static pictures such as photos of the band as well as album narration When a DVD Audio...

Page 43: ...N C E D O P E R A T I O N S 39 turned off A black screen is transmitted instead to minimize any potential interference Because HDMI carries audio together with video the HDMI video signal cannot be co...

Page 44: ...d readers but may not be sufficient for USB hard disks It is recommended to check with your drive manufacturer for power requirements or use an external power supply NOTE x This unit supports USB Mass...

Page 45: ...an input press the INPUT button on the PBD 1 remote to bring the Input Source Menu and then select the HDMI IN BACK port NOTE x HDMI INPUT ports are HDMI v1 4 compatible and can accept up to 1080p hi...

Page 46: ...ready have an SMB client embedded Please refer to respective OS instructions to set up the SMB CIFS shared file folder NOTE x NAS is a networked appliance that provides file based data storage service...

Page 47: ...provides personalized internet radio services x Picasa connects you to your Picasa account and provides online photo viewing and sharing capabilities NOTE The Network feature is not officially suppor...

Page 48: ...ber and size of files this process could take up to several minutes Customers can only access the Category list Artist Album and Genre when the database has been built otherwise a warning message will...

Page 49: ...TION button to access features like video information Details can be found on page 24 x Press the TOP MENU button to move the cursor to the category menu in the top of the screen This menu functions t...

Page 50: ...lighted by the cursor press the ENTER or PLAY button to play back the photos as a full screen slideshow The following operations are available during the photo slideshow x Display the help screen INFO...

Page 51: ...need to prepare digital music files The music files can be stored on the same disk as the photos or on a different USB drive Start music playback first by selecting Music from the Home Menu Once the m...

Page 52: ...n the left column of the Setup Menu Playback Setup Video Setup Audio Format Setup Audio Processing Device Setup and Network Setup Menu Item is the parameter to be adjusted which appears in the center...

Page 53: ...sible when a disc is being played it is recommended that you operate the Setup Menu when playback is fully stopped or when there is no disc in the player 1 Press the SETUP button on the remote control...

Page 54: ...button 5 To exit the Setup Menu at any time press the SETUP button on the remote control or select Exit from the Setup Menu sections Settings are permanently saved when the player is turned off using...

Page 55: ...t or not This setting applies to CDs SACDs DVDs and certain Blu ray Discs x On Playback automatically starts from the previously saved point x Off Playback starts from the beginning 5 Parental Control...

Page 56: ...the language for the player s Setup Menu and the on screen display Currently the player only supports English x Disc Menu Language Allows you to choose the preferred language for displaying DVD and B...

Page 57: ...ality may be lost NOTE x The player can automatically adjust the resolution of digital audio and video signals depending on the capabilities of the connected television and receivers x For HDMI 1 OUT...

Page 58: ...frame rate are converted to a 60Hz frame rate if neither 1080p24 Output nor Source Direct output resolution is enabled x PAL When playing PAL encoded discs no system conversion is performed NTSC enco...

Page 59: ...contains a sub menu with multiple configuration options Please refer to the HDMI Options section on page 59 of this manual for details of each option 11 Display Options Configures the options for dis...

Page 60: ...into a standby or sleep mode and turn off their projection lamp or LCD backlight lamp thus saving energy and prolonging the lamp life When you press any button on the PBD 1 remote control or the playe...

Page 61: ...tton The following picture adjustment controls are available for both HDMI 1 and 2 1 Picture Mode Allows you to choose a customized picture mode saved by you The PBD 1 allows you to save up to three c...

Page 62: ...ion and chroma transition However we do not recommend using level 3 and above unless the source content is poorly produced and blurry For HDMI 2 OUT the sharpness level can be set between 0 and 2 The...

Page 63: ...atically determine what color space to use If the display device supports YCbCr 4 4 4 then it will be used to avoid extra color space conversion x RGB Video Level The HDMI output uses RGB color space...

Page 64: ...ut The available options are the same as those for HDMI Deep Color HDMI 1 NOTE x Since the Deep Color feature is optional and may not be supported by all TVs enabling Deep Color while connected to a T...

Page 65: ...with the device connecting to the HDMI output to automatically determine which audio format to use x LPCM Digital audio output via HDMI will be in the multi channel Linear PCM format When this option...

Page 66: ...limitations SACD audio cannot be sent through the coaxial optical audio output and the high resolution audio on DVD Audio and Blu ray discs will be sent out at reduced resolution Details can be found...

Page 67: ...r receiver is capable of HDCD decoding it is recommended that you set the HDCD Decoding setting to Off on the PBD 1 in order to avoid decoding HDCD twice This will prevent the occasional pop or crackl...

Page 68: ...CM up to 7 1ch DTS LPCM 2ch Up to 7 1ch DTS HD High Resolution DTS HD High Resolution LPCM up to 7 1ch DTS core LPCM 2ch Up to 7 1ch DTS HD Master Audio DTS HD Master Audio LPCM up to 96kHz 24 bit 7 1...

Page 69: ...apability for high resolution lossless audio formats such as Dolby TrueHD and DTS HD Master Audio please use the following audio format options o Secondary Audio Off or On if you need secondary audio...

Page 70: ...dary Audio Off or On if you need secondary audio o HDMI Audio Off o SACD Output any SACD is not available through optical coaxial output o HDCD Decoding On or Off if the receiver can decode HDCD o Coa...

Page 71: ...stance size and trim level The Speaker Configuration menu shows an illustration of speaker placement to assist you in properly configuring your speakers Upon entering this menu the cursor is positione...

Page 72: ...th the left and right front channels This is recommended for use with TV sets or stereo receiver amplifiers x 5 1Ch This mode enables 5 1ch decoded audio output The number of actual output channels de...

Page 73: ...se they are discarded The bass frequency upper limit is set by the Crossover Frequency selection in the Setup Menu see page 71 for details x Off Speaker for the corresponding position does not exist A...

Page 74: ...s If the channel delay settings cannot match your speaker configuration please set all distances to the same and use your receiver amplifier to set the channel delay 3 Trim The speaker trim level para...

Page 75: ...energy present in the original recording x Auto Plays at the dynamic range specified by the disc This option applies to certain Blu ray Discs only which have DRC instructions encoded in the Dolby True...

Page 76: ...s to upgrade the player s firmware x Via USB You may download the firmware files from the our web site to a USB drive and then use the USB drive to upgrade the player Please follow the instructions on...

Page 77: ...on can automatically turn on the TV and change to the proper input when you start playing a disc in the Blu ray Disc player It can also turn off the player automatically when you turn off the TV The i...

Page 78: ...n the player that can accept a USB drive to be used as the persistent storage You may choose from the following Internal Flash Uses the internal flash memory for persistent storage USB Drive Uses a US...

Page 79: ...parental control password and ratings will not be reset This operation is only available when the playback is completely stopped or when there is no disc loaded x Erase Accounts and Settings default R...

Page 80: ...hotos from media servers within the home network x On default Enables local network streaming A broadband internet connection is required details on page 19 and special hardware software configuration...

Page 81: ...by selecting Wireless in Internet Connection menu The procedure is described as follows The player first searches for the last successful wireless settings If they exist a message will pop up to remi...

Page 82: ...ess point and is also referred as a network name WPS is short for Wi Fi Protected Setup WPS It is the latest standard for easy and secure wireless home network configuration It is also named Wi Fi Sim...

Page 83: ...ndary DNS server When IP Setting is set to Auto DHCP the value displayed here is obtained using DHCP and cannot be changed 9 Proxy Setting Allows you to configure the proxy server settings The proxy s...

Page 84: ...ons of DVD Audio Please use the analog or HDMI audio output Alternatively you may switch to the DVD Video playback mode 17 51 No picture Video cable is not properly connected Check video cable reconne...

Page 85: ...up options Fully stop playback eject the disc and try the Setup Menu again 49 Connection Test fails No internet connection Verify that your router has a connection to the internet Try power cycling th...

Page 86: ...Internal Storage 1GB Actual space available for persistent storage varies due to system usage Output Input Audio Characteristics Frequency 20Hz 20kHz 0 05dB Output level 2Vrms Single ended 3Vrms Balan...

Page 87: ...se 7565 Georgian 7575 Kazakh 7576 Greenlandic 7577 Cambodian 7578 Kannada 7579 Korean 7583 Kashmiri 7585 Kurdish 7589 Kirghiz 7665 Latin 7678 Lingala 7679 Laothian 7684 Lithuanian 7686 Latvian Lettish...

Page 88: ...the Gracenote Servers including all ownership rights Under no circumstances will Gracenote become liable for any payment to you for any information that you provide You agree that Gracenote may enforc...

Page 89: ...user is responsible for all shipping charges insurance re importation and duty charges When shipping a product to the factory for service always include the following 1 A sales slip or other proof of...

Page 90: ...before use Do not remove cover No user serviceable parts inside Refer servicing to qualified service personal The warranty is void if the product is tampered with by non authorised personnel Use only...

Reviews: