background image

19

9395P 250 kVA / 275 kVA / 300 kVA 

User’s and Installation Guide

Table 3-9: Recommended DC input circuit breaker ratings

Rated battery current is computed at 1.7 volts per cell. The battery wiring used between the battery 

and the UPS should not allow a voltage drop of more than 1% of nominal DC voltage at rated battery 

current. If the conductors used for DC input from the battery cabinets to the UPS are those provided by 

the UPS manufacturer, and the UPS and battery cabinets are manufactured by the same supplier, then 

it is acceptable if they do not meet the noted minimum conductor sizes.

UPS model

Input rating

400 V

9395P-250 kVA

700 A (or 800 A for upgradeability)

9395P-275 kVA

800 A

9395P-300 kVA

800 A

Table 3-8: Recommended bypass and output circuit breaker ratings

UPS model

Circuit breaker rating

Load rating

400 V

Bypass/MOB/MBS

Output branch fuse

9395P 250 kVA

100% rated

400 A

80 A (gG type)

9395P 275 kVA

100% rated

500 A

80 A (gG type)

9395P 300 kVA

100% rated

500 A

80 A (gG type)

There is no DC disconnect device within the UPS. A battery disconnect switch is recommended, and 

may be required by local codes when batteries are remotely located. The battery disconnect switch 

should be installed between the battery and the UPS.
External DC input overcurrent protection and disconnect switch for the remote battery location is to be 

provided by the user. Table 3-9 lists the maximum rating for continuous-duty rated circuit breakers 

satisfying the criteria for both.

Summary of Contents for Power Xpert 9395P 250 kVA

Page 1: ...User s and Installation Guide Power Xpert 9395P UPS 250 kVA 275 kVA 300 kVA...

Page 2: ......

Page 3: ...Power Xpert 9395P UPS 250 kVA 275 kVA 300 kVA User s and Installation Guide...

Page 4: ...and industrial application in the second environment Installation restrictions or additional measures may be needed to prevent disturbances 2014 Eaton Corporation All Rights Reserved The contents of...

Page 5: ...tion 21 3 3 Inspecting and unpacking the UPS cabinet 22 4 UPS system installation 24 4 1 Preliminary installation information 24 4 2 Unloading the UPS cabinet from the pallet and mechanical installati...

Page 6: ...9 7 3 19 UPS Module Map Screen 100 7 3 20 System Overview Screen 100 7 7 UPS Operation using the Color Touchscreen Control Panel 146 7 7 1 Starting the UPS in Online mode 8 Communication 8 1 X Slot ca...

Page 7: ...not supplied by Eaton Corporation 18 Table 3 7 Recommended input circuit breaker ratings 18 Table 3 8 Recommended bypass and output circuit breaker ratings 19 Table 3 9 Recommended DC input circuit br...

Page 8: ...gure 4 14 Interface Terminal Detail Figure 4 15 Typical Alarm Relay Connection Figure 4 16 Terminal Blocks TB1 TB2 and TB3 Connector Assignments Figure 4 17 Typical Battery Interface Connection Figure...

Page 9: ...Meters Screen Figure 7 17 Input Meters Detail Screen Figure 7 18 Select Source Screen Figure 7 19 Battery Meters Screen Figure 7 20 Battery Log Screen Figure 7 21 Battery Log Detail Screen Figure 7 2...

Page 10: ...ency power to safeguard operation The UPS system is housed in a single free standing cabinet with safety shields behind the door for hazardous voltage protection The cabinet matches the battery and di...

Page 11: ...or Touchascreen The LCD control panel located on the front of the UPS contains a liquid crystal display LCD and pushbutton switches to control the operation of the UPS and to display the status of the...

Page 12: ...provided for connection to equipment at the facility such as a light an audible alarm or a computer terminal The equipment connected to this contact alerts you to a UPS alarm See Chapter 8 Communicat...

Page 13: ...synchronization This option facilitates the uninterrupted transfer of the load from one load bus to another by means of a transfer switch The Sync Control is housed in a wall mounted panel that can b...

Page 14: ...UPMs minus the capacity of one UPM Under normal conditions the UPMs in the UPS share the load equally If one or more UPMs becomes unavailable and the load is at or below the capacity of remaining UPM...

Page 15: ...mode If the High Alert mode is reactivated during the one hour the one hour timer will be restarted 1 2 11 Optional X Slot cards The optional X Slot cards support several protocols such as SNMP HTTP A...

Page 16: ...e UPS system being installed or operated 1 5 Conventions used in this manual This manual uses these type conventions Bold type highlights important concepts in discussions key terms in procedures and...

Page 17: ...ing initial startup Regional locations and telephone numbers A question about any of the information in this manual A question this manual does not answer RISK OF ELECTRIC SHOCK Indicates that a risk...

Page 18: ...ty 95 maximum The system is not intended for outdoor use Ensure all power is disconnected before performing installation or service Batteries can present a risk of electrical shock or burn from high s...

Page 19: ...RNING notices affixed to the inside and outside of the equipment CAUTION To prevent damage to the wiring channel and wiring in the UPS cabinet base when lifting or moving the cabinet Lift and move the...

Page 20: ...pecified 123 become void This service is offered as part of the sales contract for the UPS Contact service in advance usually a two week notice is required to reserve a preferred startup date 3 1 Crea...

Page 21: ...abinets use forced air cooling to regulate internal component temperature Air inlets are in the front of the cabinet and outlets are in the top You must allow clearance in front of and above each cabi...

Page 22: ...on requirements during full load operation Ventilation required for cooling air exhaust approximately 920 liter sec 250 300kVA unit 260 liter sec ISBM Figure 3 1 UPS cabinet dimensions front view Rati...

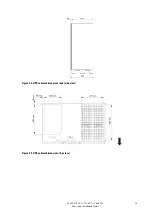
Page 23: ...14 9395P 250 kVA 275 kVA 300 kVA User s and Installation Guide Figure 3 2 UPS cabinet dimensions right side view Figure 3 3 UPS cabinet dimensions top view...

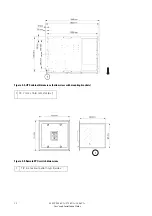
Page 24: ...kVA 300 kVA User s and Installation Guide Figure 3 4 UPS cabinet dimensions bottom view with mounting brackets Figure 3 5 Remote EPO switch dimensions 1 12 7 mm x 15 8 mm slot 6 x 1 1 2 in knockout p...

Page 25: ...A B C and D map to Figure 6 6 Bypass wiring data is not applicable to Input Output Module IOM configurations Table 3 4 Input output rating for 9395P 250 kVA 275 kVA 300 kVA Read and understand the fo...

Page 26: ...nd Figure 4 6 show the location of the power cable terminals inside the UPS Table 3 5 UPS cabinet power cable terminations for the 9395P 250 kVA 275 kVA 300 kVA NOTE Bypass terminations are not applic...

Page 27: ...Corporation Source protection for the AC input to bypass should be treated as if supplying a 250 275 300 kVA three phase transformer to allow for inrush current Bypass input wiring and bypass input b...

Page 28: ...00 A or 800 A for upgradeability 9395P 275 kVA 800 A 9395P 300 kVA 800 A Table 3 8 Recommended bypass and output circuit breaker ratings UPS model Circuit breaker rating Load rating 400 V Bypass MOB M...

Page 29: ...etween the alarm input and common terminal All control wiring and relay and switch contacts are customer supplied Use twisted pair wires for each alarm input and common The building alarms can be prog...

Page 30: ...The UPS can be installed in a high resistance ground application only by using a factory installed neutral forming kit MOBs with dual auxiliary contacts are to be provided by the customer Table 3 9 l...

Page 31: ...site or as close as possible before unpacking Insert the forklift or pallet jack forks from the right side of the cabinet between the supports on the bottom of the pallet see Figure 3 6 for the locati...

Page 32: ...NOTE While waiting for installation protect the unpacked cabinet from moisture dust and other harmful contaminants Failure to store and protect the UPS properly may void your warranty Figure 3 6 Eaton...

Page 33: ...ge steel 1 5 mm 0 06 thick If perforated floor tiles are required for ventilation place them in front of the UPS 4 2 Unloading the UPS cabinet from the pallet and mechanical installation The UPS cabin...

Page 34: ...let facing the cabinet between the supports on the bottom of the pallet see Figure 3 6 binet center of gravity measurements If the cabinet must be moved using the cabinet front or rear fork lift slots...

Page 35: ...the left and right side of the UPS cabinet with the angle facing outward see Figure 4 1 and Figure 4 2 10 Secure the cabinet to the floor with customer supplied hardware 11 If installing a FI UPM pro...

Page 36: ...ed to paragraph 4 4 if installing a battery system otherwise proceed to paragraph 4 5 4 4 Battery cabinet installation If installing an Eaton battery cabinet refer to the Power Xpert 9395 Integrated B...

Page 37: ...ng of the UPS 4 6 Installing UPS external and battery power wiring NOTE The UPS cabinet is shipped with a debris shield covering the ventilation grill on top of the unit see Figure 4 4 Do not remove t...

Page 38: ...8 NOTE Conical washers are special purpose washers that look similar to flat washers except for a slight conical shape When installing conical washers the top of the dome should be next to the nut and...

Page 39: ...l and punch all conduit holes in the bottom conduit plate prior to mounting on the UPS Install the conduit plate and install all conduit runs into the plate Pull the wiring through conduit into the wi...

Page 40: ...erminals to the critical load See paragraph 3 2 2 for wiring and termination requirements 14 Proceed to paragraph 4 6 3 CAUTION On a UPS that is configured for separate rectifier inputs all sources th...

Page 41: ...proper operation the following must be true 1A 2A 3A 4A 1B 2B 3B 4B In order to save cabling costs the following is also considered to be sufficient 1A 1B 2A 2B 3A 3B 4A 4B Any difference in wire leng...

Page 42: ...2 AC Output to Critical Load A B C See Figure 4 7 for Detail AA AC Input to UPS Bypass A B C See Figure 4 7 for Detail AA DC Input from Battery E4 See Figure 4 11 or Figure 4 12 for Detail BB DC Input...

Page 43: ...A E6 Phase B E7 Neutral E12 AC Input to UPS Rectifier Phase A E1 Phase C E3 Phase B E2 Phase C E11 Phase A E9 Phase B E10 AC Input to UPS Bypass Ground Terminals Ground terminal bus can be relocated...

Page 44: ...AA AC Output to Critical Load A B C See Figure 4 9 for detail AA AC Input to UPS Bypass A B C See Figure 4 9 for detail AA DC Input from Battery E4 See Figure 4 12 for detail BB Neutral E12 DC Input...

Page 45: ...to UPS Bypass Ground Terminals Ground terminal bus can be relocated below Alternate Ground Terminal Bus Location UPM Rectifier Input Terminal Block See Figure 4 10 for detail Figure 4 9 UPS Power Ter...

Page 46: ...battery and ground terminals Use both sets of terminals shown in Figure 4 11 as needed See paragraph 3 2 2 for wiring and termination requirements 7 Proceed to Step 9 8 Connect the positive negative a...

Page 47: ...ry E4 DC Input from Battery E5 Figure 4 11 UPS Power Terminal Detail BB Common Battery DC Input from Battery E5 UPM 1 DC Input from Battery E5 UPM 4 FI UPM DC Input from Battery E4 DC Input from Batte...

Page 48: ...4 If installing interface wiring through the left interface entry conduit landing proceed to Step 5 otherwise proceed to Step 7 5 If not already accomplished remove one top screw and two bottom screws...

Page 49: ...ep 13 13 Reinstall the small top internal safety shield panel and secure with the cabinet mounted screws 14 Reinstall the front door removed in Step 3 and secure with the retained hardware 15 Close th...

Page 50: ...t General purpose normally open NO relay contact 6 Alarm Relay Common 7 Not Used 8 Not Used 9 Not Used 10 Not Used Terminal TB3 Name Description 1 Building Alarm 1 Input Programmable UPS alarm activat...

Page 51: ...y Common Figure 4 15 Typical Alarm Relay Connection NOTE Alarm relay contacts have a maximum current rating of 5A and a switched voltage rating of 30 Vac and 28 Vdc Alarm relay normally open and norma...

Page 52: ...ctional name A jumper wire must be connected between pins 1 and 2 on TB1 if the normally closed REPO contact is not used UPS 1 10 1 10 TB1 TB2 UPS 1 10 TB3 Figure 4 16 Terminal Blocks TB1 TB2 and TB3...

Page 53: ...the panel This panel is to the right of the X Slot communication bays see Figure 4 13 8 To locate the appropriate terminals and review the wiring and termination requirements see paragraph 3 2 2 Tabl...

Page 54: ...removed reinstall the left front panel removed in Step 5 and secure with the retained hardware Battery Breaker or Disconnect TB1 Battery Aux Battery Aux Common 48 Vdc Battery Shunt Trip 48 Vdc Batter...

Page 55: ...tall the LAN telephone and other cables to the appropriate X Slot cards See Figure 4 13 and Figure 4 19 for X Slot communication bay locations 6 Close the front door and secure the latch 7 Refer to th...

Page 56: ...ements A latching type Remote Emergency Power off REPO switch can be used in an emergency to shut down the UPS and remove power to the critical load from a location away from where the UPS is installe...

Page 57: ...move the UPS cabinet interface entry conduit landing plates to drill or punch holes see Figure 4 4 10 Reinstall the interface entry plates and install conduit 11 To locate the appropriate terminals an...

Page 58: ...ded on the REPO switch for this function see Figure 4 20 The REPO switch wiring must be in accordance with NEC Article 725 Class 2 requirements 16 Reinstall the small top internal safety shield panel...

Page 59: ...O Switch Wiring NOTE REPO switch rating is 24 Vdc 1A minimum The REPO switch must be a latching type switch not tied to any other circuits REPO normally open and normally closed return terminals are s...

Page 60: ...his manual This checklist ensures that you have completely installed all hardware cables and other equipment Complete all items listed on the checklist to ensure a smooth installation Make a copy of t...

Page 61: ...ected from the UPS to the battery disconnect Battery shunt trip signal wiring is connected from the UPS to the battery disconnect OPTIONAL LAN and telephone drops are installed All telephone and LAN c...

Page 62: ...____________________________________________________________ _________________________________________________________________________ _________________________________________________________________...

Page 63: ...pass systems To install the card 1 Verify the UPS system is turned off and all power sources are disconnected See Chapter 7 UPS operating instructions for shutdown instructions 2 Unfasten the front do...

Page 64: ...ons for Bypass Status 5 Alarm J3 Terminal Name Description 1 Alarm Programmable UPS alarm Activate by a remote dry contact closure 2 Alarm Return 3 Alarm Relay NC Normally closed contact opens when UP...

Page 65: ...w the wiring and termination requirements see Section 3 2 4 Table 4 1 and Figure 4 16 through Figure 4 19 7 Route and install CAN wiring between the UPS cabinets See Figure 5 2 and Table 5 1for the Ho...

Page 66: ...tem UPS CAN wiring without MOBs NOTE External CAN connections between UPSs require shielded twisted pair wire Table 5 2 CAN Bridge Card wiring terminations From UPS 1 CAN Bridge Card To UPS 2 CAN Brid...

Page 67: ...out MOBs NOTE Use twisted pair wiring between the UPS and MOB AUX contacts Table 5 3 Pull Chain wiring terminations From UPS 1 To UPS 2 To UPS 3 if installed To UPS 4 if installed TB2 1 Pull Chain TB2...

Page 68: ...ave pigtail leads use the same wire gauge to connect to the UPS and use the correct crimp connections for the wire gauge External CAN connections between UPS cabinets require shielded twisted pair wir...

Page 69: ...rn MOB 2 Aux 1 Com UPS 2 TB2 1 Pull Chain MOB 2 Aux 2 NO Pull Chain UPS 2 TB2 2 Pull Chain Common UPS 3 TB2 2 Pull Chain Common Pull Chain Common UPS 3 CAN Bridge Card J3 1 Alarm MOB 3 Aux 1 NC MOB Op...

Page 70: ...ure 6 1 Main elements of the UPS system 9395P 250 kVA 275 kVA 300 kVA User s and Installation Guide Optional NOTE On a UPS configured as an Input Output Module IOM the bypass input static switch and b...

Page 71: ...wer In Variable Module Management System VMMS mode the UPS operates as a traditional double conversion UPS but selectively shifts the load to fewer UPMs to increase the efficiency of the UPS In Energy...

Page 72: ...f a transformer The inverter derives regulated DC from the rectifier and uses IGBT devices and pulse width modulation PWM to produce a regulated and filtered AC output The AC output of the inverter is...

Page 73: ...er outages from the source Some power line filtering and transient protection is provided to the load but no active power conditioning or battery support is available to the output of the system in th...

Page 74: ...the UPM full power rating If the limit is exceeded additional UPMs are activated to take on the increased load The VMMS redundancy setting sets the number of redundant UPMs that the customer requires...

Page 75: ...ttery mode before returning to Normal mode Energy Saver mode is a normal operating mode and not an alarm condition While the UPS is in this mode the NORMAL light on the front display will illuminate 6...

Page 76: ...required for normal operation the battery continues discharging until a DC voltage level is reached where the inverter output can no longer support the connected loads When this event occurs the UPS i...

Page 77: ...battery supply and basic maintenance bypass NOTE Callout letters A B C and D map to Table 3 4 Oneline drawing UPS model Voltage System type Input Output Figure 6 6 9395P 250 kVA 9395P 275 kVA 400 400...

Page 78: ...utral a bypass source neutral must be provided If the load does not require a neutral and there is no neutral conductor connected at the bypass input a neutral to ground bonding jumper must be install...

Page 79: ...stem a maintenance bypass without a rectifier input breaker a minimum of two separate feeds with upstream feeder breakers or one feed with two upstream feeder breakers must be provided one for the UPS...

Page 80: ...bypass control even if the CAN bus is lost The system is paralleled for N 1 redundancy as long as there is always one or more UPMs online than required to support the load The system is paralleled for...

Page 81: ...ode of operation 6 4 2 Normal mode distributed bypass In Normal mode utility AC power is supplied to the UPSs Each UPS then conditions the incoming AC power and provides clean regulated AC power to ti...

Page 82: ...les remain online to support the load Load can be supported as long as there is a sufficient number of modules otherwise the load must be transferred to maintenance bypass or shut down The distributed...

Page 83: ...s again within the specified voltage or frequency acceptance windows Figure 6 10 Path of current through the UPSs in battery mode distributed bypass If the input power fails to return or is not within...

Page 84: ...pass source neutral must be provided If the load does not require a neutral and there is no neutral conductor connected at the bypass input a UPS neutral must be connected to source star point Oneline...

Page 85: ...76 9395P 250 kVA 275 kVA 300 kVA User s and Installation Guide Figure 6 11 Typical distributed bypass system 1 1 and 2 0 configurations Optional Optional...

Page 86: ...77 Figure 6 12 Typical distributed bypass system 2 1 and 3 0 configurations 9395P 250 kVA 275 kVA 300 kVA User s and Installation Guide Optional Optional Optional...

Page 87: ...78 9395P 250 kVA 275 kVA 300 kVA User s and Installation Guide Figure 6 13 Typical distributed bypass system 3 1 and 4 0 configurations Optional Optional Optional Optional...

Page 88: ...was successful and the system operates properly Read this section of the manual and have thorough understanding of UPS operation before attempting to operate any of the controls The UPS displays two m...

Page 89: ...PS and to monitor UPS operation For a description of the UPS control panel functions see Section 7 1 2 Circuit breakers The optional circuit breaker CB1 is used to control the AC input to the UPS rect...

Page 90: ...he following figure shows the location of the optional color touchscreen control panel on the front door of the UPS For a description of the control panel see Section 7 3 Using the Color Touchscreen C...

Page 91: ...tal row of LED indicators 2 Before system power up the panel displays a system status screen similar to the one shown in the figure above When the unit powers up the screen displays as shown in the fi...

Page 92: ...e will also be displayed Indicator Status Descriptions Green Lit Steady The UPS is in Online mode operating normally The power module is supplying power to the critical load Yellow Lit Steady The UPS...

Page 93: ...ass code for ooperation See the following table D The padlock number indicates security level 0 4 E ENTER button Figure 7 5 Sign In or Password Request Screen Table 7 2 Security Levels and Functions 7...

Page 94: ...reen The Power Maps screen displays immediately after entering the access code The Power Maps screen shows a real time graphical representation of the operating status See the following figure Number...

Page 95: ...uching the LOAD kVA button displays the Output kVA screen shown in the following figure Figure 7 8 Output kVA Screen from Home Screen Touching the AVERAGE EFFICIENCY button displays the system efficie...

Page 96: ...s the user directly to that information screen Figure 7 11 Bypass screen Number 1 in the figure above refers to Figure Output kVA Screen from Home Screen Number 2 refers to Figure Average Efficiency S...

Page 97: ...nditions of the UPS at that time The two items at the far right of the OVERVIEW section are active buttons They can be selected to show a profile of efficiency or consumption over various time periods...

Page 98: ...gure displays values pertaining to the Bypass conditions Figure 7 15 Bypass Meters Screen The Output Meters Screen shown in the following figure displays values pertaining to the system output Figure...

Page 99: ...l The Bypass Output and Battery meters screens display similar values relevant to their monitoring of the system Figure 7 17 Input Meters Detail Screen The Select Source screen shown in the following...

Page 100: ...Screen Figure 7 20 Battery Log Screen The following figures show the Battery Log Detail screen and the Battery Log Summary screen Figure 7 21 Battery Log Detail Screen 9395P 250 kVA 275 kVA 300 kVA U...

Page 101: ...bar on the main menu screen to look at the active events screen This screen shows any currently active alarms notices or commands System Event Horns The system event horn beeps to alert an operator th...

Page 102: ...llowing figure Figure 7 24 User Log Screen Selecting an event opens the Event Detail screen shown in the following figure This screen details the specifics of the event for the user to see Figure 7 25...

Page 103: ...e individual modules within the system It also gives their values and status Figure 7 27 Module Controls Screen The following figure shows the Module Control Detail screen By selecting any of the modu...

Page 104: ...to select line to line or line to neutral monitoring values See the following figures Figure 7 29 Online Mode Metering Method Option Screen Number 1 in the following figure points to an icon that indi...

Page 105: ...access to basic system information such as serial number installed firmware version etc Touching the CLEAN SCREEN button disables the screen for 30 seconds to allow the user to safely clean the scree...

Page 106: ...figure allows the operator to activate the various energy saving and power efficiency modes of the system The various Energy Advantage Architecture operations are described in Section 1 2 9 and in Se...

Page 107: ...ning at that time Figure 7 35 High Alert Timer Screen The screen shown in the figure above asks the operator if they want to start the High Alert mode timer 7 3 17 Statistics Basic Screen The screen s...

Page 108: ...istics Data Detail Screen 7 3 18 ESS Comparison Screen The screen shown in the following figure allows the operator to visually obtain EAA mode efficiency values Figure 7 38 ESS Comparison Screen 9395...

Page 109: ...Screen The screen shown in the following figure allows the operator to control the individual UPMs Figure 7 39 UPS Module Map Screen 7 3 20 System Overview Screen The screen shown in the following fig...

Page 110: ...onal controls When the unit powers up the screen displays the Eaton logo as shown in Figure 7 41 To advance to the Main Menu and Mimic screen press any control panel pushbutton once The following para...

Page 111: ...attery or Bypass modes the UPS may issue alarms to let you know exactly what event caused the change from Online mode System events on the UPS can be indicated by horns lights messages or all three Se...

Page 112: ...may be accompanied by an audible horn To silence the horn press any control panel pushbutton once Shown is a typical alarm message For more information about alarms and notices see paragraph 7 4 2 B T...

Page 113: ...tical load and powers down the UPS ESC Returns to Main Menu and Mimic screen from the Events Meters Controls or Setup screens Returns to the main System Setup Level screen from a setup submenu Return...

Page 114: ...omer Service Engineer can change the screens to display the voltage phase to phase A B B C C A Press the METERS pushbutton on the main menu bar to display the Meter screens To scroll through the meter...

Page 115: ...he up or down arrow pushbutton to set the counter Press SAVE or ABORT Once the action is completed the Energy Saver System Setup screen is displayed Storm Detection Timer The Storm Detection Timer scr...

Page 116: ...password or abort the password change Press SAVE RETRY or ABORT If SAVE or ABORT is pressed the action is completed and the System Setup screen displays If RETRY is pressed the Change Password screen...

Page 117: ...d Use the return arrow pushbutton to toggle through the values for the setting to make the change Press SAVE or ABORT Once the action is completed the COM Port Setup screen is displayed Controls See p...

Page 118: ...screen Table 7 7 lists the typical System Status Screen Messages that are displayed during UPS operation Table 7 8 describes the control functions and provides instructions to access and use the comma...

Page 119: ...n Online mode or transfers the UPS to Online mode from Bypass mode Enable Disable Energy Saver Enables or disables Energy Saver System mode Enable changes to Disable when the Energy Saver System mode...

Page 120: ...Command screen is displayed 14 On the UPS Control Command screen select GO TO ONLINE 15 If Auto Bypass is enabled factory default the critical load is immediately supplied by the bypass source in Bypa...

Page 121: ...isplayed 2 On the System Status screen select the UPS command 3 Press the CONTROLS pushbutton on the System Status menu bar The UPS Control Command screen is displayed 4 On the UPS Control Command scr...

Page 122: ...pushbutton on the System Status menu bar The UPS Control Command screen is displayed 4 On the UPS Control Command screen select ENABLE VAR MODULE MANAGEMENT 5 Press the SELECT pushbutton on the UPS C...

Page 123: ...bar The UPS Control Command screen is displayed 4 On the UPS Control Command screen select START HIGH ALERT 5 Press the SELECT pushbutton on the UPS Command menu bar The UPS starts High Alert mode wit...

Page 124: ...ntrol Command screen select GO TO BYPASS 13 Press the SELECT pushbutton on the Bypass Command menu bar The critical load is immediately supplied by the bypass source in Bypass mode The BYPASS status i...

Page 125: ...Press the CONTROLS pushbutton on the main menu bar The System Status screen is displayed 2 On the System Status screen select the BYPASS command 3 Press the CONTROLS pushbutton on the System Status me...

Page 126: ...enu bar The System Status screen is displayed 2 On the System Status screen select the BYPASS command 3 Press the CONTROLS pushbutton on the System Status menu bar The Bypass Control Command screen is...

Page 127: ...e door open see Figure 4 1 2 If the UPS contains input breaker CB1 verify that input breaker CB1 is open 3 Close the UPS input feeder circuit breaker 4 Close the UPS Bypass input feeder circuit breake...

Page 128: ...S is ready to transfer to the Online mode and supply the critical load 19 If the UPS is a three UPM model repeat Steps 12 through 15 selecting UPM 3 to start UPM 3 20 Verify the following messages dis...

Page 129: ...E 10 Verify no alarms are active 11 On the System Status screen select the UPM command The UPS Control Command screen screen is displayed 12 On the UPS Control Command screen select the UPM to start 1...

Page 130: ...status indicates ON The UPM status indicates READY The power module remains on 7 5 18 Transfer from Bypass to Online Mode To transfer the critical load to Online mode 1 If not already closed close th...

Page 131: ...rol Command screen select UPM OFF 7 Press the SELECT pushbutton on the UPM 1 Command menu bar The UPM status indicates READY The input output and battery contactors open and the power module remains o...

Page 132: ...F 9 Press the SELECT pushbutton on the UPM Command menu bar The UPM status indicates SHUTDOWN The power module is turned off The remaining UPMs continue to supply the critical load Logic power remains...

Page 133: ...the System Status menu bar The Charger Control Command screen is displayed 4 On the Charger Control Command screen select CHARGER ON 5 Press the SELECT pushbutton on the Charger Command menu bar To tu...

Page 134: ...ess the SELECT pushbutton on the Command menu bar The Load Off screen is displayed providing a choice to proceed or abort the shutdown 6 To shut down the UPS press LOAD OFF from the Load Off menu bar...

Page 135: ...the UPS insert the supplied key and rotate clockwise until the red pushbutton releases see Figure 7 46 To remove the key rotate the key back to the vertical position 3 Restart the UPS by following the...

Page 136: ...ers 12 Verify no alarms are active 13 On the System Status screen select the UPS command 14 Press the CONTROLS pushbutton on the System Status menu bar The UPS Control Command screen is displayed 15 O...

Page 137: ...ushbutton on the main menu bar The System Status screen is displayed 2 On the System Status screen select the UPS command 3 Press the CONTROLS pushbutton on the System Status menu bar The UPS Control...

Page 138: ...stem Status screen select the UPS command 3 Press the CONTROLS pushbutton on the System Status menu bar The UPS Control Command screen is displayed 4 On the UPS Control Command screen select ENABLE VA...

Page 139: ...the UPS command 3 Press the CONTROLS pushbutton on the System Status menu bar The UPS Control Command screen is displayed 4 On the UPS Control Command screen select START HIGH ALERT 5 Press the SELEC...

Page 140: ...Control Command screen is displayed 13 On the Bypass Control Command screen select GO TO BYPASS 14 Press the SELECT pushbutton on the Bypass Command menu bar The critical load is immediately supplied...

Page 141: ...elect START HIGH ALERT 5 Press the SELECT pushbutton on the Bypass Command menu bar If the UPS is online the UPS starts High Alert mode with the UPMs online supplying the critical load After one hour...

Page 142: ...bar The System Status screen is displayed 2 On the System Status screen select the BYPASS command 3 Press the CONTROLS pushbutton on the System Status menu bar The Bypass Control Command screen is di...

Page 143: ...open on all of the UPSs see Figure 4 1 2 If the UPSs contain input breakers CB1 verify that all input breakers are open 3 Close all UPS input feeder circuit breakers 4 Close all UPS Bypass input feede...

Page 144: ...2 rectifier and inverter turn on 19 If the UPS is a three UPM model repeat Steps 12 through 15 selecting UPM 3 to start UPM 3 20 Verify the following messages display sequentially on the UPM status l...

Page 145: ...E 10 Verify no alarms are active 11 On the System Status screen select the UPM command The UPS Control Command screen screen is displayed 12 On the UPS Control Command screen select the UPM to start 1...

Page 146: ...status indicates ON The UPM status indicates READY The power module remains on 7 6 18 Transfer from Bypass to Online Mode To transfer the critical load to Online mode 1 If not already closed close the...

Page 147: ...ress the SELECT pushbutton on the UPM 1 Command menu bar The UPM status indicates READY The input output and battery contactors open and the power module remains on 8 To turn off the power module pres...

Page 148: ...nu bar The UPM Control Command screen is displayed 8 On the UPM Control Command screen select UPM OFF 9 Press the SELECT pushbutton on the UPM Command menu bar The UPM status indicates SHUTDOWN The po...

Page 149: ...ator is illuminated The Bypass status indicates ON The UPM status indicates READY The power module remains on 7 Perform the LOAD OFF procedure in paragraph 7 6 27 on the UPS being shut down The input...

Page 150: ...PM OFF 11 Press the SELECT pushbutton on the UPM 1 Command menu bar The UPM status indicates SHUTDOWN The input output and battery contactors open and the power module is turned off The remaining UPMs...

Page 151: ...l Communications Failure alarm has cleared and no other alarms are active on the online UPSs 12 On the System Status screen select the UPS command 13 Press the CONTROLS pushbutton on the System Status...

Page 152: ...ELECT pushbutton on the Charger Command menu bar To turn the battery charger off 1 Press the CONTROLS pushbutton on the main menu bar The System Status screen is displayed 2 On the System Status scree...

Page 153: ...The UPS or Bypass Control Command screen is displayed 4 On the Control Command screen select LOAD OFF 5 Press the SELECT pushbutton on the Command menu bar The Load Off screen is displayed providing...

Page 154: ...restarting the UPS insert the supplied key and rotate clockwise until the red pushbutton releases see Figure 7 46 To remove the key rotate the key back to the vertical position 3 Restart the UPSs by f...

Page 155: ...d is 0101 9 On the System Status screen verify the UPS status is OK and the UPM status is OFFLINE 10 Close the battery breaker 11 Verify no alarms are active on the EVENTS LOG screen 12 On the System...

Page 156: ...ided as standard equipment with the UPS NOTE The Modem card cannot be installed in X Slot 2 Modem card provides out of band remote notification and monitoring using modem communication directly to cel...

Page 157: ...vents and notification of important UPS or power information With custom views for monitoring status and metering information various user groups can select the most useful view for their specific nee...

Page 158: ...by the control panel softkeys See Section for instructions on navigating the control panel 8 3 2 Event History Log This key sequence prints the entire Event History Log of the UPS at the time the dat...

Page 159: ...UTPUT UNDER OR OVER FREQ PM1 03 16 2099 21 25 20 675 S302 EEPS CONFIGURING PM1 03 16 2099 21 25 23 475 N267 POWER MODULE CABLE FAIL 15 PM1 03 16 2099 21 25 25 180 N271 DC HW AMPS LIMIT PM1 03 16 2099...

Page 160: ...One general purpose relay contact is provided as a standard feature on the UPS The alarm contact is located inside the UPS on the customer interface terminal board You can use a normally closed or no...

Page 161: ...the electrical state of any cabinet in the UPS system Since each battery string is an energy source in itself opening the battery circuit breaker does not de energize the voltage within the battery st...

Page 162: ...ze is 12 20 1 and the right UPM filter sizes are 19 5 21 5 0 5 Contact your service representative for replacement filters To remove the filters a Open the front door latch and swing the doors open b...

Page 163: ...ate on a product Use proper local collecting centers meeting local legislation when handling waste of electrical and electronic equipment WARNING HAZARDOUS MATERIALS Batteries may contain HIGH VOLTAGE...

Page 164: ...o 460 Vac Operating Input Frequency Range 5 Hz Operating Input Current See Table 3 4 Reduced for Generator Adjustable Input Current Harmonic Content 3 THD at full load Power Factor Minimum 0 99 Line S...

Page 165: ...battery charging current 120 A Operating Temperature 0 to 40 C without derating The recommended operating tempera ture is 25 C Operating Altitude Maximum 1000m at 40 C without derating Storage Temper...

Page 166: ...itions of the equipment do not fulfil the requirements specified in the documentation delivered with the unit and other relevant documentation Equipment subjected to misuse negligence or accident Equi...

Page 167: ...e It is recommended that the UPS be installed on a level floor suitable for computer or electronic equipment Adequate workspace exists around the UPS and other cabinets Adequate lighting is provided a...

Page 168: ......

Page 169: ......

Page 170: ...614 01919 00...

Reviews: