background image

4

Montage- und Betriebsanleitung GuideLed DX/DXC 10011 CG-S    40071860286(F)    April 2019     www.ceag.de

SICHERHEITSHINWEISE 

•  Die Leuchte ist bestim mungs gemäß in un-

beschädigtem und einwandfreiem Zustand 

zu betreiben!

•  Als Ersatz dürfen nur Originalteile von 

CEAG verwendet werden!

•  Bei Arbeiten an der Notleuchte ist erst die 

Anlage zu blockieren, der Batteriekreis zu 

unterbrechen und dann das Netz abzuschal-

ten - komplett spannungsfrei schalten, 

gegen Wiedereinschalten sichern und 

die Spannungsfreiheit feststellen (gilt für 

Netzspannung, Ersatzstromquelle und 

evtl. Steuer- / Fremdspannungen). Das 

Bild unten zeigt das Hinweisschild auf der 

Notleuchte.

•  Vor der ersten Inbetriebnahme muss die 

Leuchte entsprechend den im Abschnitt In-

stallation genannten Anweisungen geprüft 

werden!

•  Die  Notleuchtenkenn  zeich  nung  vornehmen: 

Stromkreis und Leuchtennummer zuordnen 

und eintragen.

•  Die Protokollführung gemäß der nationalen 

Vorschriften ist durchzuführen (entfällt bei 

automatischer Protokollierung)!

•  Alle Fremdkörper müssen vor der ersten 

Inbetriebnahme aus dem Gerät entfernt 

werden!

•  Beachten  Sie  bei  allen  Ar              beiten  an  dem 

Gerät die nationalen Sicherheits- und Un-

fallverhütungsvorschriften und die nachfol-

genden Sicherheitshinweise in der Betrieb-

sanleitung, die mit einem 

      versehen 

sind!

SAFETY INSTRUCTIONS

•  The device shall only be used for its 

intended purpose and in undamaged and 

fl awless condition

•  Only genuine CEAG spare parts may be 

used for replacement and repair

•  When working on the emergency luminaire 

the system must fi rst be blocked, battery 

operation must be interrupted and mains 

must be switched off - turn off the power 

completely, ensure that it cannot be turned 

back on and check if it is free of voltage (the 

above applies to mains power, backup power 

and possibly control and external voltage). 

The picture below shows the indication 

label on the emergency luminaire.

•  Prior to its initial operation, the luminaire 

will have to be checked in line with the 

instructions (see installation section)

•  Carry out the marking of the emergency 

luminaire: Assign the circuit and the 

luminaire No. and enter them.

•  The recording must be carried out in 

accordance with national regulations (not 

applicable for automatic recording).

•  Any foreign object shall be removed from 

the luminaire prior to its initial operation!

•  Observe the national safety rules and 

regulations to prevent accidents as well as 

the safety instructions included in these 

operating instruction marked 

with 


1 Normenkonformität

Leuchte für Notbeleuchtung gem.DIN EN 60598-2-

22, DIN 4844-1, DIN EN ISO 7010 und DIN EN 1838 

zum Betrieb an Sicherheitsbeleuchtungsanlagen 

gem. DIN EN 50172, DIN VDE 0100-560 und 

DIN VDE V 0108-100-1. 

Gemäß ISO 9001 entwickelt, gefertigt und geprüft. 

1 Conformity with standards

Luminaire for emergency lighting acc. to EN 60 

598-2-22 DIN 4844-1, DIN EN ISO 7010 und DIN 

EN 1838 for connection to safety luminaire systems 

acc. to DIN EN 50172, DIN VDE 0100-560 and DIN 

VDE V 0108-100-1. 

Designed, manufactured and tested according to 

DIN EN ISO 9001.

*

*

******

 IMPORTANT 

gem./acc.to IEC 60598-2-22:2014

Summary of Contents for CEAG GuideLed DX 1 011 CG-S Series

Page 1: ...g Mounting and Operating Instructions Zielgruppe Elektrofachkraft Target group Skilled electricians Verwendungszweck Notbeleuchtung nicht f r privaten Gebrauch Intended Application Emergency Lighting...

Page 2: ...g Verwendungsbereich 5 3 Aufbau der Leuchte Ma bilder 5 3 1 GuideLed DX DXC 1x011 CG S 5 3 2 GuideLed DX DXC 1x021 CG S 8 3 3 GuideLed DX DXC 1x022 1x023 CG S 10 3 4 GuideLed DX DXC 1x024 CG S 12 4 In...

Page 3: ...ption Scope of application 5 3 Construction of the luminaire Dimensional drawings 5 3 1 GuideLed DX DXC 1x011 CG S 5 3 2 GuideLed DX DXC 1x021 CG S 8 3 3 GuideLed DX DXC 1x022 1x023 CG S 10 3 4 GuideL...

Page 4: ...replacement and repair When working on the emergency luminaire the system must first be blocked battery operation must be interrupted and mains must be switched off turn off the power completely ensur...

Page 5: ...l function to block escape routes via a switching input DX e g smoke detector or panic switch via potential free contact or connection to an AE CU via anintegrated bus interface DXC The advanced switc...

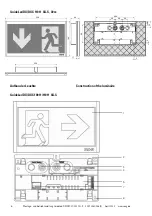
Page 6: ...28 35 5 3 202 96 20 220 B A E D F C F E D C Schutzvermerk ISO 16016 beachten Attention to protective note ISO 16016 Ma blatt dimension sheet 1 Anz Blatt sheets 1 Blatt Nr sheet No A3 Ma stab scale For...

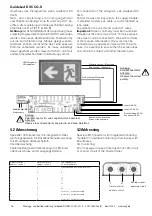
Page 7: ...ble DXC 5 Electr control gear ECG with address switch 6 Fixing holes 7 Mains connection PE connection 1 4 6 2 3 Die Netzkabel und Schaltkontakt Loopleitung durch die vorgesehene Kabeleinf hrung 3 4 ei...

Page 8: ...26 18 5 4 4 3 9 54 200 E D F C 5 6 7 8 9 Schutzvermerk ISO 16016 beachten Attention to protective note ISO 16016 Ma blatt dimension sheet 1 Anz Blatt sheets 1 Blatt Nr sheet No A3 Ma stab scale Forma...

Page 9: ...endeleinf hrung 7 schieben und mit Maden schrauben 4 fixieren Die beiden Baldachin Geh useh lften 1 auf den Deckenmontage Adapter schieben Feed mains cable and switching input loop cable of the ceilin...

Page 10: ...Blatt Nr sheet No A3 Ma stab scale Format size 1 2 GuideLed DX DXC B CEAG Notlichtsysteme GmbH Senator Schwartz Ring 26 59494 Soest Tel 02921 69 870 Internet www ceag de Technische nderungen vorbehal...

Page 11: ...ecken mit Madenschrauben 3 fixieren LED Anschlussleitungen an Versorgungsmodul anschlie en Beigelegten Silikonschlauch als Klemmschutz u zus tzliche Isolation benutzen Beide Baldachin Geh use 1 auf de...

Page 12: ...t Nr sheet No A3 Ma stab scale Format size 1 2 GuideLed DX DXC B CEAG Notlichtsysteme GmbH Senator Schwartz Ring 26 59494 Soest Tel 02921 69 870 Internet www ceag de Technische nderungen vorbehalten T...

Page 13: ...read out and affixes the mounting enclosure 12 12 374 362 326 461 75 61 184 62 92 19 27 27 50 15 6 461 362 6 184 326 75 92 61 19 27 27 62 92 374 50 15 19 B A 5 4 3 2 1 F E D C 6 7 8 9 Schutzvermer ISO...

Page 14: ...fernen und aufbewahren Die Piktogrammscheibe mit der Blende auf den Deckeneinbau setzen Ach tung keine Leitungen einklemmen mit Schrau ben 3 die Blende befestigen und die Abdeckpl tt chen 9 auf die Sc...

Page 15: ...modul anschlie en Wichtiger Installationhinweis Die zul ssige Leitungsl nge am Steuereingang der Leuchte ist abh ngig von EMV Einfl ssen Bei Nut zung einer ungeschirmten nicht verdrillten Leitung betr...

Page 16: ...tion Observe the correct polarity Loop IN AE CU Loop OUT AE CU Siehe Anleitung AE CU See manual AE CU Achtung Polarit t Loop In In und Loop Out Out beachten Attention Observe the correct polarity Loop...

Page 17: ...nkle Umgebung Red Cross static 1 dark surroundings Rotes Kreuz statisch 2 helle Umgebung Red Cross static 2 bright surroundings C OFF ON Emergency ON Rotes Kreuz blinkend Red Cross blinking Emergency...

Page 18: ...emperature 20 C 40 C Anschlussklemmen Netzanschluss Mains Terminals 3 x 2 x 2 5 mm2 3 x 2 x 2 5 mm2 Anschlussklemmen Schalteingang Bus Schnittstelle Switch input terminals Bus Interface 2 x 2 x 1 5 mm...

Page 19: ...chtmittel kontaktieren Sie bitte info n ceag de 7 Entsorgung Recycling Beachten Sie bei der Entsorgung defekter Ger te die g ltigen Vorschriften f r Recycling und Entsorgung Kunststoffteile sind mit e...

Page 20: ...kort afstand undg s Deutsch Allgemeine Sicherheitshinweise Die Leuchte ist nicht f r den privaten Gebrauch geeignet Eine Installation darf nur durch qualifizierte Elektrofachkr fte unter Ber cksichtig...

Page 21: ...nt Les luminaires portant cette tiquette doivent tre plac s de mani re viter de fixer du regard la lumi re pendant une dur e prolong e une courte distance Hrvatski Op e sigurnosne upute Svjetlosna jed...

Page 22: ...medlegemer fra enheten f r f rste gangs bruk Ved arbeid p armaturen skal str mmen f rst sl s helt av og det skal sikres at den ikke kan sl s p igjen Kontroller at det er spenningsfritt Det ovennevnte...

Page 23: ...tukseen asianmukaisessa ja vahingoittumattomassa kunnossa Poista kaikki vieraat esineet laitteesta ennen sen ensimm ist k ytt kertaa Kun ty skentelet valaisimen kanssa sammuta s hk t ensin kokonaan ja...

Page 24: ...ie richtige L sung f r jede Anwendung zu finden Dabei erwarten Entscheidungstr ger mehr als lediglich innovative Produkte Unternehmen wen den sich an Eaton weil individuelle Unterst tzung und der Erfo...

Reviews: