14
Montage- und Betriebsanleitung GuideLed DX/DXC 10011 CG-S 40071860286(F) April 2019 www.ceag.de
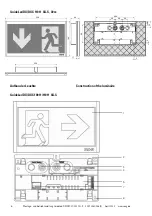
GuideLed DX/DXC 1x024 CG-S
Aufbau der Leuchte
Construction of the luminaire
3
4
5
6
7
• LED-Anschlussleitungen durch Kabeleinführung
der Abdeckblende (6) schieben
• Piktogrammscheibe an Abdeckblende durch Ein-
rasten der 2 Adapter (7) befestigen
• Nach Einschnappen des LED-Piktogramms in der
Deckeneinbaublende auf beiden Seiten die beilie-
genden Hülsen über die Leitung führen und in die
Befestigungsclip schieben (10)
• Die Abdeckblende an den Abhängesicherungen (4)
einhängen, LED-Anschlussleitungen an das Versor-
gungsmodul anschließen
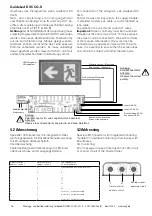
• Elektrischer Anschluss siehe Kapitel 4.1
• Adresse am Versorgungsmodul einstellen (siehe
Kapitel 4.2 und 4.3)
• Die beiden Abdeckplättchen (9) von der Blende ent-
fernen und aufbewahren. Die Piktogrammscheibe
mit der Blende auf den Deckeneinbau setzen (Ach-
tung, keine Leitungen einklemmen!), mit Schrau-
ben (3) die Blende befestigen und die Abdeckplätt-
chen (9) auf die Schraublöcher stecken
• Insert the LED-connection cables to the cables ent-
ries of the cover frame (6)
• Fix the pictogram panel to the cover frame until the
2 adapter (7) snap in
• After snapping the LED panel into the bezel the
included sleeves have to be lead over the cables
on both sides and after that be slid into the fixing
clips (10)
• Fit the cover frame to the plastic safety-strips (4).
Connect the LED-connection cables to the supply
module
• Electrical connection see chapter 4.1
• Set address on supply module (see chapter 4.2
and 4.3)
• Remove the two blanks (9) from the cover frame
and put them aside. Put the pictogram panel with
the cover frame onto the ceiling insertion by obser-
ving not to clamp the cables, fix it with screws (3)
and put the blanks (9) on the screw-holes
1
8
9
10
1
2


