background image

EasyIO

EIO-75 032719

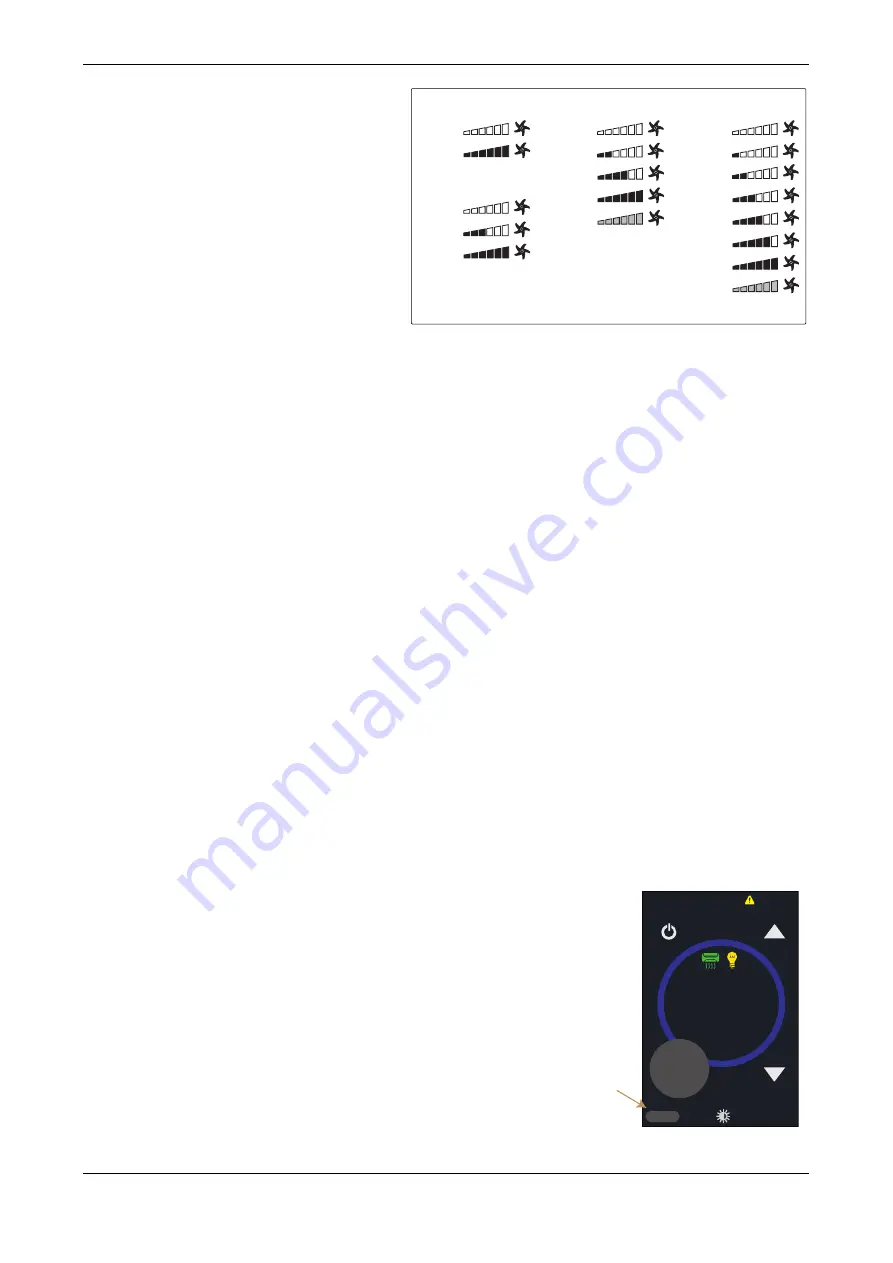
The system uses the 
last command principle. 
If the fan speed has 
been set/changed from 
the network then the 
display goes to 
automatic mode 
(showing ’A’ next to the 
line bar if Auto option 
selected). When the 
device is manually 
overridden then the ’A’ 
symbol changes to ’M’ 
indicating manual 
operation (only if Auto 
option has been 
selected for Manual 
Control). Otherwise the 
screen shows only the selected Fan Speed.

1-STEP MANUAL
CONTROL

3-STEP + AUTO MANUAL
CONTROL

2-STEP MANUAL
CONTROL

M

M

M

M

THE UNIT RETURNS TO 
AUTO AUTOMATICALLY 
IF THE NETWORK 
WRITES A NEW SPEED

6-STEP + AUTO MANUAL
CONTROL

M

M

M

M

M

M

M

Speed 1

Speed 2

Speed 0 

Speed 3

Speed 4

Speed 5

Speed 6

A

Auto

SPEED SET BY 
NETWORK

Speed 1

Speed 0 

Speed 1

Speed 2

Speed 0 

Speed 1

Speed 2

Speed 0 

Speed 3

A

Auto

SPEED SET BY 
NETWORK

To set the fan speed (or the line bar) to a position, touch the line bar / fan icon area and the line icon 
(and network variable) is set according the configuration e.g. 1-step, 2-step etc. The options for the 
FAN MANUAL CONTROL (operating the FAN speed manually) are:-

DISABLED (Default)

1-STEP; fan speed rotates between OFF and 6 segments

2-STEP; fan speed rotates between OFF, 3 and 6 segments

3-STEP; fan speed rotates between OFF, 2, 4 and 6 segments

6-STEP; fan speed rotates between OFF, 1, 2, 3, 4, 5 and 6 segments

1-STEP+AUTO; fan speed rotates between OFF (M), 6 segments (M) and Auto (A). When auto
is selected, the display returns to show the speed set over the network.

2-STEP+AUTO; fan speed rotates between OFF (M), 3 segments (M), 6 segments (M) and Auto
(A). When auto is selected, the display returns to show the speed set over the network.

3-STEP+AUTO; fan speed rotates between OFF (M), 2 segments (M), 4 segments (M), 6 seg-
ments (M) and Auto (A). When auto is selected, the display returns to show the speed set over
the network.

6-STEP+AUTO; fan speed rotates between OFF (M), 1/2/3/4/5/6 segments (M) and Auto (A).
When auto is selected, the display returns to show the speed set over the network.

ADVANCED; advanced fan speed control option. See below for details.

When pressing the area again the (fan speed) line segment is set to display the next value. When the 
fan speed is changed manually on the screen, the fan speed network variable update is delayed 
shortly so that the network variable does not update at intermediate values.

ADVANCED FAN MANUAL CONTROLWhen selecting the Advanced option for the Fan Manual 
Control, the fan speed rotates between AUTO (speed set by network) - N (night) - M1 - M2 - M3 - 
M4 - M5 - M6. The night speed is set by Modbus register 135. The Auto speed is set by register 111 
and displays ’A’ next to speed. The register 134 shows the current speed.

Operating Mode Icon

The interface unit has Operating Mode icon 
that allows the unit operating mode to be set 
(network variable).

71

.5

°F

Room

73

.8

°F

CONTROL MODE; PRESS-
ING ICON ROTATES 
BETWEEN AUTO-FAN-HTG-
CLG

FAN

°F/

°C

By touching the icon the operating mode 
rotates between the below options. The 
number of options depend on the 
configuration setting.

AUTO (AUTOMATED)

FAN (CIRCULATION/VENTILATION)

HTG (HEATING)

CLG (COOLING)

As default the Mode icon is not active and it 
can be activated and configured in the 
configuration parameters. The options are:-

DISABLED

HTG/CLG; rotates between Heating/Cooling

EasyIO Holdings
www.easyio.com

Summary of Contents for EIO-75 Series

Page 1: ...rides Measurement EIO 75 Model Type EIO 75 BAC BACnet MSTP Touchscreen LCD Room Interface 24Vac dc Power Supply 24V rated relay degF default EIO 75 BAC CO2 BACnet MSTP Touchscreen LCD Room Interface C...

Page 2: ...ssing 0 to 127 via Touchscreen Device ID Default 651000 MAC Address User Configured Communication 9k6 19k2 38k4 57k6 76k8 Baud Parity None Even Odd 1 or 2 Stop Bits Connections Terminal Connections Re...

Page 3: ...YOUT 24VAC 30VDC 5A Relay Contact RELAYCOM 24VAC 30VDC 5A Relay Contact 24V 24Vac dc Supply 0V 0V Supply Rin1 Remote NTC10 Temperature Sensor Input 1 Rin2 Remote NTC10 Temperature Sensor Input 2 Din V...

Page 4: ...BLUE DISPLAY SRI 75 WITH FAN SPEED DEG C 21 5 C Room 20 1 C A CONTROL MODE AUTO HEATING COOLING FAN VENTILATION FAN F C F C F C The EIO 75 room interface home screen has four touch sensitive areas tha...

Page 5: ...ration pages By setting the description to Disabled the sensor reading is not displayed on the screen Target Units Note If all sensor displays are Disabled the ACTION CIRCLE displays the last drawn im...

Page 6: ...5 has fan icon and line bar to indicate the fan speed It is also possible to use the line bar only to indicate other signals by disabling the fan icon The fan and line bar display is configured by a p...

Page 7: ...ents M and Auto A When auto is selected the display returns to show the speed set over the network 3 STEP AUTO fan speed rotates between OFF M 2 segments M 4 segments M 6 seg ments M and Auto A When a...

Page 8: ...mode OFF Mode Icon OFF MODE CANCEL ICON Room 73 1 F 46 0 F OFF MODE ICON TO ACTIVATE OFF MODE Room 73 1 F 71 5 F OFF MODE ACTIVE OFF MODE INACTIVE TARGET VALUE DIMMED WHEN OFF MODE ACTIVE F C F C The...

Page 9: ...frosting 71 5 F Room 20 1 F Target A FROST ICON F C Cleaning Mode After entering FURTHER INFORMATION screen by selecting the CLEANING icon it is possible to activate the cleaning mode The EIO 75 will...

Page 10: ...the Programmed Times NO INPUT All Buttons Locked Alarm Display When entering FURTHER INFORMATION AND SETTINGS screen and an alarm is active select the alarm icon for more information FURTHER SETTINGS...

Page 11: ...e humidity sensor for room space humidity measurement The humidity reading is displayed inside the SMALL ACTION CIRCLE display as default enabled option to disable through configuration pages and avai...

Page 12: ...n Range Sensor 1 Source Sensor 1 Source When set to Hardware reads RI1 status monitoring over the network is always active 0 Hardware RI1 1 Network Default Sensor 2 Source Sensor 2 Source When set to...

Page 13: ...light Brightness 0 20 default 5 Enable Lights Icon Enable Lights Icon Network Variable 0 Disabled default 1 Enabled Enable AC Icon Enable AC Icon Network Variable 0 Disabled default 1 Enabled Enable L...

Page 14: ...sabled removes Sensor1 Text and Measurement from Display Sensor 3 Text Description for the Sensor3 Built In Sensor Network Default 1 Room Note Disabled removes Sensor1 Text and Measurement from Displa...

Page 15: ...101 Relay Output Status 0 1 Off On 102 Time Clock Status not available 0 1 Off On 103 Light Switch Status 0 1 Off On 104 A C Switch Status 0 1 Off On 105 OFF Mode Status 0 1 Off On 106 Screen Lock Sta...

Page 16: ...8 0 122 0 C F Default 0 0 109 Fan Manual Control Mode Unsigned 16 0 4 0 Disabled default 1 1 Step 2 2 Step 3 3 Step 4 6 Step 5 1 Step Auto 6 2 Step Auto 7 3 Step Auto 8 6 Step Auto 9 Advanced 110 Fan...

Page 17: ...None default 1 Override On 2 Override Off 132 Override Lock Mode Note The parameter returns automatically to 0 allowing local control Unsigned 16 0 2 0 None default 1 Lock Screen 2 Cancel Lock Mode 1...

Page 18: ...end Switching Time 1 Unsigned 16 0 2400 0 2400 Default 0600 211 Tuesday Weekend Switching Time 2 Unsigned 16 0 2400 0 2400 Default 1000 212 Tuesday Weekend Switching Time 3 Unsigned 16 0 2400 0 2400 D...

Page 19: ...t 1700 255 Saturday Switching Time 1 Target Unsigned 16 0 1 0 1 Default 0 256 Saturday Switching Time 2 Target Unsigned 16 0 1 0 1 Default 0 257 Saturday Switching Time 3 Target Unsigned 16 0 1 0 1 De...

Page 20: ...or 1 RI1 AI 4 Sensor 2 RI2 Analogue Value 5 AV 0 Nominal Setpoint AV 1 Sensor 1 Temp AV 2 Sensor 2 Temp AV 3 Sensor 3 Temp AV 4 Brightness Binary Input 4 BI 0 Digital Input DI1 BI 1 Boost Party Mode S...

Page 21: ...Name ID Attributes Range Default Object Identifier R W 20 Object Name R W 32 Characters Max Concatenation of product type and MAC address i e SRI001 Object Type R Device System Status R STATUS_OPERAT...

Page 22: ...1 On Off Boost workable only 2 Temp settings only available 3 All buttons disabled 40118 Show Unit Swap Icon Unsigned 0 Disabled 1 Enabled default 40119 Built In Sensor Calibration REAL 10 0 10 0 C F...

Page 23: ...Default 0 Disabled Note Disabled removes the text and measurement from the display Unsigned 40141 Sensor 3 Text Built in Network Sensor Default 1 Room Note Disabled removes the text and measurement fr...

Reviews: