58
BACKLIGHT
The AirMap’s display and keyboard have lights that can be turned on for
night use. To turn the lights on, simply press the PWR key. To turn them
off, press the PWR key again.
If the unit is operating from the battery pack, it automatically turns the
lights off after 30 seconds. This helps conserve battery power. The time is
adjustable from 5 seconds to 240 seconds. Press the PWR key to turn the
lights on after the unit turns them off.
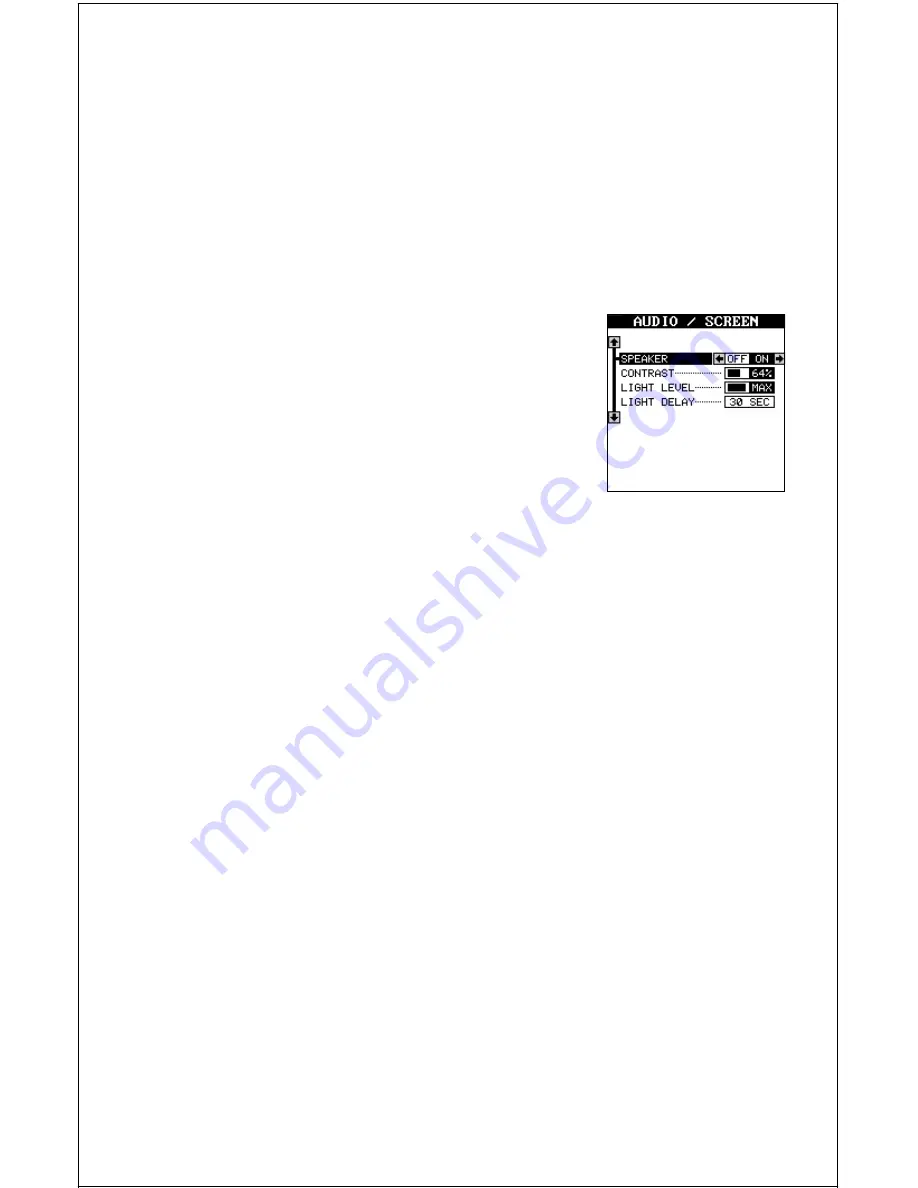
To change the backlight’s delay time, press the
MENU key, then press the up or down arrow keys
until the “AUDIO/SCREEN” menu is surrounded
by the black box. Press the right arrow key. The
screen at right appears. Move the black box to the
“Light Delay” label at the bottom of the list. Now
press the left or right arrow key until the desired
time appears on the menu. Press the EXIT key
when you’re finished.
The backlights brightness is also adjustable. To do this, press the up or
down arrow keys until the “Light” menu is surrounded by the black box.
Now press the left or right arrow key until you have the lights at the de-
sired level. Press the EXIT key when you’re finished. The default light level
is maximum.
CONTRAST
To adjust the display’s contrast, press the MENU key, then move the black
box to the “Audio/Screen” label, then press the right arrow key. The screen
shown above appears.
Move the black box to the “CONTRAST” label, then press the right or left
arrow keys until the screen’s contrast is best for the lighting conditions.
SPEAKER
You can turn the speaker off, if desired. Turning the speaker off also turns
off the audible portion of the alarms.
To turn the speaker off, press the MENU key, then move the black box to
the “AUDIO/SCREEN” menu and press the right arrow key. The screen
shown at right appears. Now press the left arrow key to turn the speaker
off. Repeat these steps to turn the speaker on. Press the EXIT key to
erase this screen.
Summary of Contents for AccuMap Sport
Page 1: ...1 INSTALLATION AND OPERATION INSTRUCTIONS AccuMap Sport TM TM ...
Page 62: ...62 ...
Page 63: ...63 WINDOW BOXES These windows are used on Map 4 and Nav 1 only 1 2 3 4 5 6 7 8 9 10 11 12 ...
Page 64: ...64 13 14 15 16 ...
Page 65: ...65 WINDOW GROUPS This is a listing of window groups A through T A B C D E F G H I J K L ...
Page 66: ...66 M N O P Q R S T ...
Page 70: ...70 ...


